
Ninja Goblin
Limited run 1/6th scale Resin kit from Fire Miniatures
Painted in 2007
Inspired by The 30mm Rackham wargames miniatures, this is the second offering from Fire Miniatures.
As with the initial release – Pumpkinhead – the Ninja Goblin has been sculpted by Sean Green, and follows the look of the smaller Rackham pieces, but with a lot more details added.
The parts are cast in a soft resin, which is easy to work on for the small amount of cleaning that is needed on mould part lines – only two that I found, on both of the sleeves on the underside. Otherwise it’s very cleanly moulded, and the only surprise is the size of this model when compared to the Pumpkinhead.
I have to admit that I was expecting something of a similar size to the Pumpkinhead, but the Ninja’s a lot bigger. I don’t have the original 30mm pieces from Rackham, so I couldn’t compare their sizes together, but apparently it does mirror the relative sizes of the originals.
As sometimes happens, I was in so much of a rush to get paint on the components, I was a bit forgetful with the camera…….In fact I didn’t get any shots of the parts, or of the initial painting……..Um, sorry.
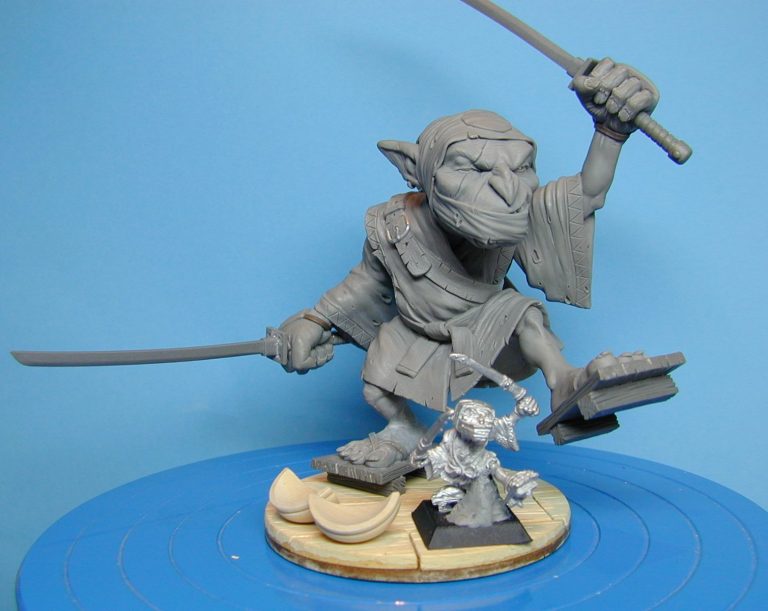
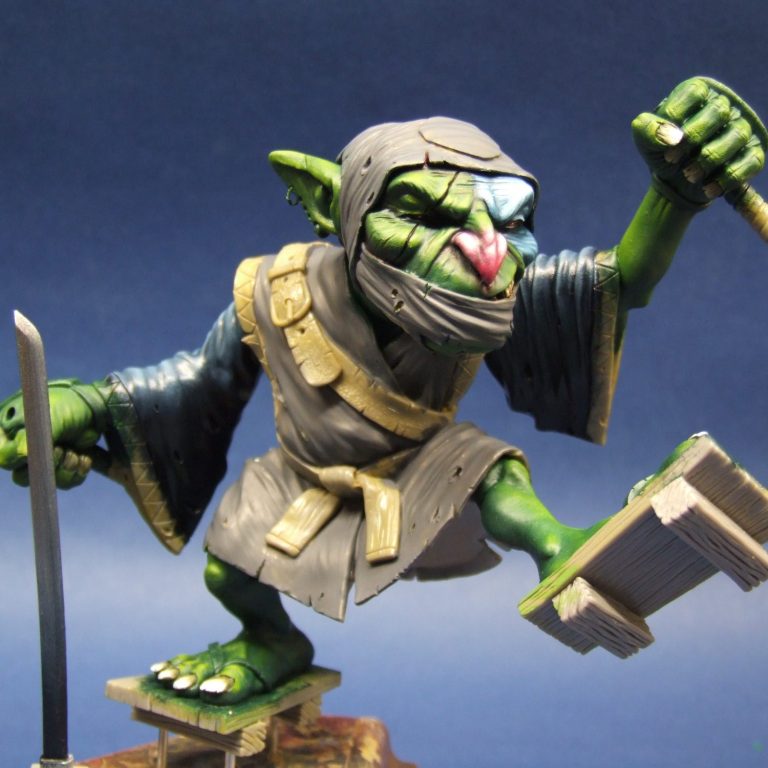
Just to give you an idea though, there’s some shots of the model in the bare resin, courtesy of Sean Green, and I can tell you that there’s ten parts to the kit, these being the main casting with the head, body and right leg as one piece. The left leg, both arms, two sword blades, a crossed scabbard, a wood plank base and two halves of a drinking bowl are what make up the other nine bits.
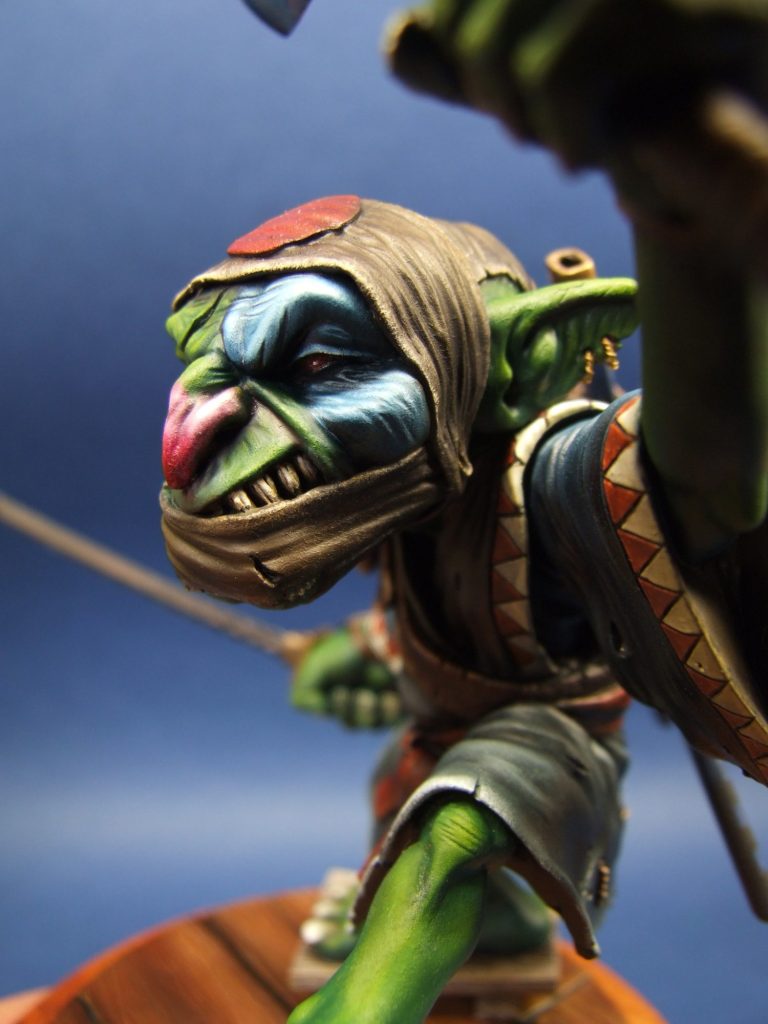
Surface detail is good, Sean’s hallmark cracked finger and toenails feature, as to does some nice wood grain effect on both the floor section and on the wooden footwear. The face though, that’s the best bit for me. It’s just so well done – evil and sneaky looking.

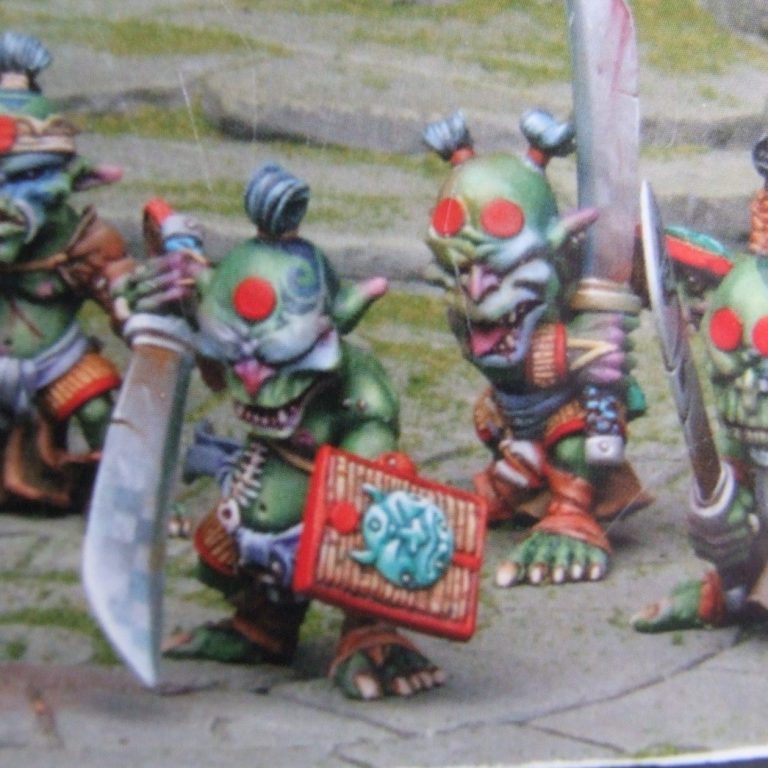
To begin with though, I’ve put up a picture from the Rackham catalogue ( 2006 ) showing a group of the small scale goblins that this piece is based on. The colour scheme for this large scale model is inspired by some of these, although I’ve restrained myself to just some of the painted effects, rather than trying to cram them all onto one model.
Seeing this group, I couldn’t wait to get the brushes out and start work on the kit, so that’s exactly what I did.
Photo #2 shows just how far I’d got with the painting. The skin areas are all but done, beginning with an undercoat of GW Goblin Green, over which I added a mix of Chrome Yellow and Prussian Blue oils. I used a lot of the blue in the mix so that it was quite a dark green, and then used a lighter mix ( with more yellow added ) to paint in the mid-tones. Highlights were a mix of the Chrome Yellow and some Titanium White, this mix then being added to bring out the high spots on each area.
The toe and fingernails are painted in this shot too, these being a good solid undercoat of GW Orc Brown, covered with a very thin coat of Burnt Umber oils, then some Mars Yellow worked into this to provide the colour for the main area of each nail. Some highlights and also the edges of the nail were painted on with some Titanium White, all this being allowed to dry before going back with fine brush and sharpening up the shadows with more of that Burnt Umber.
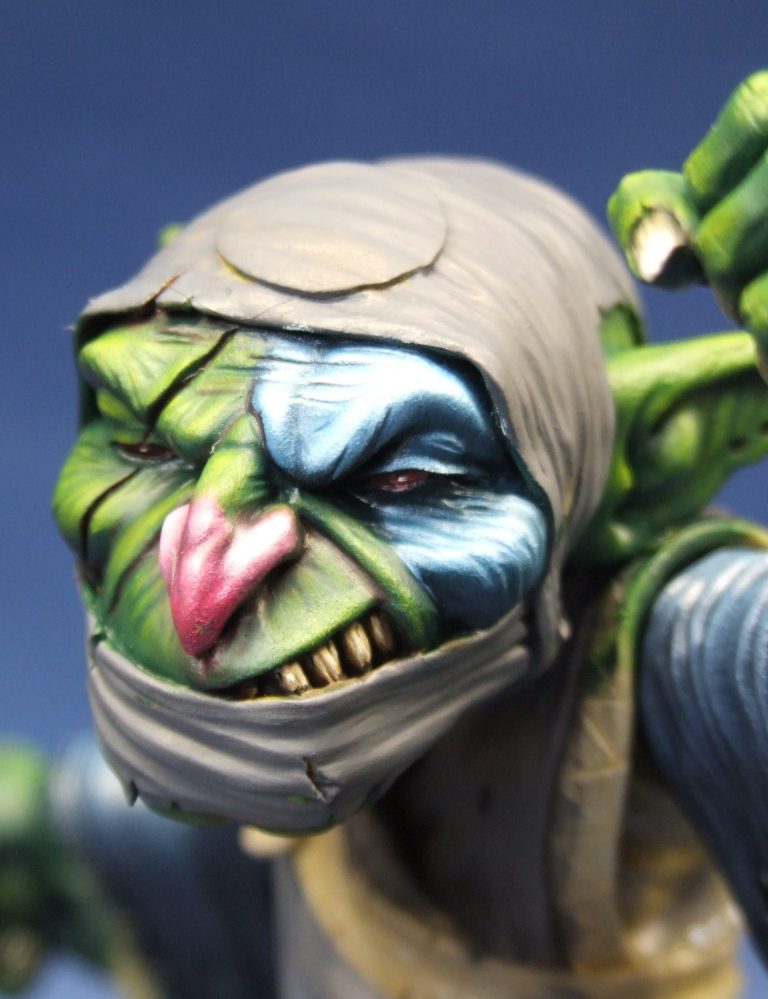
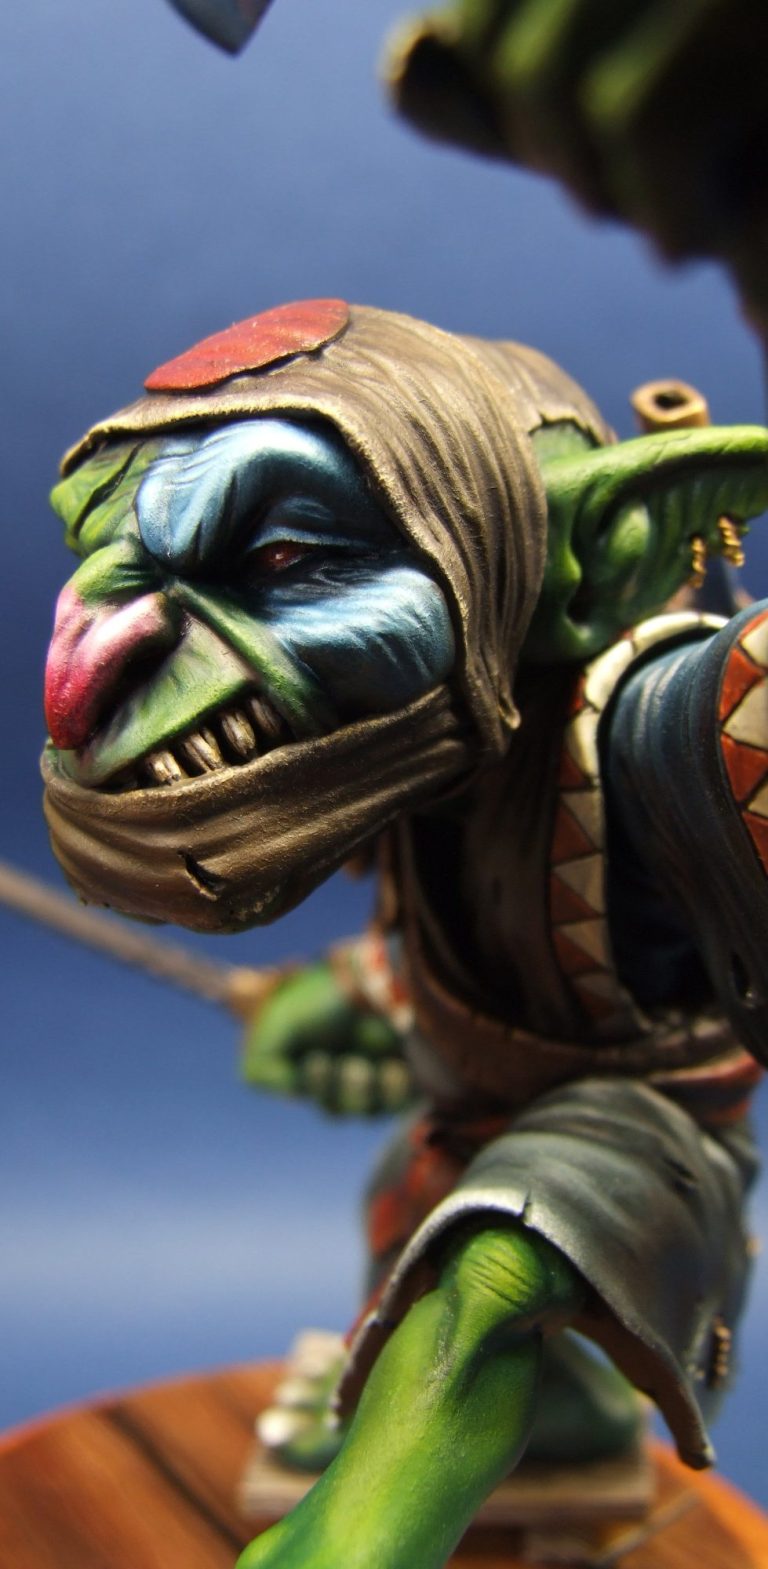
The pink nose was painted over a thin wash of GW Skull White acrylics. I had to re-undercoat the area that I wanted to be red, because the green would have polluted the red colouration, making in all probability a very dark brown. So once undercoated, I could add the pink coloured oils – this being a mix of Titanium White with Carmine.
Not really visible in photo #2 is the blue colouration to the left side of the face. Photo #3 gives a better view actually, and the good news was that I didn’t have to undercoat that side of the face. I simply added a thin coat of Prussian Blue, and then worked Titanium White into the blue to build up mid-tones and highlights.
Also in this shot, the eyes are completed. The figure’s right eye is quite difficult to do, as it’s partially closed due to a scar running across it. I managed to get a coloured pupil in with the black iris and a small white catchlight, but admittedly, it took a few goes to get it right and to match it up with the figure’s left eye.
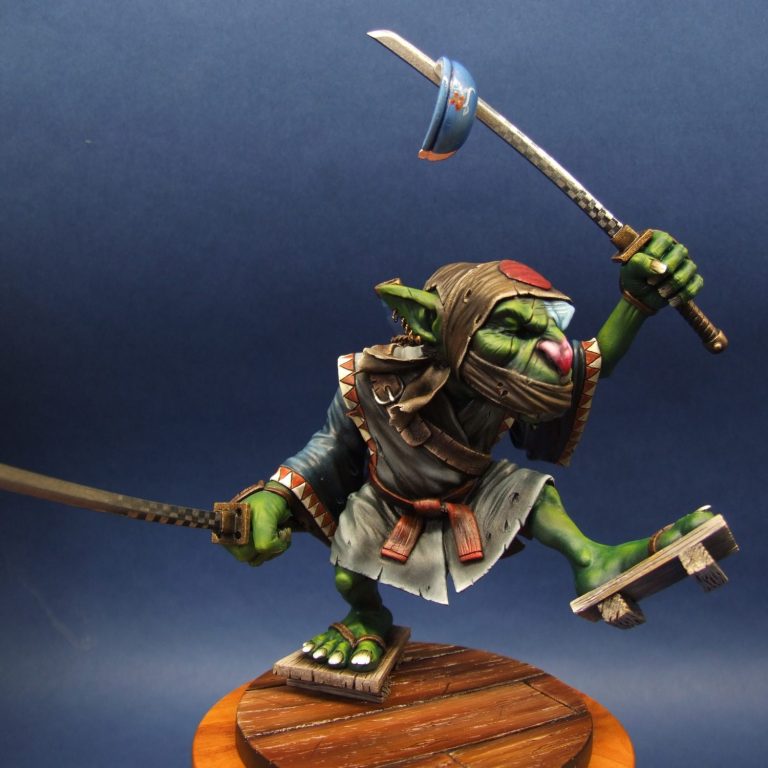
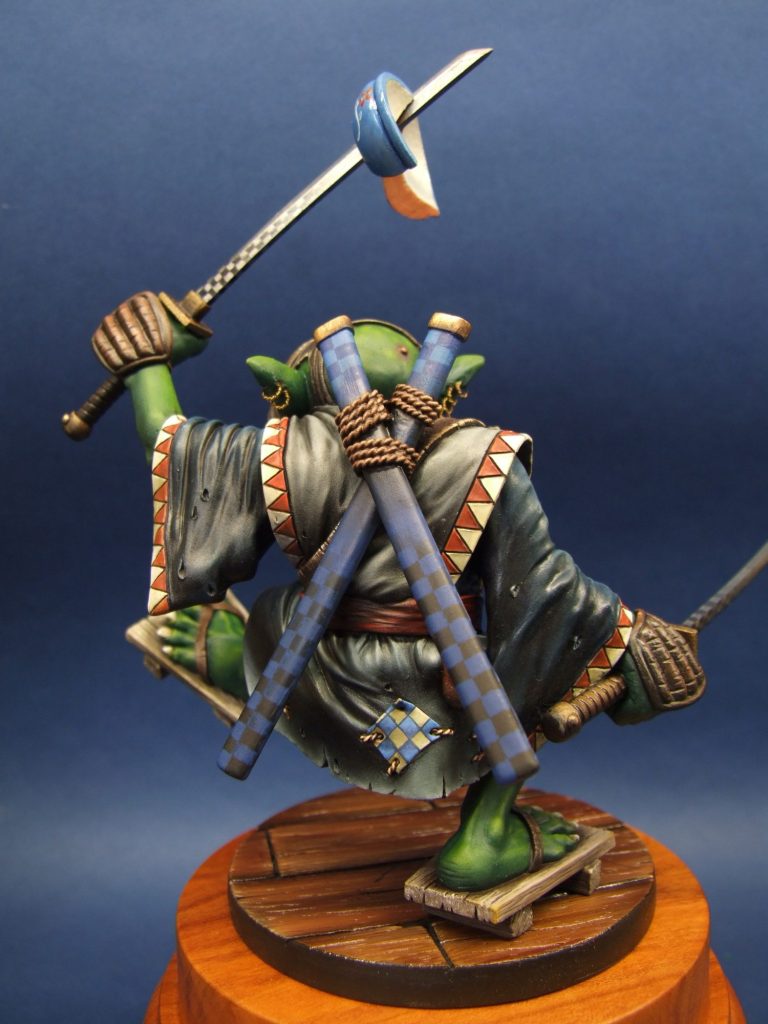
For the clothing – yes, I had gotten some of that done in these shots too – I wanted to paint any colour other than black. Sean had asked me to try and stick to what Ninja is supposed to wear – black – but I was trying to wind him up with thoughts of white suits and chrysanthemum flowers. In the end ( well I actually was going to do it that way anyway ) I stuck with traditional dark colours, but I’d walk a country mile before I used a true black.
So the sleeves are actually a very dark blue. I used the same colours as on the left side of the face, just adding less white to build up mid-tones and highlights.
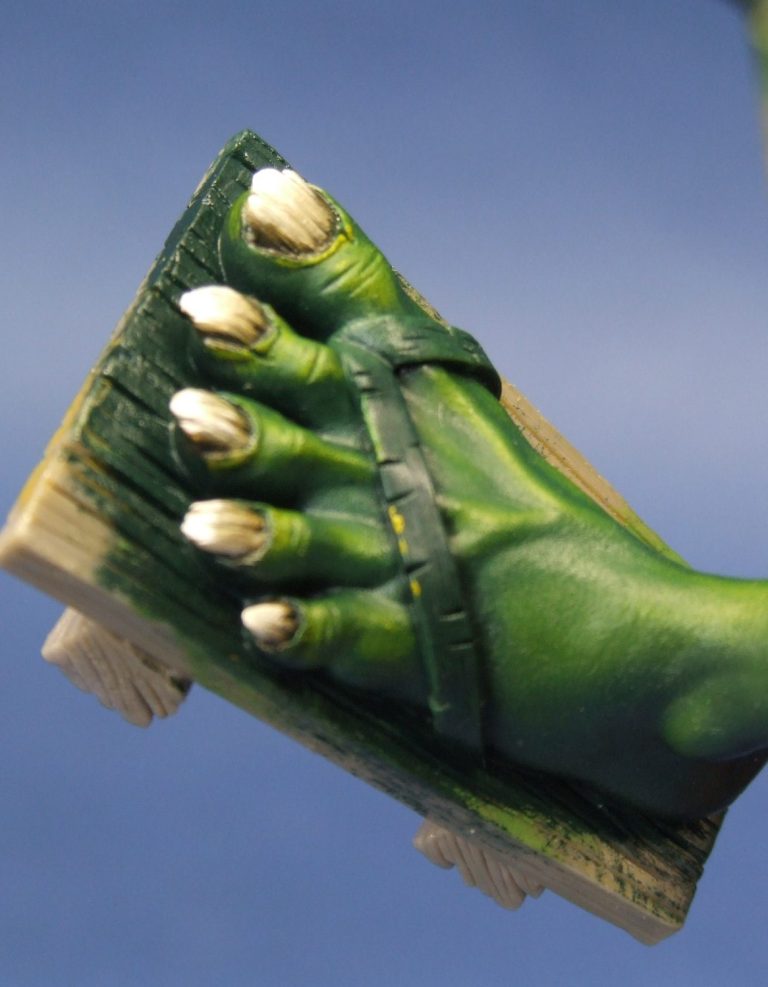
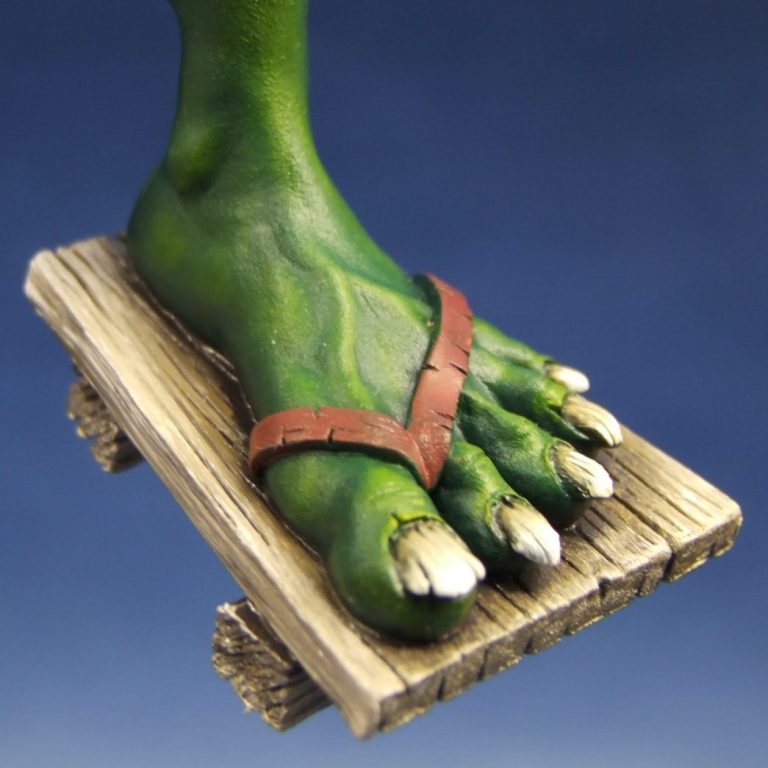
Photo #4 shows the detail of the feet. The toenails are really well sculpted, as too are the protruding veins, and also you can see the wood grain detail on the footwear ( clogs ? ).
Having taken the shots in photos #2 and #3, I have to admit that I was cheating. I wasn’t painting the kit as a fully assembled piece,

and photo #5 shows this. The model has very good joints, there’s even some lugs on so that he can be loosely fastened together, and as soon as I’d taken the aforementioned shots of the model, he was disassembled and painting could carry on.
In this shot – photo #5 – I’ve painted the tunic. There’s not a lot of difference apparent in the photo, but the grey undercoat has been swapped for some oil paints, and I used a mix of Raw Umber and Carmine to arrive at a rich black colour, and then added Titanium White to build up mid-tones and highlights. The art is to add very small amounts of the white to the upper ridges of the creased cloth, and then stipple with a clean brush so that the lighter colour mixes with the darker colour, thus building up a mid-tone. As more of the white is added, the highlights can be built up too, although I tried to restrain myself from getting too light, because after all, he was supposed to be wearing rather dark clothing. I did use rather a lot of the white on the edges of the tunic though, hinting at a piece of cloth that had been washed a lot, and basically had seen better days.
Photo # 6 is a different view of that face, note the detailed ear, something that Sean is very good at rendering.

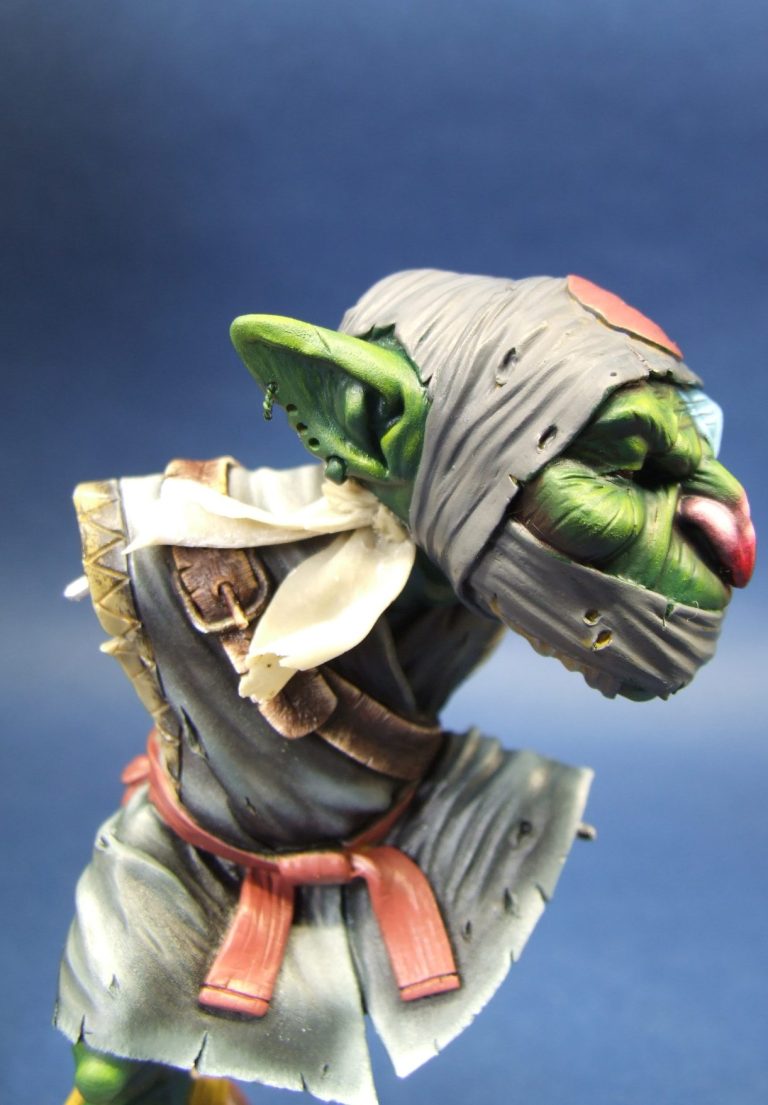
Photo #7 shows the bit that Sean forgot. The head wrappings don’t have any ends, and on the right of the neck they don’t follow around the head quite as they should. I rolled out some Magic Sculpt, and used this to make some scarf ends, and disguised where I fastened then in place with a small lump of the modelling putty, sculpting this to look like a knot in the material. Easily done, and to be honest, it’d be impossible to get this out of a mould if the piece were to be included in the main casting.
Also in this shot, and prior to the addition of the scarf ends, I’ve painted the belt and the buckle. I used Burnt Umber, Mars Brown, Mars Yellow and some Titanium White for this, using the two darker browns to fill in the main areas of the belt, and then adding the lighter colours on the edges, finishing off with the white to show all the damage that the belt has had ( because It’s rather old ).
The sash is the only area that I painted in a bright colour on the lower half of the figure, reverting to the red for this. I wanted to tie this in with the red circle on his headscarf, balancing out the two bright areas.
In photo #8 I’ve begun on the wood for the clogs. I used the same colours as I used on the belt, mixing them slightly differently, with more of the light colours ( Mars Yellow and Titanium White ) in the mix, but trying not to blend the paint as much, but allow it to help the sculpted detail show some rather nice wood.
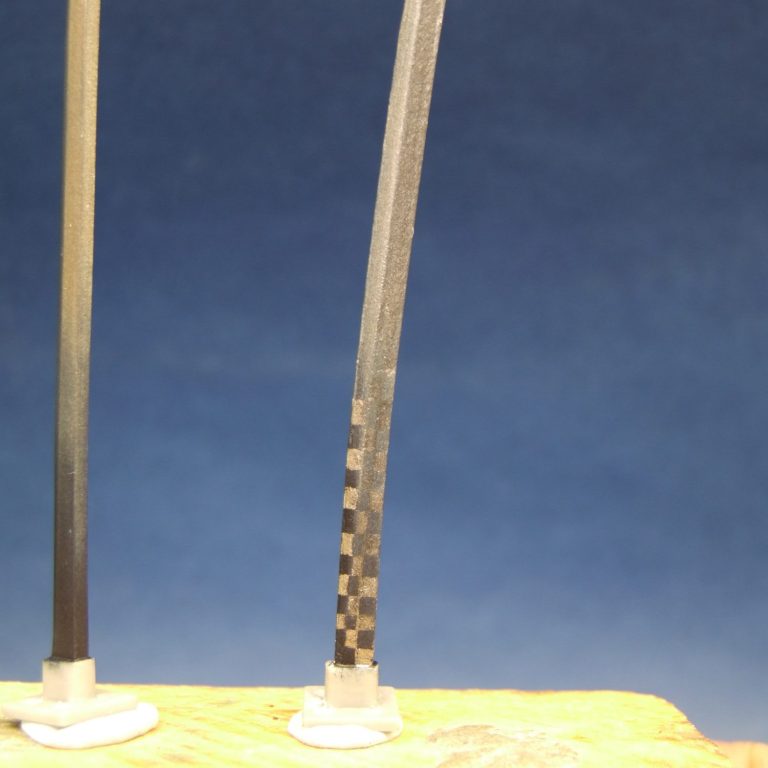
One thing I wanted to have a go at were the fading chequer-boarding on the swords. The 30mm figures do have some broader blades to work on, but it didn’t stop me wanting to have a go at these. I painted the sword blades with GW Burnt Steel, adding two or three coats to get a smooth effect, and then used an airbrush to spray on a facing coat of a very dark blue colour towards the hilt of each sword. Then it was simply a case of painting with some more of the Burnt Steel over the top to mark in the little squares. I used the same method with the sword sheaths, although I ended up going back and adding highlights to each square on those because they looked too flat. But the sword blades looked just fine without any other work being done.
Supplied with the kit is a round resin base, sculpted to look like part of a wood floor. Photo #10 shows this having been painted, and to be honest, I think it’s the best bit of wood effect I’ve done so far. I used the same colours form the belt and the clogs, but added more of the Mars Brown, and it just seemed to go right somehow. Once dry, I added some Mars Black ( sorry, I knew I’d have to use it at some point ) for the gaps between the planks, and then used some Chaos Black ( GW ) acrylic for around the edge.
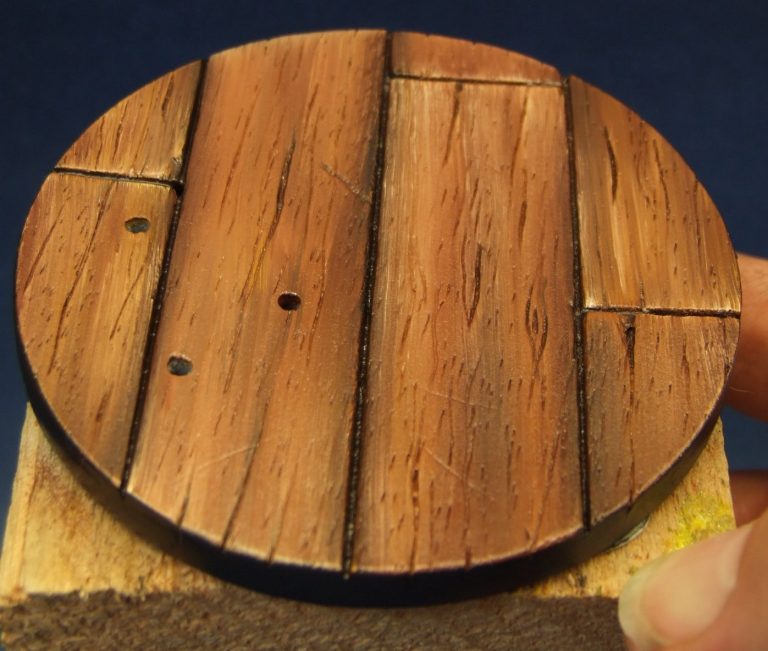
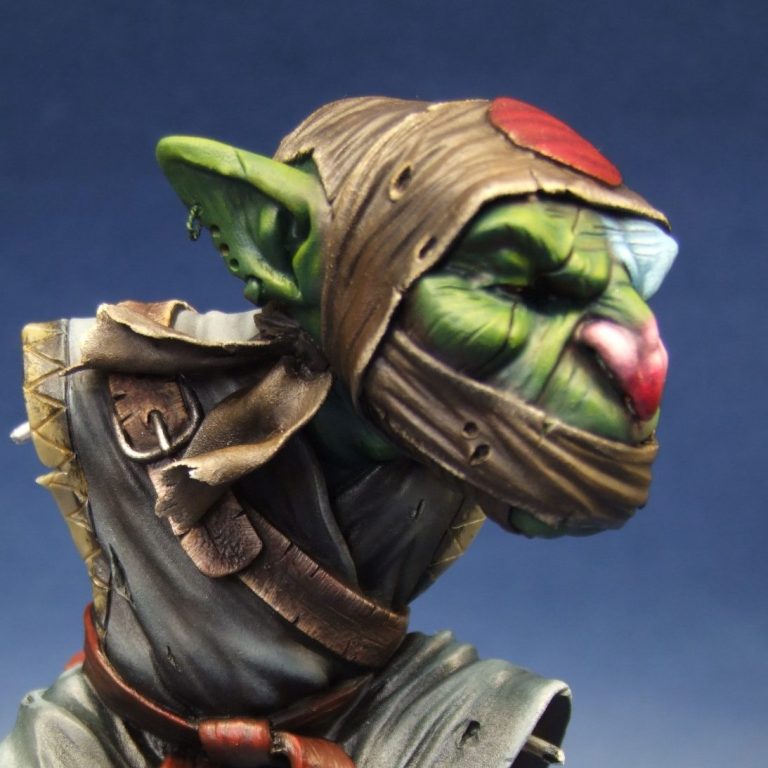
Photo #11 shows the headscarf painted. I used a very dark brown mix on this, opting for Burnt Umber with only marginal mid-tones from Mars Yellow and some Titanium White. I used a light mix of the yellow and white to add frayed eges to the bands of cloth though, as it helped denote the breaks between different payers of the scarf as it wraps around the head.
You might have noticed the holes in the ears in some of these shots. I decided early on that the two little earrings just weren’t enough, and that I would add more. I’d make them out of twisted pieces of wire threaded through the holes that have been drilled in each ear.
The photos from #12 onwards show the model finished. There’s lots more work been done, but I’m sure that you’ve read enough now. It’s really just a case of neatening things up, painting the triangle design ( that Sean has actually sculpted on the sleeves ) and fastening things together.
All along, I’d been threatening to paint flowers on this model……Somewhere, and I did eventually mange to do just that, because there’s two tiny ones painted as decoration on the side of the drinking bowl that is being sliced in half. The bowl comes ready split in the kit, and although it’s really designed for being put on the floor next to the figure, I thought that maybe it would add more movement to the model if he appeared to be slicing it in half, as though someone’s thrown it at him as a form of self defence. This guy’s swords are so sharp though that instead of the crockery shattering, the blade just slices clean through it !
I don’t know whether it works, that’s up to the viewer of the piece. But I thought that it looked O.K.
Final touches were some detail work on the face to pick out all the fine wrinkles, same on the hands and feet, and to add dark washes around the deeper undercuts to really punch in the shadows.
Overall I like this figure ( a lot ). I feel that the pictures don’t do him justice though, partly because he’s quite big, and because he’s in this “Whirling Dervish” pose, he’s also quite hard to photograph. The problem being that some parts are close to the camera, and others seem to diminish off into the distance, giving a forced and very false perspective.
At Thirty-three pounds, the piece was quite cheap too, certainly compared to the old Forgeworld offerings, which this piece can certainly stand up to in the size and detail stakes.
I think a scene with this character smashing his way through one of those sliding paper screens would look cool too, although I couldn’t do that with this piece because the pictures might be used for Fire Industries advertising.
Thanks go to Sean Green for passing one of these on to me.
Whilst I had high hopes for this to develop into a range of figures, a third and final sculpture was produced, that of a small knight, again mirroring a Familiar from the Rackham range.
Unfortunately that's as far as Fire Industries went before stopping production of any of the three figures.
It's a great shame, because these would have sold well if publicised, and with the continued interest in Rackham figures as second-hand collectors pieces, I wonder if bringing this range back would be successful.
If you can get one of these second-hand, then I can highly recommend it as a great addition to a collection.