Native American Family
Three 120mm Resin kits from PiLiPiLi Miniatures
Article in Military Modelling magazine in 2006
Historical Background
The models depicted in this article show a Crow woman and her child some time in the early 1900’s.
The Crow tribe hail from the Central American plains, around the area of present day Wyoming. For neighbours they had the Cheyenne to the south, the Blackfoot and Gros Ventre to the north, the Assiniboin and Tenton Sioux to the east and the Shoshoni to the west.
Before the influx of Europeans to America, the Native Americans had been closely knit tribes. Up to this point they lived in an almost stone age society with no knowledge or use for smelted metals. There were several settled communities who had taken to farming, but in the main, the tribes were still “hunter – gatherers” roaming set areas.
Once the “Americas” were discovered though, the Europeans were quick to make settlements of their own, intruding upon the Native Americans ancestral lands.
Some tribes fought this intrusion bitterly, but some did not, seeing the European influx as a foregone conclusion, and trying to adapt as best they could to a new way of life.
The Crow were one such tribe, and in the main were on friendly terms with “the white man”. Because of this they gained a considerable amount of goods through trade, and became one of the wealthiest tribes in the upper Missouri region.
This isn’t to say that they didn’t have problems of course. They had age-old enemies of the Sioux and Blackfoot, with constant raiding back and forth across the borders of each tribe’s lands.
The trade with the Europeans became their most important asset though, and the Crow Women in particular were noted for their skills in producing clothing and highly decorative craft items.
The men of the tribe had to support this, by being proficient at hunting game not only to provide food, but also to get the raw materials for the women to work with.
So successful were the tribe, that one aspect of tribal life became the Crow Fair where the wealth and grandeur of each individual could be shown to all.
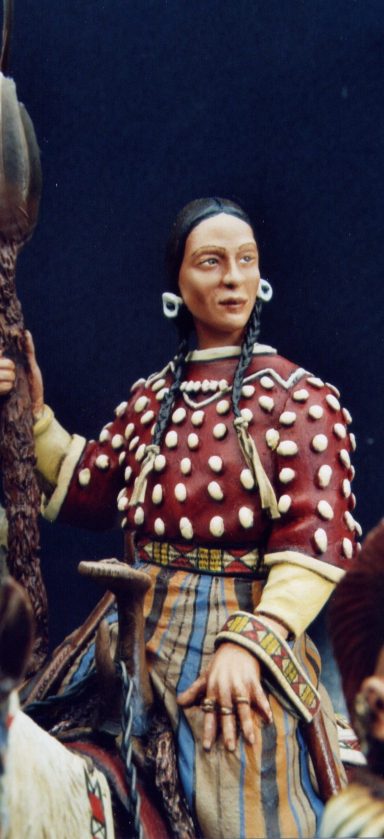
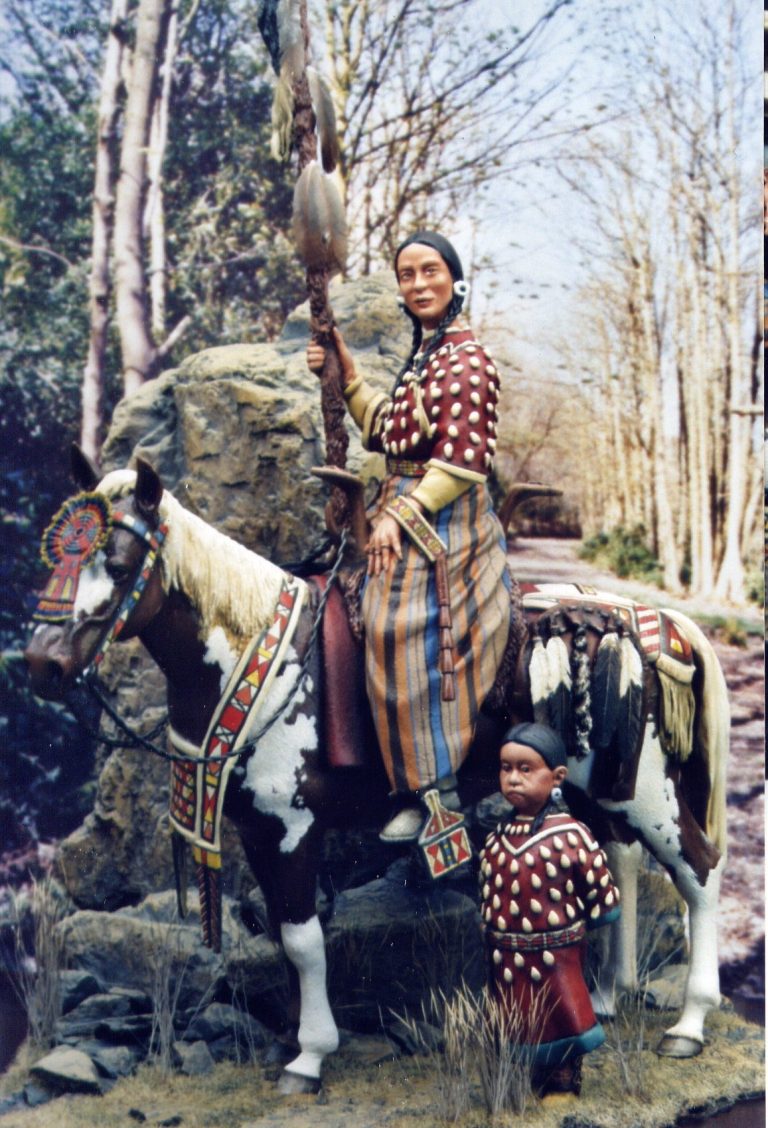
Here we return to this model, showing a Crow woman in all her finery. Of particular interest is the dress. This has a mass of elk teeth sewn to it, and as only two teeth of each elk are suitable, this shows her husbands prowess as a hunter.


The skirt is actually a “trade blanket” which was traditionally used as a skirt by women when riding a horse. These blankets were woven in wool mills like Pendleton and Racine, and were produced with the trade to Native Americans in mind. The variety of patterns, not to mention the brightness of some of the colours of these blankets is sometimes astounding ( and some of the more complex patterns would certainly be something to make a model painter’s eyes ache, were he or she of a mind to attempt such ).
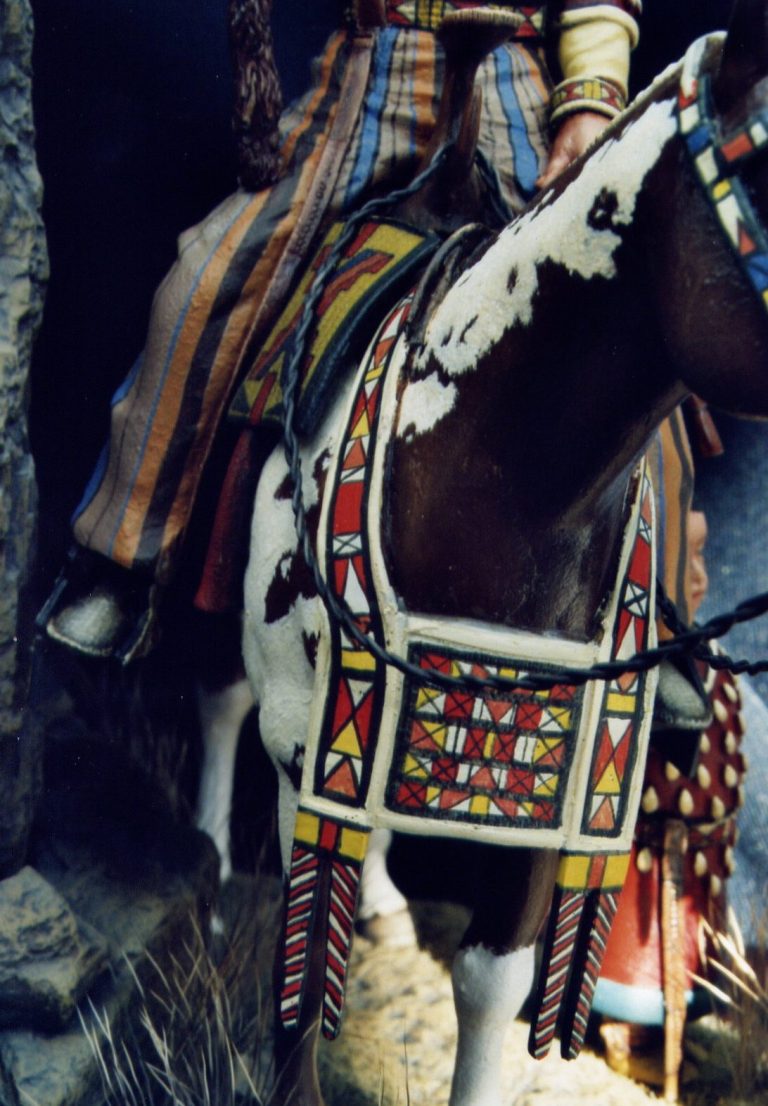
The saddle is typical Crow, having the high pommel and cantle, but the horse collar, whilst commonly used by the Crow to decorate their horses, is thought to have originated with the Shoshoni tribe.
Again, decoration of these items is only limited by the reference source and deftness of brush of the modeller, but certain patterns – like the hourglass shaped design – were commonly used.
As the model is depicting subjects from a Crow Fair, I’d best give some background to what the fairs are all about.
Begun in 1904 by a government Indian agent, the premise was to help the Crow Indians become more self-sufficient. This was to take the form of something similar to the fairs being held by whites in the mid-west, and there would be competitions with awards for the best entrants.
Initially there were categories for agriculture, as well as crafts and dancing. Horseracing was introduced too, although initially only in a straight line rather than the European circuit racing.
The agricultural aspect was dropped soon after the Second World War, but the Crow Fairs went from strength to strength with the Crow’s culture featuring heavily.
The fairs are held annually, usually in mid August, and feature processions of traditionally dressed Crow. Traditional dance for men woman and children takes place in a large arbour covered central area, with not just the dancers competing, but also the musicians too.
Many craft items are on sale from stalls and booths, and a family atmosphere is encouraged, hopefully to make the fair continue into the next generations.

With this in mind, the model could be depicted in severely different settings. Either in the period of the early 1900’s, with attendant scenery of that period; in an up-to-date setting with a modern street and casually dressed onlookers or anywhere in between these periods.
The models
This began as a relatively simple project, having seen Lee Van Quang’s latest release from his company, Pilipili. The model of the Crow Woman on her horse looked good, and as I like Quang’s models, I thought I’d make enquiries as to whether the review item was “being done” for an article.
What I didn’t know was that Quang had also sculpted a young girl to go with what now became her mother.
Let’s look at the mounted figure first of all.
Quang was celebrating his model company’s tenth birthday, and had released the woman and her horse as a celebration of those ten years of his sculpting and producing resin figures and busts. It’s a fair old leap from sculpting a bust to doing a mounted figure, and Quang has been adventurous in the way he’s split some of the parts.
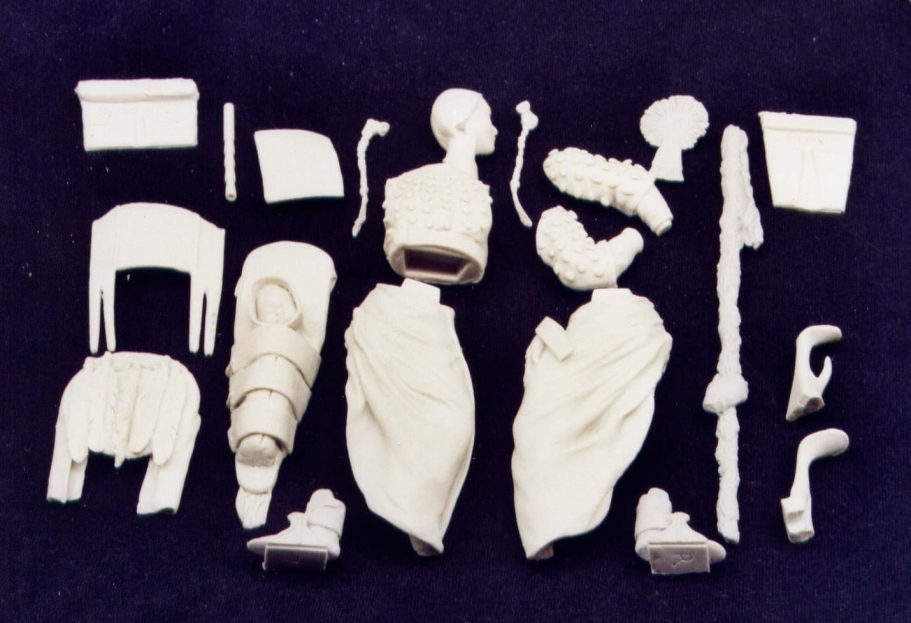
Obviously, with any kit of a mounted figure, there’s going to be quite a few components, and I’ve taken a photograph of what’s included in this kit, rather than try to describe all the bits verbally.
Photo #1 shows the main components of the horse, and photo #2 those that make up the woman.
The resin used is the expected soft grey material that Quang is known for; it’s easy to work with and clean up and takes paint well. Quang has split up the parts of the woman fairly logically, and there was no filler necessary when joining her together apart from a swipe of Magic Sculpt at the shoulders. The fitting of the horse is a lot more involved, and is certainly the most novel way I’ve seen ( so far ) of splitting a horse kit up.
Normally I’d expect a horse to be in two halves, split laterally, and perhaps with the neck and/or head separate. Quang has split the horse’s body into five, having each of the legs separate ( although with the applicable rump or shoulder attached ) and these are then joined to the barrel of the body ( with the saddle and blanket ). The neck and head are one part, with the ears and forelock being separate too.

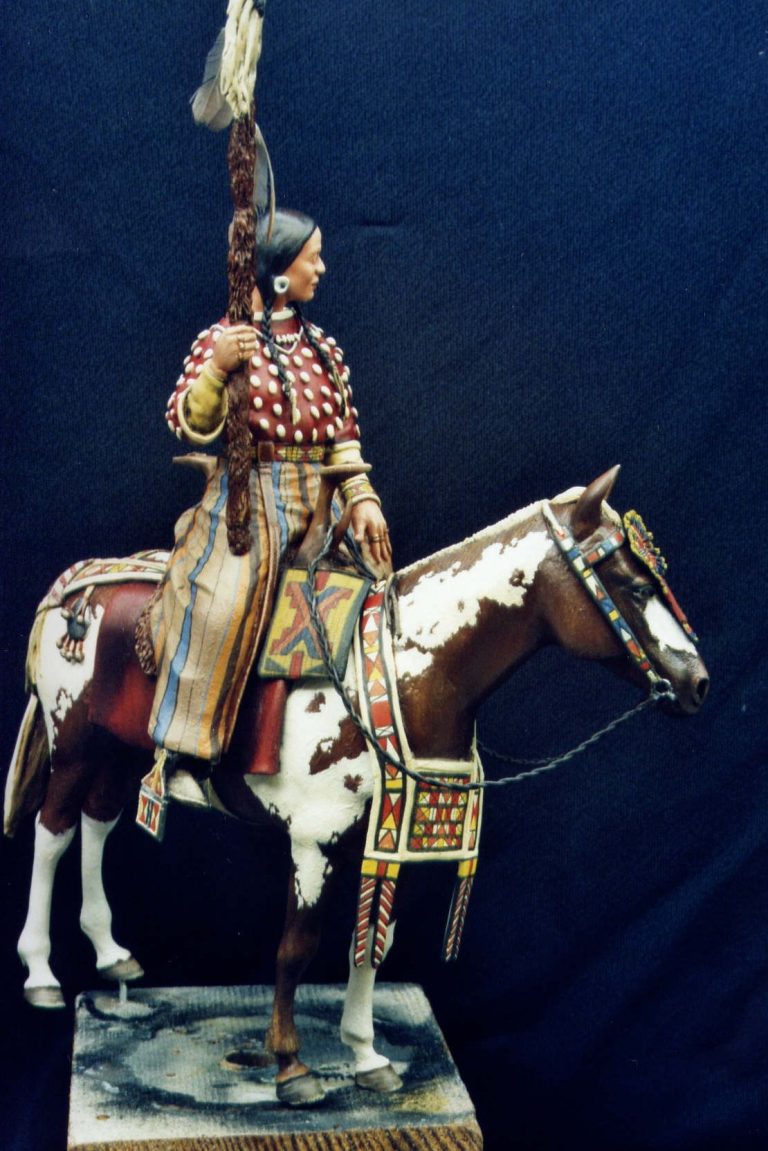
Fit of parts was, well let’s say a little unfortunate. There are large location keys on each of the parts, and these fit well, but either some of the parts have suffered shrinkage, or my alignment was out.
Having said that, I’ve not come across a horse model that did fit together without some adjustment and filler, and I didn’t see it as too much of a problem.
I did e-mail Quang about the split of parts, simply because I like to pick folks brains. He wasn’t letting too much go on why he’s split the horse up this way, but did come up with a suggestion for fastening the model together that I’d not thought of before.
Quang suggests joining the parts with pads of filler, rather than smears of glue. I tried a new filler from Legends ( available from Friendship Models ) first, but it was a little too dense for the job. Microwaving it for 10 or 20 seconds might have helped, but instead I used it to re-sculpt the mane ( O.K. multi tasking here, I’ll come back to the mane later ! ). Milliput was O.K. but again a little too solid, and so I eventually tried Magic Sculpt, and that worked just fine.
The advantage to using a filler to join the parts is that you get plenty of time to align the components; and also, so long as you used plenty of filler, and squeeze it out of the joint when fastening the two parts together, then any gaps are already filled.
I joined the two leg pairs together; then added these to the barrel of the body on the next modelling session. The head and neck were added the session after that. I decided to leave the tail off the horse for now. This would be fastened in place once the main painting had been finished.
The mane. Quang often sculpts hair in quite an open manner, giving the form and volume of the hair, but unlike a lot of other sculptors, doesn’t usually add a lot of detail. I like the way he does this, as it works well, especially on the female busts he’s produced over the years.
This is the first time I felt the need to change it, partly because I felt that the mane was a little “flat” looking, and partly because I wanted to use the new Legends filler / putty. So admittedly, I was playing !
The Legends putty worked well, and is a little more plastic than Milliput. It’s a bit more dense that Magic Sculpt, probably being more akin to Duro.
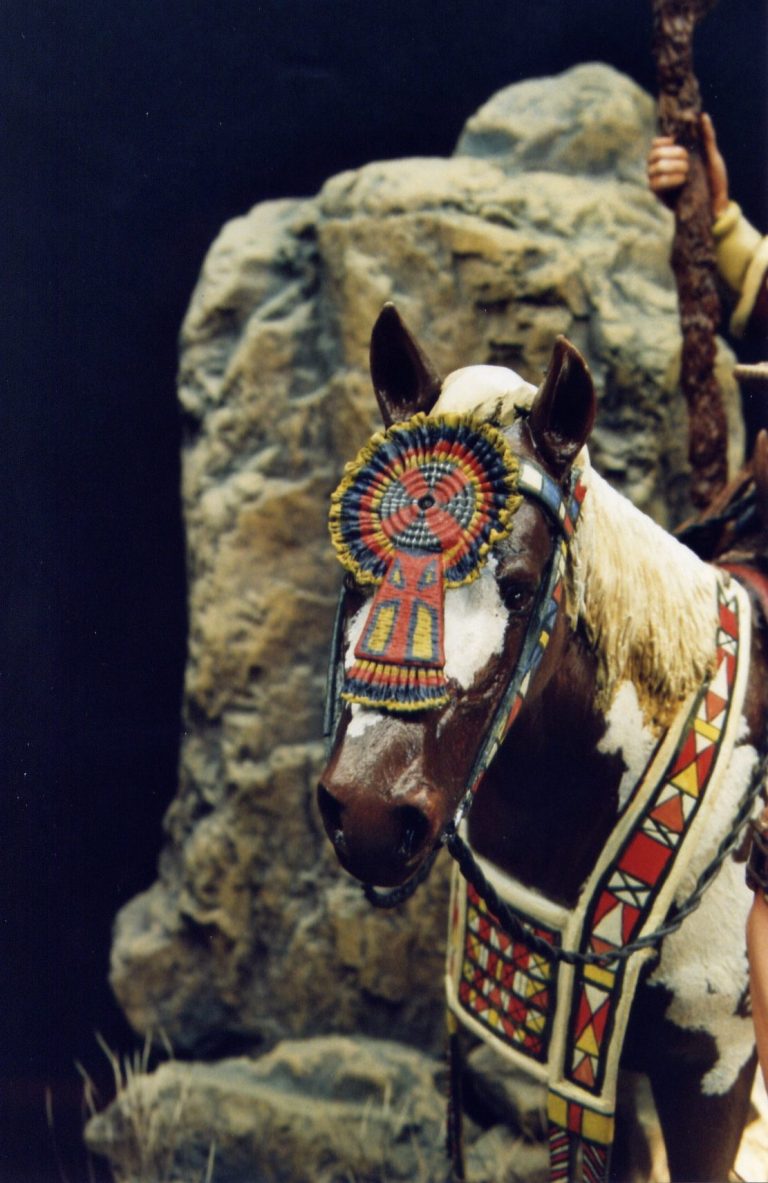

As with all modelling substances and tools, it will have it’s uses and is a handy addition to the toolkit.
I did find, even having used the Magic Sculpt to join the horse together, that there was some remedial work to do. Some of the parts had a slight step where they joined each other, and this needed filing down so that the “step” between the parts was lost. I had actually managed to align the parts so that these steps were mainly underneath the horse’s belly or would be under the large decorative tabard hanging at the front of the animal.
Having smoothed these, and filled a couple of tiny air bubbles on the horse’s rump, I could begin painting.
I’ve taken to adding a primer coat in the form of a diluted acrylic wash in recent times. I’ve found it gives a good base on which to paint, and the paint is controllable, simply because it’s applied with a brush. I use Games Workshop’s Skull White, and mix this with some Isopropyl Alcohol. Subsequent coats of acrylic for the undercoats can be diluted with water, and will not affect the primer coat.
I liked the look of the horse colouration that Quang had used for his box art. It’s of a “paint horse”, called this apparently because of it’s colouration, looking like some mad fool has taken a brush to the poor animal.
I began by painting the horse with a few more coats of the Skull White, to build up a solid colour over the grey resin. Then I added a coat of pale greyish / yellow oils to the horse, making this colour up from Titanium White, with a dash of Mars Yellow and a little Payne’s Grey.
This would act as the mid-shadow colour, and simply by adding some more of the Titanium White to the upper areas and blending it in, I could gradually build up the highlights. For deeper shadows, I used some Sepia, added in the form of thinned washes once the white had dried fully.
Now for the fun; I began adding the brown areas to the horse. To begin with, I used Burnt Umber oils to mark out the larger basic shapes. This would leave a slight outline to each of the shapes, which would make them stand out when all the other colours had been added. For the smaller dots, I just added rough areas of the Burnt umber.


Inside each of these areas now, I added Mars Brown oils, stippling this with a broad flat brush to spread the paint evenly. For highlights I added some Light Red, and then just a few touches of Titanium White. Shadows were added with more of the Burnt Umber.
Whilst this dried, I moved on to paint the flesh areas of the woman.
There’s not all that much to paint here, just the face and hands, although the face will benefit from some attention, as it’s the focal point of most figures, and in this case, is the detail that will draw the attention.
I used a slightly darker mix than usual, making the mid-tone oils from Winsor and Newton Flesh Tint, Mars Yellow and Titanium White as normal ( a ratio of around 4:1:1 ), but added just a touch of Mars Brown to the mix, just to darken it a few shades, and get back a sun-bronzed look. Highlights were added with more of the Titanium White, blending this in to the surrounding areas so that it didn’t look too stark, and the majority of the shadows were from Mars Brown, strengthening these with a little bit of Burnt Umber around the eyes, the hair line and underneath the chin.
Once the face had dried, I added in the eyes and the eyebrows. These have to be more delicate than usual, because the subject is female. Quang has managed to sculpt a woman’s face very well, and it deserves attention to bring the features out without becoming too heavy-handed. So I kept the eyebrows fairly thin, and just hinted at a little more red on the lips.
For the dress, I consulted a book that I bought of Ray Lamb ( Poste Militaire ) several years ago, and who is sadly not trading anymore. The book in question is one on “trade blankets” produced in America, and used mainly on the frontiers. I find this book useful for design and colour ideas, and the ISBN no is included in the reference section at the end of the article.
Although many of the patterns shown in the book are highly complex, with a little ingenuity, sections of the patterns can be borrowed for paint ideas.
This is what I used for her skirt, adding an initial coat of an earth coloured acrylic ( Orc Brown, Skull White and Vermin Fur, all GW paints ), and used higher proportions of the Vermin Fur colour to add basic shadows, and more of the Skull White for dropping on the highlights.


With this done, I then picked several colours to use to paint in the lined pattern, adding these in thin bands that gradually gain width as they travel down to the hem of the dress.
On the lighter colours I added basic shadows, and on the darker ones I just added highlights. This makes painting the whole dress a lot simpler, and eases the look of the whole area. There is work there with the differing colours, and the highlights and shadows flow through the whole, but adding more than this would begin to confuse the eye, and the pattern might appear to break up.
Normally I’d add highlights and shadows to all the areas, but with the amount of “pattern” going on over the whole of this model, I felt that the dress would lose it’s effect if I worked on the colours too much – look it’s a damn fine excuse, and I’m sticking to it !.
For the blouse, I began with several coats of Humbrol acrylic Crimson ( heaven knows what I’m going to do when this paint runs out ! ). Over this I added a mix of Carmine, Mars Yellow and Prussian Blue oils. The Mars Yellow and Prussian Blue are mixed first to produce a mid-green, this is then used to darken the Carmine. To thin the mix slightly I added a small amount of matt varnish ( Humbrol ). This dries the paint faster, and also – hopefully – imparts a matted down effect to the oils.
The paint was stippled with a large brush to take off any excess, and at this point I completely ignored all those elk teeth.
More of the green mix was added onto the model for the shadows, blending this into the dark Carmine mix, and then some Scarlet was added to build up some highlights on the shoulders and a few of the creases across her chest.
Once fully dry, the elk teeth were painted in with an undercoat of Skull White ( mixed with some Isopropyl Alcohol to allow the first coat to flow over the oils without beading ).
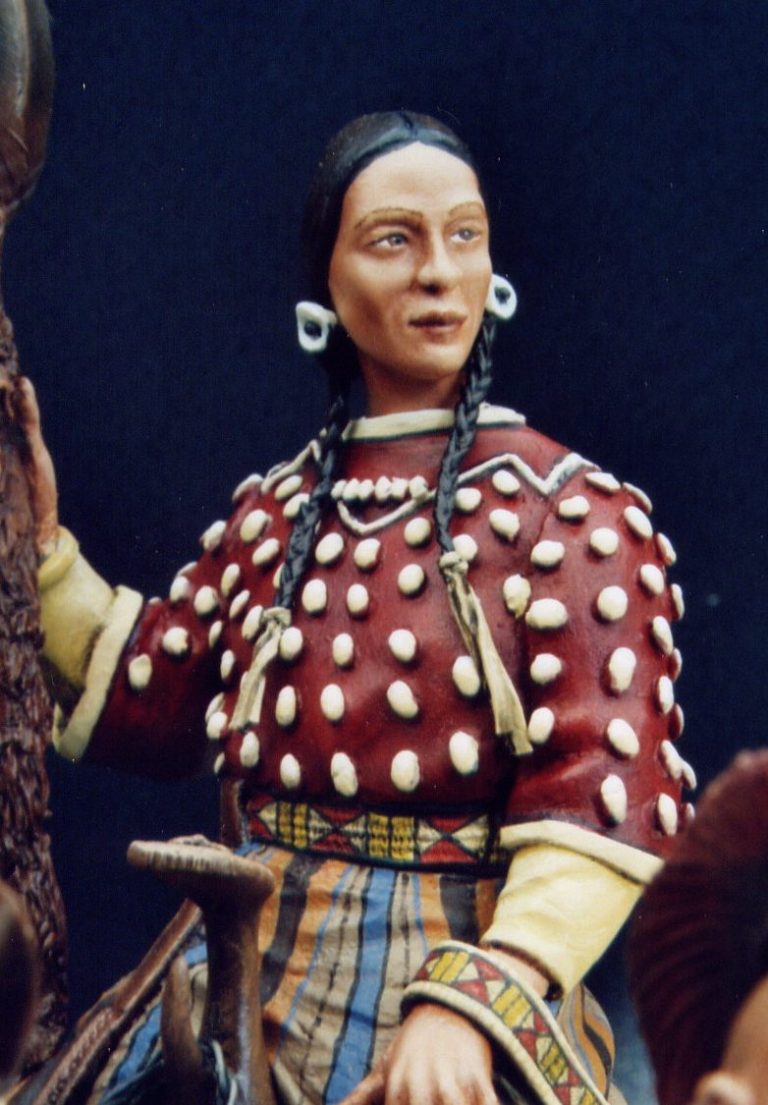

I then added a mix of Orc Brown and Skull White - giving a yellowish colour – which would be the shadow for each of the teeth. Over this I added five further coats of the off-white, gradually adding more of the Skull White to the mix so that it became lighter. I worked on smaller and smaller areas towards the top of each tooth, thus building up highlights.
I also used this method to paint in all the white embroidery around the cuffs and neckline of the blouse, seeing as I’d made too much paint up – as usual.
The final areas to be dealt with were her shoes – which were kept pretty simple – a couple of coats of the Orc Brown acrylic with shading done in Burnt Umber and Mars Black oils once the acrylic had dried fully.
I added decoration to the stirrups, as this would be the basis of the designs used on the rest of the horse furniture. I decided to use acrylics for this, and opted, for now, to use a dark green ( GW - Chaos Black and Forest Green ) and also the Humbrol Crimson.
These were applied with a fine brush and given a minimum of shading by adding a thin wash of Payne’s Grey oils.
The design was carried over to the wristband that is attached to the crop, adding a variation to the triangle design, which again would be further developed on the horse furniture.
Back to the horse though now.
To tie the rider and the horse together, I’d already decided on the linking of the beadwork / embroidery designs, but felt that as the woman has only relatively small areas of these, perhaps some larger area should also be co-ordinated. So I decided to paint the saddlecloth in a similar shade of red to her blouse, using the same colours, but in a slightly different mix. The colour was similar enough to link horse to rider, but not an exact match.
Again a period of drying had to take place – red does take a while to dry fully, and so I worked with paper and pencil trying to come up with designs to link those already done on the woman for those to be put onto the horse furniture, and referring to the reference sources I had from the pictures Quang has included with the model, and also from my own library of reference books.


I came up with a fairly basic pattern that could be blocked in, and then by adding further areas of colour, can be made to look more complex. Once I started on the model, I found that by adding the shapes of colour, an outline of the dark green could be used to not only neaten any edges up, but also to define areas and make them stand out more.
The art is really to have a good brush with a fine point, and when using the acrylics, to keep the brush clean. Rinsing the bristles out in clean water at regular intervals is a must. Also don’t get too much paint onto the brush, and, daft as it sounds, draw lines that aren’t too fine. It’s all very well starting off a design idea with really fine lines, but reproducing them accurately will become a real chore. Better to start off the basic design with a few heavy strokes, and then when the confidence and technique is perfected, add in finer detail lines to liven up the pattern.
This is what I did, by adding the “colour splashes first, then the thicker boundary lines that run down the outer edges of the main areas, only adding the dividing lines between the colours, followed by the really fine lines within the colours last.
Long winded I know – but hopefully I’ve managed to explain how it’s done.
The mane and tail on the horse were about the last things to be painted, these being a thin coat of a dark yellow mix ( Mars Yellow, titanium White and a dash of Sepia ). Over this I used flowing brush strokes to add more Titanium White to the upper areas, blending the white in at first, but allowing the last few brush strokes to leave marks in the paint hinting at the mass of hair making up each area.
After the mane and tail were fully dry, I added a couple of thin washes of Sepia to the areas that would be in deepest shadow.
Once everything was painted, the glue was brought out, and I began assembling the sub-assemblies. The woman seats onto the horse easily enough, and then the saddle horns can be added. The tail was glued in place, and the quirt was added to her decorative wristband.
There are a few parts that need gluing to the model before paint can be added. The woman’s plaited hair are two such. They fit with a minimum of adjustment, and after a wipe of filler can be painted to match in to the rest of her hair.

I liked the way that the feet and stirrups fit into the bottom of the dress. I usually find getting the feet, stirrups and stirrup hangers to fit properly to be a real pain. But with the way that Quang has sculpted and engineered these parts, there’s no problem at all.
The only additions I made for this model were the reins. There weren’t any in the kit I got, and although I’m sure that Quang would have replaced them, impatience ( which I suffer greatly from ) saw me plaiting some soft lead wire together in sufficient length to provide a simple replacement.
Just as a note, lead wire ( it’s not actually made of lead now, but a soft metal replacement that is non-hazardous ), is available from fishing tackle shops that deal in fly fishing supplies. It’s usually sold on small rolls, and in various sizes, and comes in darn handy for allsorts of modelling applications.
I also added a bit of putty to the top of the lance. I’m not sure what Quang has put here, but mine seemed to be cut off rather abruptly. I sculpted a little bit of fur / hair onto the top of the lance, and also part of a strap holding it in place.


The final addition was that of several feathers. I used some cut down from real feathers, and for the first time it seems to have worked. Usually I’ve made feathers from plasticard, but decided to try cutting some small feathers down to an appropriate size. My only advice here is to use a really sharp knife ( a new blade is best ), and to have several spares to practice on.
With the woman and her horse assembled, I put her to one side so that I could begin work on the little girl.
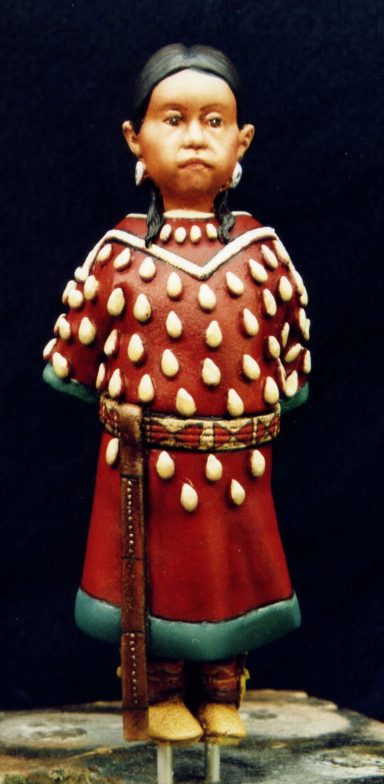
This is a much simpler model. It’s split quite logically, in that the upper body is one piece, the lower body is split so that the legs and back of the skirt are one part, and the front of the skirt clips over this. It’s a neat way to make the dress look hollow rather than have a solid bottom edge to the casting. It also allows for a cleaner undercut for the legs too.
Instead of the patterned dress her mother has, I decided to use a solid red for the whole of it, just using the elk teeth ( which would have in reality been carved bone, rather than actual teeth ), to break the colour up.
If you want to know why I chose to do this, it’s simply that looking at her mother, I felt that I’d probably been better served by painting the skirt in one solid colour, and leaving all the stripes off. This would have lessened the “noise” that only adds to the patterns on the horse itself. But maybe I’m boring…
Anyway, the little girl was painted in basically the same method as that used for the woman. I did try and vary the shades of red a little, just to hint at a different source for the material used to make her clothes.
The only thing of note is to paint her shoes and leg coverings first, then add the front of the skirt, and then sort out the small gaps in the side of the dress. Then the dress can be painted. Doing it in any other order will make things awkward, as you’d struggle to get a paintbrush to the legs after the front of the skirt is added to the model.

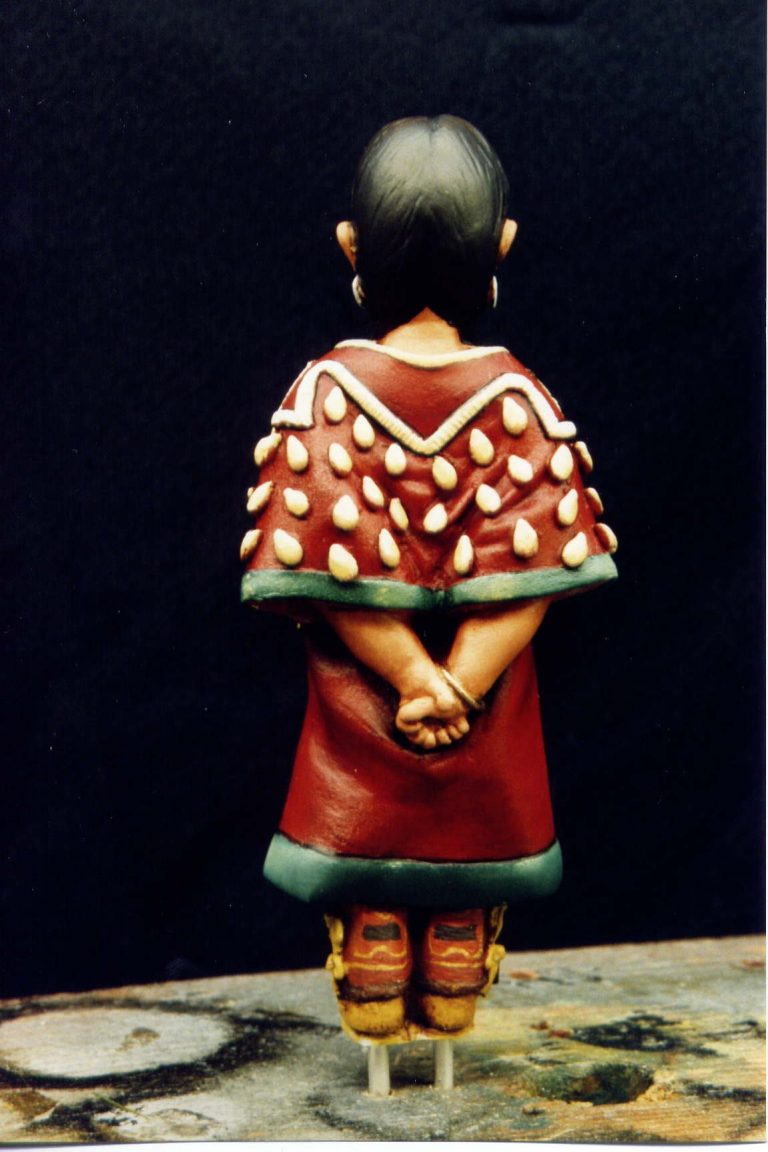
Things I left off.
I did decide to leave off the baby in the wicker carrier that’s supposed to go on the front left of the horse. I also left off the little girl’s doll too.
The Base
I wanted a large base for these models, and sourced one from Armstrong Bases of Peterlee. Onto this I positioned the models, drilling holes to accept the wires that I’d put into the feet of the little girl and the hooves of the horse.
I played around with the position of the models, I’d had the idea of adding another of Quang’s models; though more about that later.
After sorting out where everyone was going to be, I removed the models, and plugged each of the location holes with a cocktail stick. To mark the extent of the groundwork I’d drawn around the models roughly with a pencil, and then laid on masking tape so that any paint applied to the groundwork wouldn’t get onto the wood base.
I then added a pack and a half of Milliput ( really do wish I had shares in this company ), having first built up a polystyrene plinth to take the large lump of rock that would be used as a background for the models.
The rock was pinned and glued in place, and the putty added around it.
To texture the putty I used a small piece of rock, adding texture to all exposed areas of the groundwork.
Before the Milliput dried, I test fitted the models, making impressions with their feet for where they would stand. Again the models were removed whilst the groundwork was painted.
I used an overall coat of Burnt Umber oils to stain the Milliput, adding the same colour to the rock once it had been primed and undercoated with several coats of Orc Brown ( GW ) acrylic. The oil paint was wiped and abed off with an old T-shirt, leaving the dark brown paint in all the recesses.


Some small areas of Static Grass were added, fastening this in place with wood glue, then once dry, the whole base was treated to a light over-spray of Tamiya desert Sand acrylics The grass areas were painted in with washes of various Humbrol greens and a light drybrushing of Mars Yellow and Titanium White oils.
Finally the models were added and some pictures taken.
The third man
I’d come across the Fox Warrior figure that Quang had produced several years ago whilst rummaging around on my shelves for something completely unrelated to this project.
In my keenness to paint – I’d just got back from Euro Militaire 2005 – I thought it would be an excellent idea to add him onto the scene that I was building up.
So I did.
And that’s why he’s in one or two of the photos.
The problem is that he’s a completely different tribe, and from around 60 years earlier. So it’d be inaccurate for him to appear with the woman and child.
Which is a shame really, as I like the figure and the way he rounds out the composition.
Of course I didn’t notice the gaff. It was Quang who did, as we were discussing the model via e-mail. So I must extend my thanks to him for making me take a step back from the model to go back to checking references, before getting all enthusiastic just because I like a model.
That said, the Fox Warrior is a very nice model, and might appear in an article all his own in a future issue, you never know.
Summing up.
Quang is offering a nice model here. The assembly of the horse might be something for a more experienced modeller to tackle, but the work involved in getting the joints just right is certainly worth the effort for the look of the finished piece.


As with most mounted models, this is a project that will benefit from a fair amount of time spent on it, so don’t expect to complete it quickly. The model is certainly worthy of every effort to add decoration to the textile areas, and the only limit really is your ability to replicate the reference sources you have to hand.
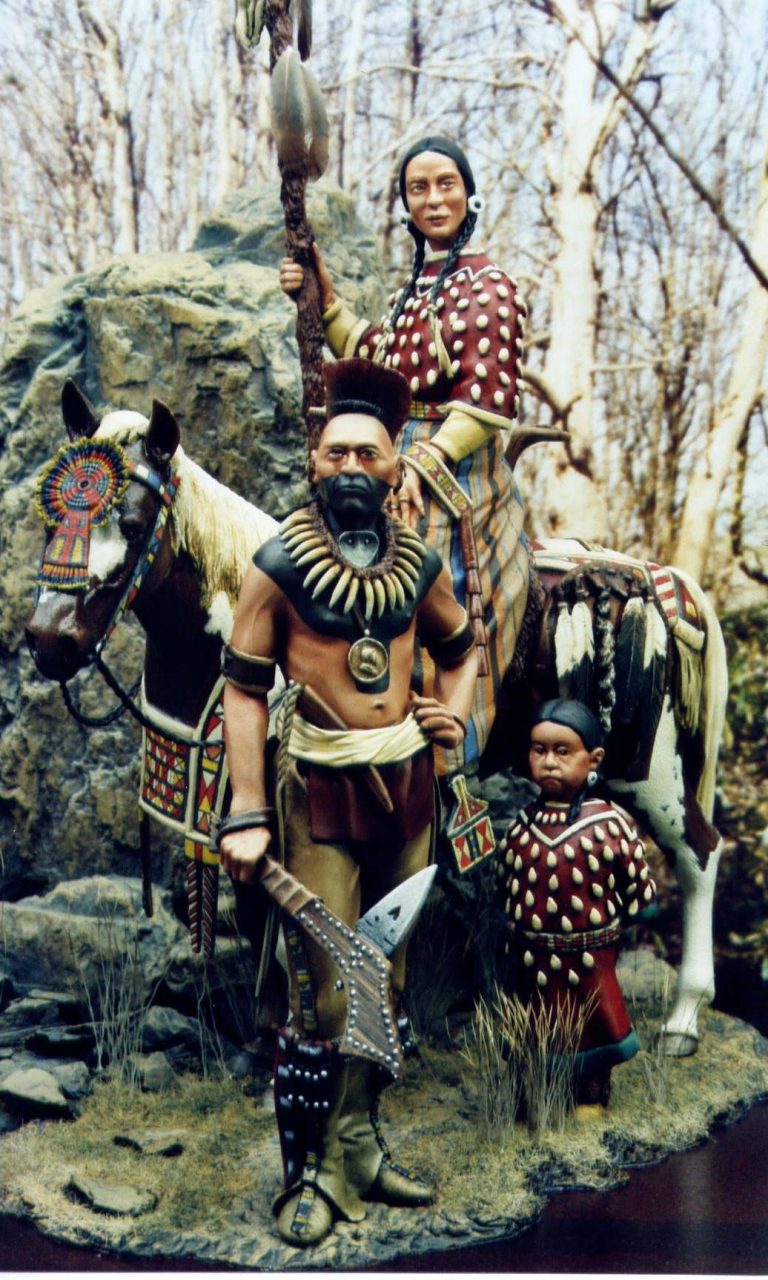
The whole point of modelling – well as far as I’m concerned – is to make something that might just fool the viewer into thinking that it’s a picture of a real person ( or persons in this case ) rather than a model.
That’s why I’ve included the picture of the trio of figures, inaccurate though it is historically, because I feel that it’s one shot that does fool the eye.
Whether you agree with me, and will allow the inaccuracy to slide just for that one picture – well that’s up to you. There’s always the chance that the models depict re-enactors at some gathering…..
Of course another option might be to change certain aspects of the Fox Warrior’s clothing and weaponry, to bring him into the correct time frame and location.
The boots, axe and headdress can easily be altered or swapped out. Hmmmm, makes you think.
I’d like to mention thanks here to Quang at Pilipili, for providing the kits for this article, and also some amount of help with references – thanks Quang.
References.
Crow Indians
The Native Americans – Salamander books – ISBN1-85501-765-2
The Language of the Robe – Robert W. Kapoun0-87905-911-0
The Art of James Bama – James Bama0-86713-015-6
The First Americans – Joshepha Sherman – ISBN1-880908-54-9
Crow Fairs
These sites give a background to the fairs, and might be of interest as there are several useful pictures showing clothing.
http://www.turtletrack.org/Issues00/Co08262000/CO_08262000_Crowfair.htm
http://lib.lbhc.cc.mt.us/about/crowfair/
We need your consent to load the translations
We use a third-party service to translate the website content that may collect data about your activity. Please review the details in the privacy policy and accept the service to view the translations.