Angelfish Flat sculpture
1:1 scale resin castings sculpted in 2023 for Bash Models by Adrian Hopwood
I’ve kept fish for most of the last forty eight years, my interest being primarily freshwater tropical, and I can only remember one period of about two years during that time when I didn’t have at least one fish tank in the house.
Some time ago I saw a flat casting of an angelfish, and it garnered quite a lot of attention, people didn’t seem to know who had produced it, if it was still available or where to get it from. It was a single fish, and it sparked an idea that at some point I’d maybe sculpt one for myself, and if there was time, produce a mould and some castings for if other people were wanting to have a go painting one themselves.

The idea – like so many of mine – went on the back burner, and it’s only at a point where I decided to semi retire, and as luck would have it, get a part time job in my local tropical fish supplier which got me thinking that maybe I should get some putty and have a go at sculpting an angelfish.
Sculpting a flat of any kind isn’t perhaps as easy as it should be, proportion and shape have to be right of course, but then there’s the forced perspective of a subject to be taken into account, and in this latter consideration I was on a bit of a winner in that the Angelfish is quite compressed laterally.

Photo #1 shows the sculpture beginning to take shape. I find it easiest to work from back to front, if you will, so areas that are furthest away from the viewer are sculpted first, building up to the sections that are closest to the viewer.
This can cause problems if you begin by putting the putty on too thick, something I’ve learned by trial and error, because starting with too thick a mass of putty can =then lead to the flat not being a flat at all.
To return to photo #1 then, the fins, which are the thinnest part of the fish, were added first. Initially I thought that having these completely flat and without any detail for the rays within the fin would be best, allowing the painter more control over how the fins were painted. Later on I changed this by adding detail to the fins, but again, this is a case of adapting as I go along.
There’s an extra piece of plasticard added between the fins on the underside of the fish.
The long thin ( pelvic or ventral fins ) would be very delicate if a casting was made of the fish if they were “free standing” so a thin “bridge” of resin would prevent them breaking, a bridge that could be cut away by the artist prior to painting.
Photo #2 shows the body having been added. The scales on an angelfish are very small and adding a light texture to the body was a better option that trying to sculpt thousands of tiny scales individually.
The steel rule at the side shows how large the flat is, and although a couple have people have mentioned “they don’t get that big” let me assure you that they do, and angelfish can grow to be over ten inches ( 250mm ) from the tip of the dorsal fin to the bottom of the anal fin, given the right conditions and space.
What a lot of people forget is that it’s much easier to transport young specimens, so the ones you see for sale are usually babies or at best juveniles that are going to get a lot bigger.
Back to the sculpture. It looks very basic doesn’t it. There is quite a bit of fine surface detail that isn’t showing up in the picture, but the scale texture is visible just in front of the dorsal fin, and towards the bottom of the body near the anal fin.
Making a mould and then taking a few castings was relatively easy, and here’s where options start being “offered”

Photo #3 shows two options of casting, the one on the left being in cream coloured resin, the one on the right being in clear resin. Clear resin is a particularly difficult medium to use, as the liquid has to be warm before mixing, the mould has to be warm before being used, and it’s best to allow the resin to cure for several hours in a warm place. When I’m talking about warm, I mean hotter than room temperature, and I use my drying cabinet for all of the above. Take the resin out quickly, mix it, take the mould out, pour and get rid of air bubbles, then replace everything in the drying cabinet – it’s a pain, and even then you can get white streaks in the resin.
Of course there’s other options too….
Because I used the thick plasticard as a backing for the sculpture, I could also allow resin to flood this and create a back for the angelfish, and for a little bit of extra interest, make the backing have a marble effect….. So that in fact it the casting I used for the painted example.


Photo #4 shows this marble backed casting part way though the process of being painted. There’s a lot of colour options of actual angelfish, and a quick look on Google will supply loads of photos of various real fish to use as inspiration.
I used a picture of one of my own fish - a marble angel - as inspiration for this scheme, shown in photo #5. It’s not supposed to be an exact copy, and even in fish sold as “Marble Angels” there is a lot of variation in the balance of colour between the black and silver / gold colouration.


Having got the body and anal fin painted, I moved on to the tail ( photo #6 ). There’s a lot of bands of colour within this and I found it easiest to break it down into a process of painting the tail in a very pale sand colour, adding longitudinal highlights with white, then whilst the paint is still wet ( because I was using oils ) I began semi-stippling vertical lines of black onto the tail.
Once these were done, I added horizontal lines of the black, and some highlights of white on the edges.
Photo #7 shows a close up of the face, the detail of the spotting within the marble colouration attempting to imitate highlights on separate scales, along with the rust colouration that a lot of Marble Angels display over the tip of the head can be better seen in this picture along with the red eye and it’s tiny catchlight around the pupil.


Probably the most difficult fin to paint – which is why I left it to last, was the dorsal fin – photo #8. There’s a lot of different markings going on within it, and I began by using the sand colour that I’d used on the tail as a starting point, then adding some dark grey to add in the darker areas, allowing this to fade out towards the tip of the fin.
Using an old brush I semi-stippled the horizontal bands of white across the forward / middle section, adding black in a similar manner to the lower back of the fin.
The end product is shown in photo #9, and the only bit that wasn’t painted, and is by the way completely random, is the marble background. This is produced by pouring a very small amount of black resin ( cream coloured resin with a few spots of black dye mixed in ) at the same time as pouring the main amount of cream coloured resin into the mould. The two colours hardly mix, and a random marble effect is produced.
The fun bit is ( perhaps worrying too ) is doing the pour and having to wait half an hour for the resin to cure before you find out what sort of effect has been produced, sometimes it’s superb, and sometimes….. well maybe less so.


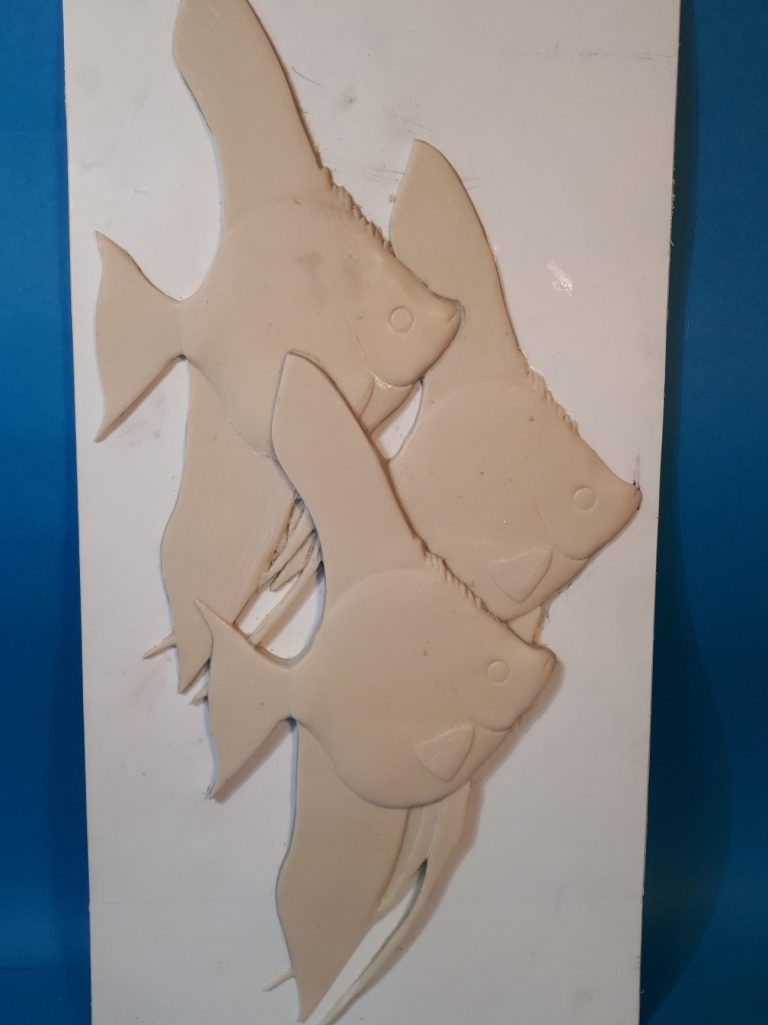
Now then, a single angelfish was really just copying someone else’s idea, and what I’d had in mind all along was something a little bit more adventurous – seen in photo #10 is a montage made of three of the single angelfish castings. This is what I had in mind as an end product, although it is a little larger that I’d planned.
Although it is three castings, because I’ve produced the initial single sculpture, this can also be termed as a master sculpture, as there is some cutting, filling etc in order to get it looking right. I had to remove sections of the middle fish to set the upper fish into the dorsal fin, and remove the tail and some of the ventral fins too.
Just like the single fish, there is the option to cast this in cream coloured or clear resin, and include the backing plate like the single fish I’ve painted in the first few pictures, or as in the case of the trio of fish, I chose to just cast the fish themselves.
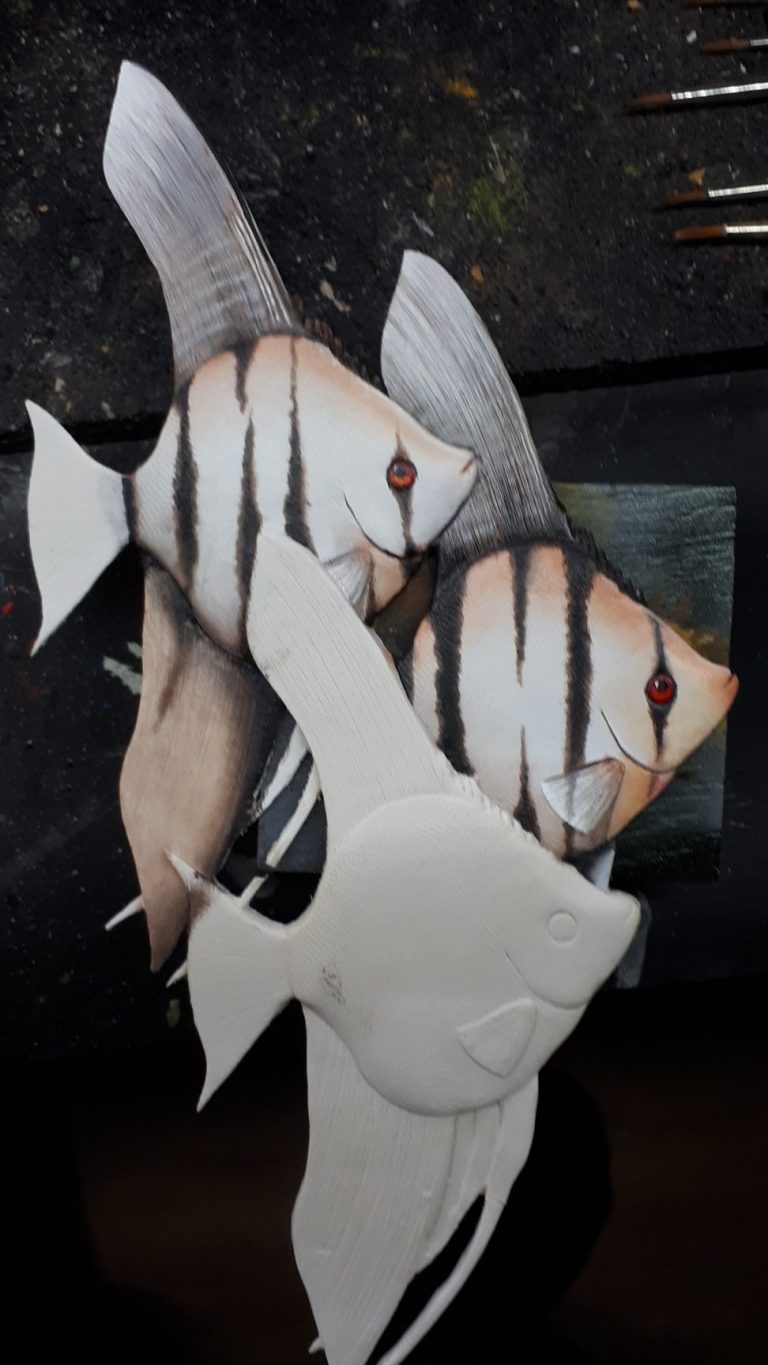
In photo #11 I’ve begun painting the first of the Angels, beginning with the middle fish as it is effectively the farthest away from the viewer. To make these a little different, I decided to paint them as clown angels, which would be similar to conventional silver angels – silver with dark brown or black vertical stripes – but the clown angels display a warmer pinkish grey colouration with the dark brown vertical stripes being broken up and not always travelling the whole height of the fish.
I began with an overall primer coat of very pale flesh coloured acrylics mixed with Isopropyl Alcohol, followed by two coats of the same colour but thinned down with some water.


Once this had all dried, I added a very pale flesh coloured oil, darkening this around the edges with very small amounts of Mars Brown. To produce the stripe running through the eye, I used some Burnt Umber oils, stippling these on to get a ragged and slightly broken edged finish.
Photo #12 shows a closer view of this, and the effect depicting the scale texture can be seen in this shot too.
In photo #13 I’ve finished the body with more of the dark coloured vertical stripes, fading the one that runs behind the pelvic fin for when I come to paint that part in later.
The eye has been added in too, painting the outer edge of the eye with the dark brown, then adding the bright red in the centre, with a little scarlet as a highlight. A black pupil was then painted on with a very small dot of white for the catchlight.
It’s very rare to get two angelfish with exactly the same markings.


Yes, generally they will be similar, but not exactly so, and with that in mind I began painting the topmost fish in photo #14, and whilst I used the same colours, the markings were slightly different for the vertical stripes. The dorsal fin was painted in a very similar manner to the one I did on the marble angel, the very pale vertical stripes being added at the leading edge with a fine brush, and the horizontal bands with a slightly darker paint that the main pale brown colouration, and using an older brush that the bristles had spread out on.
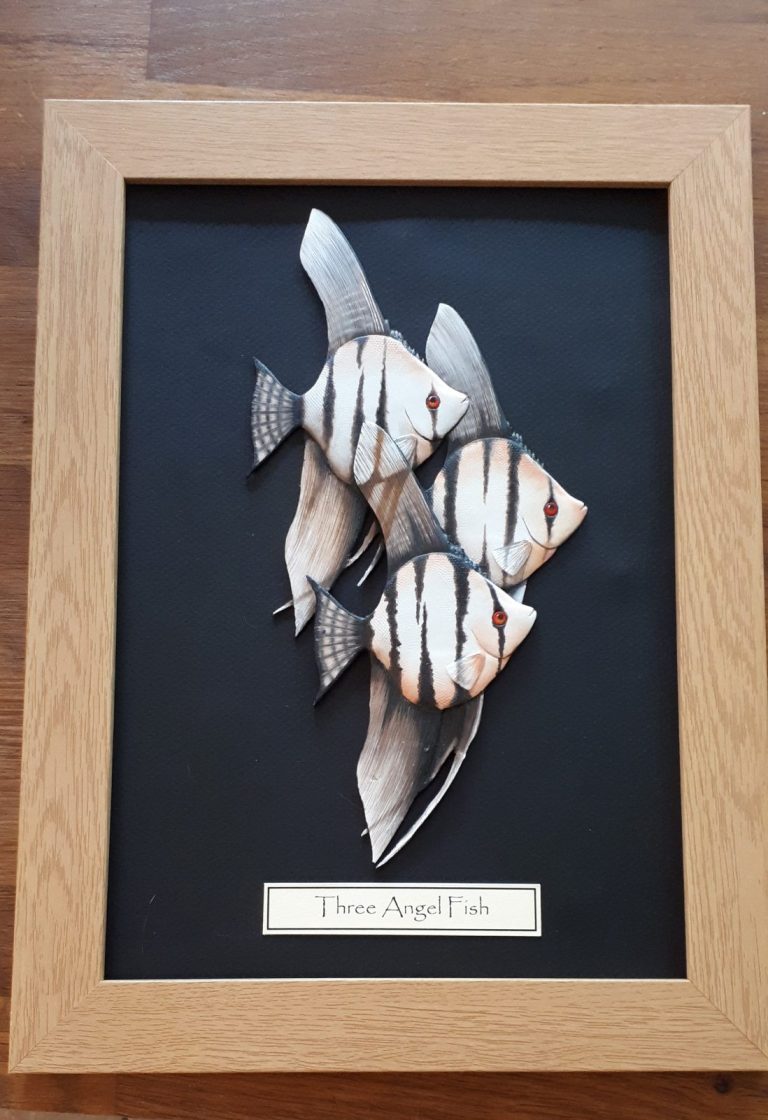
Photo #15 shows the two upper fish almost completed, and just the lower fish to do. I used the same paints, this time lightening the background pale flesh colour slightly but darkening the brown used for the stripes, although again changing the layout of the dark, vertical stripes from the other two fish.


To finish off the flat, I added a black background from some thick card, fitting this into a wood photo frame.
Whilst I appreciate that some flat painters use deeper frames and retain the glass over the front, a practice that protects the flat from dust and possible damage, it does cause havoc with anyone at a show that wants to take a photo of the piece. I prefer to use a conventional frame and take the glass out completely, yes it means I have to use a soft brush to dust the flats occasionally, but then again it makes it easier for them to have pictures taken of them. I guess it comes down to personal preference, and I see no problem with either display option.
The single and triple Angelfish flats are available as unpainted castings from Bash Models via Ebay seller ash0040, or you can contact me to place an order. Price varies between £9 to £16, depending on which item you prefer, and the type of resin used.
Click on these links to find different options –
Angel Fish Flat Figure | eBay – three angels
Angel Fish Flat Figure | eBay – single angel
Angel Fish Flat Figure with backing plate | eBay single angel with backing

We need your consent to load the translations
We use a third-party service to translate the website content that may collect data about your activity. Please review the details in the privacy policy and accept the service to view the translations.