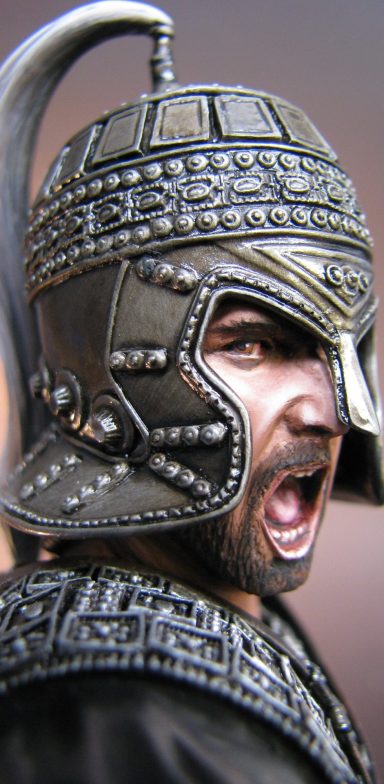

Hector
1/8th scale Resin bust from Young Miniatures
Article in Military Modelling magazine in 2005
Background
The fall of Troy was thought to be a legend, coming down to modern times and translated from a poem by the Greek writer Homer. Some might even say that Homer wasn’t one particular poet, but the name was an honorary one given to a particularly talented writer or orator in a similar way to which we have a Poet Laureate.

In fact until Heinrich Schliemann began excavations in 1871 in the area now thought to be the site of Troy, the Trojan Wars and fall of Troy were thought to be mere legend and the combination of various battles into a longwinded epic produced as entertainment for ancient society.
Schliemann developed archaeological techniques long before it became recognised as a science, and his finds of gold and other remains seemed to point towards his having found an ancient city, and one that had been destroyed almost completely in ancient times.
It would seem that the fall or Troy happened at that cusp where legend transsferred into true history, and that the heroes taking part in the conflict might have been real people, albeit their talents and actions being fortified for the artistic license of peorty and performance.
Even then, it might also be said that the consumers of the time – ancient Greeks – were a demanding and critical audience, and that whilst heroes and villains were aplenty, the plot twisting and turning; there might just have been a large grain of truth to have it all based on.
It’s proposed that the Fall of Troy took place approximately three centuries before Homer ( if he was a single person ) wrote the epic poems, and so, even then, fact might well have mutated somewhat by the basic story having been passed down by generations of storytellers.
Even so, over two thousand years later, it transfers to modern storytelling – that of the big screen – with little trouble, and when a Hollywood star or three don the swords and sandals, well, it gives a decent two and a half hours of entertainment.
And really, that’s all that Homer intended, isn’t it ?
That his audience be entertained.
I doubt that he was overly concerned about historical accuracy, stuck rigidly to timelines or worried that the descriptions of uniforms was absolutely bob on.


The model.
Young Miniatures have used the film “Troy” to hang two of their bust offerings around. Obviously the most popular one would be the Brad Pitt look-alike – after all, he’s the hero of the film, gets all the best shots in with a sword and generally does a good job all round of being the centre of the stage.
Erik Bana in his character of Hector, only gets to apear in about half of the film, and his is the troubled and flawed hero, out to protect his little brother Paris.
Whilst Pitt’s character is probably the memorable one, Bana’s is the one I prefer. It’s a little less flash, but there’s more humanity behind it, and that’s why I chose to buy this piece, rather than the Achilese bust.
I’ve berated myself into painting this – eventually – because I’ve got several of the Young Miniatures busts on the shelf, and never painted a one of them. They’re very well sculpted and cast, and I have no excuse for not having put one together before now.
Some parts do have rather large casting lugs on them, but all are placed to make cleaning relatively simple, and the resin used for casting is quite soft and easy to work with.
That’s not to say that I didn’t make a very minor alteration, but I’m getting ahead of myself as usual.
The kit comes in several pieces, the main casting of the shoulders, the interestingly shaped neck and face, and the helmet in three pieces – the main part of the helmet itself, the crown or top of the helmet and the horsehair plume.
Let’s start with photo #1. That is simply a shot of the helmet and main body roughed out with a wire connecting the two. Doing this allows me to see approximately where the shadows will be cast by the helmet, and also how tall the whole piece is – it then gives me something to think about regarding a plinth.


Photo #2 gives a closer look at the helmet, and I’ve removed the edge to the upper part of the crown section and replaced it with some fine lead wire. The joint in the wire is hidden with a smear of superglue, and I replaced the original area of this part because removal of the casting lug and subsequent sanding had put a slight flat on the lower edge of the beading. Gluing the top or crown of the helmet in place and then disguising the joint in this way, was relatively easy and made for a cleaner finish overall.
At the bottom of the picture – where the plume joins on to the edge of the helmet, you can just about see the strengthening wire I put from the plume and into the helmet to add strength to the area. The top of the plume – well it’s finial that joins onto the top of the helmet – is a tiny area for the glue to hold onto. The model is designed so that there is contact between the plume and the helmet at the point I’ve added the wire, but with this being one that I’ll probably take to shows and displays, I thought that the addition of some wire was a good idea.
The construction of busts is usually pretty straight forward. There’s not many parts as a rule, and you can choose to either glue everything together than add the paint, or keep sections of the kit apart and use adhesive in the final stages.
Either choice is O.K. it’s simply a case of what you prefer to do, or more exactly, what works best for you.
Having decided that, it’s then best to fasten the bust ( or the components of the bust ) to something so you can hold the model without touching the areas that have been painted. I use a selection of wood blocks ( ‘ve found that pieces of three by two ( three inch by two inch in section, or 75mm by 50mm for those much younger than me ) work for my ham fisted grip. Sawn to about 5 inches long ( 125mm ), they don’t tend to over-balance and are comfortable to hold for long periods of time.
They tend to get coated in splashes of paint, so they don’t look pretty; but they’re temporary and re-useable. However, I’ve seen the tops from aerosol cans, old paint bottles and all sorts of other things used – again, it’s a case of comfort, not aesthetics.
Once cleaned up, washed and dried off, the parts were all given a thin coat of an acrylic mixed with Isopropyl alcohol. This acts as a primer and seals the resin, whilst also giving a decent “key” for the undercoat to stick to.
Now to begin the armour.
Now to begin the armour.
In photo #3 I’ve undercoated the armour areas with a couple of layers of a dark brown acrylic, which is to be seen on the left as you look at the picture, and the wet looking area on the right is where I’ve begun to add the oil paints.
Initially I’m using a mix of Mars Black and Bronze Printers Inks ( I use the ones from El Greco ), and in this shot the paint has been put on rather heavily. The method is to get the paint on and owrked into all the detail, after which it can be removed and thinned down using a large brush and regularly wiping the brush on an old T-Shirt.
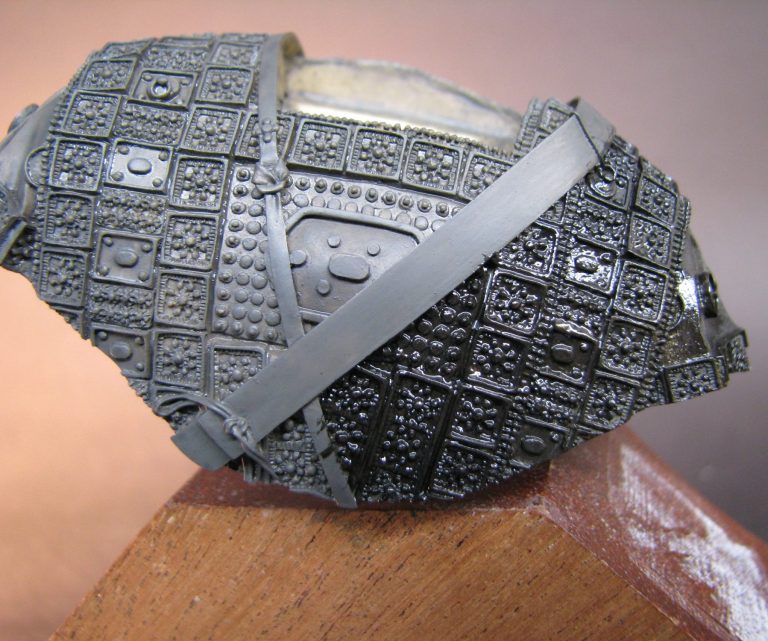

Photo # 4 shows something similar happening on the helmet, but in this shot I’ve taken off the excess paint and then added some lighter colours, working through pure Bronze and on to an Old Gold colour.
Once most of the deep shadow colour is removed, the method is simply a case of using a dry-brush technique ( get the colour on a large brush, wipe the brush until there’s not a lot of paint lef ton the bristles, and work the area in a downwards brushstroke, cleaning and recharging the brush with fresh paint on a regular basis ).
The lighter the touch of the brush, the slower the build-up of paint will be, and this can seem quite frustrating, but also the more subtle and gradual the change from light to dark will be too. And this subtlety is really what you’re after on a large scale piece like this.
Once the metallics are fully dry – and the printers inks need heat to do this, they won’t just dry over time, so you’ll need to put them in some form of container in an airing cupboard, on the top of a radiator that’s working ( a proper summer ruins both these ideas ) or have a purpose built drying cabinet…..or risk the oven at a low temperature setting.
Overnight on a hot radiator, a couple of days in the airing cupboard, the drying cabinet can be as simple as an old kitchen uint with a 40 watt lightbulb in it, and the oven setting I haven’t got right yet – under threat of my food tasting funny…….I’m not sure if that’s the paint that’s going to do that or my having to cook from the time of “ruining” the oven in my wife’s eyes.
Anyway, having got the bust dried, I’d then be adding some very dark shadows with somethinned down Mars Black oils. Thinners used – either White Spirit or Turpentine, and the paint down to the consistency of milk.
If you use a good brush for this, then you can do what the AFV guys call “spot washes” where you paint on very select areas of the model and allow the thinned paint to flow a little into the recessed detail. The more practice you get, the fancier you can become and you eventually get to the point where you’re picking out the detail by painting it there, rather than in the beginning where you’re hinting and suggesting where the shadow should be.

With the helmet, the drying stage is shown in photo #5, where the colour has evened out a lot and the deeper contrast has been knocked back quite a lot.
To counteract that, and to seal the inks completely, I add three coats of thinned Tamiya Smoke lacquer all over the area, and the effects of this can be seen in photo #6.
The shadows are back, although they will be deepened even further, and the metal now has a gloss effect.
I thin the Tamia lacquer with an equal amount of water, this stops it drying too fast and also prevents the second tha third coats attacking and lifting the previous applications.
Just one last thing about the shots of the helmet, and something that was bothering me right through the painting process – that mould line on the finial under the start of the plume. I began by trying to convincing myself that it wasn’t there, By the time there was more paint on and it wasn’t getting filled in ( or going away ) I sort of wished that it was going to be O.K. and it wouldn’t show up on the photos. And I carried on kidding myself almost all the way through.
It never works though, once you’ve seen a mould line, you might as well stop, remove it and try and either fix the paint that you ruined sorting it out, or just repaint the whole area.
Putting it off doesn’t work, and you’ll hate the model ‘til the end of time, because every time you look at it, that’s all you’ll be able to see……..And the further on you get with the painting, the more work fixing things there’ll be.
Yes, I left it almost to the end ( bad Adrian ! ), but then again, if I wanted an easy life, I’d probably do something else.

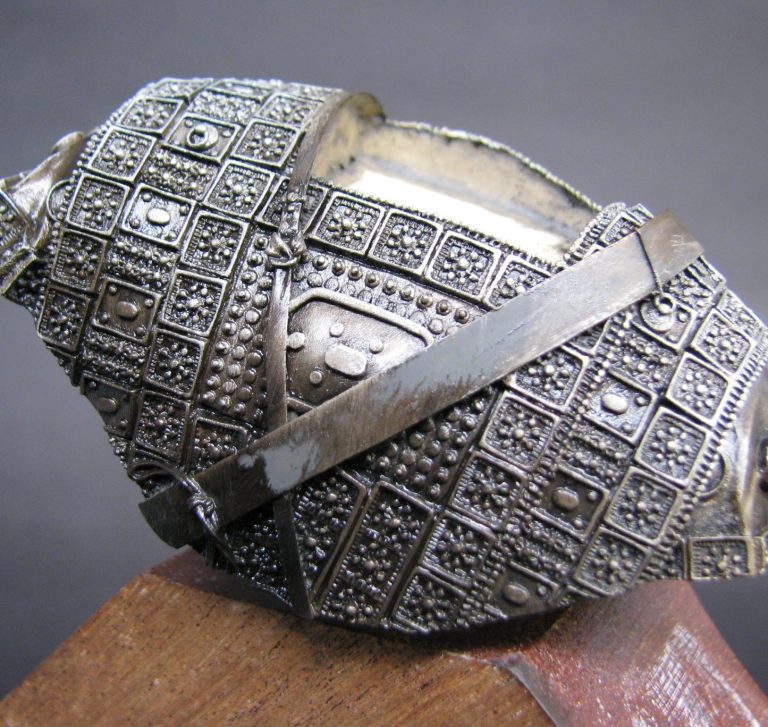
Photo #7 is back to the main casting, and although it’s not quite as obvious here as it is when looking at the finished piece, I’ve thought about the way the bust is going to be diplayed – canted at an angle so that the model’s right shoulder is much higher than the left. Also giving thought to how the contrast can be forced, I have painted the tops of the shoulders with a very light colour – almost silver in fact, whilst letting the lower areas of the bust, particularly the bottom right ( as you look at the picture ) have almost no mid-tone at all on it.
Right, here’s the theory behind that thinking.
If you look at the top of this part of the figure – helpfully supplied in photo #8 – then what you should see in theory ( overhead lighting rules applying, where the light is coming from a single overhead source like the sun at midday ), then all you should really see from this angle is light mid-tones through to brightest highlights. Some might say that you’d only see highlights and bright highlights, but then the contrast disappears a bit – my opinion on that one.
On the other hand, and I didn’t take a photo, because I know you’re intelligent enough not to need the example, but if you did look up at the model from beneath, then the opposite effect for the cntrast would be true, and all the colours you’d see would be mid-tones down to deep shadows.

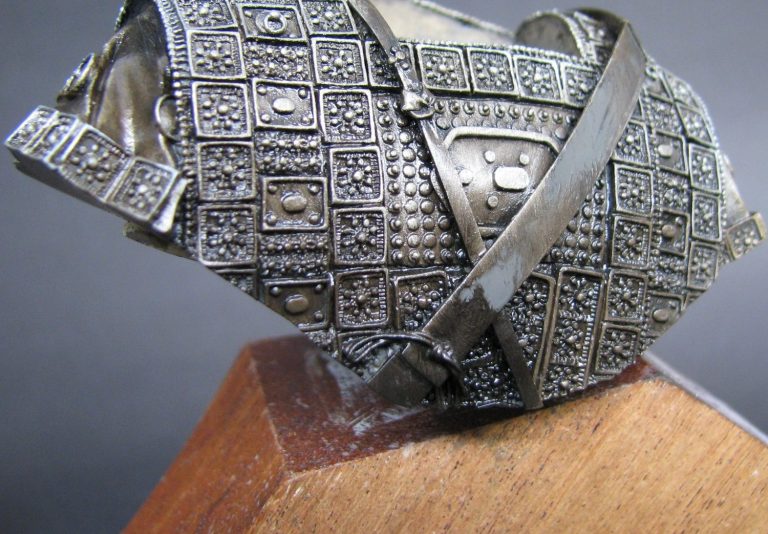
Photo #9 shows the bust having dried out, but prior to the addition of the deeper shadows.
Another point to make about painting – either with acrylics or oils – is that when a large area is completed, especially with a messy painter like me; a true view of the contrast and effects isn’t sometimes available until you clean up the areas by undercoating sections that should be a different colour.
An example of this is shown in photo #10, where I’ve re-primed and then undercoated the belts. I’ve re-primed them with the Isopropyl Alcohol so that the acrylic paint will stick to the dried oil colours, and then built up the solidity of the acrylics with several thin coats.
Looks different, huh ?
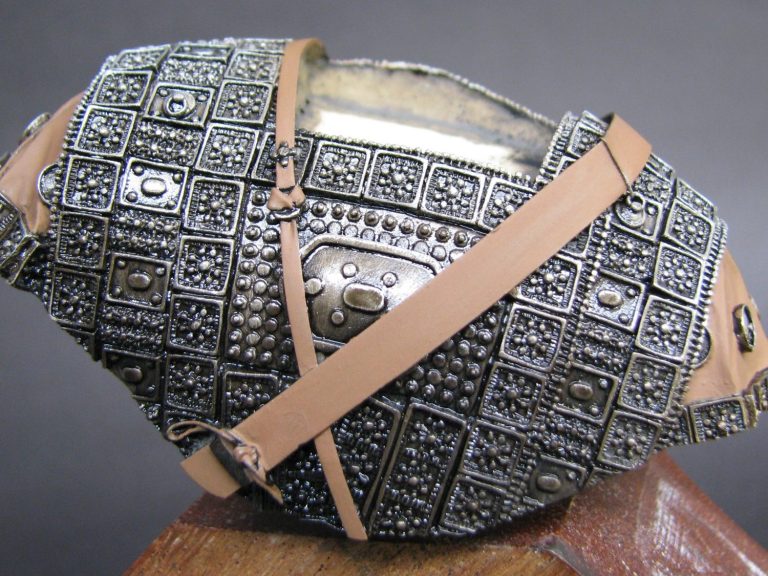

I’ve done the sleeves in a similar colour too – photo #11, and in photo #12 I’ve added the deepest shadow in the form of Mars Black to the lower edges and blended this up the chest a little so that the contrast isn’t too harsh.
The real problem here is taking pictures of wet paint, which is very unhelpful and allows nice shiny reflections that look like highights from any raised details. So unfortunately you’ll just have to take my word for what’s going on, plus perhaps glance at the photos of the finished piece……but come back to read this after you’ve had that quick glance…….come on, we’re waiting you know……


Right, the face. I’m not going to bore you with that – it’s my usual method, Mars brown and Titanium White etc, etc. It’s a separate article really.
But with the magic of article writing, it just pops up ready done in photo #13.
The likeness to Eric Bana is very good indeed, and this is where picking a well sculpted piece enhances any skill that the painter has.
Photo #14, just worth mentioning the eyes.
I’ve been experimenting again, and I think I’ve discovered something different to do to make the eyes look glossy. Having painted the eyes this time in my usual manner, I was a little bit impatient.
Normally, after establishing a pale gery acrylic colour for the eye ball, I’d paint the dark “U” shape of the iris, back this off with some highlight in a half “U” shape within that then add the black of the pupil; all done in oils, all done wet on wet.
I’d leave the above to dry overnight and then add the white catchlights afterwards with some Titanium White oils.
This time I was in too much of a rush and wanted to get the catchlight in. It went wrong, and I had to try and lift the spot of white oof the black pupil without disturbing the rest of the wet paint already there.
As it was, I managed to get the most of the white off, but in the process the black of the pupil turned a mid-grey within a black outline. I hadn’t noticed this until I took the photos, but the grey, added to the white catchlight added in the right place gives the illusion of the eyeball being wet.
I liked this so much that I went and altered the other eye, and didn’t add any varnish at all.

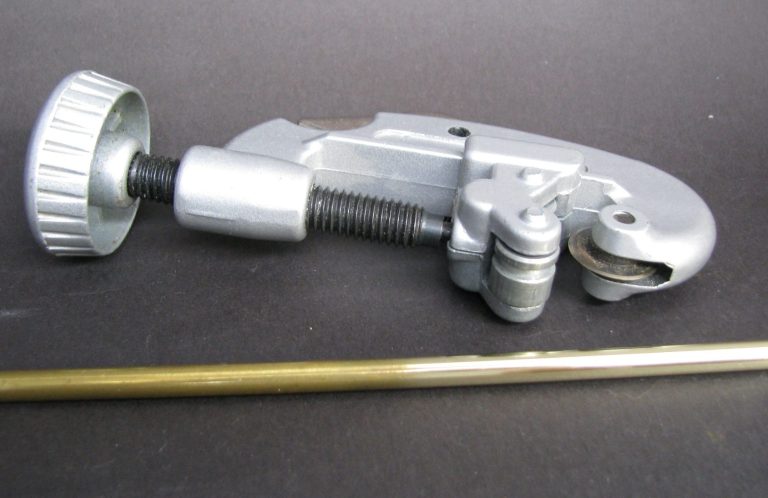
Displaying busts is something rarely touched on, and perhaps worth a mention for how I do this. Photo #16 shows a simple little tool for cutting pipes, and is excellent for the modeller for several reasons.
For a start they aren’t expensive – less than a tenner in a DIY store – they don’t tend to wear our, and finally they put a chamfer around the place that they’re cutting, that can be used in other ways – I’ll come to that.
They’re easy to use, just thread the pipe between the cutter blade and the two rollers opposite it and gently wind the tightening handle a little so that there's minimal pressure on the tube. Rotate the cutter round the pipe a few times until it becomes loose, then tighten the cutter again and repeat. Gradually the cutter slits the pipe without deforming it too much.
The small chamfer that the cutter puts on the pipe makes it easier to get into the hole that you’ve drilled into the plinth, and if you practice a bit, you can put decorative ribs around the tube by running the cutter round in one or two places, but without applying the necessary pressure to cut the tube – see photo #16 which shows two different effects.
The brass tube I use is polished up with a soft rag and some T-Cut car polish, then lacquered with some Tamiya Smoke.

Test fitting – ( photo #17 ) This is important, because paint adds a thickness onto the surface of the model components. It’s not much, but it can make a difference, and so test fitting parts if you paint in sub-assemblies like I do, is best done with just the parts and the pins and absolutely no glue.
If things still fit together, then take everything apart and add the glue.
That’s another point to make – glues are designed these days to travel within a joint to maximise the area that they are affecting. It’s a common thing, even on the show benches at Euro to find glue marks. It’s unsightly, hard to disguise and can ruin the chances of a competition piece.
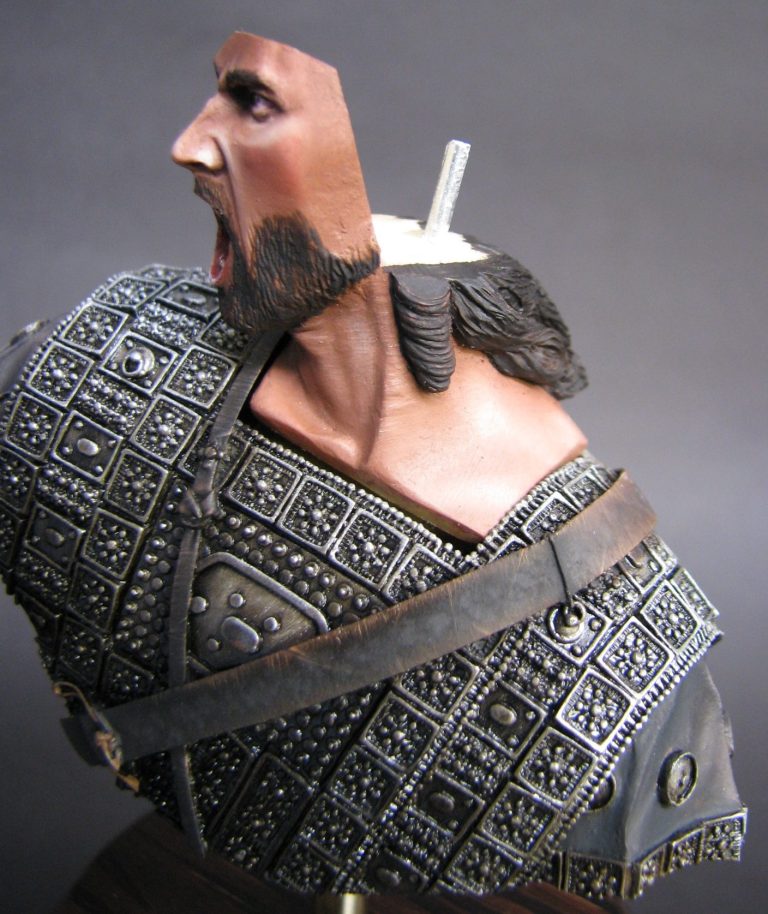

As a counter to this, I try to keep the glue to certain areas within each joint so that I minimise problems. In photo #18 I’ve added red marker to the area that I’d add glue to inside the helmet for where it contacts the back of the head. It will seep further, but at least it should still remain well away from any area that will be visible.
The photo is a bit fuzzy ( sorry about that ), btu it also shows the dark colour I’ve added to the inner edges of the helmet so that none of the pale resin is showing – again, it’s something that is simple to do now, but bleedin’ difficult once the glue’s gone hard.
Taking pictures……
Most digital cameras, heck half the modern phones we have, will take a decent picture. The only thing to do is to maximise the effect you are trying for, and that can be done with a couple of simple additions.
I’m lucky and have a whole room to myself for modelling – my wife says it’s peace of mind for her because she doesn’t have to clean the room. That allows me the space to set up for a section of table to take photos on. But this will work on the back of the kitchen worktop just as well as it does here.
The simple ingredients are:-
A backing card – from an art shop, A2 size and whatever colour you want. They’re about £1.50 or less, so you can play about with different colours.
Some Blu-tac to hold the card in place – again, it’s pretty cheap and also re-useable.
A tripod – look around car boot sales, you’ll pick one up for about £5 to £10. Check that they have the fastening for a camera though – a lot are missing and it’ll cost you extra for one in a camera shop.
An old clip-on light – 40w to 60w is plenty, and if it has a switch on it, even better.
Photo #19 shows the bust against a black backing card that seems to have a soft grey highlight glow on it.

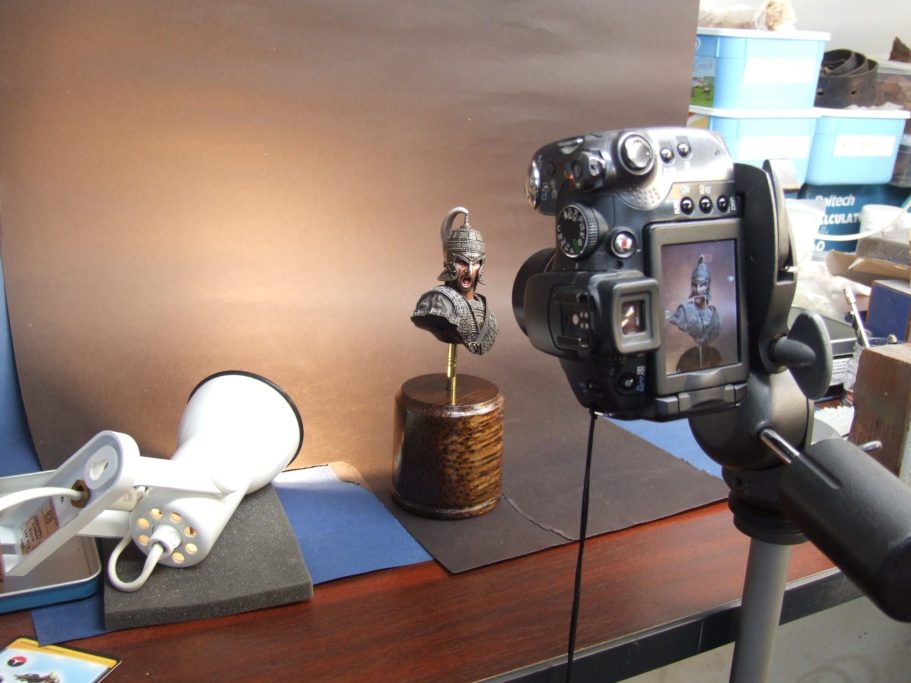
Photo #20 shows how that’s done, with the bust and camera in view, and the clip light laid down and pointing it’s beam on the backing card behint the model. The model MUST be in front of the light so that you don’t get false highlights appearing under areas that should be in shadow.
And hopefully, in the final shots of the model, that dreadful mould line has magically disappeared too – well, maybe not by magic, but it’s not there anymore to bother me.


We need your consent to load the translations
We use a third-party service to translate the website content that may collect data about your activity. Please review the details in the privacy policy and accept the service to view the translations.