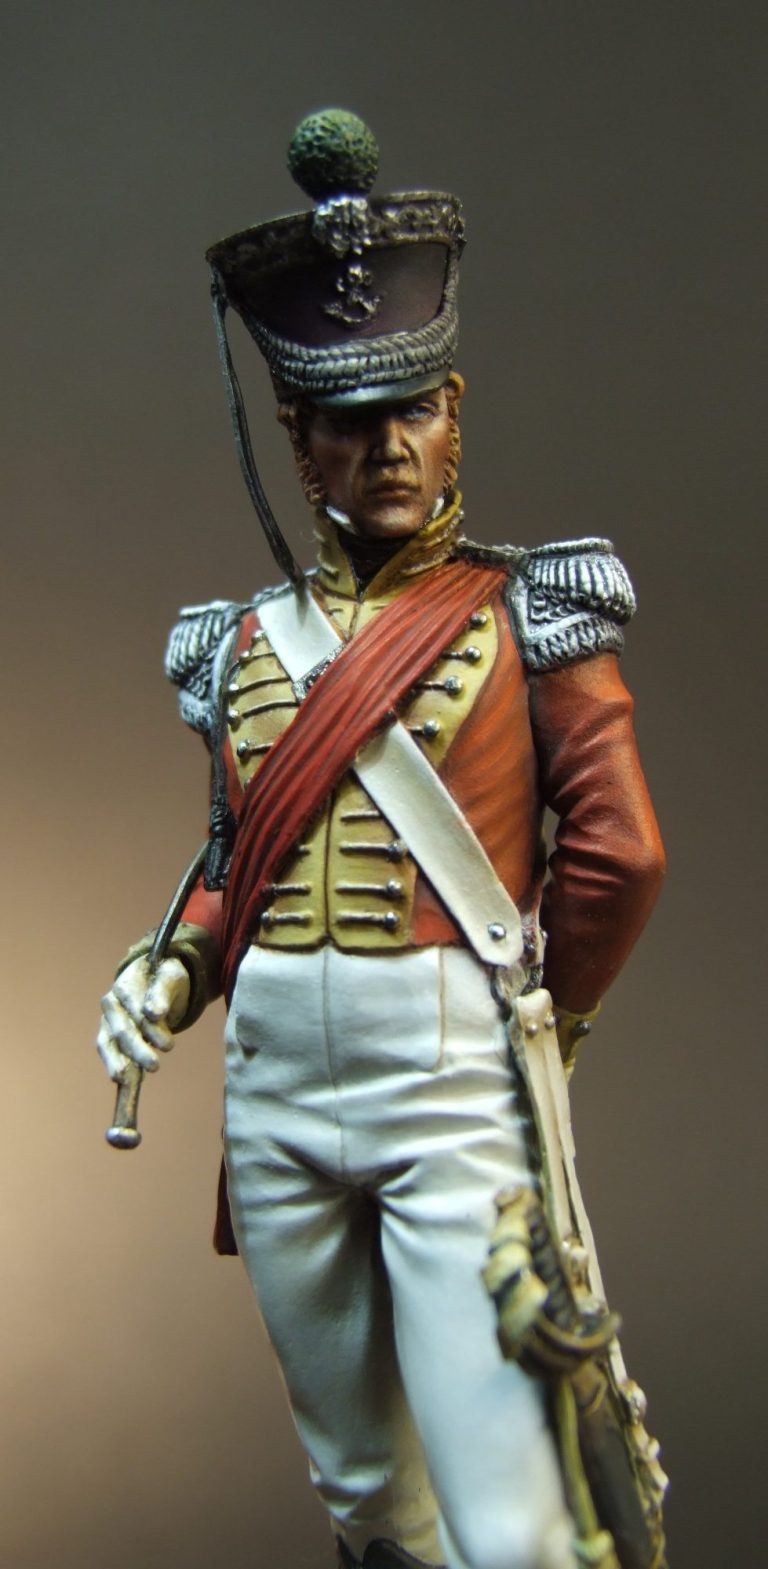

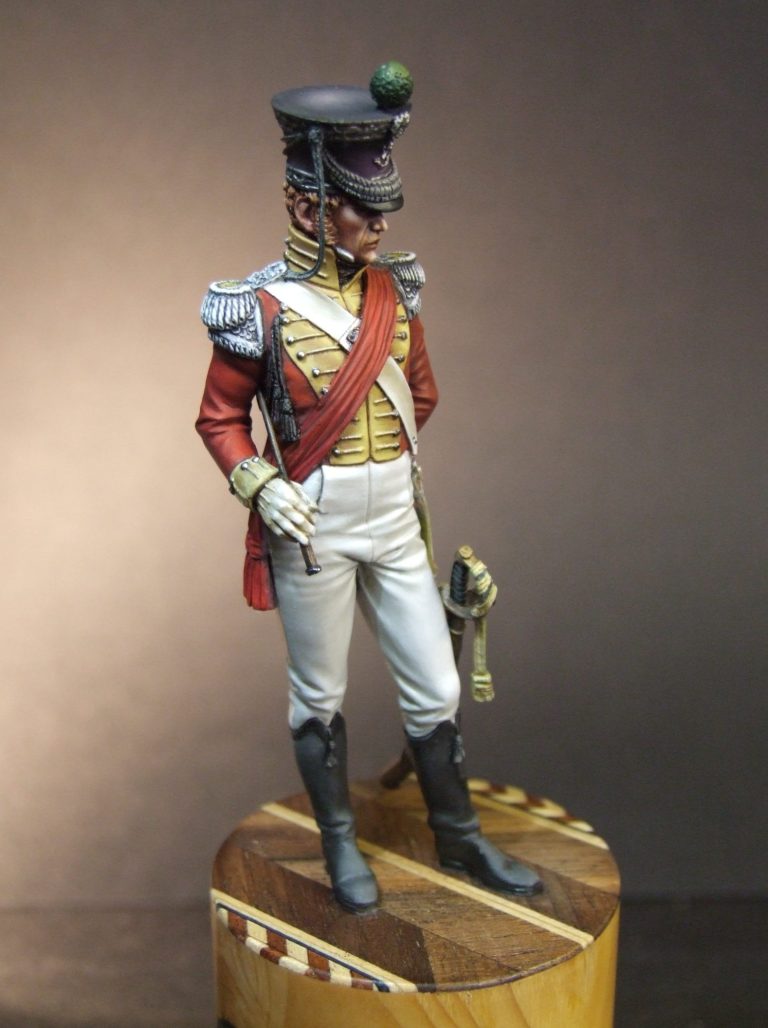
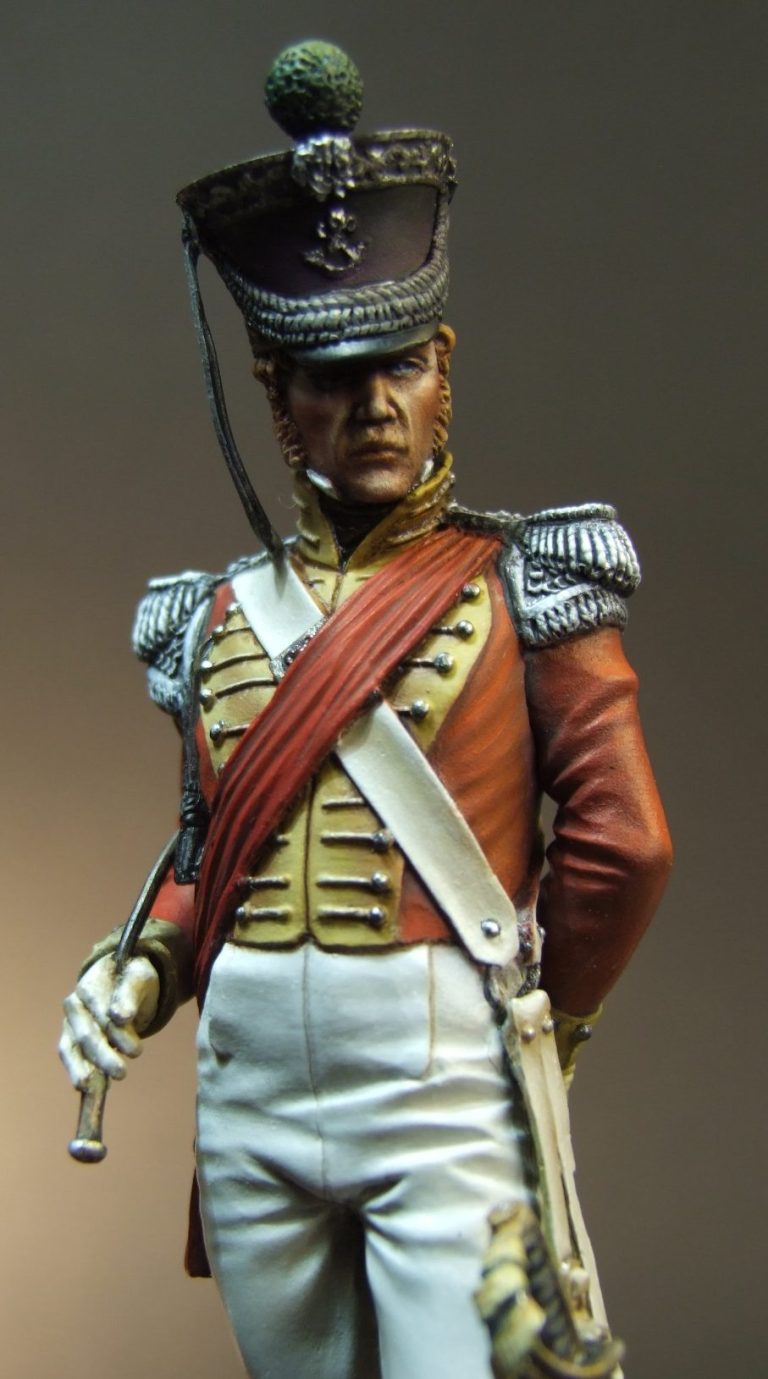
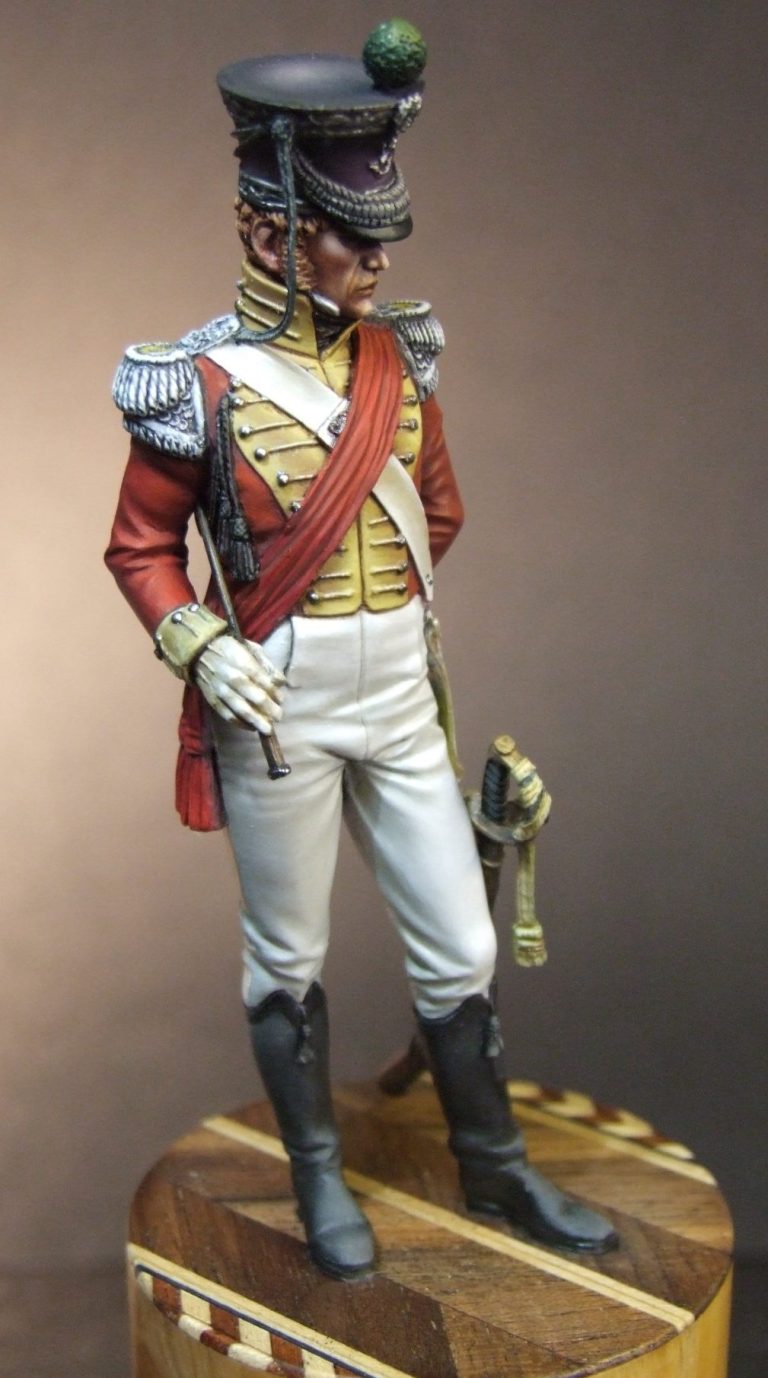
Pegaso’s 75mm Officer of the 75th Infantry Rgt ( Highland Light Infantry ) in white metal. (75-046 )
Sometimes you pick a figure simply because it looks good – the history doesn’t really feature as an interest, it’s the sculptor who’s dragged you in ( kicking and screaming possibly – well that’s what we tell our partners when we have to explain why another kit’s being added to the grey army ),
Article in Military Modelling Magazine in 2015

and it’s only when you begin to paint the piece that you start finding out that maybe this isn’t such a simple research project as you’d thought.
This kit’s a case in point because I’ve come across two different years for the formation of the 71st regiment ( 1777 according to Pegaso and 1775 variously on t’internet ).
Either way, the regiment was raised from the Scottish populace, taking in men from highland and lowland regions, and taking its base in the district of Paisley in Glasgow.
The regiment served some time in India in 1779, showing themselves to be a stout and effective group of fighting men under the command of Sir Eyre Coote.
A second battalion was raised, and they took part in the Siege of Gibraltar but were disbanded upon their return home in 1783, the original battalion continuing its service in India until the end of 1798.
Over the next few years, a second battalion was raised again. The 1st battalion being moved to South Africa in 1806 under Baird’s command, then being moved to South America where they were part of the disastrous campaign in Buenos Aires that ended in the surrender of the British forces.
From there they were shipped to Spain and were under the command of Sir John Moore until 1809. At this point they were allowed an adjustment to their uniform which took the form of being allowed the inclusion of elements of their Highland dress, so long as it didn’t interfere with regulations for the Light Infantry.
The 1st battalion served at Walcheron during the Peninsular Campaign ( 1810 – 1814 ) and were at the final conflict with Napoleon at Waterloo in 1815.
Continuing with their service to the crown, the 71st moved to Canada between 1825 and 1832.

Looking at the kit bits.
Really this is a marriage of perfection – Maurizio Bruno on the putty, Pegaso on the casting, to be honest, it’s figure modeller heaven.
So, expanding on that, the sculpting is very nicely handled. The pose is just haughty enough to make this chap officer material, and whilst it is a simple up-and-down study, there is no sign of a wooden stance. He’s just pausing before barking out an order.
Casting of the metal components – very little to catch you out, the part lines for the rubber moulds are in obvious and easy to access places, they’re very small and don’t take any effort to clean up. Fit of parts is good; the only filler I used was around the exit hole for the riding crop at the back of the right arm.
Presentation – a stout box with the signature Pegaso colours, a front and rear view of a painted example of the model and good backup to that with the potted history and painting suggestions – see photo #1 for the box art.
If I was to point at one flaw with the model, and it is only one, it’d be the split of parts regarding the head and main body casting. It would have made life for the painter a lot easier if the head was part of the main casting and the hat separate. As it is, the head and shako are one piece and attach to the main casting at the neck. The joint is seamless but the peak of the hat gets in the way of the brush…….I’ll tell you more about that later.
Painting the kit.
So here’s where it gets interesting, or I get a bit boring……
Y’see, I’m a little confused about the uniform. Pegaso provide a very good potted history and colour instructions, but surfing the internet and looking around, I seem to see various possibilities for uniform colouration.


The addition of plaid troos is one thing, diced red and white bands on a shako cover, and plenty of rank and file renditions of soldiers for this regiment - not much in the way of Officers uniforms, but you can’t have everything.
So, and this is where I got boring, because I liked the model just how it was, and having been enthused by seeing a couple of these already painted, I thought I’d just stick with the box art. Red jacket with the yellow facing down the front, white trousers, it looked pretty striking anyway.
So where to begin ?
I’ve moved away from painting faces first recently, I haven’t a clue why, there’s not really a reason for it, I just seem to get caught up in other areas of the model – this one being a case in point where I began with the main casting – see photo #2 – yes, I know, I‘ve got quite a bit done here, but I’ll explain.
The arms pretty much foul large areas of the jacket making it a difficult prospect to paint if you join everything together prior to getting brushes wet. However, if ( and here’s me taking a risk ), if the arms don’t fit pretty much seamlessly, then painting things separately will make for a nightmare of filling and retouching paint.
So I risked it hoping that Maurizio is every bit as good as I’ve made him out to be ( he is……… and then some actually ). So, having said all that, what paints was I considering using ?
Well, for the red of the jacket and sash I decided upon oils, the depth and richness of colour with the oils is difficult to beat, although getting the oils to dry matt is a whole other problem. For the lighter colours – white of the belts, very pale linen / white of the trousers and the yellow jacket front – I would use acrylics.
Photo #3. This shows four of the colours that I’d use to make the red colours. Working from left to right, the colours are Indian Red, Carmine, Crimson and Purple Madder Alizarin.
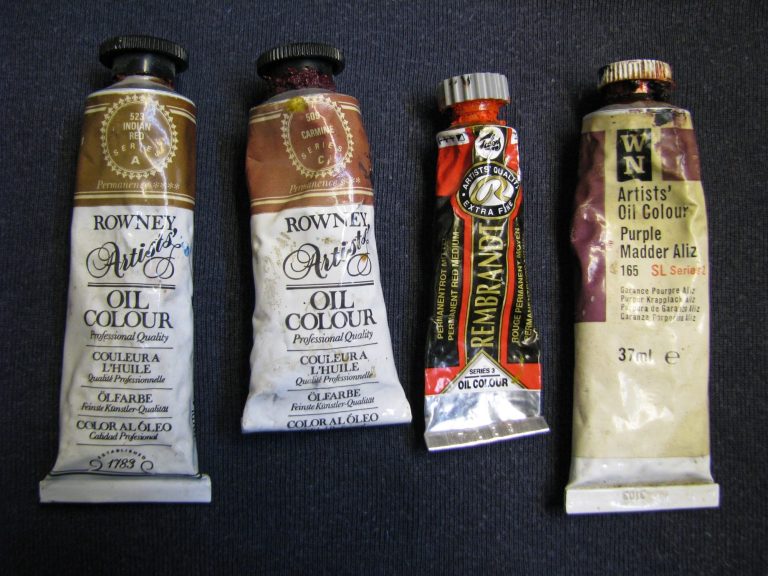

To see what the colour actually look like I’ve done a draw-down in photo #3 on some white card. This serves three purposes, you get to see what the colours look like rather than the printed colour that they’re supposed to be on the outside of the tube, you get to see the density of the pigment and how each colour will cover underlying areas ( or not ) and also just how little oil carrier has remained in the paint – bearing in mind that the purple is around twenty years old, the crimson is about ten, and the carmine and the Indian red are both about six.
Working from this, it’s obvious that the Indian red is the densest and driest of the paints, and the crimson the oiliest. The Carmine is about the most transparent.
All of this then will affect how the paints are used. The Indian Red for instance will overpower any of the other colours unless used very sparingly. The Crimson will give the nicest gloss finish………which is exactly what I don’t want, and the Carmine, whilst probably the colour that I want to use as the mid-tone, is so weak and ineffectual, that I’ll have to use a lot of it compared to the other colours.
So, how to counter the gloss of the oils ?
Simply put, it’s down to doing everything possible and practical to get rid of the carrier medium.
Firstly a good undercoat ( preferably several thin layers ) will help soak up oils. I use acrylics to undercoat the areas, and apply a colour similar to how the area will finish up – in the case of the red colour here I chose Mechrite Red from the Games Workshop primer colours. It’s a dense paint even when thinned with water, and three coats of this will give a good solid coat for the oils to lie on.
A little trick is to add just a spot of Tamiya Flat Base to the last coat of the acrylic. This makes the red colour go pink ( see the arms in photo #12 ) but that’s of little matter. The matt acrylics absorb the oils a lot better than if they were a silk or gloss finish.
The second trick is to put get rid of as much of the carrier medium as possible - if you get a pool of clear-ish liquid at the top of the tube or surrounding the paint as you squeeze it onto the pallet, then there’s way too much carrier in the paint. To get rid of this squeeze out the amount of paint needed from any suspect tubes onto small sections of card – I use cut up pieces of paper plates, the card is absorbent enough to leech out the carrier fluid, but don’t use the wax covered plates, just the really cheap card ones.
Leave the paint for half an hour and you’ll return to find a tidemark of the absorbed carrier surrounding the paint.
Finally, have a warm place to dry the model once it’s painted. The heat of an airing cupboard ( if people still have such things ) is ideal, a metal plate on top of a double radiator or a drying box made from an old cupboard and a low wattage light bulb ( 40w maximum ) will all do the trick. In the case of the airing cupboard and the metal plate on the radiator, the model needs to be in a box so that it doesn’t get covered in dust as the paint dries.
Finally – yes this will be the fourth tip, and I said there were only three, so consider this extremely good value for money, don’t pile the paint on. The undercoat ( even if it’s pink like it is here ) will do most of the work, all you need is enough paint to cover the area evenly and a little bit extra so you can mix highlight, mid-tone and shadow colours on the model. If there are brush-marks visible, then there’s simply too much paint on the model.
So, let’s go back to photo #4
The acrylics used on the yellow areas are all Games Workshop, and starting off from a good dense undercoat of Iyandan Darksun ( look, it’s a sand brown for us plebs ), I added a darker colour mixed from Calthan Brown and Iyandan Darksun. With a decent covering of this over the whole area I then added more of the Iyandan Darksun to lighten the mix gradually, adding water in as well to thin the mixture so that I could build up layers of the lighter paint very gradually. More Iyandan Darksun was added to the point where it seemed that there was no trace of the Calthan Brown, and that was the point that I began adding Skull White so I could bring in highlights to the outer and upper edges of the area.
Painting with acrylics is usually slower than with oils, but I find it gives me a smoother effect than using oils when I’m dealing with light colours.

Whilst I was working on the front of the jacket, I used the same colours to paint the collar as well.
With that all done, I could start painting the main areas of the jacket.
I began by making a mix of the Indian Red with a small amount of the purple Madder Alizarin. The purple isn’t very dense, so there’s little chance that it will overpower the much denser pigments in the Indian Red. Even so, it’s a case of adding a small spot at a time and mixing the colours together. I added some White Spirit to the mix – to thin the paint down and make it easier to get it to cover the areas I was working on.
I find it easiest to work in small sections, letting the sculpted detail on the model make natural breaks for me to use as boundaries. For example it was easy to paint the section around the right shoulder that is surrounded by the thin cord that loops around that area. Then the section beyond that which is has a boundary formed by the sash and part of the cross-belt. When you start looking at the model, it’s easy to see that rather than a large section of red, the jacket is split up into lots of little sections, all of which are painted separately, and because the oils can remain workable on the palette for a couple of days in cool conditions ( yes, possibly putting the palette in the fridge when not in use ), then the jacket can be rendered over the course of a week if you only have short periods of time to paint in.
So, having painted a section with the thinned Indian Red / Purple mix, I use a soft brush to stipple the area to take off excess paint and to even out how the paint covers the area. Then I can add small spots of Indian Red, stippling this in to the surrounding paint.

To build up the highlights I use the Crimson paint, again adding very small amounts to the areas that I want to bring forward, and blending them with the surrounding paint so that the change in colour is gradual and there aren’t any harsh lines of change.
I was tempted to make very small additions of orange at this point to make the highlights even brighter, but restrained myself, thinking that I’d let the paint dry and see what the whole jacket looked like – there’s tricks that can be used to add paint afterwards to make highlights a lot brighter if necessary.
All the above has taken place by the time you’re seeing photos #4, #5, #6 and #7.
However I can show you the changes in colour as I go through the painting of the sash.
I used similar colours the other above method, substituting Carmine instead of the Indian Red. The Indian Red tends to dry very matt, whereas I want ed a s light sheen to the sash. The Carmine is nowhere near as strong as the Indian Red, so colour change tends to be more gradual.
Photo #5 shows how the sash section across the figure’s back has been painted in the initial thinned dark red mix, the tassels aren’t painted as yet, so you can see how close the undercoat is to the final colour.
Photo #6 shows the Carmine having been added from the top of the shoulder to around the middle of the back, and also the Crimson added to bring in the highlights from the top of the shoulder to just past the area where the shoulder blade would be.
In photo #7 I’ve moved around the model to the front, and this again shows the gradual change in colour from the dark red mix through just Carmine being built up and on to the highlight of Crimson.
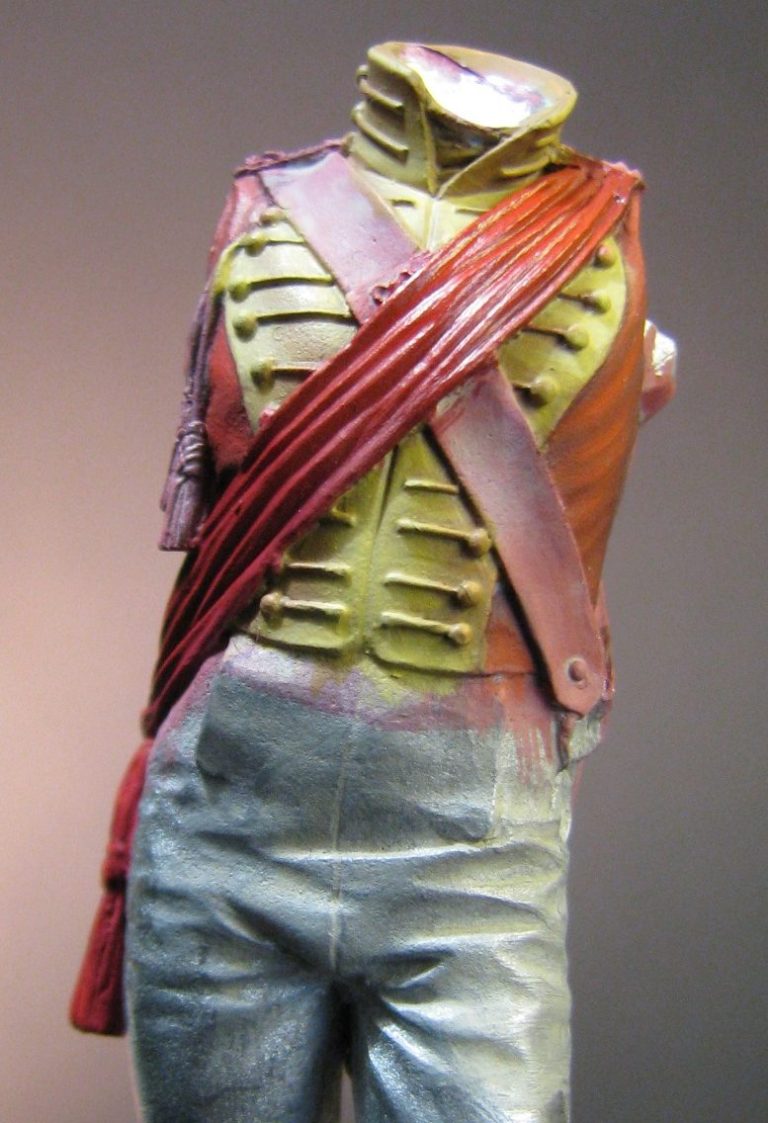

The close up shot in photo #8 shows that some shadow areas are left in the deepest creases at the top of the shoulder. These will be blended out a little bit more, but although they’re slightly inaccurate, they need to stay in as they add depth to the area.
As I mentioned, with the paint’s still wet the colour change from light to dark is somewhat difficult to see, however in photo #9 the model has been dried fully and the gradual colour change is a lot more visible.


I’ve painted in the cross-belt in photo #9 too. As with all the areas of light colour on this model, I used acrylics, and for the cross belt I began with a mix of Kommando Khaki ( Yes, it’s a Games Workshop colour ) mixed with a little Skull White and a very small touch of Iyandan Darksun.
I built this up into a solid colour over the course of several thin coats. One tip here for people using acrylics over the top of oil colours ( because if you’re like me you’ll get some of the oils onto the surrounding areas that eventually require acrylics painting onto them ), by adding a small amount of Isopropyl alcohol to the initial coat of acrylic, it seems to cover the oil paints rather than “beading” on the oily surface. Subsequent coats of acrylic can be mixed with water, it’s just a case of creating that initial barrier between oils and acrylics that the Isopropyl facilitates.
To gradually lighten the colour, which was a dark shade of ivory, I added more of the Skull White, thinning the paint with a lot of water, and working from the edges to the top of the shoulder at front and back. The theory I used was that edges would be slightly lighter as too would the upper areas as the belt passes over the top of the body.
I allowed small imperfections to form in the paint to depict minor damage and create interest to what could easily be a flat and relatively boring are of the more, but erred on the subtle side, so that it didn’t simply seem to be bad blending on the painter’s part.
Photo #10 shows the back of the model at this stage, the red areas having matted down very nicely, and the deeper shadows have been added with some of the Purple Madder Alizarin, thinned down and added specifically to the areas of deeply recessed detail.


The model still lacks it’s arms, which leads me nicely onto photo #11 – pink !!!!
Yes, it shows the difference between the undercoat and the finished colours of the jacket, but also just how matt the acrylic paint is with the addition of the Tamiya Flat Base.
The same colours were used to paint the arms as on the jacket, trying to have the same gradual changes and same colour hues so that it matched the colours used on the main body of the piece.
That’s not quite as easy as it sounds, as I was working with wet, shiny paint and trying to match to colour mixes that were fully dry and matt. Anyway, I got there without too much drama.
Photo #12 shows the back of the model, again with those nice pink arms still. It also shows how the colour alters the impression of size, in that the figure’s right arm in particular appears to be oversized and quite chubby; once the colours match though it reduces to fit in properly, a case of optical illusion.


Moving further down the figure, photo #13 shows the beginning of the trousers. It’s difficult to demonstrate the painting and gradual changes in colour when working with lighter shades, so I’ll hopefully give you the gist of what’s happening here and you’ll be able to see what I’m pointing to in the photos.
As I say, Photo #13 shows the initial coats of a pale ivory colour mixed from some of the Calthan Brown, a little bit of the Iyandan Darksun and some of the Skull White. This actually appears darker in real life than it does under the lighting I used to take the photos – a yellow brown that is a fair stab at a dark ivory.
The main point here is to make plenty of that initial colour, because mixing it up again is going to be a nightmare. Not impossible, but it will be time consuming and a pain in the neck. So I made plenty - enough to do for three or four coats, and then a bit extra.
Once I’d got a solid coverage of this first colour – the four coats were necessary – I could begin adding small amounts of the white to the mix ( along with some water to thin the mix down substantially ) and start building up the mid-tones.
In photo #14 you can possibly see this happening as layer upon layer of the very heavily thinned paint is built up. Possibly the best area to see this is the section just over the stomach. As you can see the edges of the pockets and the upper sections of each fold has become lighter,


Possibly it’s not as obvious as when using darker colours, but there is quite a colour difference when you can actually pick up the model and turn it round, but hopefully you can see the lighter paint taking effect in photos #15 and #16 as I added more white to the mix and added four or five coats to the sections I wanted to lighten, then a little more white and some water to keep the paint mix thinned down, and a further five or so coats, working on areas of ever decreasing size – almost like forming the rising altitude of land as depicted on a contour map.
In both the above shots you can see that I’ve also added the epaulettes, the buttons and the cords at the shoulder. The epaulettes have been painted with varying shades of grey acrylic with final highlights in white and then a thin wash of a metallic silver added to give the sparkle that the metal threads added into such items. I painted the upper areas with a couple of washes of yellow ochre and then added a thinned wash of gold acrylic to that area to have the same effect.
The buttons and buckles were painted with metallic colours, using the Dark Star Miniatures range. I’ve found these to be very good and there are enough colours covered in the range that I tend not to have to mix anything up, but can be lazy and just use them straight from the bottle after adding a little bit of water to the paint laid out on the palette.
Beginning with the very darkest of the silver colours, I could then work my way through a mid-tone and on to a highlight so that the buttons appeared to be polished.
The cords are of a dark braid, and for these I began by using a black acrylic, lightening it with a little Kommando Khaki to pick out the separate lines of the cords, then adding a lot more of the khaki colour and using a very thin brush to paint cross hatch lines down each thread to make it appear as though the braid was in fact a twist of several “threads” This took a bit of time to do, and by adding the Kommando Khaki all on it’s own to selected sections of the cord where it would catch the most light, I could emphasize both the twisted make-up of the cords along with carrying through the overhead lighting technique from the rest of the model.
In photo #16 you can see a view of the back of the figure, of note here are the gloves that have been painted in a very similar set of colours to the cross-belt. Also of note is the massive ( well it looks like that in this picture ) gap between the body and the right arm. This would partly be filled by the tail end of the riding crop, but also once that was glued in position I’d have to add a little bit of putty and then match up the red paint to that of the rest of the jacket.


I’ve added the colours to the shako in photo #17 and also the hair. Being as the subject is of Scottish extraction I couldn’t resist hedging towards a red-headed subject. The shadows being from Mars Brown and then gradually working through Light Red and Mars Yellow to some very small points of Titanium White – all oil colours so that I could wet-blend them and make the hair seem less solid.
The shako was painted with some mid-grey and then the body of the piece treated to some Purple Madder Alizarin mixed with some Payne’s Grey and then gently adding some Titanium White to lighten the areas towards the middle and bottom of the shako. The upper and lower decorative bands were painted like the epaulettes, but leaving them a lot darker and also adding Mars Black to help pick out the details after the acrylics had fully dried.
The top of the shako is painted with Mars Black and then some Buff Titanium used to create a slight highlight in the centre of the upper surface.
The eyes……I left these for some time to be honest, as the peak of the shako fouls them quite badly as far as getting a brush to them is concerned. I tried my best to define the white of the eye using some Buff Titanium mixed with a small amount of Prussian Blue and some titanium White – an oyster colour is the best I can liken it to – and then let this dry fully before marking the iris and pupil in. It took a couple of tries to get the eyes even ( photo #18 ), and it was easiest to have him looking off to one side, getting the white catchlight in was much more fun than I can mention and I might have blasphemed a little……only a little, and no fluffy animals were harmed either.


Before painting the boots and adding him to a base, I had to decide upon how I was going to display him.
I’ve wanted to do a figure that wasn’t standing on grass or mud for some time now – something more civilised - like on a carpet or a wood floor, and this piece just seemed to be “the one” for that hallway or dining room setting.
I’d been given some wood veneers by Conrad Mynett a few years ago – the kind of thing that I suppose is used by dolls house makers on very high end pieces, and I thought that by combining two different pieces, pairing them so that they created the centre of a parquet floor section, then it might just work. I also had a very nice little turned base made for me by the master of such things Nick Tebbs, who’s bases are so good, they tend to stay on a shelf until you’ve got something really nice to put on them, and then you have doubts about whether you’ve really painted something worthy of his skills with the wood…….I think I’ve defaced his base by adding my figure to be honest.
Anyway, with the parquet section glued to the top of the plinth, then the figure drilled and pinned in place I could admire the lovely gaps between feet and floor. It wasn’t much, but they were there.
I knew that this would happen as I’d be very unlikely to get both feet flat, level and the figure upright , so I was expecting having to add a little bit of filler. This was done and then I could add paint to the boots afterwards.
The final shots show the model fully painted. I admit that the upper line of the boots isn’t quite straight on the back of the left leg, I need to go back and correct that, and in hindsight I should have used a scalpel during the clean-up stage to define the line between boot top and trouser a little better. As it is the line between the two is a bit soft and rounded, and the brush, no matter how steady the hand, tends to want to wander like a drunk.
Oh, and cleaning up the soles of the boots to flatten them off saw me getting a few war wounds from the scalpel, there’s a couple of substantial locating lugs to carve off in a situation like this, and it’s easy to slip – so if you’re doing something similar, remember to be careful and cut away from yourself please.


The sword in its scabbard is the final addition, this being painted not to represent a nice shiny parade ground example, but one that’s been out in the rain on a battlefield once or twice recently, and has gotten a bit used. Again I made use of the Dark Star Miniatures range of acrylics for the metallic areas, and oils for the black leather with some Buff Titanium to add the highlights.
So that’s him finished.
I don’t do Napoleonic’s, I don’t do WWII or WWI subjects – just not my bag at all – would seem to be the call I’ve made for the last ten or twenty years, and yet the last eighteen months or two years have seen me repeatedly prove myself wrong with that statement.
The truth is that I’m a sucker for a nicely sculpted piece and to be honest Maurizio Bruno’s a master at form, pose and drapery. This one ( apart from that Shako peak problem ) was a joy to paint and to be honest is a joy to look at in the cabinet.
It gave me the chance to play about with oils and acrylics to get the best out of both mediums, and also produce a figure on a restrained, simple but eye-catching base.
An enjoyable experience from Pegaso – what more can I say.

We need your consent to load the translations
We use a third-party service to translate the website content that may collect data about your activity. Please review the details in the privacy policy and accept the service to view the translations.