Hussite Handgunner 1486
110mm White Metal kit from White Models
Article in Military Modelling magazine 1999
When approached by Ken Jones and asked to do "Something special for the
Special Issue on figures" I had the opportunity ( and excuse ) to do something I'd wanted for a long time. I'd seen this kit in the blur and hubbub that was Euro Militaire 1998, one painted by a friend of mine ( Phil May ) and displayed on the Figureworks stand, and a flashing glimpse at another one on White Models own trade stand which I assume to have been painted by Stefano Borin, the chap who sculpted the model.

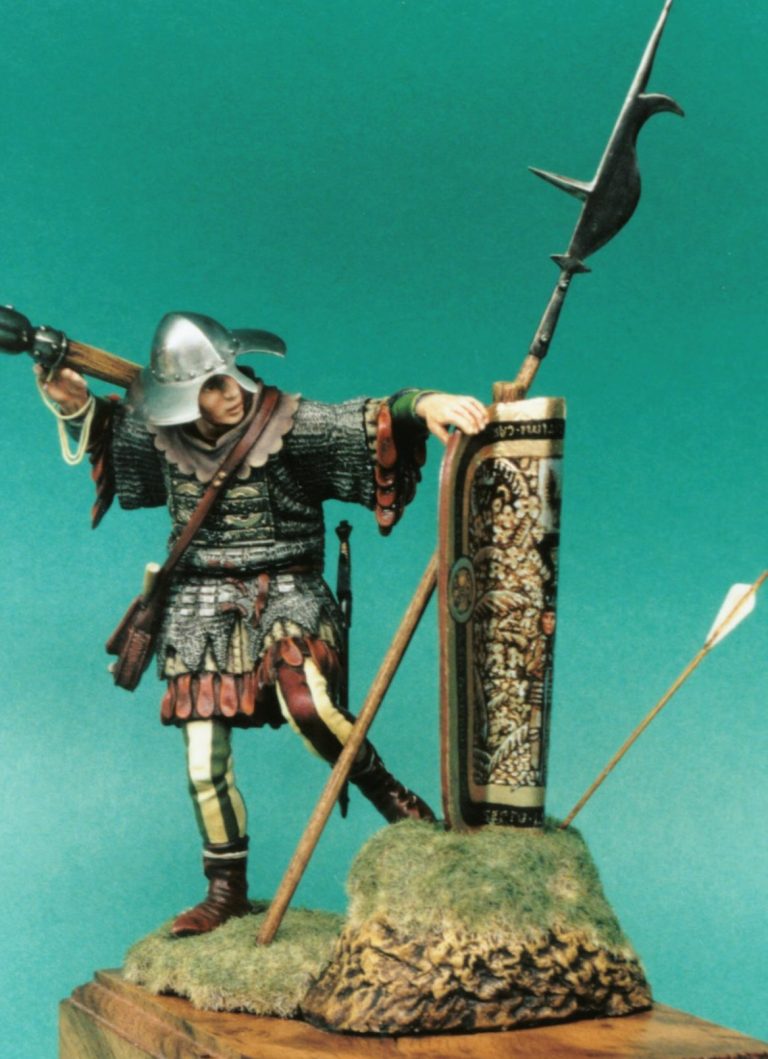
I didn't get too good a look at the latter model - the press of bodies being too great, but I liked what I saw of Phil's rendition, and mumbled a vow that I'd have a go at one of those soon.
In the meantime I came across a book detailing Heraldry, and in that was a very small but perfectly formed picture of a "Hussite Standing Shield" or "Pavise", these being used by hand gunners and archers as a kind of portable haven against incoming missiles. The picture on the pavise was somewhat elaborate, but more importantly made me remember my promise of painting this figure.
This figure was a little hard to identify, mainly because it hasn't been advertised in the U.K. modelling press as far as I can tell. But with a little help from Lynn Sangster at Historex, a model was found and sent to me - Christmas came early - thanks to everyone at Historex !
A little History
The Hussites were followers of one John Huss, and native to Bohemia in the first half of the fifteenth century. Huss was executed by Sigismund in 1415. Sigismund then ruling in Wenceslas' name, later assuming his step- brothers' throne after which he went on to become an Emperor.
Huss' followers were persecuted by the Catholics, being considered by them as heretics. The Hussites eventually established a home for themselves at Tabor near Usti, this base acting as a centre for their activities.
One of the leading lights of the Hussites at this time was one John Ziska, a proven soldier, who had a lot of experience as a mercenary in Poland's war against the Teutonic Order.
Ziska led what would seem to be an astounding carreer, developing the use of firearms tactics, by establishing "Wagenburgs" for his troops to fight from, forcing opposing troops to commit to charging his fortified ring of wagons, the attackers finding themselves on the nasty end of several artillery pieces, not to mention hand guns and longbows. Ziska was so successful, not to mention able, as a commander that even though he lost an eye during a civil war waged against Wenceslas, and then lost the other in 1421 in the campaign against Sigismund, he continued to command his troops and to win battles right up until his death in 1424.
This period in Bohemian history is filled with turmoil, the repulsion of Wenceslas and then Sigismund, followed by the persecution of religious beliefs, the Hussites themselves suffering their own "civil war" as their own tenets were split and divided. All this should have finally been resolved when Sigismund was recognised as the ruler of Bohemia - 1436 ( they had refused this for the previous seventeen years ). Well it would have been if only Sigismund hadn't died the following year !
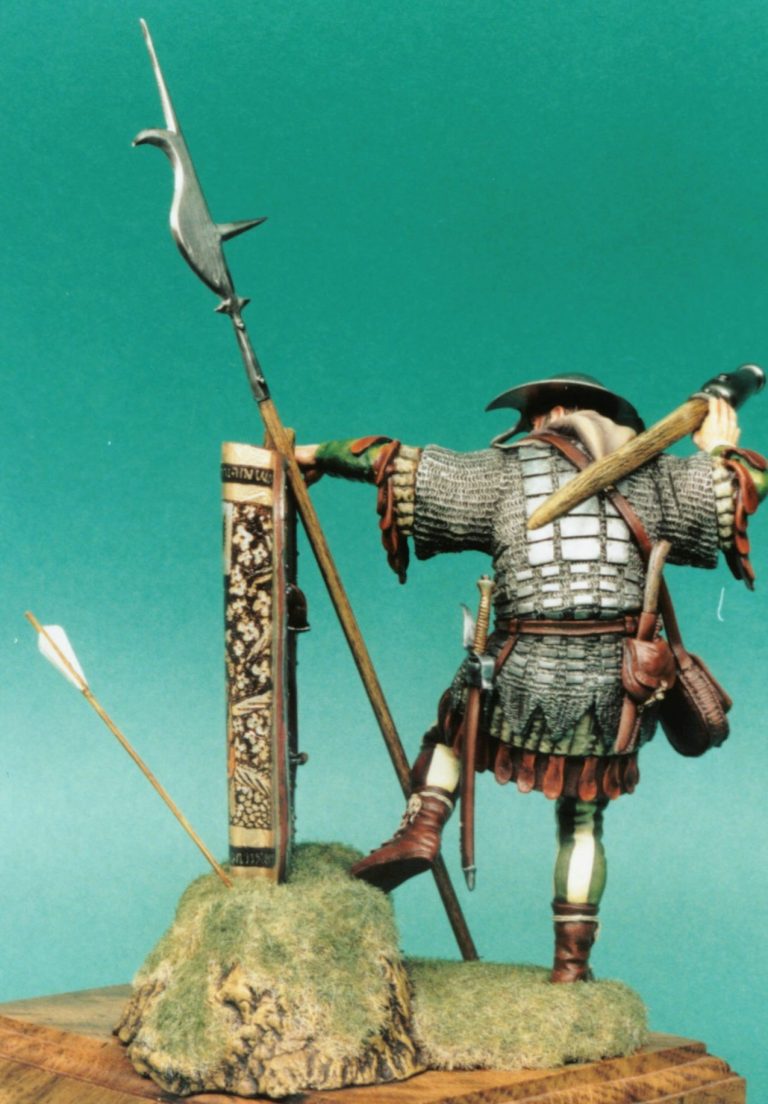

Now to the model
The model itself is fairly standard fare compared with the other Italian manufacturers. The fit of parts isn't as accurate as say, Pegaso's, but the layout, amount of parts, packing and casting quality are all there.
The fit of parts is about the only thing I can whinge about with this kit, and it seems to be that the only components to suffer are the larger castings that make up the upper torso, and the two parts which form the legs and lower torso, these being split vertically so that the legs are separate.
It isn't particularly hard to fix up, so long as patience is exercised, but it is galling to see such a good looking kit, well sculpted and detailed, end up being a beggar to fasten together. But I'm getting way, way ahead of myself, let's start at the beginning.
Starting off - the shield
The kit is moulded in twenty four parts, which also includes a length of soft lead wire for the slow match, and a length of aluminium tube for the shaft of the polearm. The components are cast quite cleanly in white metal, and after a small amount of work to any mould lines and a quick wash with water and mild detergent, all was ready.
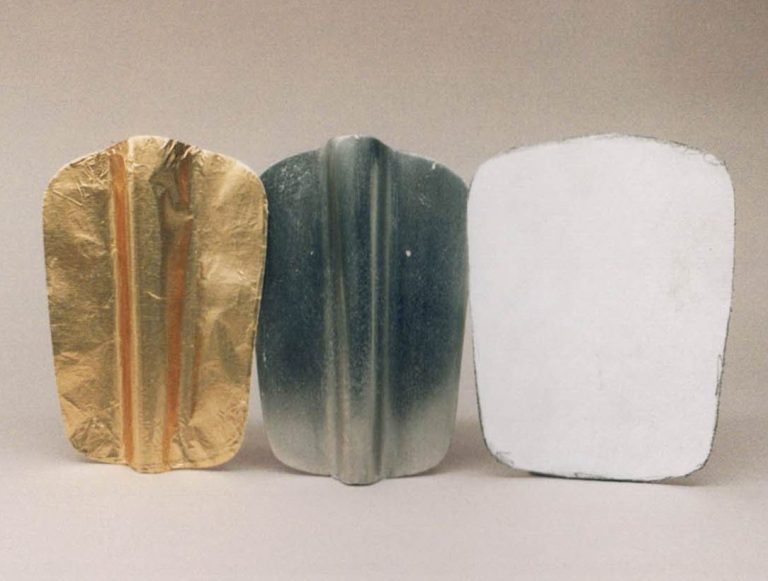
First of all the shield. How was I going to get a design painted on an awkwardly shaped piece of metal like that. So the first "cheat" was to spray a piece of thin paper on one side with some "spray mount" - a low tack glue available from stationers for temporarily attaching notes and pictures to things. In this case it allowed me to fasten the paper to the shield, trace around the shape and then remove the paper.
The shape was neatened up, and then cut out with a sharp pair of scissors. I then flattened out a piece of gold foil - the type found wrapped around large pieces of chocolate ( usually only for the short period of time it takes me to consume said chocolate ), and transferred the shape from the paper to the foil and then cut out the foil shape.

Now for some paint. I mixed up equal amounts of black and burnt umber acrylics, thinning this mix with water to a milk-like consistency.
Then using an old fashioned style calligraphy pen, I marked out the outer design of lines freehand, except on the circles on the outer border, for which I cheated and used a suitably sized technical drawing template.
After that it was a case of filling in the different aspects of the design, constantly keeping the pen charged with paint. And also checking that the paint that was still to be used didn't become too thick as the water evaporated off.
I took photo's at various stages, allowing you to see the design build up, from the bare shield, it's paper template and the foil cut-out, working through the stages of putting on the border, and on to adding the leaf design and the ( very ) rough sketching of the knight.
Hopefully the pictures will explain better than the written word what's supposed to be going on.
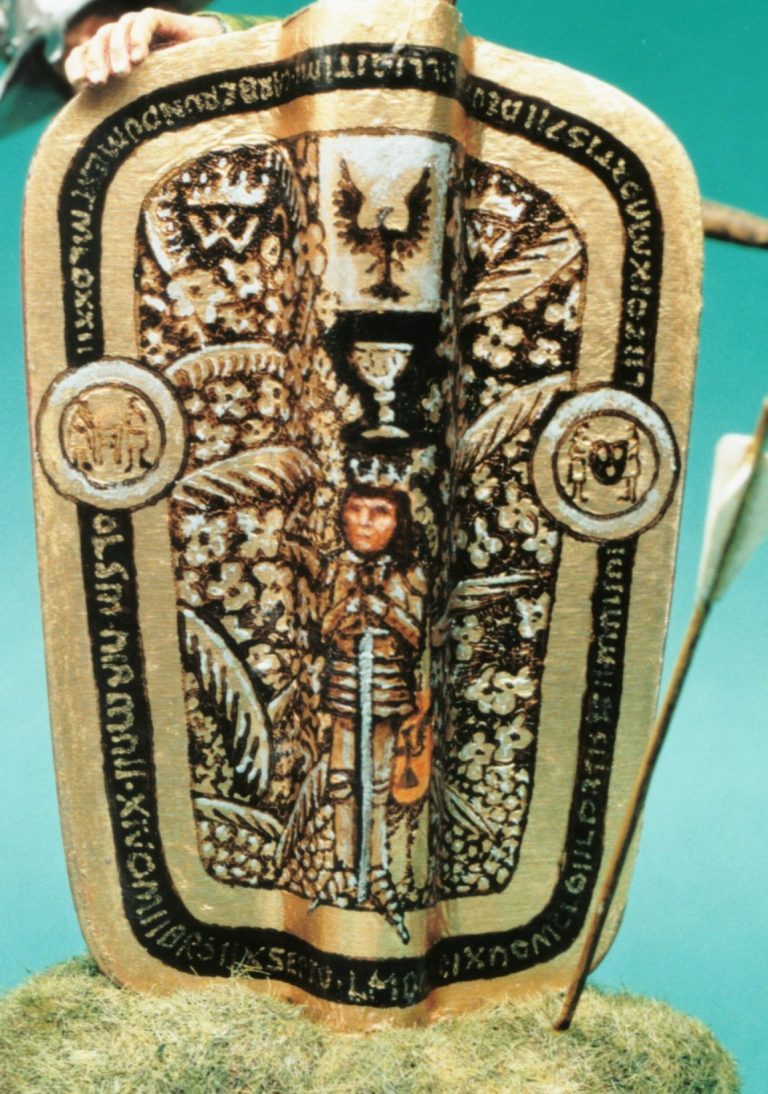
The only time I used any gold paint was to mark in the lettering around the border. Unfortunately the reference pictures I had weren't big enough to give a good view of all the script, or the design, so I chose to "ad-lib" somewhat to get the feel of the artwork on the shield, rather than trying to get all the decoration photographically correct.


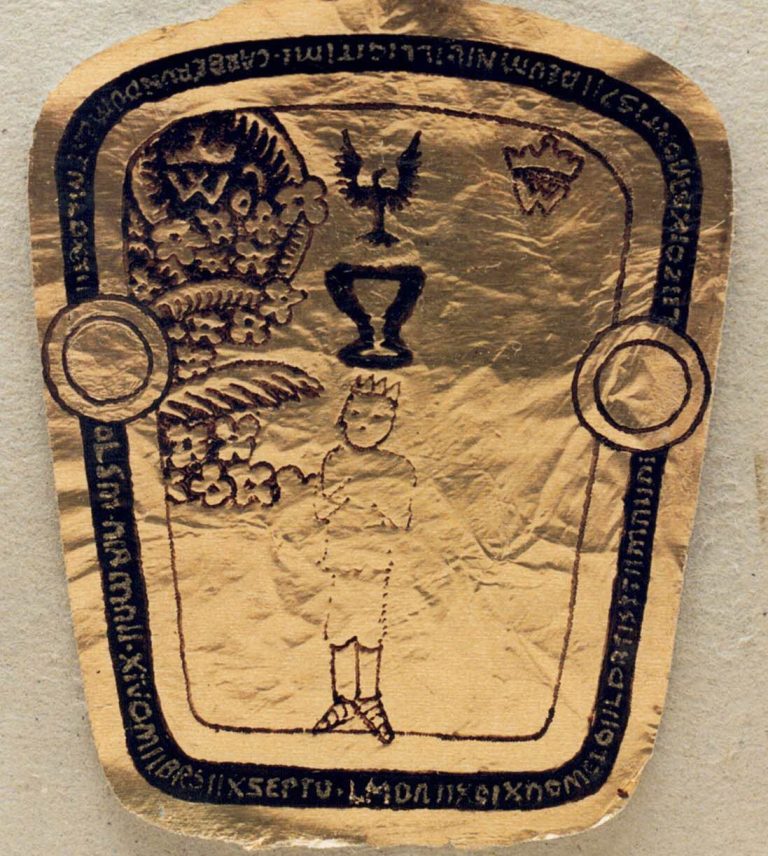
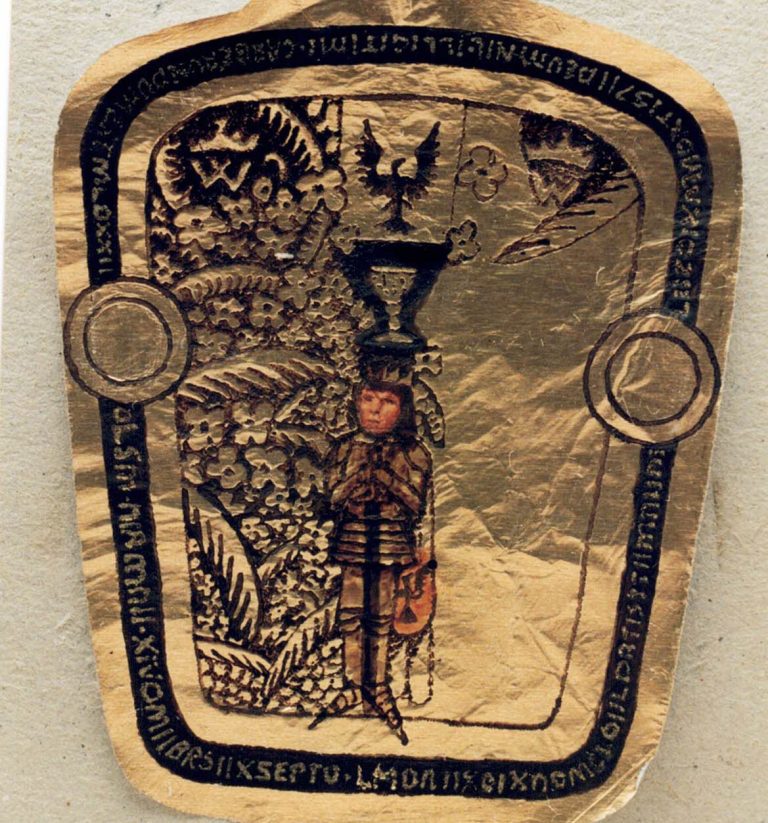

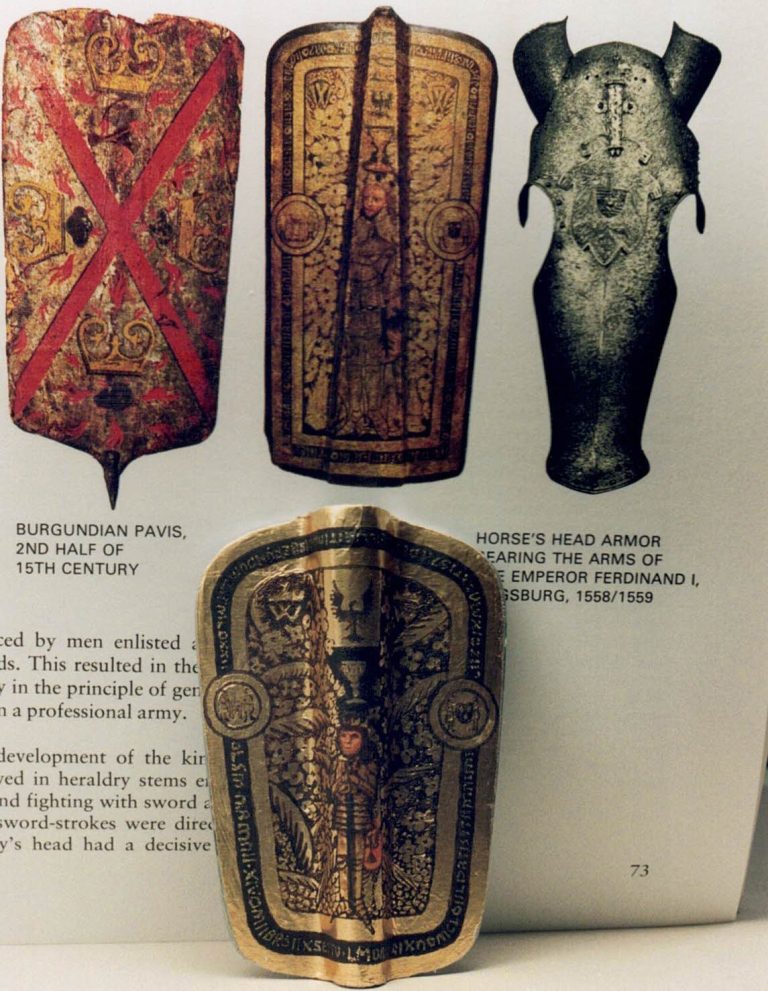
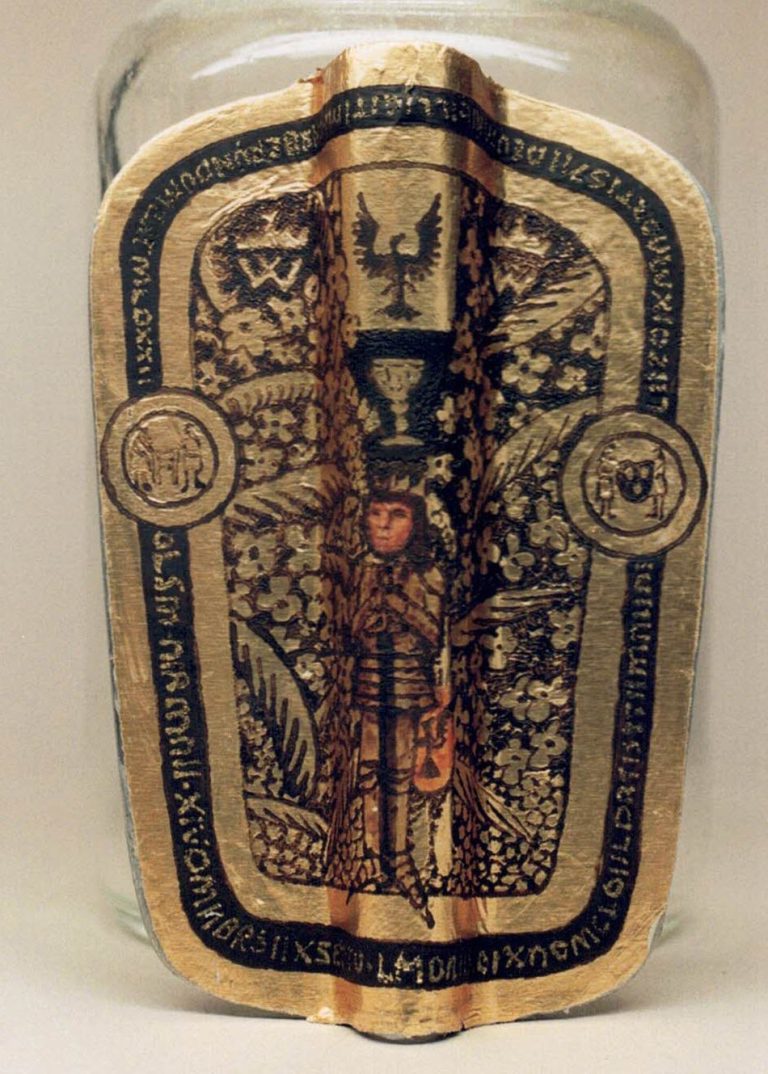
The finished shield is shown below the picture that inspired it in the right hand shot above.
During the painting of the design I did find that it was necessary to break off from doing the fine lines and swirls, and so added detail to the knights face and shield, these being the only two areas on the original that seem to have colours other than brown or gold.
The figure of the knight on the shield is about 20 - 25mm tall, and doing the face was a whole bundle of fun in itself. I used acrylics again here, finding them easier to control in such small spaces.
The method for painting the face, being basically that used for any figure, and as you can see from my marking out of the face "I ain't no artist !" I assume that this picture of a knight is a representation of either John Huss, or possibly John Ziska, although I stress that this is speculation on my part, and I'd be interested if anyone out there has better reference pictures and text regarding this shield.

First base
As I seemed to be doing the whole figure the wrong way round - whatever happened to face and armour first ? - I next tackled the base / groundwork and the wood / metalwork of the polearm and the post holding the shield up.
First the base. I chose a wood base from Armstrong Bases, and fastened the lower half of the model groundwork to that.
I filled the recess in that area of the groundwork with Milliput, and used that to glue the upper half of the groundwork to the lower half - aided by some superglue. I added a fair amount of Milliput to the groundwork, together with some static grass, thinking to improve it's looks, but alas failed miserably, let's hope everyone looks at the shield and the figure rather than at the base, eh ?
Now for the polearm. I replaced the shaft with a barbeque skewer, preferring this for the "instant" wood grain once an oil wash had been applied.
The post supporting the shield was painted with a sand coloured acrylic and hen given several washes of oil paints to bring out the engraved detail. I used this method for the shaft of the hand gun after the metal barrel had been polished and varnished.
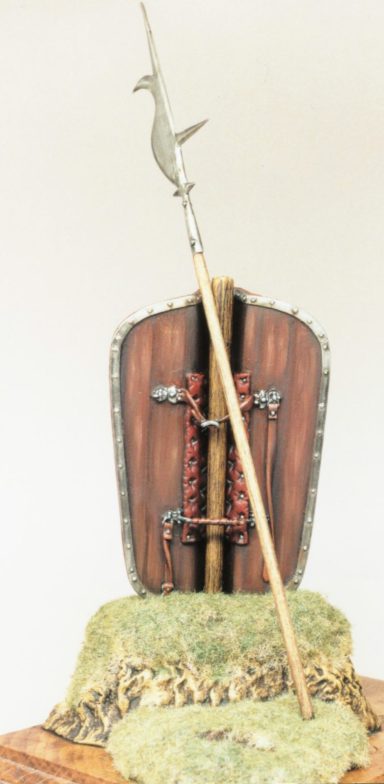
The back of the shield was painted to represent woodgrain, using oil paints and allowing brushstrokes to show so that the impression of a grained effect was given. The padded area was painted in a reddish leather, mainly using dark browns, topping these off with deep red highlights. The silver studs being dotted in with two shades of silver acrylic. Once all this was dry, the bar-like handle and the leather strap could be added, and then painted with colours matching those already employed on the shield back.
One of the hardest bits on the shield, was putting the fine line of brown around the edge of the piece between the metal edge strengthener and the gold foil front face.
Thin paint that flowed well, a good brush and a steady hand were used in varying quantities for this bit. Once everything had dried the shield, its support and the polearm were glued into position on the base, and the components of the figure test fitted around them.
I'll mention here that it was at this point that I showed the shield etc. to a friend of mine who also models figures, and he very helpfully pointed out that the design on the shield is the same one as used by Stefano Borin on his model used on White Model's trade stand.
This friend also showed me an advert ( in an American magazine ) which showed the model in full colour, for me to compare. Granted the two renditions aren't exactly alike, but they're obviously using the same source material - what's the saying ? "Great minds think alike, fools seldom differ." Thanks Keith !

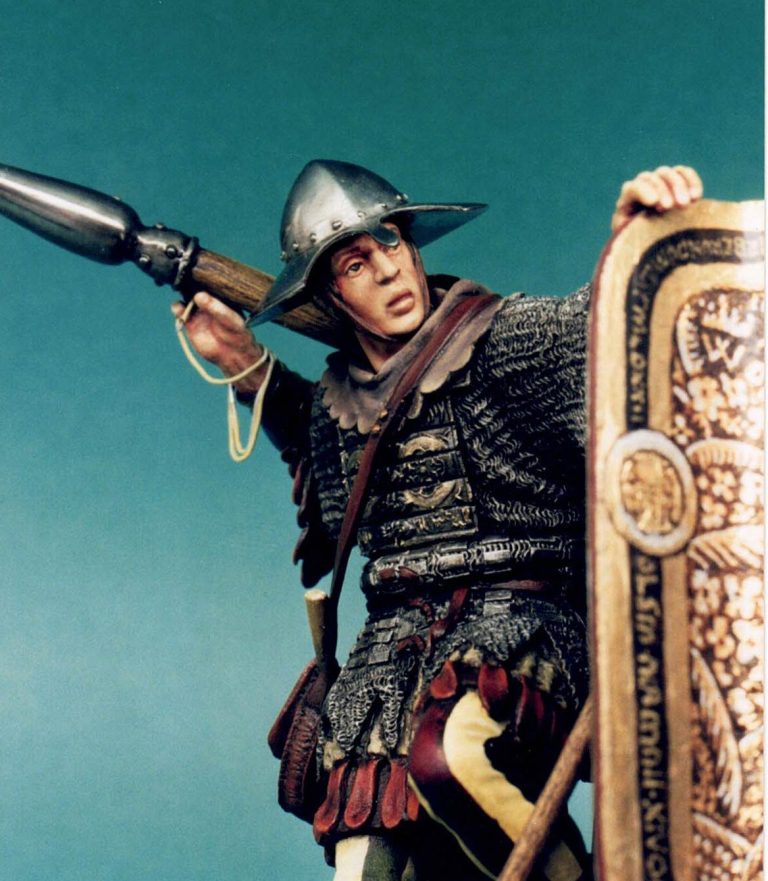
At last the figure - face and hands
Business as usual here really. I began with the face, which I didn't photograph, mainly because it's an odd looking sculpture. Don't get me wrong here, it looks good once in position, but because it's moulded minus hair - well on the top of its head anyway, it looks like it's missing a flat cap or something.
Once the helmet is on it's great though. One thing here I'd better mention is that I wanted to add an arrow through the shield, to give the figure that look of urgency and movement. I binned this idea mainly because try as I might I couldn't get the least bit of a panicked expression onto the face, this is my shortcoming, rather than the figure's, and I suppose I'm a bit relieved at not having to drill a hole through the painted detail on the shield face if I'm to be totally honest.
I did however add an arrow to the groundwork, this having been scratch built from some wire and some small bits of plastic card. Whilst it might seem at first to be rather fiddly adding such small pieces of card to a bit of wire, I've found that using oversized pieces of card, giving myself something a bit more substantial to hold, is easier.
The flights then being trimmed to size once the glue is fully dried and before the paint is added.
Whilst I was painting the face, I also used the same colours to paint the flesh areas of the arms. I'll just mention here that Stefano Borin - in my humble opinion at least - is brilliant at sculpting hands.
The detail is well above "good", and cries out for a little bit more work than usual. The only thing to do on the hands really is drill a hole through the two clenched fingers on the right hand, so that once the hand has been painted the "slow match" - in the form of lead wire provided in the kit - can be added and then painted.
As far as the painting goes, I particularly wanted to try something new with the veins. This being a method I saw in an American fantasy figure magazine that suggested painting the veins a bluish-purple directly on the undercoat, then ( as they were using an airbrush ) spraying the final coats of flesh colour over the top, allowing the paint to be transparent enough to show the veins underneath.
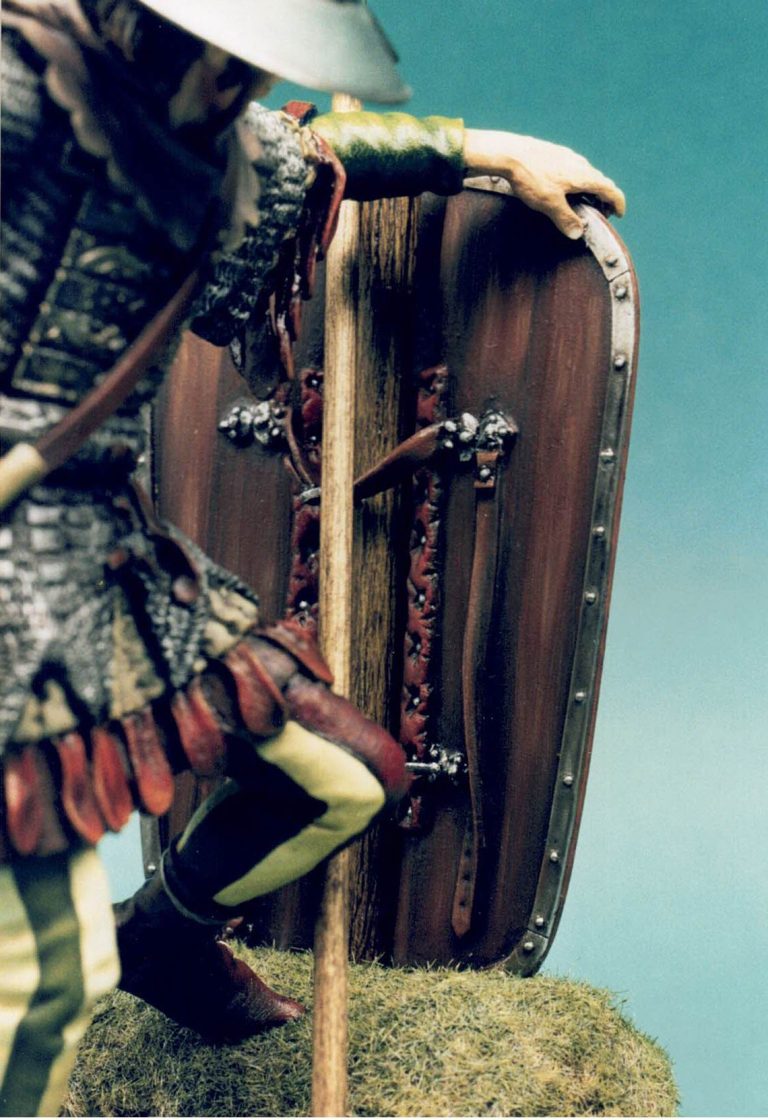
I suppose this is merely copying nature, having layers of "skin" over the veins. Anyway I wondered if the method would work with oil paints rather than airbrushed acrylics, and so gave it a whirl. I painted the purple over the flesh undercoat in a fairly restrained manner, and I think I could have used a stronger colour really. The method works fine however, and it's one that I'll use again - aren't these Yanks clever folk ?
I'd polished the helmet with wire wool, followed by an abrasive car polishing compound at the same time as I'd done the handgun, sealing this with Tamiya "Smoke" coloured clear lacquer. Once the face and sideburns were painted I glued the two pieces together and then put them to one side.
Painting the legs
Now the main body. After several test fits of the legs and main body casting, I decided to paint the hose first, mainly because access to these would be easier before they were glued together. I wanted to do stripes on these, because I'd had fun doing similar designs on some 54mm figures earlier in the year ( see Andreas' Trebuchet diorama ), and the chance to do something similar in a bigger scale seemed attractive.
The secret, so I've been told, of doing simple patterns like this is not to "over shade" the paint. I began with an undercoat of sand and white acrylic, these being mixed in equal amounts.
And after building up the strength of paint by adding several thin coats, I could begin adding the oil paint. For this I used a mix of yellow ochre, white and raw umber ( approximate ratio 2:4:1 respectively ). This was thinly brushed over the whole of the legs. more raw umber was added and blended in to form the shadows. White being employed to form the highlights, again this being blended in with a soft dry brush.
Once the pale cream area was fully dry the stripes could be added. I decided to use different colours on each leg, as this would add a bit more colour to the model, and to suggest a mercenary down on his luck omewhat. I began with the left leg, adding to this broad stripes of Brown MadderAlazarin.
This was lightened in the centre of the stripe with some burnt sienna, and highlights were added where necessary with some Crimson. This gives the overall look of a red stripe, which is in fact made up mainly of browns. For the green I employed a similar method, beginning by adding a little yellow to a larger amount of blue, thus creating a quite dark green.


Once the pale cream area was fully dry the stripes could be added. I decided to use different colours on each leg, as this would add a bit more colour to the model, and to suggest a mercenary down on his luck somewhat. I began with the left leg, adding to this broad stripes of Brown MadderAlazarin.
This was lightened in the centre of the stripe with some burnt sienna, and highlights were added where necessary with some Crimson. This gives the overall look of a red stripe, which is in fact made up mainly of browns. For the green I employed a similar method, beginning by adding a little yellow to a larger amount of blue, thus creating a quite dark green.
Once the pale cream area was fully dry the stripes could be added. I decided to use different colours on each leg, as this would add a bit more colour to the model, and to suggest a mercenary down on his luck omewhat. I began with the left leg, adding to this broad stripes of Brown MadderAlazarin.
This was lightened in the centre of the stripe with some burnt sienna, and highlights were added where necessary with some Crimson. This gives the overall look of a red stripe, which is in fact made up mainly of browns. For the green I employed a similar method, beginning by adding a little yellow to a larger amount of blue, thus creating a quite dark green.
More painting
I elected to paint in the main areas of the armour first, basing these with Games Workshop "Chainmail" acrylic. I'd return to this area later to add shadows and highlights, but for now moved on to the leather undershirt and the padding. The leather was painted in similar reds and browns to those used on the "red" stripes, the padding being painted to represent unbleached linen which due to use had become dirty.
Colours used for this latter item being a mix of Raw Umber and white, with small additions of yellow ochre to the mix to give the colour a little more life. Whilst I was painting these areas, I also took care of the sleeves, as the colours to be used here were the same.
Picking the colour for the hood and shoulders was a bit of a struggle, should I use a bright colour, one to match either the red or the green on the legs, possibly even a mix of the two, or should I use a completely different colour.
I eventually decided on a leather colour, reasoning that the hood would probably need to be at least weather resistant to some extent - lest why bother with it in the first place, and that a poor mercenary probably couldn't afford leather that had been treated with a coloured dye.


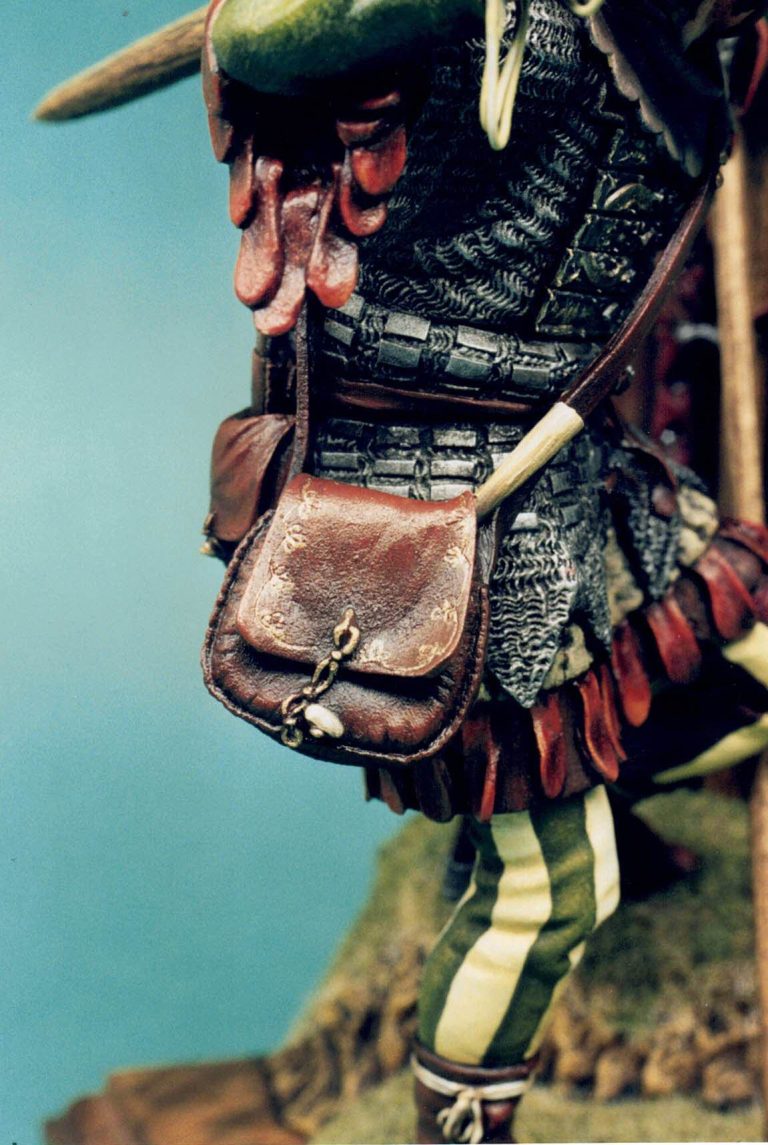
Once the above areas had dried I gave the armour a basic shading of black oil paint, this being heavily thinned and allowed to run into all the detail. I then added the bag, which seemed to hang in quite an odd fashion.
It gives the finished figure a look of movement, but does look quite odd during this stage of construction. Some filling was necessary along the join of the strap at the front of the chest, but otherwise there was no real problem ( I'd been dreading fitting this part, because it didn't look or sit "right" when I was test fitting parts ).
The detail on the bag is very good indeed, extending to some very fine detailed engraving on the flap. This together with the boots and the belts on the armour and on the waist was painted with a mid-brown acrylic, followed by burnt umber, burnt sienna and light red oils, mixing the colours on the model to get a movement from dark to light colouration.
The fine engraving on the flap of the bag, mentioned previously, was accentuated with a little gold enamel once the oils had dried, together with the chain fastener which was also painted gold. The small toggle was painted with a fresh layer of burnt umber oils, followed by a light touch of cream coloured oil. This gave a slight streakiness to the finish, hopefully suggesting a carved bone toggle.
Finishing touches
The final additions of the sword and small bag, together with its knife, were done next, these being painted off the model, and then glued in place once the paint had dried. Again the detail on these is outstanding, and I only hope that the photos do the sculpting justice.
Once all the bags and sword were in place I added the final highlighting to the armour. I realise that the painting of this area of the kit may seem to have been done in fits and starts, but I found it easier to do it in this way, first to get the shadows where I wanted them, and secondly, to prevent the silver ink used to highlight the metalwork from being rubbed off by inadvertent handling.
I don't as a rule touch painted surfaces once they're finished, mainly because of greasy finger marks, and the possibility of rubbing fresh paint off, but some slight handling is always necessary, and the silver ink in particular has a nasty habit of sticking to finger tips rather than to the model.
The sleeves were added to the shoulders, and then the model pinned and glued onto the base. Once dry the arms were test fitted ( yes they actually still went in place with no adjustment - someone was looking after me here ! ), and before gluing them in position the slow match was added, stretching this into position once the arm was glued to the sleeve, and then adding paint to it once I was happy with the shape an hang of it. The gun, sword and bag were also glued in place, and after a suitable nameplate had been made, I deemed the kit finished.

In conclusion
Well, with the model finished, and even though I feel it's somewhat a copy of Mr Borins, I'm still pleased with it. The model itself is a satisfying project, and whilst not maybe for the beginner, is certainly worth having a go at if you're confident of your skills in filling and resculpting a couple of small areas of mail.
The painting of the standing shield can certainly be made a meal of - if you so desire, not to mention the many variations that the figure's livery can be given. At forty pounds ( At the time of writing -1999 ), the kit isn't cheap, but then again you do get quite a bit for the money, and although the groundwork could probably be improved on, the model as noted is certainly a project worth considering, and one that I gained a great deal of enjoyment from, both in the painting, and viewing it once finished in my display case. I'd like to extendmy thanks to Mr Sangster and his staff at Historex Agents of Dover, for taking the time to both find and then send me this kit.
Finally thanks to Keith and Carole Clutton who did some research for me concerning this project.
We need your consent to load the translations
We use a third-party service to translate the website content that may collect data about your activity. Please review the details in the privacy policy and accept the service to view the translations.