Boudicca's
Daughter
Origen Art's 1/9th scale resin kit
Article published in Military Modelling magazine in 2015 with a picture of the model taking the full front cover

So why Boudicca’s daughter, rather than Boudicca herself ?
Well, the simple answer is, because it’s more interesting and provokes more questions.
The story goes that Boudicca’s daughters were captured, along with Boudicca herself at some point during the Celtic Iceni tribe’s rebellion against the Roman invaders.
Boudicca was recognised as a powerful and influential leader – a figurehead and especially so because she was a woman. The Roman’s, even with their vast knowledge of different peoples, peoples that they’d subdued and conquered in the main, just didn’t have female warriors. The fact that this female harridan not only fought them, but was a recognised and respected leader was strange beyond belief.
Unfortunately it still didn’t curb the Roman’s desire to bring the British tribes under control, and having captured Boudicca along with her daughters, the Roman’s thought that punishing the young girls in front of their mother might break Boudicca’s fiery resistance to their rule.
To this end, the two daughters were brought before Boudicca and repeatedly abused in almost every way imaginable, and then all three were released back to their home.
The exact abuse the two girls suffered tends to be “what we think would have been done” more than a list of physical punishments visited upon them, but enough detail is given to suggest beatings and rape.
Beyond that the details become sketchy.
For example, the names of the daughters are not recorded.
“Oh yes they are !” you might say.
Actually they aren’t recorded in the writings of Tacitus – the main source for what is thought to be first hand records from that period, in fact the age of the two girls can only be guessed at, although the eldest is thought to have been twelve years old, or perhaps just into her teenage years, and the second girl may have been as young as eight.
Horrific treatment then, and with their mother forced to watch.


Just returning to the names of the girls, if you look on the Internet, there are indeed several suggestions for the names of the girls, and two in particular seem to feature quite heavily, even in some respected tracts of writing.
The fact is that prior to 2010 there is no mention of either girls name being known, but then a piece of teen fiction was published with a story about the two daughters, giving them plausible sounding names and telling of their adventures.
Once those two names got out there on the net, they managed to become accepted and were then referred to in other more respected bodies of text. Other writers expanded the problem by using variations of the names in their stories, and the waters became so muddy that the fictional names somehow became accepted fact ( almost, I do stress almost ).
Quite amusing how “facts” can develop, grow and become accepted and all with the aid of a very short space of time ( relatively ) and a lot of usage on the internet.

Perhaps the lesson here is that cross referencing and using several sources to check data is important to have a hope of maintaining accuracy……and even then, how much of what we read is opinion or ideas based on sketchy facts – Oooh look, I’m doing it now too.
But accurate or not, Boudicca had two daughters, and one of them, nameless though history finds her to be, is my choice of subject.
Needless to say, that once released, Boudicca, far from cowed by the treatment of her family, went on to raise even more dissention and discontent against the Roman occupiers, and returned to the battlefield albeit unsuccessfully, to wage war on the oppressors.
As far as I can tell, there is no further mention of the two girls, whether they joined their mother in the following battles, were so injured by the Roman abuse that they died or perhaps were sent away to a safer region of the country to try to keep them out of further trouble can only be guessed at.
I feel that perhaps the elder girl might have been head-strong enough to have wanted to continue the fight and to join her mother in the battle lines. If the eldest daughter was twelve years old, then I suspect that Boudicca herself was probably the wrong side of twenty five, possibly thirty.

I also suspect that a thirty year old woman, leader or not, would look older and more careworn than the model we have here.
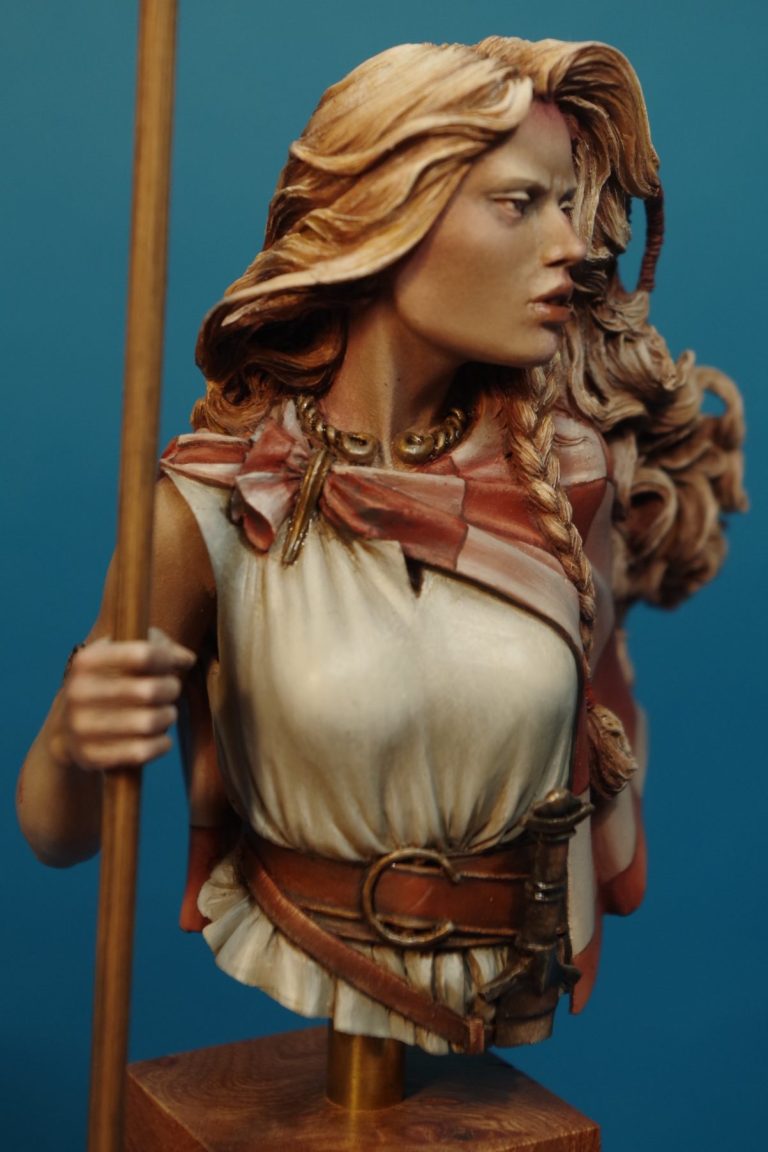
Yes, the face of this piece is a little bit glamorous, but she does also look fairly young too, hence the choice as the daughter rather than the mother.
The model.
I think it’s safe to say that this was one of the big releases at Euro Militaire 2014, certainly Origen Art had managed to keep a lot of the details of the model under wraps until just before the show, giving a couple of teaser pictures out on the net in the week leading up to Euro weekend.
I’m told that they brought about thirty kits to the show and pretty much sold out of them within the first few hours of the Saturday.
I was lucky and got one, I’m glad that I did, although it’s taken me a while to get around to painting it.
The kit itself comprises of a main casting that has some very fine detail on it, plus the arm which is separated at the bicep from the main casting. A third part, that of a spear that will slide into a hole that passes through the hand is also in the pack and finally a fourth part gives us the hilt and part of the scabbard of a small sword or large knife that fixes onto the lower belt at the front of the main casting.
Because this was an early release, there was no box art, although because of the period and references that we do have, the clothing can be painted in varying manners – well, within reason that is.
The sculpting of the parts in places is superb, but in others it’s a little less than perfect, the hand on my example suffered from a step in the moulding and in fairness, the details of the fingers and nails is not as well done as the hair. There’s a slight difference in the shape and height of the eyes, but that could be due to flexing of the rubber mould, rather than sculpting; but the hair, face and clothing will make you forgive all, because simply put, they’re brilliant.


There is an amount of cleaning up to do, this isn’t a mass-produced kit, and I suggest that you expect a small to moderate amount of work will be necessary removing the mould lines on parts and perhaps adding a little filler to bulk out and round off some areas. This work will vary from kit to kit – as I say it’s not a mass produced piece and each kit will have slight differences in mould quality.
As you’re doing this the hair will frustrate you – it’s perfectly formed, but there’s a couple of clever little loops that are separate from the main mass of hair and these fall swiftly to the average gorilla-fingered modeller like yours truly.
I’d suggest marking their place and leaving them off ( if you break them off ) until you’ve finished cleaning the rest of the model up, otherwise you tend to spend valuable time creating new and colourful curses as you knock them off repeatedly from the place you’ve just glued them back onto…… I’m just trying to be helpful.
Again a suggestion – look for very minor air bubbles in the resin just above the belt line, particularly on her right hand side. These perhaps hover just below the surface until you pup paint on – particularly the first layer of primer if you use an astringent thinner like Isopropyl Alcohol, that will probably attack the surface of the resin.
I found about a dozen or so, they’re tiny and could be filled with Mr Surfacer liquid filling compound.
I also chose to replace the spear shaft with a bamboo skewer. I removed the resin shaft close to the hand, then used three different drill bits – increasing the size from the initial 1mm diameter through a 3mm and on to a 5mm diameter drill bit to gradually make the hole larger to accept the skewer. The head of the spear was also drilled out in the same way to accept the skewer, I tapered the end of the bamboo so that it fitted into the socket a little better.
The final thing to do was to add a circle of lead wire around the joint of the arm. I glues it into place on the arm rather than on the main casting, as I could judge to fit of the arm a little better. I made this addition to hide any gaps that might be there, rather than having to use filler.
So, a couple of minor things to fix – that’s why we’re modellers, not just painters, and the thing with the hands, which to be honest aren’t terrible, but take a little carving and filling.
I suppose we’d better get on to the painting now ?


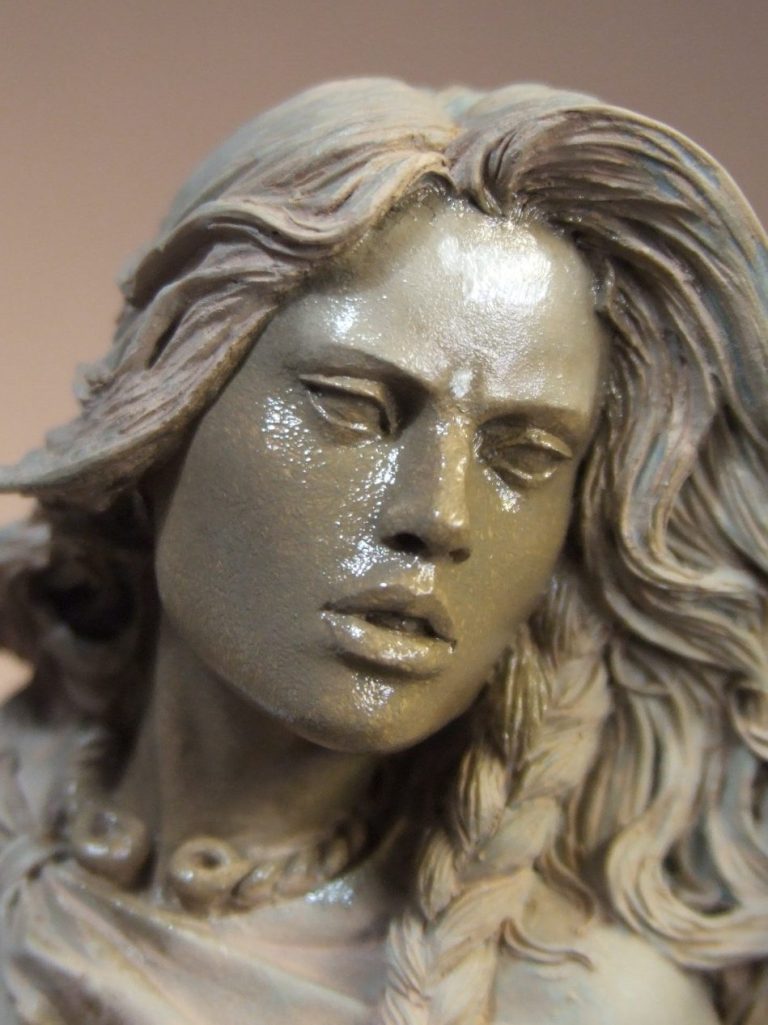
Photos #1 and #2 shows how I’ve primed the main casting using some Games Workshop Talarn Flesh, mixing the first coat with Isopropyl alcohol, then putting a couple of further coats on, mixing the paint with some water.

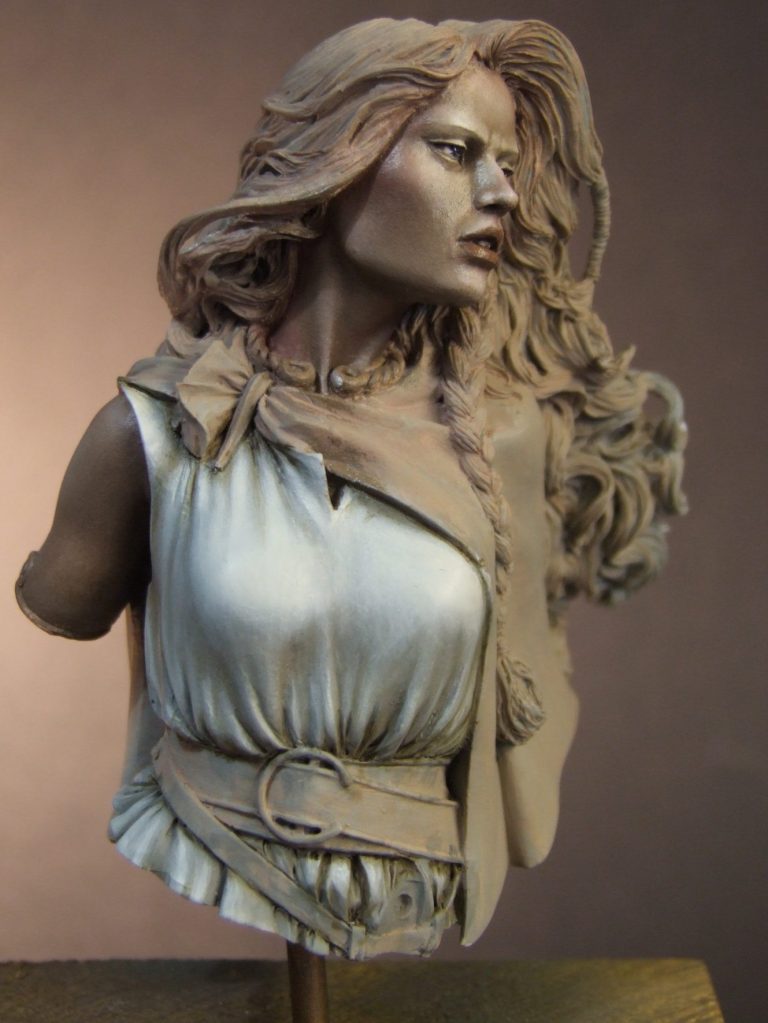
In photo #3 I’ve started adding the oil colours to the flesh areas, and I wanted to depict a young person, who, having reached the end of the battle is weary but also frightened - a greyish pallor of fatigue and fear.
I’d used a similar mix to depict an elderly skin tone on a model some time ago, and began with a healthy sized blob of Titanium White into which I added some Raw Umber, a spot of Prussian Blue and another spot of Carmine. This was mixed up to give a dark, greyish base colour that had hints of blue and green evident in it.


Photo #4 shows a more frontal view, and whilst the light is causing a lot of reflection off the wet paint, you should be able to see that I’ve added Titanium White to the central area of the forehead and also across the brow ridges above the eyes.
And let’s just pause there for a moment and review what brushes are being used.
First off I use an old brush or sometimes a cocktail stick to mix the paints, a second brush is used to apply the mid-tone colour to the face ( or whatever area I’m working on ) and then a softer, broad brush used to stipple the excess paint off the surface of the model. I use a finer brush to add the lighter colour that will be blended in to make the highlights, and second soft brush to do the work of blending.
These brushes are only used for the particular job stated, and are not washed until the area being painted is completed. The stippling brush used for blending and the fine brush applying fresh colour are regularly wiped on a clean cloth, but that is all.
So, with the Titanium White added, the soft brush is used to blend the lighter colour into the darker colour that is already on the model. I add small amounts of the lighter colour so that several amounts can be added gradually. That way the highlight can be built up and brought to a definite “high point” rather than a widely spread mass.
Photo #5 shows that the white has been blended into the surrounding colour on the centre of the forehead and across the brow ridges, and with further additions of spots of white to the raised areas of the face,


the process of building up the highlights continues through photos #6 and #7.
At this point I’ve added a small amount of a mix of Mars Brown and Carmine to the lips. It looks a bit red at this point, but once some blush colour is added to the face, it won’t stand out half as much.
Granted though, she still looks a bit like and extra for The Walking Dead.


Amazingly, the only additions made in photo #8 are the eyes and the teeth, and a small amount of Purple Madder Alizarin blush put on with an almost dry brush over the top of the forehead and the upper cheeks, and she’s looking a lot less in need of resuscitation.
I’m leaving the face for the moment, because until the hair colour is added it’s quite difficult to judge the contrast in the colours already added and how they will look with the hair added in.
So in photo #9 I’ve added the tunic – because I tend to work on the clothing by dressing the figure from the inner clothes as a starting point and then adding the outer layers of clothing later.
Pale colours – as a rule – I tend to do in acrylics. I find that the painting process isn’t as quick as using oils, but the pigments are denser and it’s easier to cover up underlying layers of paint with the paints.
I began with a lightish brown-grey made from Kommando Khaki, a little Chaos Black and a little Skull White ( yes, Games Workshop colours ). This was thinned a little and then three or four coats were added to build up a solid, even colour all over the tunic area. By adding more of the Khaki colour and a little water I then began painting very thin coats of paint onto the tunic to begin marking out the areas that would become the lighter shadows. This is a relatively long and drawn out process, adding maybe ten thin layers – the first two or three are only visible when they’re being applied because they’re still shiny and wet as the brush passes over the area. If you can see the paint from the first two layers once it’s dried, then the paint is simply too thick and it needs more water adding to thin it down.


So, eight to ten layers of that colour to start building it up, then add a little more of the Khaki, and maybe just a spot of the white plus more water to keep the consistency of the paint very thin. Again eight to ten layers of paint are added, gradually reducing the size of the area being coated – think of the old Ordinance survey maps and how hills and valleys are denoted with contour lines. That’s the basis of the method here, but the variance between the colours should be so slight that the transition from light to dark becomes invisible – hence the transparency of each layer of paint being applied.
Photos #9 and #10 show this although oil colour washes will be used later on to further deepen the effects of the shadows.I’d decided that the cloak would be a simple but striking pattern of squares, a light brown colour with a darker brown colour over the top. It’s easiest to paint a light colour first, rather than try and put the light paint over a darker layer.
So to begin with I used a mix of Vermin Fur, and Kommando Khaki with just a touch of Mechrite Red as a starting point, then added more of the Khaki and some Skull White in the same gradual way that I’d lightened the tunic colour.


Again this took many layers of thinly applied acrylic colour to build up the colour changes from dark to light. This can be seen in photos #11, #12 and #13.


To begin adding the square pattern to the cloak I used a thinned Light Red colour oil paint. The advantage of the oils is that you can clean up the edges with a clean brush dampened with white Spirit, and even remove whole sections if they don’t look right. The down side is that in photos like #14 and #15 the painting looks patchy and untidy, but really it’s only the size, shape and neatness of the edges that matters at this point.
Working out the shape – because not a single one of these areas is square – is fun, and you have to remember that although the cloak ( if it were real ) could be laid flat out on a surface and the squares would be roughly just that – square – the cloth deforms and forms around the shoulders of the subject so that the squares become anything but square and you have to work at making the appearance become believable to the viewer, rather than trying to keep size and shape exact…… Darn fine excuse for how these look anyway !


So, having marked out the layout and shape of the squares I left the model to dry fully before adding the finishing colours to this area.
In photos #16 and #17 you can see the effect of having filled in and solidified the darker brown squares. I used an initial coat of Mars Brown oils, over which I blended Light Red to build up the mid tones and highlights, then added some Titanium White to bring areas up to a final highlight.
OK, so I don’t know if you’re seeing a theme here or not, but in photo #17 I’ve begun working on the hair. Again I’m using a thinned Mars Brown oil colour to begin the process, and have then begun to lighten the hair by adding a 50:50 mix of Light Red and Buff Titanium. I used a flat brush to do this, moving the brush in an action similar to that of combing the hair, and cleaning the brush on a lint free cloth after each pass.
It takes a bit of patience, but the flat brush leaves streaks as it’s passed over the surface of the model, and this further reinforces the appearance of the hair.


You can see this process building up in photos #18 and #19, and by gradually concentrating the lighter colours – working to use Buff Titanium on its own and then adding Titanium White for the very final highlights, the very nicely sculpted effect of flowing tresses ( quick where’s the Silvikrin advert music ! ) and hopefully the illusion of a mass of hair is given.
Having let this dry fully, then shown it to a couple of friends, it was felt ( and I had it niggling at me, which is why I asked for opinions ) that the whole bust, whilst balanced for the colours being used, was somewhat monochrome – too much of that reddish brown basically.
I thought then that maybe I could just throw things off a little by tinting the hair. This was done by adding a couple of thin washes of Golden Ochre oils – a very transparent colour at the best of times, but ideal for such things as adding a tanned effect to Caucasian skin areas, or in this case, a golden blush to the hair sections of this model.


Whilst this can be seen in photo #20, the better comparison will be between photos #19 for the “before” and #21 for the “after”.


And so to the final touches. Photo 22 shows the undercoating of the metallic details – the belt buckle, brooch and torc with some Iyandan Darksun acrylic ( yes, yes, GW and their interesting names, just read “sand” colour for that last bit ) and then the addition of some Metallic printer’s inks, beginning with a bronze colour and working up through a gold to highlights with a few spots of silver.
The belt had been painted with leather colours – beginning with a mix of Mars Black and Mars Brown and then working in some Light Red and scuffs and scratches being added with a mix of Mars Yellow and some Buff Titanium.

With a swift lick of black paint to the underside of the bust, a brass pipe was attached to the previously drilled hole underneath the bust and the opposite end of the pipe fitted in to a suitably sized hole in a small base from Richard Warton at Oakwood Studios.
I’ll get into trouble from him, but what the heck, he’s produced some lovely little slope-sided bases that are out of the ordinary. I take it ( from his complaints the last time I mentioned them ) that they aren’t the easiest of things to make, however, they are very nice and I’m sure he’ll get the hang of making them if he gets lots of practice……Yes, he’s going to kill me. However, his bases are rather nice, the conventional ones and the ones like this, which are just that little bit unusual.
My thanks to him for providing the base.
So, the final fittings. The arm was added once the main casting had been fixed in place. This was so that I could set the spear length so that it just touched the table / display shelf / ground or whatever the plinth was placed on. The spear shaft was loose in the socket that the hand formed, and so once the arm was glued in place and the adhesive had dried fully, the spear could be threaded through the loop formed by the fingers and thumb and then some very runny glue ( ZAP I think ) from Jon at Sphere Productions was allowed to flow into the joint between the hand and the spear shaft.

And really, that was about it. Some red on the ribbons in her hair, a quick check around for any stray paint or knocks ( this was on the bench for nearly twelve months, so I was surprised that :-
- · She wasn’t frowning at me for taking so long to complete the painting, and
- · There wasn’t any evidence of her being knocked over, splashed or generally having got in the way of other things – mainly my ham-fistedness.
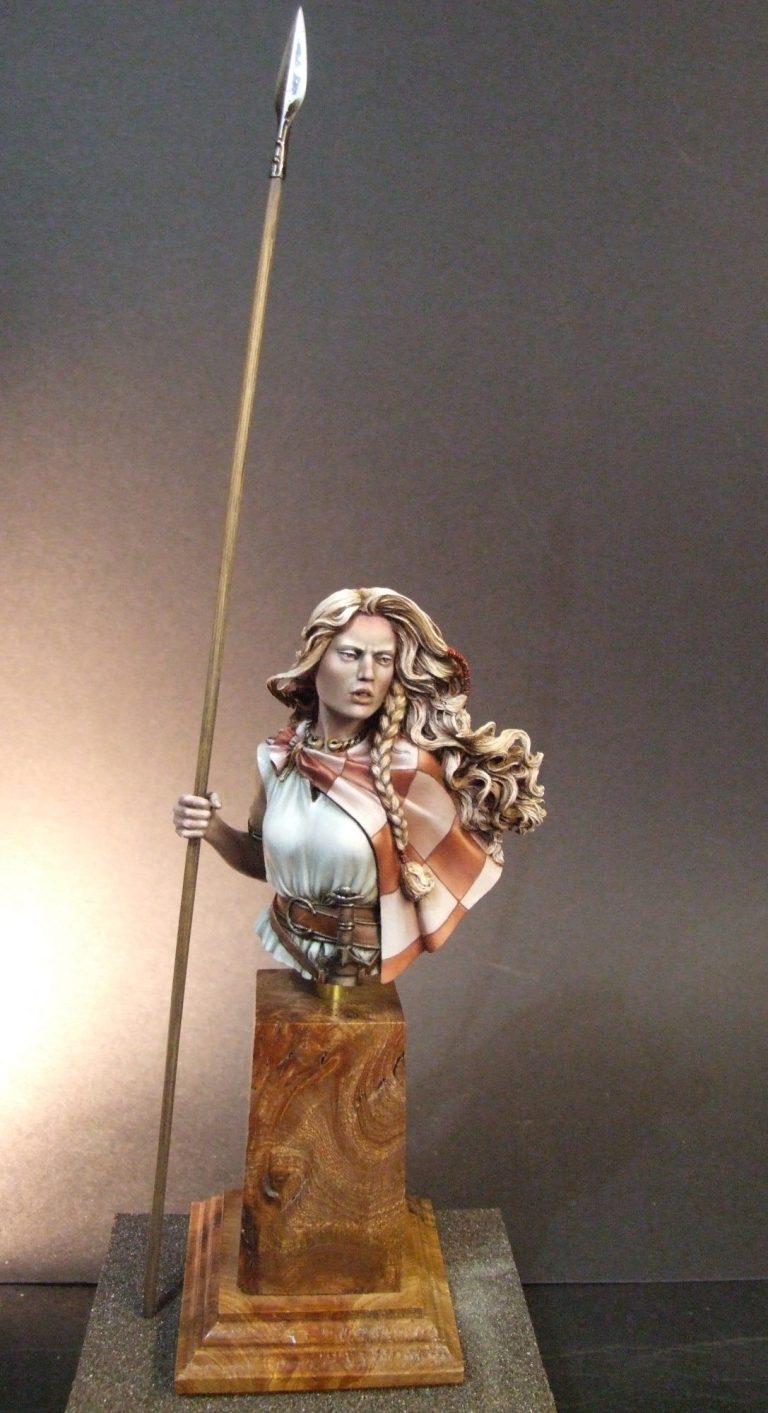
The final shots show the all round views of the finished piece, which I’m pretty pleased with, although I do think I could have perhaps painted a more complex pattern on the cloak. However I wanted something relatively simple, rather than the overworked efforts that you sometimes see. This may be a little more accurate to what the Celt’s were producing at that time in history, but at best that can only be a supposition. Their surviving metalwork seems to evince a high level of artistic flair, maybe their clothes did too ?

As for the model itself, very nice. It’s not perfect, but it’s a stunning piece that draws the eye however it’s painted. I’m glad that I rushed around the Euro Militaire hall to buy it – Thank you Mario Delgado for alerting me to the Origen Art stall – and I’m glad that I dragged this model off the shelf to paint.


We need your consent to load the translations
We use a third-party service to translate the website content that may collect data about your activity. Please review the details in the privacy policy and accept the service to view the translations.