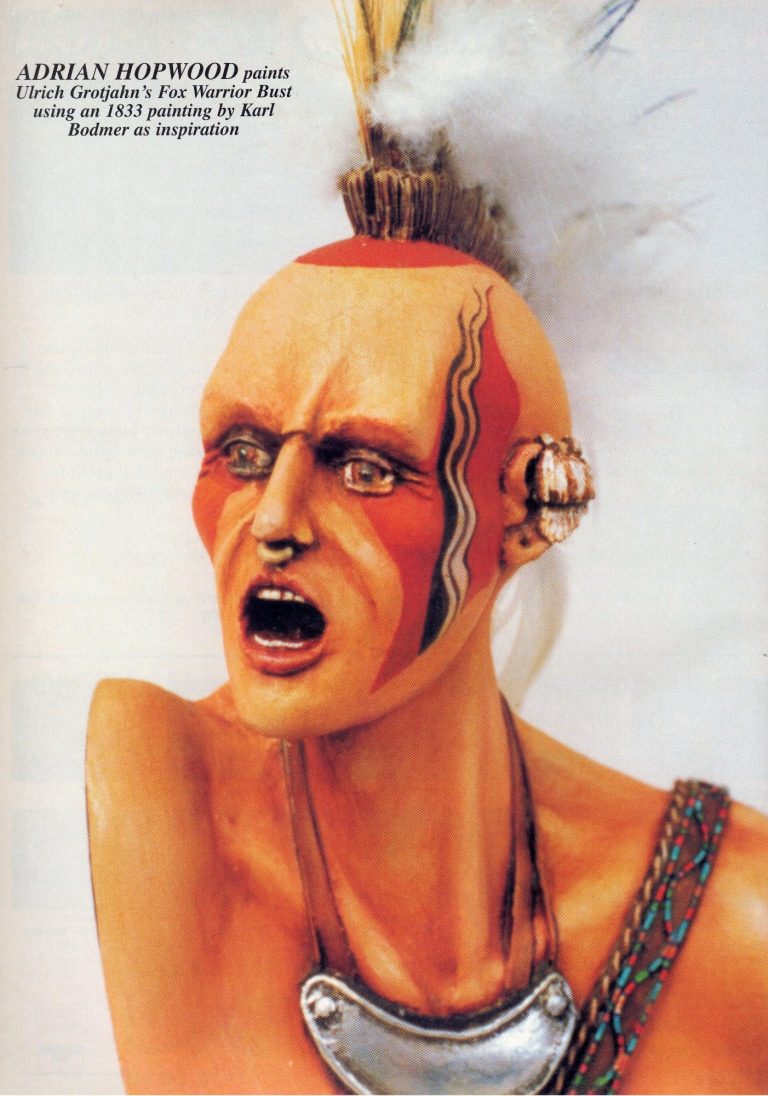
Wakusasse, Fox Warrior
First published in Military Modelcraft February 1997 and gave me my first front cover.
Sometimes when buying models, you come across a little gem that no one else seems to notice.
I’ve had this kit in my collection for over twelve months, and in that time I’ve only seen one picture of it in a magazine ( which was a black and white advert ), and I’ve never seen another one painted up yet, which really does seem a shame.
I acquired mine from the Resin 8 stand at the 1995 IPMS Nationals, Resin 8 being the UK distributor for the Ulrich Grotjahn range. As to the price, I seem to recall that it was about £17, although I was buying a few other things at the same time and believe I might have got a little discount on the bulk purchase.
My thanks to the guys at Resin 8 for selling me a really nice little model.
Go on then, you’ve twisted my arm, I’ll do a little bit of history connected to the character and the tribe he was from that I’ve based this paint job on.
In short the Fox tribe ( or Masquakie )
in an area bounded by Lake Huron to the north east, and Lake Erie to the south east. They had the Sauk, Mascuoten and Kickapoo tribes as neighbours to the northwest and south respectively. Their livelihood was made up of hunting and trapping during the winter months together with a degree of farming in the growing season.
They fought numerous skirmishes against the French until about 1737, and together with their neighbours the Sauk, with whom they had close ties, they fought and lost the Black Hawk war against the U.S. in 1832. Both tribes were then moved from Iowa to Kansas in 1837.

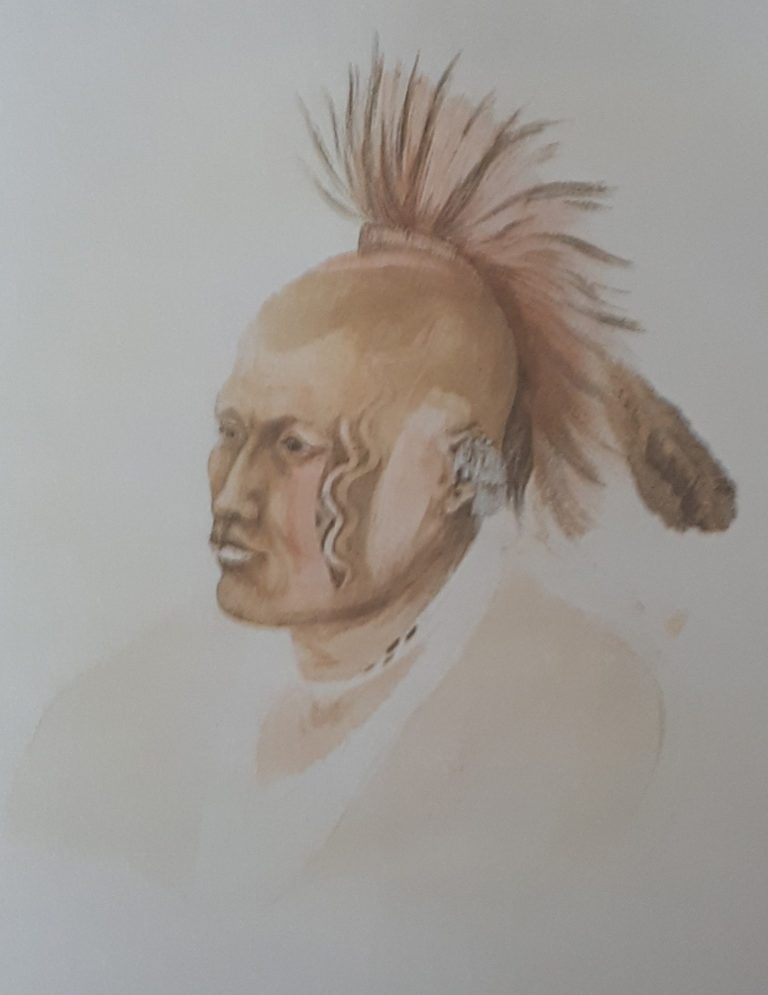
The painting pictured here by a man called Karl Bodmer
and that the model is converted to look like, was probably done towards the end of this war. As for Wakusasse himself, so far I’ve only come across this one reference to him and the caption stating the artist’s name.
The Kit
The kit is from Ulrich Grotjahn and comes well packed in a neat little box with a picture of a completed model as a reference guide to a generic Fox Tribe Warrior.
. It’s a single piece casting taking in the head and shoulders, with the finely detailed beadwork on the belts included.
Added to this there is a separate knife handle, earrings and a feather to add on to the main casting, along with a length of soft wire, all these parts being cast in white metal and retained in a separate zip lock bag.
All the parts were inspected and found to be clean and required no real preparation apart fro the main casting which had a few small air bubbles to fill with Milliput on the underside. There wasn’t even the obligatory mould plug that you seem to get on so many resin castings these days, just a plug removal point on the underside of the bust that needed cleaning up with some wet and dry abrasive paper ( used wet to cut back on any dust from the process ).
Once cleaned up, I drilled a hole through the underside of the main casting to accept a short length of brass tube. The tube was glued into position once the parts had been washed in detergent to remove any grease or dust that had accumulated on them.
At this point I have to admit that I was only thinking of copying the box art paint scheme, and the addition of the hair roach and earrings didn’t come up until much later. This was the first bust that I’d painted and I was still relatively new to painting historical figures, and kits that were so much larger scale than the fantasy wargames figures I’d tended to do before.
As the kit was moulded in a grey resin I found that an undercoat would be necessary, so the whole of the main casting was given three thin coats of sand coloured acrylic, after which the model was placed on one side to allow it to dry fully overnight.
After that a base flesh tone was made by mixing together approximately one part of Burnt Sienna, one part of Yellow Ochre and four parts of Titanium White oils with just a tiny spot of Alizarin Crimson. Small adjustments were made to this colour until I arrived at a bronzed flesh colour. I’d made enough of this base mix to put into a jar and sealed up for use as a starting point for several future figures. Mixing paint colours up like this saves time, and the life of the paint can be extended in the pot by adding a small amount of linseed oil – just enough to cover the paint when it’s in the pot. The oil will stop the paint skinning over, and the paint mix could last for up to six months and beyond.
Back to the model, the whole body / head being given a thin coat of Burnt Sienna oil paint, taking care to get the paint into all the nooks and crannies. While the paint was still wet, I used a soft, lint free cloth ( an old T shirt ) to wipe and then dab the paint off the model, thus revealing the beginnings of the mid tones and highlights.
Whilst the Burnt Sienna was still wet, I used some of the base tone colour, adding this to the upper areas of the model that I’d exposed with the cloth, and blending the two colours together at their edges. Following this I added Titanium White to the upper areas, further lightening those parts and building up highlights.
The blending action is very light, trying to have a smooth transition between the lighter and darker colours, but still allowing them to retain an area where the colour – light or dark – is still pure.
As oils take a long time to dry, this part of the painting process took place over two evenings, gradually building up the strength of each colour.
To help dry the oil colours once I was completely happy with the effect, I sprayed the whole of the main casting with matt varnish. Although this doesn’t instantly dry the oils, it does speed up the drying time, allowing me to paint over the surface of the new paint after around twenty four hours, but please note, the thickness of the oil paints applied has a great deal of influence over the drying time, and if you’re not sure that they are dry completely, then it’s best to leave it another twenty four to forty eight hours in order to be sure.
Once I was sure that the flesh areas were fully dry, O began painting the mouth. Over the years I have become less and less attracted to subjects with their mouth open. Tongues, gums, teeth, none are easy to paint up realistically, and moulding limitations can force the issue even further down that awkward route. This model, whilst playing into my hands regarding the Bodmer picture because the shouting expression with the mouth open and the lower jaw extended will cause the face to appear thinner, and could certainly make up for the rather “pleasantly plump” look of the original painting.
However, with that plus came the minus of no apparent tongue, upper teeth that look a bit “Dynasty” perfect, and a lower set that don’t have the individual teeth sculpted in.
Making the best of what I’d got though, I added some burnt Umber oils into the deepest recess of the open mouth, and carefully touched in the teeth with a fine brush and some off white acrylics. The lips were added with a 50:50 mix of Alizarin Crimson and Burnt Sienna, adding a highlight with some of the mid tone flesh colour that I’d mixed.
Moving now to the eyes, I used some of the off white acrylic mix that I’d made for the teeth, to mark in the whites of each eye, using two coats of this colour mix to get a good coverage. The iris was painted, beginning with an outline of Burnt Umber, highlighting this with some Burnt Sienna and then adding some gold flecking to each pupil with tiny amounts of Yellow Ochre.
The iris is actually convex in shape if looked at from the side, so whilst this is a very small area to work on, I did carefully blend the colours, but had to add them upside down and the lighter colour would be at the bottom edge of the iris and the shadow colour along the upper edge. Once the iris was dry, I added the pupil using Lamp Black oils, and then a tiny spot of Titanium White as added to each eye on the border between the iris and the pupil at about the nine o’clock position.
It might seem to some as a bit excessive using five colours to paint the eye, but to me this is a relatively large figure, and one thing people seem to notice without realizing it is how the eyes “look” ( Sorry, pun intended ). So to me it’s worth that little bit of extra attention to paint the eyes in this way.
Now with the flesh areas, eyes and mouth done, it’s starting to look more human and less like a lump of resin. So to continue, the belts some more of the acrylic sand colour once again and once fully dry, were given several coats of Reeves Brown Ink. The ink is applied in such a way that it flows into all the recesses of details, but isn’t allowed to form into pools, and by using several thin coats, allowing each to dry fully before adding another layer, the shadows build up and the blend from light to shade is gradual. It’s a much better effect that just adding one or two thick coats would have provided.
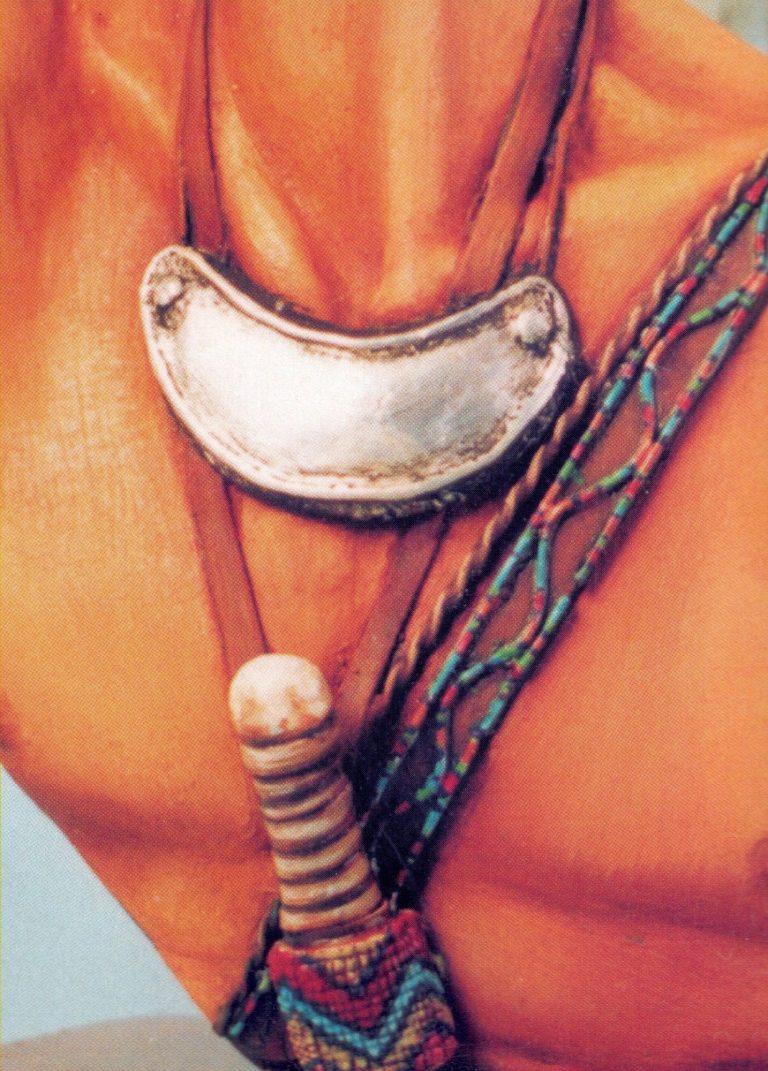
While the belts were drying, I began to mull over the problem of the metallic areas of the throat guard
. As almost every paint I have tends to give a grainy effect on larger smooth areas like this, I felt that there must be a different way of doing it that would provide a better finish. A metal casting could simply have had the area stripped of any paint and then the bare metal polished, and with this thought in mind a small piece of aluminium foil ( just big enough to overlap the section of the model by a couple of millimetres at most ) was liberated from its place in a kitchen cupboard.
To fasten the foil in place I used a small section of double sided tape, pressing the foil into shape on the casting and then trimming the edges with a sharp craft knife.
I’ll be honest here and say that this didn’t work as planned the first time ( or the second time for that matter ), because the foil was so thin that it tore when I was trying to get rid of the creases caused by the convex shape of the casting. It was a similar problem as getting rid of creases in decals, with the added trouble of the double sided tape “grabbing” onto the surface of the model a heck of a lot more than any decal I’d ever tried using.
However, when it did work, the effect was exactly what I wanted.
Having used the shiny side of the foil as the outer surface, it didn’t take much to buff it up to a bright shine, and then I used black oil paint to define the recessed detail. Finally, once I was happy with the level of shadow, I added two thin coats of gloss varnish to give an overall shiny finish.

While there was a bit of the gloss varnish on the palette,
I used a fine brush to add some ( mixed with a tiny spot of Alizarin Crimson oils ) to the eyes. The Crimson in the mix gives a pink colouration to the corners of the eyes if the varnish is allowed to pool ever so slightly.
With the belts completely dry, I could return to painting in the beadwork details. The beadwork on the wide belt is raised quite a bit, which makes it very easy to paint with different colours that will stand out from the brown of the belt. To help this though I first marked out the bead detail with some white acrylic, which will help the weaker colours like the red, stand out.
Moving on to the hair,
I undercoated it with a dark brown acrylic using more of the brown ink to make the recessed detail even darker, then once fully dry I used a mid-brown acrylic and gently drybrushed the area to bring out the details. I used three different tones of the brown that was being drybrushed on, gradually working with a lighter and lighter mix.

.

And this just left the knife handle to be painted.
I began by painting it in exactly the same way as the brown areas of the belt, in addition to this I added further highlighting from the sand coloured acrylic once the inks had dried thoroughly.
The pommel of the knife had further highlights added with the addition of white, and then a pattern was painted onto the beadwork scabbard matching the colours to those used on the belt. Once the acrylic paint had dried, I used some of the brown ink to pick out the recessed lines that split the beads up.
I had to give this several thin coats, moving from the brown after two or three applications to then using inks that matched the colours of the beads I was painting. Again, this was left to dry completely, then I added a very light coating of the individual colours so that the paint just caught the top of the beads, and bright highlight.
The sides and the back of the model are cut through and have no detail on them. I chose to paint this with some Games Workshop Chaos Black acrylic to give a definite border between the “live” flesh of the subject and the area that was in effect cut away.

So far I haven’t mentioned the warpaint and the extended hair
because as mentioned earlier, I initially just wanted to copy the box art and leave it at that. Then, whilst reading a reference book on the Native American Tribes from Tiger Press, I noticed a picture that resembled this model. All that needed changing was the hair roach, the earrings and some painting to add the warpaint.
The first thing to do was make a saw cut laterally down the length of the short hair that was moulded onto the model. A razor saw was used to make the initial cut, then using a junior Hacksaw blade to widen the cut, the whole process being done very carefully so as not to damage any of the paint on the skin areas.
The saw cut once completed ran from the front of the hair at the forehead to the back of the hair near the nape of the neck. It was about 1mm wide and roughly 4mm deep. To make the stiff part of the roach – which would have been porcupine quills on the real thing – I used bristles cut from an old shaving brush, and although a little difficult to see in the pictures, these are the straw coloured bristles within the finished roack. These were carefully lined up in the saw cut and then fastened in position with superglue. Once these were dry, they were trimmed to an even length and any stray bristles sticking out to the side were removed.
To blend the bristles colouration to that of the hair,
I used a wash of brown inks at their base where they joined the resin moulded section of hair. The added advantage of this was to disguise any white residue left from the superglue.
On to the darker quills next. For these I used Peacock Hurl which is the individual filaments on a peacock’s tail feather – the fine, thin filaments off the lower sections of the feather that has the “peacock’s eye” marking on it. These are available from fishing tackle shops, usually within the fly tying section. These filaments were carefully removed from the feathers and glued onto the side of the hair roach, again using superglue to fasten things in position. I used about twenty filaments per side.
To complete the hair roach, I used some down feathers that a budgie had shed, using these to make the fluffy areas on the sides of the roach. As a final addition, I replaced the white metal moulding of an eagle feather with three short wing feathers from a budgie as I thought these looked more true to scale thickness and shape. Before gluing these in place I wrapped a short length of the soft wire around the lower part of the quill and painted it brown to represent leather binding.
To complete the remodelling of the model I added Milliput to the ears, sculpting this into shape similar to that shown in Bodmer’s painting. Then once dry the new ear decorations were painted with an off white acrylic and then Burnt Umber oils were thinned down with white spirit and used to pick out the recessed detail I’d sculpted on. Unthinned Burnt Umber was then added to further enhance the decorations.
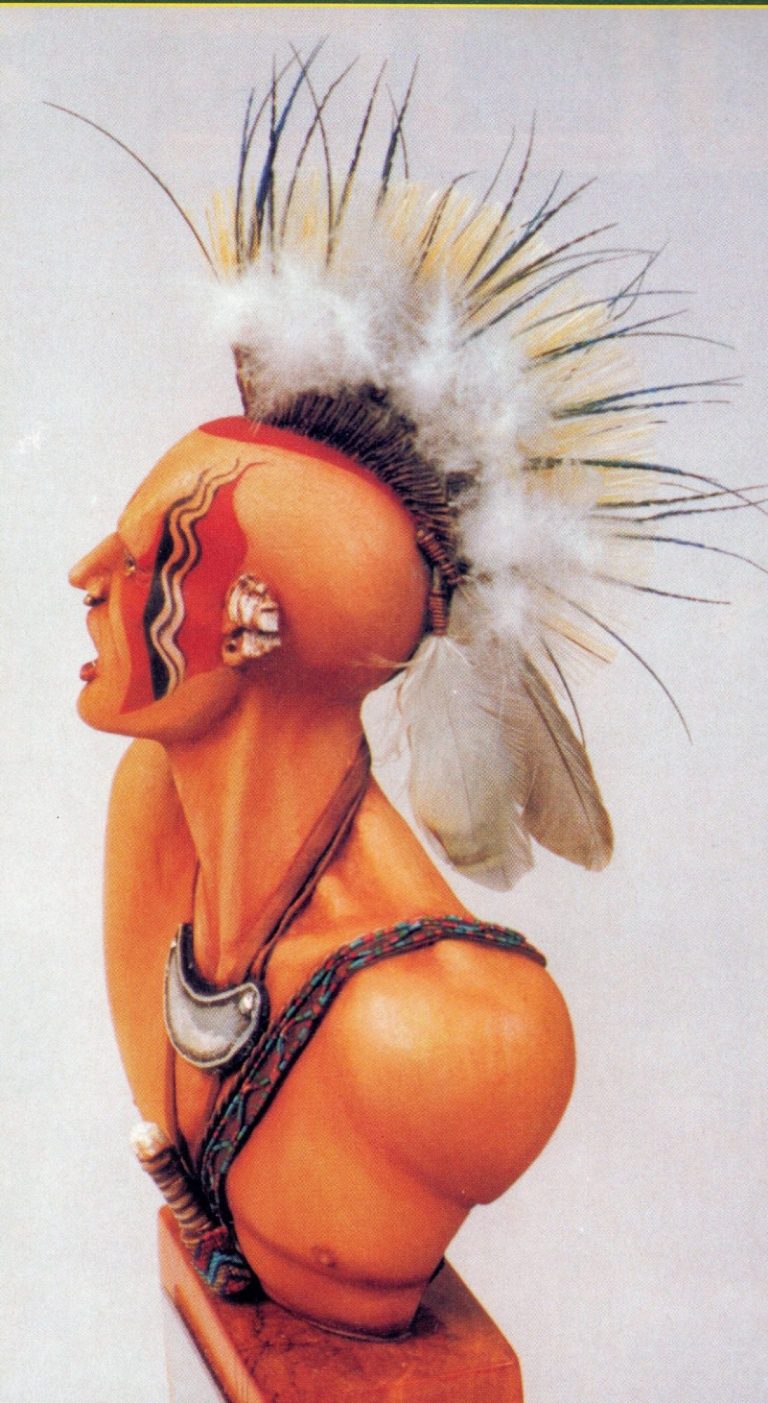
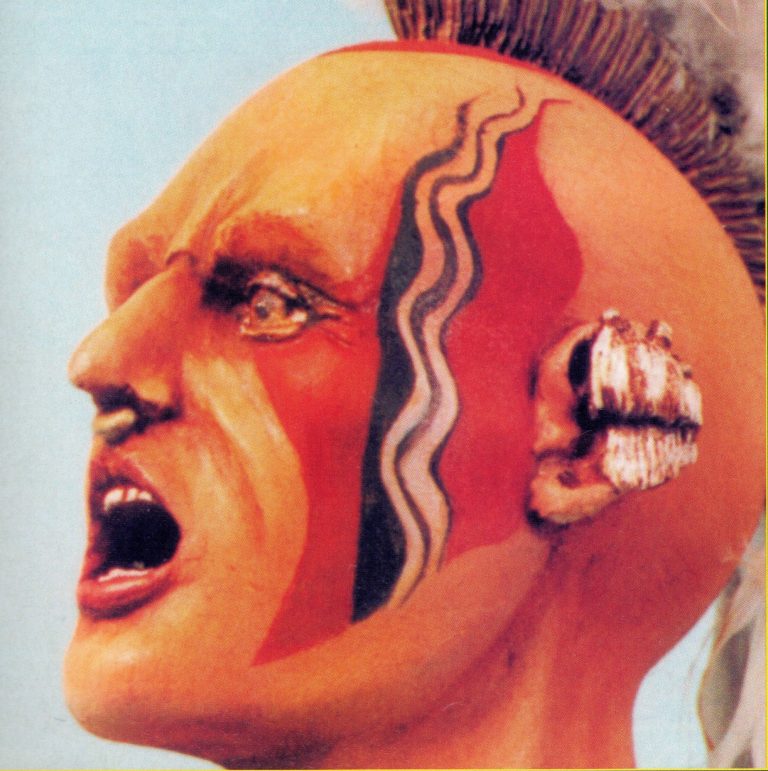
Lastly the warpaint
Lastly the warpaint - this was done in oils in separate stages, allowing each section to dry and then spraying it with varnish to protect it against subsequent layers. First of all a white section was painted onto teach cheek, fading the colour at its upper edge, and the lower edge being defined by using a brush dampened with a little white spirit, to wipe away any of the white that I didn’t want to remain on the model. The positioning of this colour was important as it would define the placement of the bottom “line” of the other colours on each cheek.
To get this right and so that it was even on each side took me about an hour, although the colour can hardly be seen on the finished model.
Next I added the black oil paint, the wavy lines being painted on with a fine brush and their edges cleaned up with a dampened brush as I’d done with the white oils above. To finish I used a colour that Winsor and Newton call “Deep Red” but is actually a rusty orange to me was painted on to the cheeks and around the roach on the top of the head.
After a good all round check,
the model was given a final coat of matt varnish, and the eyes and throat guard given another coat of gloss varnish.
I found a suitable wood plinth, made a nameplate and fastened the model onto the plinth. There it was, finished.
Well, not quite, but if you read the article about the Spanish Conquistador figure, you’ll know that this model had an adventure before getting into pictures for a magazine.

We need your consent to load the translations
We use a third-party service to translate the website content that may collect data about your activity. Please review the details in the privacy policy and accept the service to view the translations.