Japanese Geisha Girl
A 1/8th scale bust from Pilipili
Painted in 2005
I find it interesting that some aspects of Japanese society are almost universally recognisable, even to people who have no interest whatsoever in the subject; Samurai warriors and Geisha Girls are but two, and although there are quite a few offerings of the former to make as models from various companies. There is much less choice for anyone wanting to replicate in miniature a Geisha.
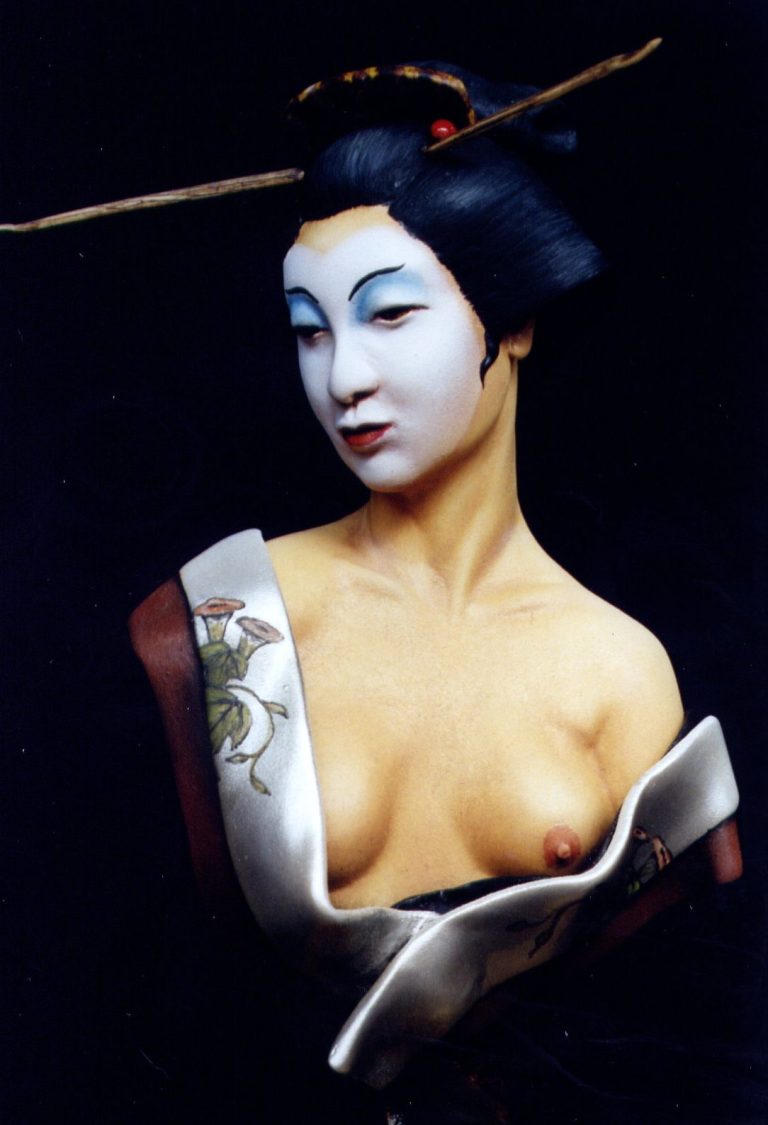
This model was the first one I saw in fact, and to me, it’s probably the best.
Geisha Girls are an interesting subject; and to paint one properly – especially a full figure, you really do need to source a book dealing with them. It’s easy to think that you could do any colour scheme, or come to that, just add any old “oriental looking” design, and to the casual observer, you’d probably get away with it.

However, it’s not quite as easy as all that, and if you do research properly, then you’ll find that there are set patterns and design motifs for some of the formal wear, which is the clothing that is likely to be modelled.
As Lee Van Quang has done a full figure now ( 120mm ) of a Geisha, then that will be important, and initially I’d harboured ideas about extending the Kimono on this model. But why change such a good model ?
So I chickened out and left it alone.
Still, it’s interesting to see the different ways in which the make-up is applied, again there are “rules” that need to be followed, even for the white powder coating on the face. In all but one of the pictures I have, the powder covers the whole face ( sometimes leaving a band of bare skin at the hairline ) and extends down the neck to just above the breasts. The powder also covers the sides of the neck, down as far as half way over the shoulder, and at the back of the neck so that it matches the coverage at the front of the body. There are usually three to five “darts” of skin down the back and side of the neck that are left bare; these triangles can vary in length and sharpness from one Geisha to the next.
Also, red seems to be the commonest colour used for around the eyes ( although it varies from a deep red to almost fuchsia ). The colour added here tends to either be just above the eyelash on the upper lid, or at the outer corners of the eye.
Eyebrows are usually black or again have a reddish tint, and the lip gloss is also red, this sometimes being just added to the bottom lip, or on other occasions both lips are coated.
The book I possess concentrates on Geisha from the Kyoto region, so I can only give information gleaned from that book. By no means is it exhaustive on the subject, hence I’m not going to say that the rules I’ve outlined above are set in stone, merely that to paint one of these models properly, then references should be sought.
Although I’ve not stuck to all these rules, I haven’t deviated far, and I did find one picture where only the face seemed to be powdered. Not only that, I felt that the red was a little monotonous, and chose to add the blue to the eyelids just to lift the colour options slightly.
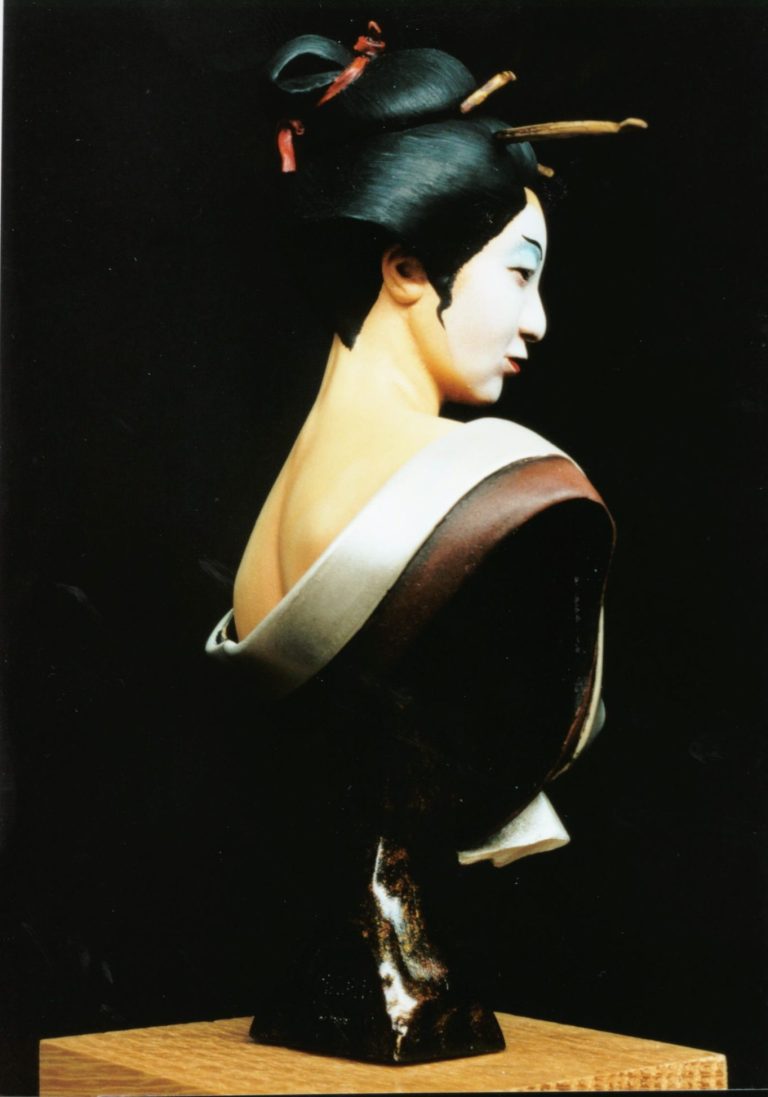
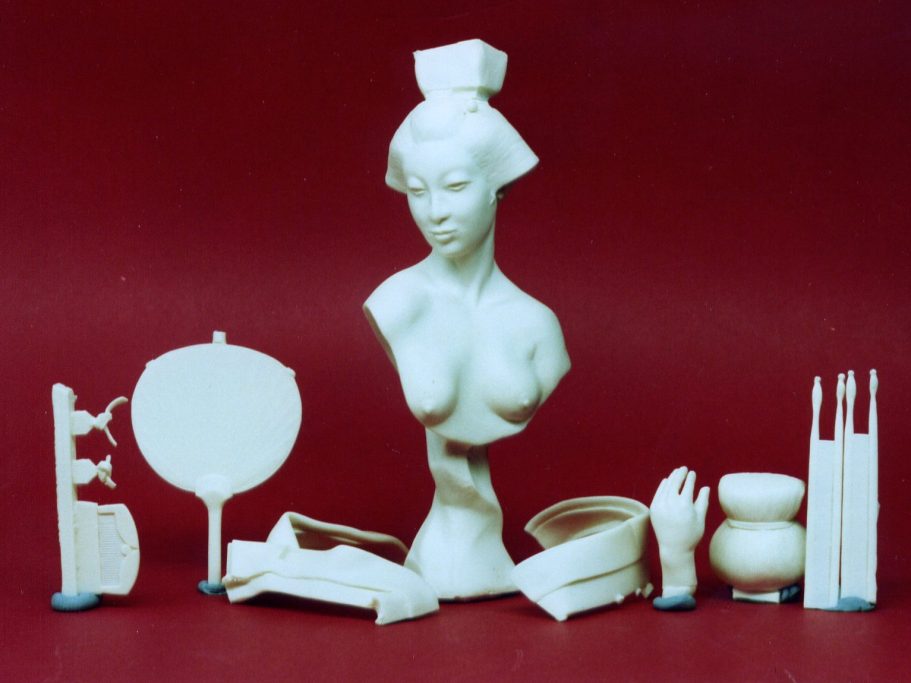
The model.
This is the first release from the "Belles" range that Lee Van Quang of PiLiPiLi has released.
The offering comes in a sturdy card box, with several pictures on the outer faces showing a finished model from various angles. Inside, the parts are separated into zip-lock bags for the smaller parts, and the larger components being held safe in bubble wrap.

On inspection, there is an amount of cleaning to be done, not excessive mind, but there are a few definite mould part lines that need attention. It's not too much of a chore, as the resin that the model is cast in is soft, and is very easy to work on.
I’ve laid the parts out in photo #1 - and there are quite a few of them too. The combs and fan are all separate from the main casting, as too is the supporting pedestal for the bust. Quang has also thoughtfully included a second set of chopstick like hair decorations, just in case one set is bent or broken in transit.
Although I liked the model very much, both in its painted form - as demonstrated on the box lid ( by Quang ), and the parts that were in front of me, I wasn't too sure about the inclusion of the hand with the fan
To me it looked a little bit odd having a disembodied hand there with the fan, but with no arm attaching it to the shoulder. So I decided that I'd leave it off, and use the fan in some other way.
With this decision made, the location hole for the hand on the kimono was filled with Milliput, and sanded smooth at this point.
I also joined some of the parts before the painting began, sorting out which could remain separate, and which would be better glued together.
I fastened the hairpieces in place, and the bust itself was joined to the decorative support stand.
The kimono was left separate, as I planned to paint the skin tone and then add these two parts to the model, and then add paint to the clothing after the joint at the shoulder was filled and sanded smooth.
So to the painting.
Having selected a slightly yellowed mix to the flesh tone, simply adding slightly more Yellow Ochre to the normal mix of flesh that I make ( that being, Windsor and Newton Flesh tint, Yellow Ochre and Titanium White in a 5:1:2 ratio ). I upped the Yellow Ochre in the mix to three parts instead of the normal two.
I painted the face and shoulders with this mix, adding shading from a mix of Yellow Ochre and Burnt Sienna, with deeper shadows of Burnt Umber, and finally highlights of Titanium White.

This was allowed to dry fully before treating the face to some basic masking using Blu-tac, and then spraying on some Humbrol Matt White with an airbrush.
Now you might be asking why I went to all the trouble of painting the face with it’s shadows, mid-tones and highlights, just to go an cover it up with a coat of white. Well, the simple truth is that the white is sprayed on fairly lightly, only a dusting really, and as it might not fully cover some areas, I thought that painting the face would be the best course of action.

Also, I happen to enjoy painting faces, so in truth, it wasn’t a chore.
The third reason to consider is that because I paint with oils, stippling the paint lightly to blend the different areas of highlights, mid-tones and shadows. There is a noticeable texture left in the paint, which would show up as different in appearance if I just painted the chest and neck, but left the face unpainted.
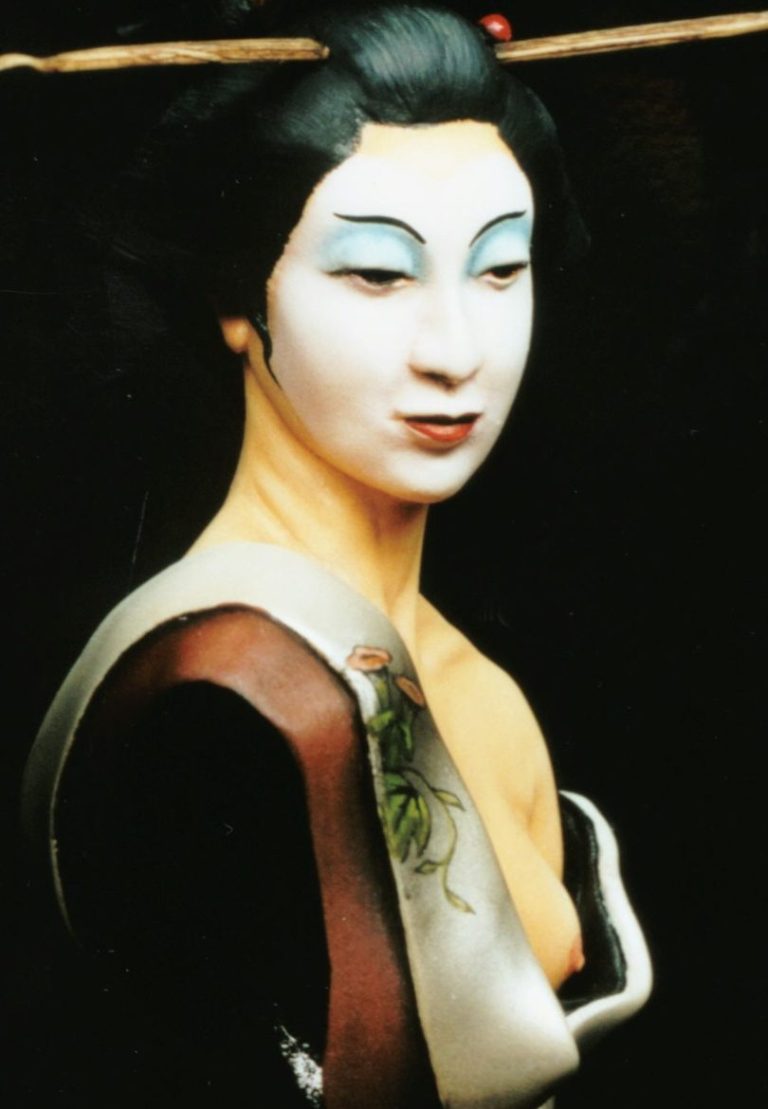
With the white paint fully dry, the rest of the face could then be finished off with the eye shadow in a pale blue, the eye brows in Mars Black, and the lips from a Burnt Sienna / Alizarin Red mix. I also added some highlights of the flesh tone to the bottom lip.
To undercoat the hair, I used a black acrylic ( Chaos Black from Games Workshop ). Adding a thin coat of Mars Black oils to this and some basic highlights of the flesh tone.
The nipples were treated to a thinned coat of the colour used on the lips, just enough to tint them, and once fully dry, I glued the kimono in place.
I found the two parts that form the Kimono a little awkward to position correctly. The joint surfaces are intentionally small, and the fit of the kimono to the body is a little bit off. After test fitting, and making a few minor adjustments, I felt it best to paint the inside of the kimono with the black acrylic before gluing the parts to the model.
Again I used Blu-tac to mask off the painted areas, as I sprayed on a mix of pearl nail varnish, thinned down with nail varnish remover. This created an excellent pearl finish, which looked quite like a reflective satin or silk.
To shade the kimono, I put on a couple of washes of Tamiya Smoke acrylic, letting the dark colour build up a little, but not too much because I didn't want to spoil that pearl finish. For decoration I added a small lily motif on the right lower shoulder of the kimono, using oil paints to get this in, picking out the finer lines once the main areas of colour had dried.
So far, I was quite happy with how the model was turning out, but it was beginning to look a little bit pale. The flesh tones and the pearl colour were looking a little monotonous, and so to add some colour to the model, the rest of the kimono was painted with a deep red / brown colour. For this I used Burnt Umber, Burnt Sienna and Light Red oils over a GW Swamp Brown undercoat.
The bust stand was painted with a couple of coats of a black acrylic, then once fully dry, a thin coat of White Spirit was brushed over this, and Testors Gold enamel was stippled sparingly onto it. When dry, several coats of Tamiya Clear Orange acrylic was added to provide a deep shine.
Now that all the major parts had been completed, it was time to turn my attention to the smaller components.

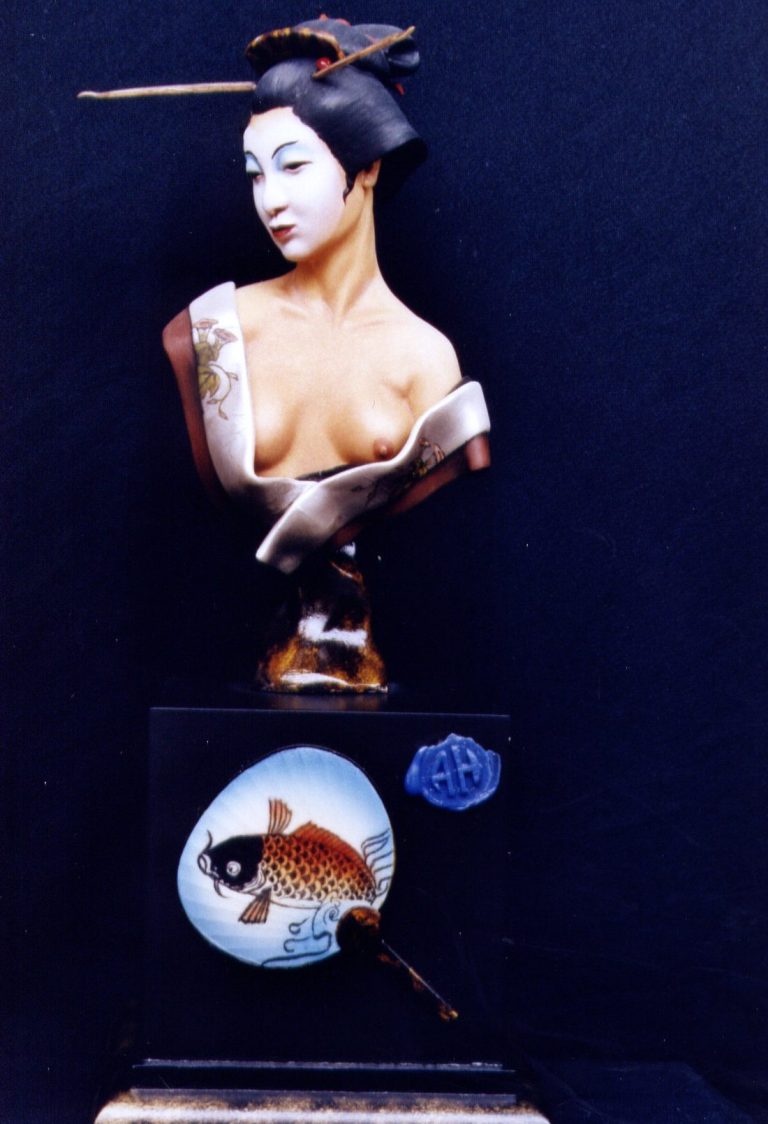
The combs and chopsticks were painted to represent tortoise shell and wood respectively, and the model glued together and added to a temporary wood base, which is shown in these pictures. I had my eye on something more that just a varnished wood plinth for her, but couldn't get hold of one for a few weeks - until the next model show.

In the meantime, I painted the fan, I used an airbrushed blue enamel on the edges, over a white acrylic undercoat, painting the handle in a similar manner to the bust stand - with the black and gold, and then using references from Japanese books that I have, I painted on a Koi Carp motif in the centre of the fan.
Originally I had two if these Koi on the geisha's back as a tattoo, but they didn't quite look right. This one looked far better.
Using some double-sided tape, I fastened it to the plinth, and then took a few photos. These are some of the finished shots with the light wood plinth.
Once I got hold of a black plinth ( from Armstrong Bases of Peterlee ), I could relocate the geisha onto it, and also the fan. I still thought that it lacked something, and decided to add designs around the plinth base, taken from a Japanese Samurai design book that I've had for some time ( it's also where the lily motif on the kimono came from ).
These designs are in the form of a long tailed bird perched on a branch with a flower and the full moon. It's quite a complex design when first seen, but breaks down quite easily into shapes that can be painted repeatedly to cover the three sides of the plinth. I also added some more of the gold stippling to the bottom of the plinth, just to tie the whole thing together.
The final shots show the completed model and the plinth, and I think on the whole it's an improvement from the lighter wood base that I'd used temporarily.
I like this model; it’s a refreshing change of pace to painting soldiers. It's still historically correct and researched by Quang; and although I had a little whinge about the mouldings needing a bit of cleaning, the effort needed isn't too great, and the results are very nice indeed.
I've had the chance to do a couple more of the Belles series, and liked them all; but somehow, this one's the best of them. I can't quite decide why, as I think, if anything, Quang's sculpting has improved as the series has progressed. There's something about this one that's a little bit special.
Very highly recommended.

Lorem ipsum dolor sit amet, consectetur adipiscing elit. Nulla euismod condimentum felis vitae efficitur.

Lorem ipsum dolor sit amet, consectetur adipiscing elit. Nulla euismod condimentum felis vitae efficitur.

Cetero oporteat sensibus his eu. Has ex vidisse perpetua, vis partem mollis mandamus at. Ea nam legere mentitum prodesset, no quo lucilius liberavisse, te oratio debitis omittantur eos. Sea ea iusto detracto, ut scripta sapientem suavitate cum, nam deleniti perpetua intellegam an. Ei per officiis detraxit probatus, vim at graecis tincidunt.
Cetero oporteat sensibus his eu. Has ex vidisse perpetua, vis partem mollis mandamus at. Ea nam legere mentitum prodesset, no quo lucilius liberavisse, te oratio debitis omittantur eos. Sea ea iusto detracto, ut scripta sapientem suavitate cum, nam deleniti perpetua intellegam an. Ei per officiis detraxit probatus, vim at graecis tincidunt.

Lorem ipsum dolor sit amet, consectetur adipiscing elit. Nulla euismod condimentum felis vitae efficitur.

Lorem ipsum dolor sit amet, consectetur adipiscing elit. Nulla euismod condimentum felis vitae efficitur.

Cetero oporteat sensibus his eu. Has ex vidisse perpetua, vis partem mollis mandamus at. Ea nam legere mentitum prodesset, no quo lucilius liberavisse, te oratio debitis omittantur eos. Sea ea iusto detracto, ut scripta sapientem suavitate cum, nam deleniti perpetua intellegam an. Ei per officiis detraxit probatus, vim at graecis tincidunt.
Cetero oporteat sensibus his eu. Has ex vidisse perpetua, vis partem mollis mandamus at. Ea nam legere mentitum prodesset, no quo lucilius liberavisse, te oratio debitis omittantur eos. Sea ea iusto detracto, ut scripta sapientem suavitate cum, nam deleniti perpetua intellegam an. Ei per officiis detraxit probatus, vim at graecis tincidunt.

Lorem ipsum dolor sit amet, consectetur adipiscing elit. Nulla euismod condimentum felis vitae efficitur.

Lorem ipsum dolor sit amet, consectetur adipiscing elit. Nulla euismod condimentum felis vitae efficitur.

Cetero oporteat sensibus his eu. Has ex vidisse perpetua, vis partem mollis mandamus at. Ea nam legere mentitum prodesset, no quo lucilius liberavisse, te oratio debitis omittantur eos. Sea ea iusto detracto, ut scripta sapientem suavitate cum, nam deleniti perpetua intellegam an. Ei per officiis detraxit probatus, vim at graecis tincidunt.
Cetero oporteat sensibus his eu. Has ex vidisse perpetua, vis partem mollis mandamus at. Ea nam legere mentitum prodesset, no quo lucilius liberavisse, te oratio debitis omittantur eos. Sea ea iusto detracto, ut scripta sapientem suavitate cum, nam deleniti perpetua intellegam an. Ei per officiis detraxit probatus, vim at graecis tincidunt.

We need your consent to load the translations
We use a third-party service to translate the website content that may collect data about your activity. Please review the details in the privacy policy and accept the service to view the translations.