5th Century Saxon Warrior
65mm White Metal kit from Latorre Miniatures
Article in Military Modelling Magazine 2006
After the fall of Rome, history becomes rather murky, because of the lack of both written records, which the Romans ( and prior to them, the Greeks ) had made. The value of these commentaries becomes evident when looking in to the cultures that sprouted after the fall of Rome.
For good reason the period is known as the “dark Ages” and although archaeological finds do occasionally surface, like the Celts, there is little known about society during this period. A lot of the battles fought are almost turned into legend, with the details passing down through the ages as embellished stories.
The crux of the problem here is that the remains from burials where grave goods have been included with the body of the deceased, tend to be from people who followed the pre-Christian faiths. No written records were kept during this period, but with the dawn of Christianity came the spread of Latin.


With the written word, came the records that could supply information – although only cursory at best – but with Christianity’s acceptance, the old ways of burial with grave goods became less common. It was viewed as a pagan belief to take goods and chattels into the afterlife.
So the problem with the Saxons, and with any peoples of this period, tends to be that the archaeological remains are from one period, and the written records applied to them come from a later time.
It’s not ideal by any means, and so re-enactors and living history groups become quite important in order that the daily living and use of accurately reproduced remains can be experimented with.
Both the reference sources I have supplied here are of that type, and are certainly worthy of inspection, as the information in both has been carefully researched, tried and tested in some cases, before being reported on, for us the “consumers” to use to paint and possibly enhance our models.
The model.
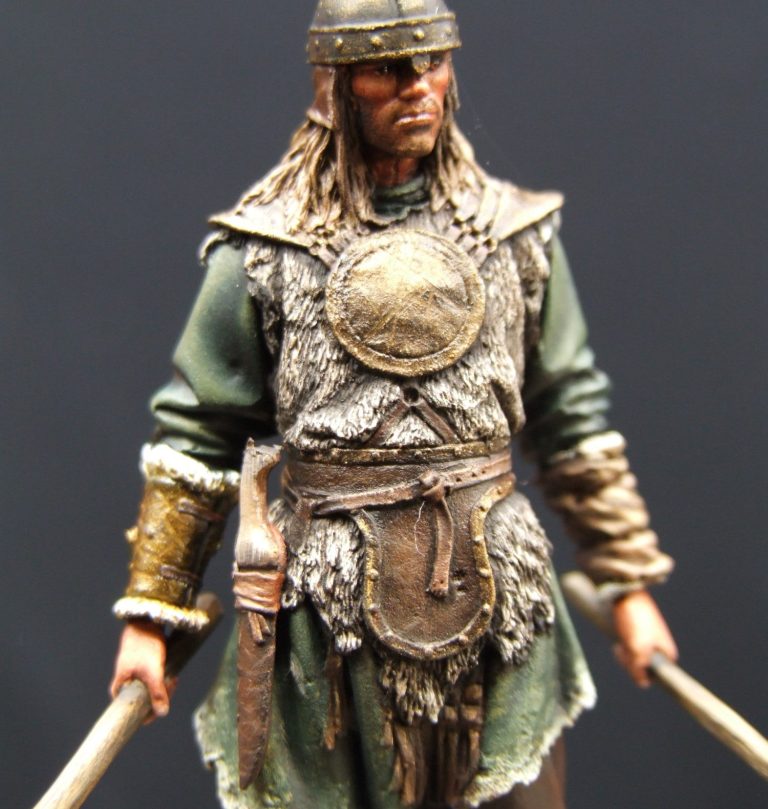
Not surprisingly then, this model has received a mixed reception with the modellers on the Internet. Whilst few, if any could fault Mr Latorre’s sculpting – yes, I think he’s back on form with this one – there were some feelings that perhaps there was a little too much myth, possibly even a little “Hollywood” mixed in with it’s style.
Having said that, I love it. So much so, that I’ll probably get a second one to have a go at sometime in the future.
I also applaud Raul Latorre for his more recent release, where he’s taken on the “it’s a fantasy model” brigade, and actually produced a second model, using this one as the starting point, and produced a truly “fantasy figure”. Needless to say, I bought one of these too, when on holiday in Spain recently.


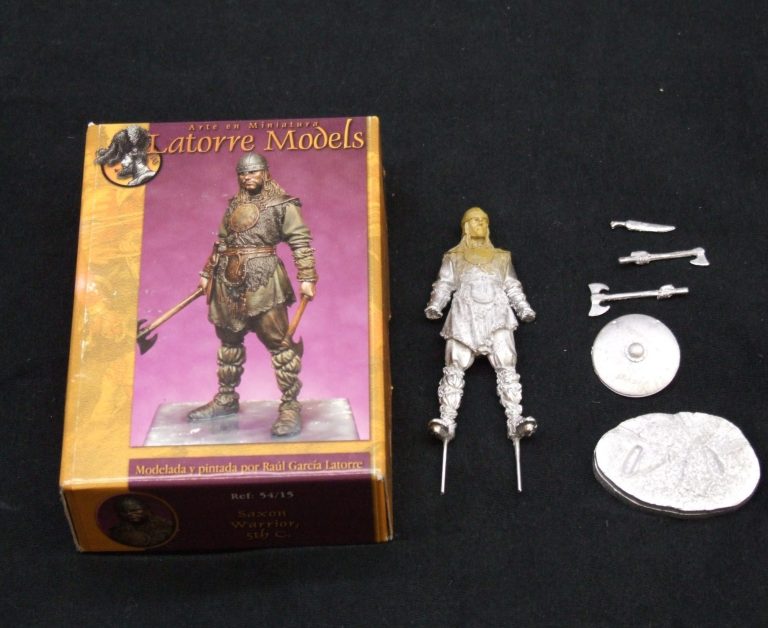
As for this kit - it’s a relatively simple affair on first impression, the up and down stance allows for the main casting to have the body, legs, arms and head all in once piece, and just leaves the separate parts to cover the hands, weapons and a couple of additions along with the groundwork.
Raul has allowed for some personalisation for the modeller, giving two left hands, one with a single bladed axe, the other holding a shield. Either of these can be used.
I’ve shown the parts laid out in photo #1 and just like first impressions; you can’t see half of the detail that’s been sculpted onto this piece. It’s only with a light primer that things start to pop out, and the sculpted fur on the sleeveless shirt alone is brilliant - the details really do have to be seen, to be appreciated.

Cleaning the model is quick; there are just the normal part lines to find. They are quite restrained too, and might take some finding where the detail is particularly tight.
You can see a little bit of the primer coat on the model in photo #1, and moving to photo #2 you’ll notice that I’ve not hung around before getting stuck in to painting.
I’ve made a start on the face, getting the basic colours in, using oils over an acrylic undercoat in my normal manner. I’ve also begun working on the leg coverings, beginning with a sand coloured undercoat of acrylic, and then adding oils over the top.
With the oils I began by adding Burnt Umber for the deeper shadows, working this in to all the details, and then wiped off most of the colour from the raised detail with a soft cloth. By dabbing at the area once enough paint has been removed, the harshness of the shadows can be softened in preparation for the mid-tones and highlights.
I used some Mars Yellow for the mid-tones, adding a dab of the Burnt Umber and also a dab of Titanium White to this to work in the other colours that were being used on this area. The Mars Yellow mix was then used with a fine brush to add in the mid-tones to the upper areas of each of the creases.
Very small amounts of paint were used, as the Mars Yellow is a relatively strong colour and will easily overpower the Burnt Umber. I didn’t want brushstrokes showing either, so the fine brush was wiped on a cloth regularly to get rid of any of paint build-up.
The highlights were applied with Titanium White, again working on very small areas of the raised details, and making sure that the paint didn’t build up too much on the model.
Finally in this picture, the helmet has been undercoated green as a preparation for the bronze paint later on, and also as a way of framing the flesh tones on the face.

In photo #3 the trousers have been painted. I left the sand coloured undercoat in place, and painted on a very dark mix of Mars Black and Mars Brown. I then added mid-tones of Mars Brown and then just some small touches of Naples Yellow as a highlight and to make the trousers look worn. The details here don’t show up too well in the photo, as the dark colour overpowers the lighter additions. A shame really, as there was almost a full evenings work put into this area – honest !
The other bits painted in this shot are the shoes. Good detail sculpting make the bound effect of the footwear a joy to paint, and I used a similar mix of colours as on the leg coverings, but with more evidence of the dark colours and fewer light additions.
I was unconsciously following the box art for the colours to this model, and so the tunic ends up being painted green. I like how Latorre paints, and in this case, the dark and muted colours seemed to fit the time period, so what the heck, just get on with it !
The green was mixed from Mars Yellow ( because I had some on the palette already ) and some Indigo. It wasn’t so much a definite colour mix, as a case of adding the two colours together until it looked right for the shadow colour.
No, it’s not very scientific, but that’s how it goes sometimes.
If forced to hazard what the mix actually was, I’d say around even parts of the two colours mentioned, with more Mars Yellow and some Titanium White added to lighten the mix through mid-tone and highlight. More Titanium White was pressed into service for the very faded and torn edges to the lower portion of the tunic once I filled in that area.


Photo #5 shows the lower edges that have just been completed, and you can see the difference between the sleeves which have been dried overnight with a heat lamp, when compared to the still shiny and wet looking lower areas on the body of the tunic. Also note the difference in colour. That would even up once the paint dried too.
See, like I said, the colour has evened out in photo #6. I’ve also begun work on the fur vest. I used a very dark brown ( Vandyke Brown ) for the initial coat, thinning this with a little white spirit so that it flowed into the details and didn’t need any excess paint removal prior to the lighter colours being added. I did allow around an hour for some of the White Spirit to evaporate, before adding a small amount of Mars Yellow and then lots of Titanium White to the fur, allowing paint to build up so that I could sculpt in further details to the strands of hair.
I did this in several sessions, allowing each layer to dry, then adding more paint so that the different layers will give a depth to the fur once the whole lot have dried.


Photo #7 shows the bronze colours have been added to the armour. The helmet showed the undercoat used – GW Forest Green acrylic. I’ve used this method several times, and although the green undercoat is virtually invisible once the metal colours and shadows have been applied, it does make a considerable difference to the finish.
I added a drybrushing of GW Shining Gold over the green, just enough of the gold to lift the raised details into visibility. Then I returned to oils, by adding a slightly thinned coat of a 50:50 Mars Black and Mars Brown colour. This is gently dabbed off until the beginnings of the gold and green undercoats can be seen again, and then I use Humbrol Gold to lay in the highlights.
Deeper shadows, particularly the lines between different panels or sheets of metal used to make up the armour can be marked in using pure Mars Black once everything else has dried, and scratches and scuffs can be added after that.
The leather belts and the groin armour were painted with dark brown colours – then cracks and stains added with lighter paints. I used the Mars Black / Mars Brown oil mix to start things off over a coat of Swamp Brown acrylics ( GW – how did you know ? ), and then added more Mars Brown to make the mid-tones. This is added with a fine brush, so that small amounts of paint can be put onto the area being worked on, and then blended with the darker paint already in place. I continued highlighting the leather areas with some Light Red, and whilst all this little lot was still wet, used Mars Yellow and Titanium White to paint in the cracked edges with a brush that had seen better days.
The best way to describe this method is to say that I splayed out the bristles of the brush whilst picking up the paint off the palette so that the hairs of the brush formed into a flattish “fan”. I then approached the area to be painted from the outer edge, and pushed the bristles into the edge of the belt. The light paint is deposited in a random manner, and with a little practice the edge of the leather looks to be cracked and frayed.


Be assured though that it does take a little practice, but once it clicks, the method is easy to produce reliably for any size of belt on a model. It’s also a bit messy, using this method, but as the paint being used is oil based, it allows plenty of time to remove any colour that has crept into unwanted places, simply by using a clean brush, dampened with a little White Spirit.
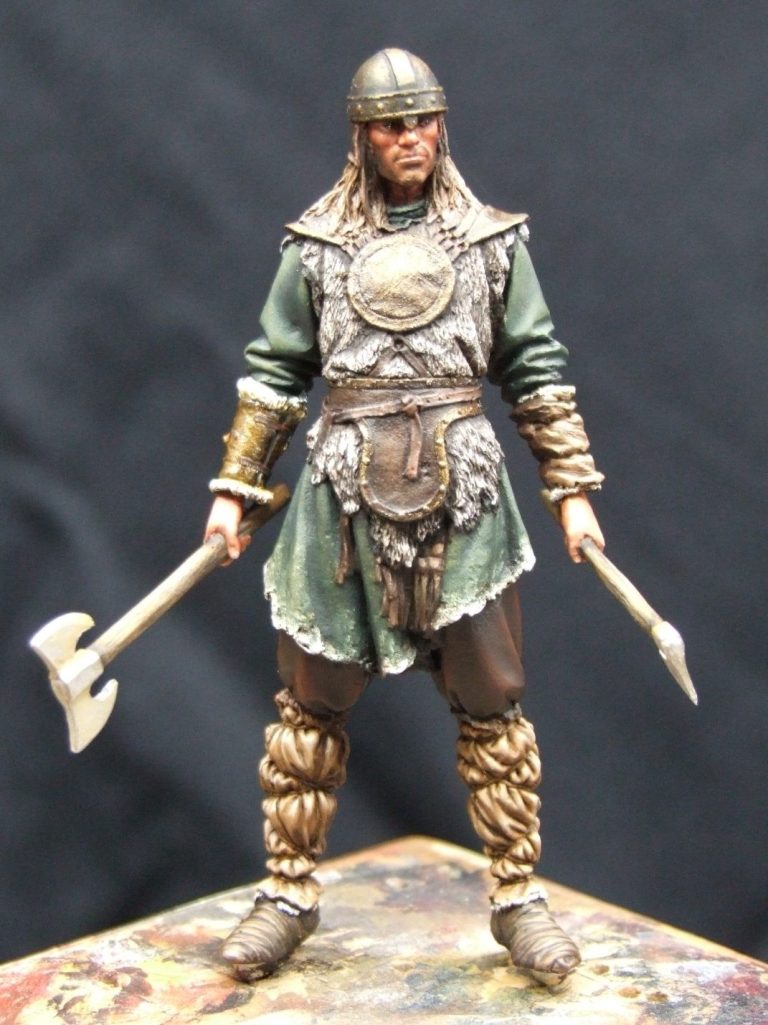
In photo #8 the model really is taking shape. The hands were painted at the same time as the belt, and the axe handles added with a sand coloured acrylic undercoat that had a mix of Raw Umber and Mars Black oils painted over the top. An old brush with its bristles cut down to make them quite stiff was used then to pick the oil paint off the axe shafts in a linear motion, thus leaving lines in the dark paint where the light coloured undercoat shows through. This gave the basics of wood grain that could be refined with light coloured oils ( Mars Yellow and Titanium White ).
The lower arms were painted – the left with its cloth covering to match the lower legs; the right arm with bronze colours to match the other armour. I added some Mars Yellow / Titanium White oils to the fur linings that peep out from the upper and lower edges of each of the above areas.
The helmet has been painted too, although initially I wasn’t too happy with the effect. My Humbrol Gold had dried up – much to my horror !
But fear not, I’m sure there’s more where that came from.
Oh no there wasn’t !
I tell a lie there actually, because actually there seemed to be quite a few cans of it in the local toy shop, and having purchased three ( need to replenish the stock cupboard ), I was agog ( look I can’t think of a better description, alright ) at the colour, texture and general “difference” of the paint that I’d bought, to that which I actually wanted.
It was grainy for a start, more of a bronze colour too, and quite different from the stuff I’ve had before. I returned to the shop, thinking that they had perhaps mixed some of their stock up, but on viewing the stack of paints on offer, the “Gunk” that I’d bought was seemingly all that there was to be had.
Please, please, please. Whoever there might be working at Humbrol and happens to read this; please can you go back to making the nice gold that you did previously. I’m actually not allowed to write a true description of the stuff I bought ( A bit like working for the BBC you know ), but believe me when I say “Liquid Poo is pretty close !”
Falling back on emergency procedures, I used some MEK to break down the hardened residue of paint that was still in the old can ( After being seen diving into the wheely bin to retrieve it, and nearly ending up stuck head first in it – why do they make those things so darn tall ? ).
Having suffered so much, I do now have the colour of the bronze helmet matching the other armour on the figure.

With the model to this stage, my mind turned to the groundwork and base that he was going to be set on. In photo #9 the basic Milliput groundwork can be seen, along with a piece of coal, pressed into service as a rock. The Milliput is still soft here, and the model has been pushed into it to make locations for the feet, and prior to the putty being added to the base, two holes had been drilled into the wood to accept the steel wire that was glued into holes previously drilled up into the legs.
The coal has also been drilled for wires to be fastened in place. This is because coal can sometimes fracture over time; and although that will look quite natural, the wires will help keep it attached to the groundwork.
The Milliput was textured using an old hobby brush ( one of the plastic ones that you get in children’s paint sets ) and the rough edges of the groundwork produced by simply tearing the putty away with a cocktail stick too create a ragged and uneven appearance.
Prior to the Milliput curing, the model is removed so that the rest of the groundwork can be completed.

One tip here, to allow the model to part from the putty in a clean manner is to put a bit of spittle onto the bottom of each foot on the model before pressing it into the Milliput. Grease will work, and so too will French Chalk. But both of these latter will require cleaning from the painted model; and anyway, spit works best !
Whilst the putty on the groundwork dried, I painted the sheathed knife. This is shown in photo #10. It’s a nice, subtle little casting, and although perfect, I still added some details with the paint. The sheath is painted with the same palette of browns used previously, and then scratches and scuffs added with a fine brush loaded with a mix of Titanium White and Mars Yellow.
The horn handle is a mix of Mars Brown and Mars Black, over which a very light cream colour ( Titanium White with only a touch of Mars Yellow added ) is brushed once or twice over the handle with an old brush. The hairs on the brush that are now separating into a broad mess, rather than a nice point, produce very fine lines, which can be further enhanced with a fine brush afterwards and some pure Titanium White.

Back to the groundwork.
The extra shield that comes with the kit, whilst relatively simple, is worthy of use, and I decided to add it to the base as “scene dressing”. I removed the hand from the back of the shield, and replaced it with a bar ( made from some wire ) for a hand grip. I also added a carrying strap, made from some spare Magic Sculpt from a different project ( yes, I sin and work on several models at once ).
The shield rim was pressed into the Milliput before it cured, and I added some French chalk to the area so that the strap could be formed over the contours of the groundwork and left in place, whilst not sticking to the Milliput while everything hardened.
Photo 11 shows how things then developed. Here the coal has also been painted with colours to match the Milliput soil. I painted the rock with some GW acrylic sand colour ( Orc Brown ) and then added Burnt Umber oil paint over the top, wiping and dabbing the excess brown paint off both the rock and the soil areas. A light drybrushing of more of the sand acrylic brightens up the detail on the coal.
I’ve then added some “Static Grass”; gluing this in place with some wood glue; and then painted it after the glue had dried, and added some taller grass in the form of some deer hair.

Having painted the shield – a very light yellow for one half, dark brown for the other, more of the brown leather for the strap – with the light yellow used to make the edge of the strap appear to be heavily used. And just because someone might take a peek around the back, the rear face of the shield has a nicely detail, painted on, wood grain.
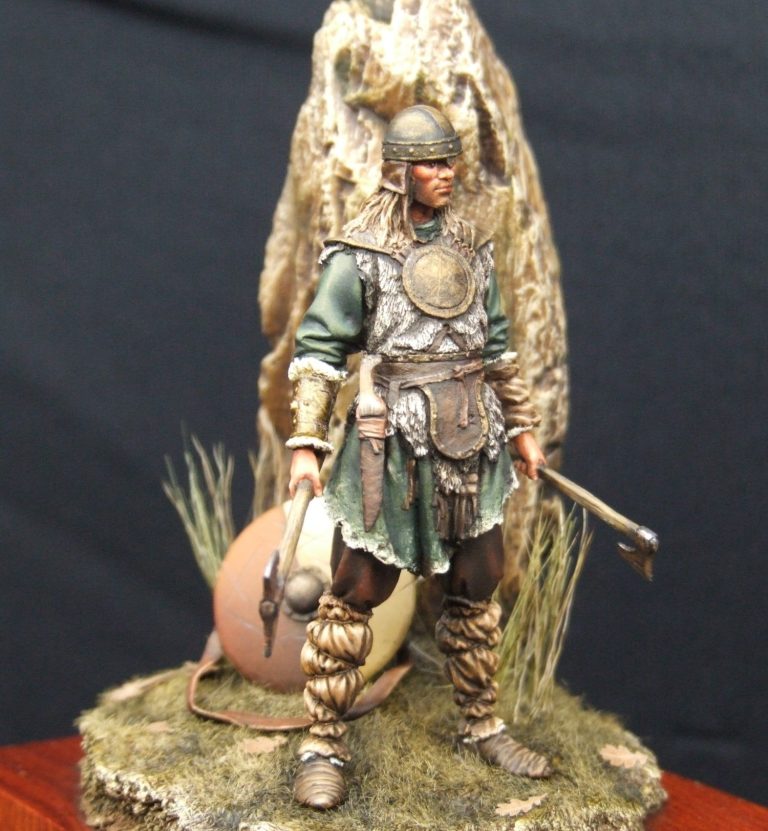
In photo #12 the model is finally in place and finishing touches have been added. More shadows have been washed on to the inner side of each leg, and also the deeper areas of grass will be getting some darker paint after this shot was taken too.
Some outlining has been done to tighten up the different areas and force their separation from one another.
Remember, this figure is only a little over two and a half inches tall ( 63mm actually ), so the definition of each item of clothing or weapon needs to be enhanced.
To do this I use a No. 1 sable brush and a very dark mix of the shadow colour for each area being treated. So for example to split the fur areas from the green of the tunic, I used a very dark green made from Mars Black and a little Prussian Blue and some Mars Yellow oils.
This part of finishing the model can become tedious; certainly mixing the paints up alone is time consuming and can add a week or two to the time it takes to paint the model.
However it is worth it, and it looks a lot better than simply using black to outline each area of the model.
The rest of the pictures show the model from different angles, along with a nameplate from “Name It!” and some oak leaves from Plus Models that are fastened separately to the groundwork with little dabs of wood glue.
Thanks to a few folk this time – to Raul Garcia Latorre for sending the review sample in to the magazine, to Mr Jones for passing it on to me to have a go at painting, and to Robin Snelson, Dave Ashby and Johan Kees for allowing me to bounce ideas for the colours off them.
Thank you one and all.


References – Brasseys “Barbarian Warriors” by Dan & Susan Shadrake
ISBN 1-5753-2139
Anglo Saxon Weapons and Warfare – Richard Underwood
ISBN0-7524-1910-2
We need your consent to load the translations
We use a third-party service to translate the website content that may collect data about your activity. Please review the details in the privacy policy and accept the service to view the translations.