There’s a lot of people find painting camouflage patterns of any kind both difficult and / or tedious, and decals to allow a shortcut can appear to be a godsend.
I’d heard about the existence of camo decals in 2021, and thought I’d give them a go, because although I can paint camo OK, these might just make life easier.
I purchased some 1/35th scale Tiger Stripe pattern decal sheets off Ebay for about £15 each, which came supplied in A5 sheets.
The printing of them was really good, and the first thing to do was test them out on a figure.
Using Camouflage Decals, the pro's and con's
Example used here is a 1/24th scale Ma.k figure
Article written in 2022
I chose a 1/24th scale model that had been hanging round the back of the workbench for a while, one that I think is for the Ma.k series of Sci-fi vehicles, originally from Nitto, but now produced by Hasegawa.

IHaving soaked the decal in water and trying to fit it around the many compound curves and creases was pretty much impossible.
I can hear you say “use softening solutions”, but I’ll come to that in a bit.
Simply put, I was trying to cover too big an area, that had too much detail sculpted on its surface.
To solve the problem, I cut the decal in half vertically at the waist where the fly and button would be. Simply making the decal reflect how the pants would be made in real life.
Whilst there was still a lot of surface detail to cover, it was a lot easier to get the decal film to fold around it by using a brush dampened with water.
The instruction sheet said to paint the area to be covered by the decals white, as this would provide a background for the colours that are printed on the decals, although shading of this white “ground” colour could be done if the modeller chose to do that.
I thought I’d stick with the pure white undercoat and see how things went.
So, initial thoughts…..
First off I tried measuring out and cutting a shape that was similar to the front half of the figure from the waist down.
When the decal parted from it’s backing sheet, it was surprisingly fine, my initial thoughts being that this would conform to the model’s trousers very well.
Other problems encountered at this point was the decal not wanting to stick to the surface of the model on one part of the leg as I tried to get it to follow the curves on another part of the leg.
Patience is required, and time. To get the decal on that first leg half – shown in photo #1 – took about forty minutes. But granted this was my first attempt.
Once I’d got the decal to form around the leg fairly closely, I then added the decal softening solution. At this point I discovered that the decals are so thin that yes, the solution works well, but if too much solution is applied, or if you’re a bit heavy handed with the brush helping push the decals further into the sculpted folds, then it’s very easy to break the decal film.

Also, adding the solution before you’re pretty much happy with the decal’s positioning can cause problems as the decal surface at first becomes a little sticky, and then can begin to break up if you try repositioning it.
Trimming the decal film should be done after about half an hour or so, long enough for the decal to dry out for a while, allowing it to adhere to the model’s surface, but not long enough for it to become a problem to lift the excess away from the model.
A new blade is best used, as it’s very easy to tear the decal film, again caused by it being so thin.
Another thing to note – keep the offcuts and trimmed buts by putting them back onto the wet backing sheets, these can be reused later for pockets or small areas, or for the sections that have broken up and need to be repaired.
A close up of Photo #1 shows the decal formed and around the front of the right leg of the figure, it’s had time to dry and to be honest was worth the aggravation caused by my ineptness of using something new. It seemed worth continuing.

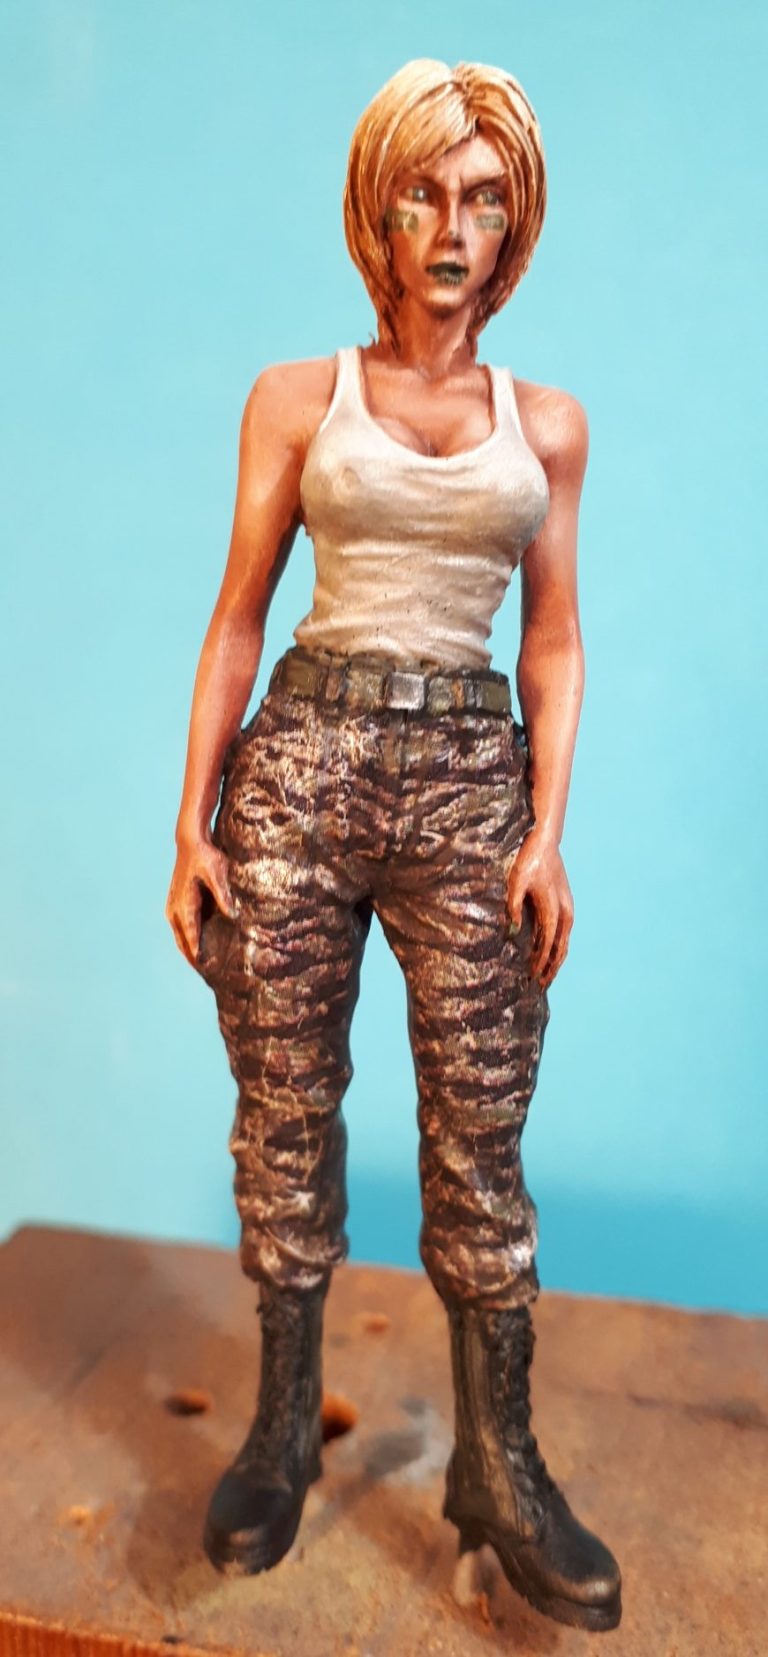
Photo #2 shows the front of the figure completed.
I’d taken some time to lay out a set of jeans on a flat surface ( the bed ) and get stared at strangely by my wife.
She didn’t ask what I was doing for fear that she might get an answer, just accepting that it would be something to do with model making
Studying how the pieces of material are fastened together makes it easier to understand that what I was trying to do was form a piece of clothing to cover the rest of the model’s pants. And using that idea to form the shapes needed for the back of the model really made sense.
More things to note – trimming around the hands and particularly the fingers was……… interesting, if only for the language that it caused. However, fixing any problems caused there was actually pretty easy, but I’ll return to that in a little while.

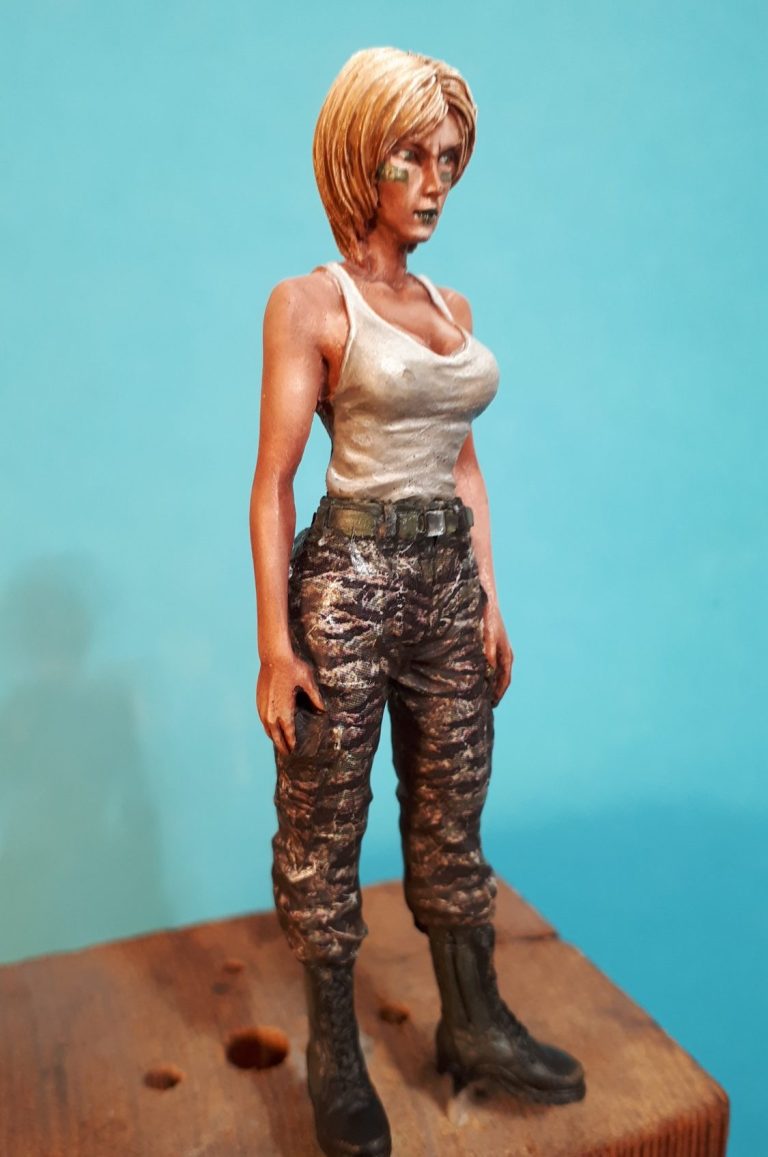
Photo #3 shows the back of the figure completed. One thing I found out whilst applying the decals was that by allowing a very thin line of overlap sown the length of the outer leg, I could give the impression of the seam where the material of the real article is sewn together.
But……whilst the effect at this point is pretty pleasing, and getting the decals onto the model was becoming simpler with the extra practice, the overall effect looked a bit flat.
So I’ll state the obvious here – just so you can have a chuckle – the camouflage colours were hiding the sculpted wrinkles and details of the casting.

To solve this, I began adding washes of oils to pick out the areas that would be in shadow = see photo #4. By shading the groin and the inner line of the legs, adding shadows to the creases too, the trousers looked a lot better.
It only took the addition of some Burnt Umber oils mixed with Mars Black and then thinned down with White Spirit to make this change, but it really did alter what at fist appeared almost flat, to something very effective.
This also came in to cover any tears that had been caused by trimming the decal to fit around the hands and fingers,
I used some of the same colour, but this time without as much White Spirit thinning it down, to paint in the seams, belt loops, pockets and the fly, and again this lifted the effect even more.

The final three shots show these additions having been made, and although difficult to see at first, those spare trimmings of decal that have been used to cover the pockets – particularly visible on the pockets on her bum in photo #6
Will the average modeller be able to make these decals work on a 1/35th scale figure ?
I think so. It’s not easy at first, and takes some bloody-minded perseverance in the beginning, but the results are worth the effort in my opinion.
As noted
- · Painting the area beforehand is a must.
- · Working in smaller sections that mimic how the real article of clothing is made works well
- · Cutting the decal to approximate shape helps.
- · Don’t add setting solutions or softener until you’ve got the decal pretty much formed around the area you want to cover

Hopefully all the above is of use if you give this a go. With practice, applying the decals becomes much easier, so don’t give up on the idea too soon.
This was a one piece casting, which in hindsight made it difficult because of having to trim around the hands and fingers. I’d suggest leaving the arms off until the clothing on the body is completed if it’s an option, and do the sleeves of jackets afterwards.
- · Keep hold of the trimmed off bits by putting them back onto damp sections of backing sheet.
- · Don’t worry about tears or breakages in the decal film, these can be covered with the spare bit’s you’ve trimmed off.
- · Give the decal chance to settle and dry off a bit before attempting to trim it to shape on the model.
- · Use a new scalpel blade to trim the decal.
- · Add a dark colour to areas that would be in shadow after the decals are fully dry.
But looking at the finished piece, and ignoring the rush job on painting the rest of the model, I think the decals are very effective, although they probably didn’t save me time when compared to painting the pattern.
There’s a lot of different patterns available on Ebay for decal sheets, so it might be worth checking out if you need a particularly complex pattern for one of your figures.


We need your consent to load the translations
We use a third-party service to translate the website content that may collect data about your activity. Please review the details in the privacy policy and accept the service to view the translations.