Charlie's Woman
1/10th scale Resin kit from Poste Militaire
Article in Military Modelling magazine in 1999
It's become almost a tradition for Poste Militaire to release one, if not
more, new models at the Euro Militaire show, and 1998 was no exception.
Not being an aficionado of the Napoleonic period, this was the offering that caught my eye on their stand. Granted the popularity of Native American subjects seems to have died down a little in the latter end of 1998 – is interest in that period / subject on the wane ? - Well not for yours truly, it isn't.


The bust of Rainy Mountain Charlie was an overnight success in my opinion, and together with the other busts previously released by Poste Militaire, is the yardstick by which I judge other companies offerings.
In this I feel I'm not alone, and I'm fairly sure that Ray Lamb and his staff not only recognise this as a kind of tribute from their customers worldwide, but that it also puts them under some amount of pressure as to what subject matter to choose to release in model form, and how best to execute said model. Am I rambling - as usual some may say - I suppose I am, let's cut to the chase.
The Model
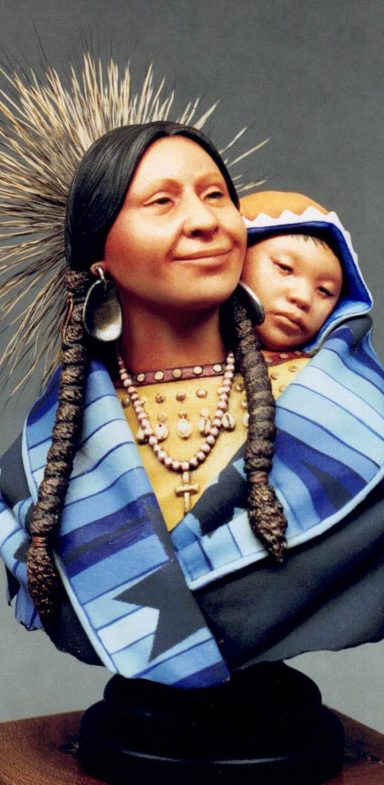
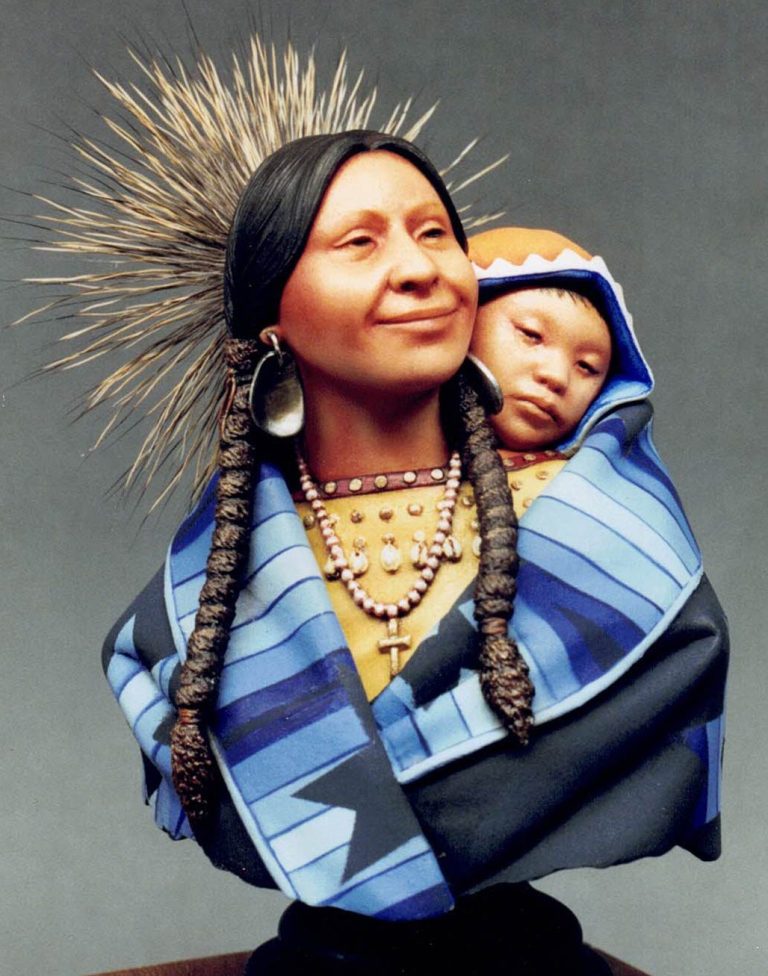
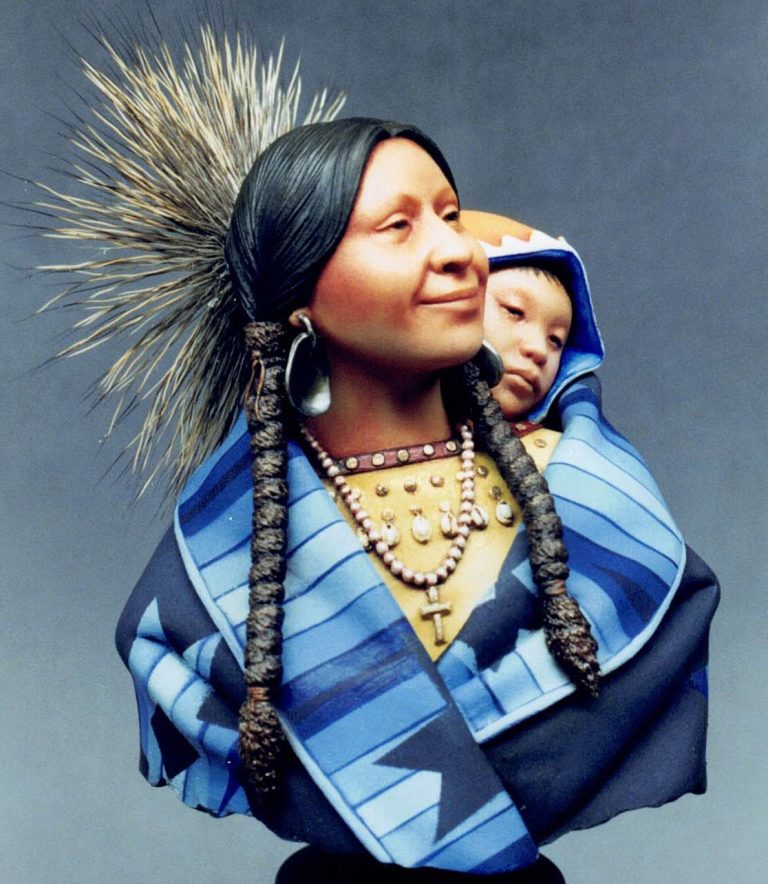
Billed as "Charlie's Woman" the bust depicts a young-ish mother together
with her child in a typical Native American papoose. The model is a true bust in that no additional arms or accoutrements are added, its just the head and shoulders of the mother and child.
Now I may be repeating myself here - and will continue to do so no doubt - by referring to the previous releases of Indian busts from Poste Militaire, so I'll ask for your indulgence in this matter here and now.
Suffice to say that the packaging is the same pure showmanship as the previous releases, and enclosed are several white metal and resin components.
There's also an instruction leaflet enclosed, giving hints and tips for possible colours to use, and how to assemble the parts into the finished model. All in some all what one would expect from Poste Militaire - and could only hope for in other companies offerings.
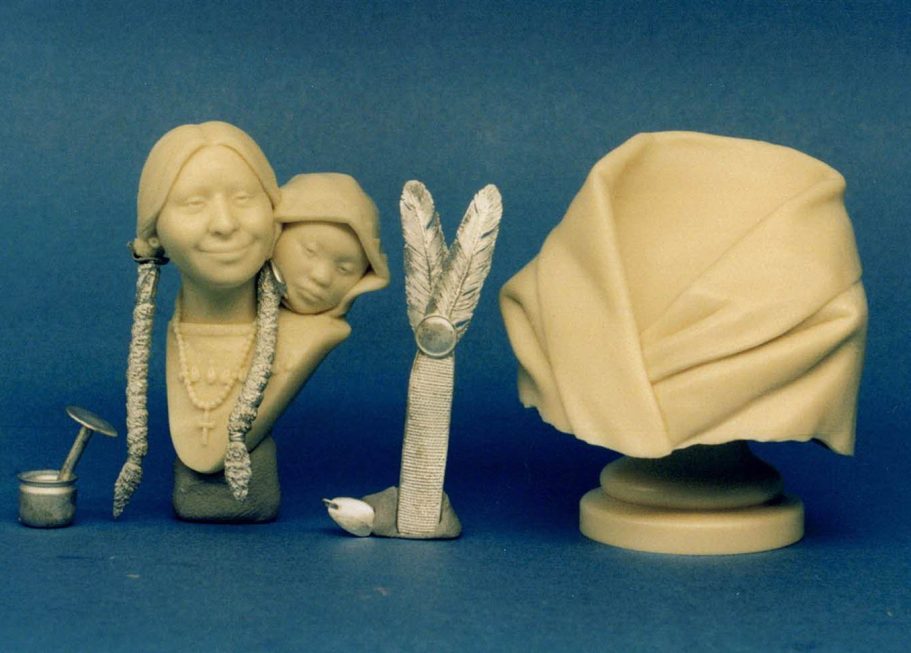
The breakdown is similar, although not exactly the same as with Charlie himself, the larger components being cast in a creamy resin that Poste Militaire have begun to use in preference to the white metal of years gone by.
There are still some white metal pieces in the kit though, and these comprise the pony tailed hair covered in buffalo skin, the feather and bead decoration for the back of the head, the alternative head decoration which I chose to use, and finally the right earring. The head and chest of mum, together with the head and hood of the child being in resin, and separate to the blanket which is also moulded in resin.
One major difference to Charlie is the texture of the cloak, which in
this case is much smoother. There is a slight texture, but it's only when you come to cleaning the moulding that you notice it, more of that though later.
The mouldings
On the face of things moulding is the usual excellence that would be expected from this manufacturer, the white metal in particular needing no more that a quick wipe over with a bit of fine steel wool to clean it up. I say this because although I struggle seeing mould lines on Ray Lambs offerings, they must be there otherwise the parts wouldn't come out of the moulds, so it's better to give the whole part a gentle pass over with wire wool, than have a very fine line that's been missed, show up later on.
Now to the resin parts. Ho Hum. How to say this without ruffling feathers.
First of all, the moulding is good...... but not as good as on Charlie. Let's just clarify a few things before I dig myself deeper shall we. The moulding on the cloak was O.K. but it had some flash and some mould lines in evidence.
These ran up the side of the cloak, along the lines that the arms would take should they be visible, and over the shoulder to the neck. It did look as though these had been semi-cleaned off already, as there were file tooth marks around this area. Also there was a slight mismatch in the mould around the bottom edge of the cloak that ran about a quarter of the way around the bust.
Nothing major really, but worthy of note.
Also on the moulding of the head / shoulders, there was a very - and I do stress very - fine line on the side of the neck. This is the one that got me, and I'll own up to not seeing this until after the skin tone was being blended in that area.
None of these - well apart from my stupidity of missing the latter - gave
any problem in cleaning them up, but the texture on the cloak showed up when a primer was sprayed on, and the cleaned area had a glossy shine due to the smoothness, contrasting with the very slight texture on the rest of the casting.
Do I sound like I'm whinging, well I hope not, I'm simply trying to give you the chance to check for these mould lines that may be on the model you get, and as they are easy to miss, at least you have the chance to identify where they could be.
So once cleaned, I drilled holes into the separate parts, allowing me to insert wires into the holes so that I could hold the parts without touching the paintwork. Once this had been done the parts were washed and the painting could begin.
Painting
As per usual I'll try not to bore you silly with a rundown of every little bit of the painting method, sticking to new things I've tried, and anything else I think might be helpful - letters please to the editor if I'm missing too much out !
I began with the skin tones. Worthy of note here is to try and make a slight difference between mother and child. I went for a darker skin on mum, but looking at the photos, this isn't too obvious. Also, there is no hair moulded on juniors forehead, that's just me taking a bit of artistic license, and referring back to when my son was of a similar age.
This hair was added by running a line of black oil paint along the underside of the hood, right at the border between the hood and the forehead, and then using an old brush that's bristles had seen better days to pull the paint down in thin streaks.
A simple but effective method.
I also found the eyes rather hard to paint in on this model ( I had similar problems I seem to recall with Charlie ), in that the eyes are indents into the skin, and as these indents are concave rather that convex, I found it something of a problem to get the eye to look "right". Filling the indent with a dark brown paint didn't work, and I'd advise the use of oils here to allow some time for experimentation.
As for mums hair, I painted the whole of it with a black acrylic, then added over this when dry, burnt Umber oils, drybrushing on a very slight highlight of the flesh tone that I'd made too much of. This gave the illusion of a very dark, but not quite pure black, hair.
Clothing
The nice thing about this kit is the thought that has obviously been given to the way in which the parts are broken down. The two resin components can be painted separately and join in such a way that filler is not needed.


In fact it's worthy noting here that this whole kit needed no filler whatsoever.
The shirt was painted with a mix of yellow ochre and white, using more white for highlights and raw umber for very restrained shadows. I also added a band of burgundy to the neck line, hoping that this would make the studs stand out, having noted that the ones on the shirt itself seem to blend into the yellow colour. I did initially think of painting a pattern onto the shirt, but decided against this, thinking that it might clash with the pattern of the blanket.
Jewellery
Nothing new about the studs, just gold paint shaded with some more burnt umber. The very small Cowry shells, which I take it were a sign of some wealth, were painted a pale creamy pink colour - there's an exact mix for you ! - and given a thin wash of burnt umber to pick out the very fine sculpting in this area. The necklace I chose to depict as pearls, probably not accurate, but if she's got access to Cowry shells, then why not pearls.
Anyway, these were painted with a white undercoat, followed by a pink acrylic. Two coats of the latter paint were added to get a good depth of colour. Now for the fun. I coated the pink with some pearl nail varnish, borrowed surreptitiously from my better half, this gave a pearl sheen, which looked to be a fair representation of the real thing in miniature.
The final addition to the necklace being some burnt sienna oils thinned to an inky consistency and being run between each of the pearls to give an added depth to the item.
The cross was painted in a similar manner to the studs, that being gold with brown shadows.
The Blanket
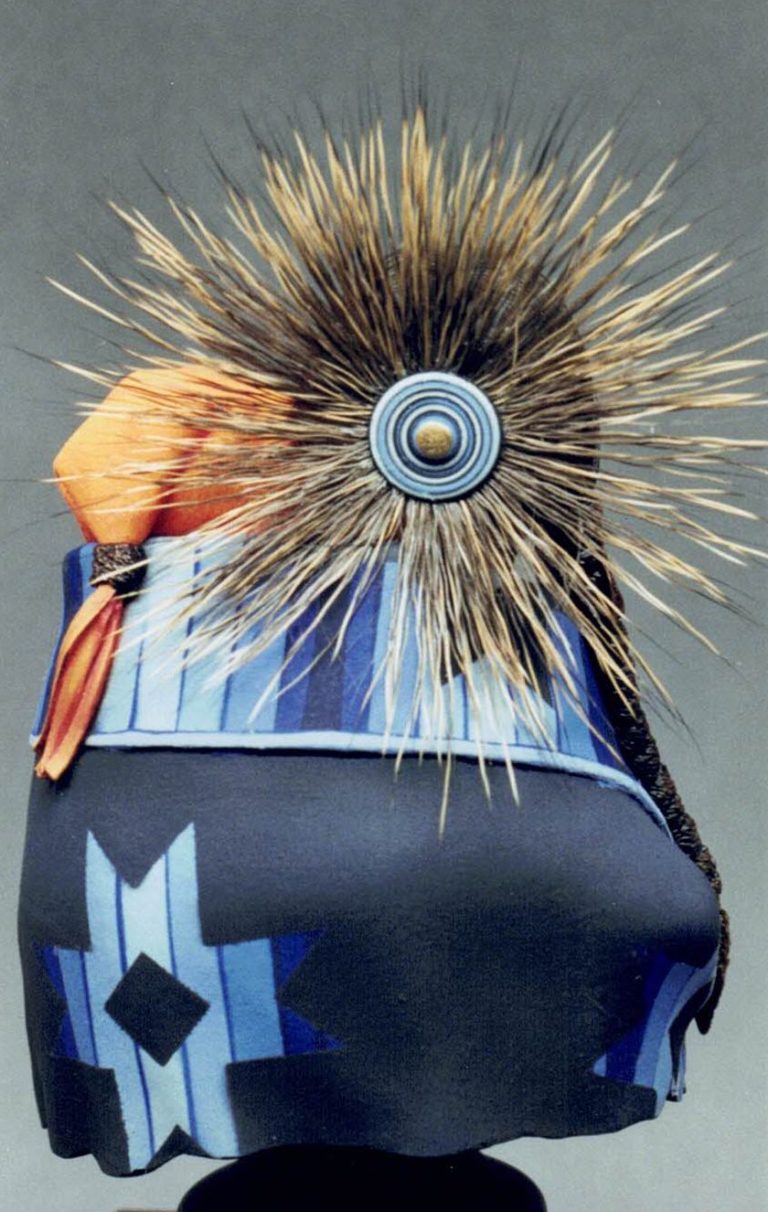
Now for the fun. I decided to use an airbrush on the blanket, mainly to play about with masking things off, and to get a little practice with a tool that I'll admit to not being too friendly with.
I began by looking through the "Language of the Robe" book - a sort of train spotters guide to Indian trade blankets - and selected a design that looked way too complicated, but that I liked. The basic design was drawn out on paper, and then radically simplified to one that I could A) actually manage to make masks for, and B) have any hope of pulling the "look" of it off.


Next to the mixing tray. I began by airbrushing on some Humbrol white, this acting as a primer, followed by a very pale blue colour. All the colours used for this were from the Humbrol range of enamels, thinned down with Cellulose Thinners. In photo No. 1 you can see the blanket has been painted in the pale blue, and then has had added to it, once the paint had dried slightly, some thin strips of paper masking tape.
I measured the distance between the tapes roughly to allow several stripes to be painted in different colours. As each set of tape masks was added, a layer of paint was sprayed over, mixing more and more dark blue into the initial pale blue mix, until I was using almost a black colour. Thin gaps were left between the masking tape strips, and these were dusted over with the darkest shade of blue, to give the thin dark stripes between each band of colour.
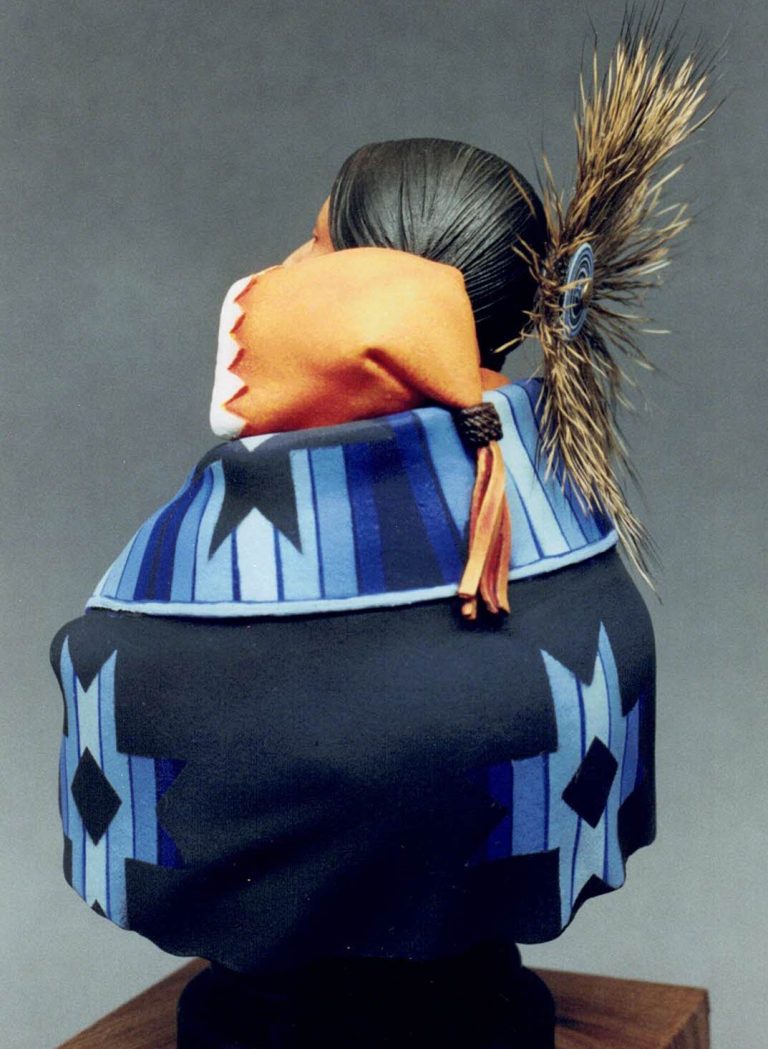
One thing I should have done though, particularly on the upper fold of the blanket, was to taper the strips of masking tape, so that I allowed for the stretching of the material as it goes around the shoulders. Because of this lapse I ended up with the black triangle of dark blue on the left of the chest area, which does look a bit "off" once you notice it. Having said that,
I'd painted the blanket three times already to arrive at this stage, once, using yellow, red and brown, then using the blue colours as shown, and then getting it almost right in the final instance with the ones pictured here.
So I'd sort of got to the end of my tether with the old airbrush.
Once the stripes were complete, I cut out several star shapes, the easiest method to get all these to be the same being to fold a piece of paper up several times, and then draw the design on the top sheet, cutting through all the sheets to end up with several duplicates of the desired pattern.
A photo of these is shown, together with the "striped" blanket before the addition of black paint see photo No. 2 I used both "male" and "female" parts of the design, one on what would be the inside of the blanket, and the other on the outer face of the blanket.
I chose to use plain paper from a note pad, simply because it is thin, and although it isn't self-adhesive, if soaked in warm water for a couple of minutes, will follow most compound curves, and if left to dry, will remain "stuck" to the surface of the model so that it can be sprayed over and not move.


Once the paint is dry, the masks can be gently eased off the model, and if they are stubborn to get off, then they can be soaked with a little warm water again, and should come off with no trouble.
The black paint that I used on the cloak to fill in the final pattern was the only colour that was shaded, beginning with a pure black, and lightening this with small additions of white, to produce a dark grey for the highlights.
A picture of the blanket at this stage has also been included see photo No. 3. That thankfully was the end of the airbrushing. The only thing added to the blanket now was an edging strip that was painted in with the pale blue colour by hand.
Now it was time to decide on a colour for the child’s hood. I decided on orange, simply because not only is it bright, but it contrasts well with the blue of the blanket, and it's also fairly non-committal about whether the child is a boy or a girl ( personally I get the impression of a boy, but someone's bound to have a difference to that opinion - still I've got a 50:50 chance of being right - Eh ? ).
I used oils again for this, over the habitual acrylic undercoat, and as the orange takes days if not weeks to dry usually, I chose to have a little bit of an experiment into drying it a little faster than normal.
I've heard of people oven drying models - too risky for me I'm afraid, and I've also heard about the Americans - Phil Kessling in particular - using a "Crock-pot" I on the other hand decided to put a ceramic tile on the top of a double radiator, the model resting on this, and covered - to keep the ever present dust off - with an old "Tupperware" box.
This worked really well, not only drying it in record time, but also giving a nicely matt finish. I glued the blanket casting to the small pedestal provided, painting the underside of the blanket and the pedestal in matt black. Then added the head and shoulders into the socket in the blanket after that. Now for the "fiddly bits"

The additional pieces
To finish the bust off, I polished the earrings with some fine wire wool, followed by some "T" cut auto polish, so that the metal was nice and shiny.
These were then sealed with some Tamiya "Clear Smoke". The pony tails were painted with brown oils over an acrylic undercoat, and once dry these items could be added to the model.
Now for a choice. Poste Militaire have allowed the modeller some latitude in the overall finished look of the model, not only with the colours suggested, but also by including two different options for the headdress.
The first one of these is the expected feather and beaded "tail" affair, but the second is ( possibly ) for the more adventurous, in that it requires assembling tufts of hair - which will need to be supplied by the modeller, into a rosette type affair that is quite stunning in both the simplicity it takes to assemble and the finished item which adds a certain flair to the finished bust as a whole.
Effusive again ain't I, well I just appreciate a company that tries, and succeeds, in bringing the modeller new ideas. Right so what does all this entail. Well what happens is you get some hair - I used deer hair which I got from a fishing tackle shop, squares of this cost a couple of pounds and can be used for long grass on groundwork bases etc. Once some suitable hair is selected the modeller ties some cotton around a clump of it, and cuts the hair just below the cotton loop.
Then add some superglue to the cut end of the hair, and once dry add this into the small cup-like metal moulding that is provided in the kit.
I had a couple of tries at this, mainly because I misjudged the amount of hair the first time and the bunch wouldn't fit in. Once it's in the cup though, push the pin like casting - also supplied in the kit - through the top of the hair so that the shaft of this extends out of the bottom of the cup-like moulding.
This flattens out the hairs into a rosette and with he addition of some glue to hold things in place, the bottom of the cup can be cut away, leaving a very effective hair decoration for the model.
Problems here, well there weren't any really, except those I made for myself in my haste to add glue, cut hair, and generally see what I could make.
What I'd advise when doing this is to stop and think a little before committing the glue to the metal bits.
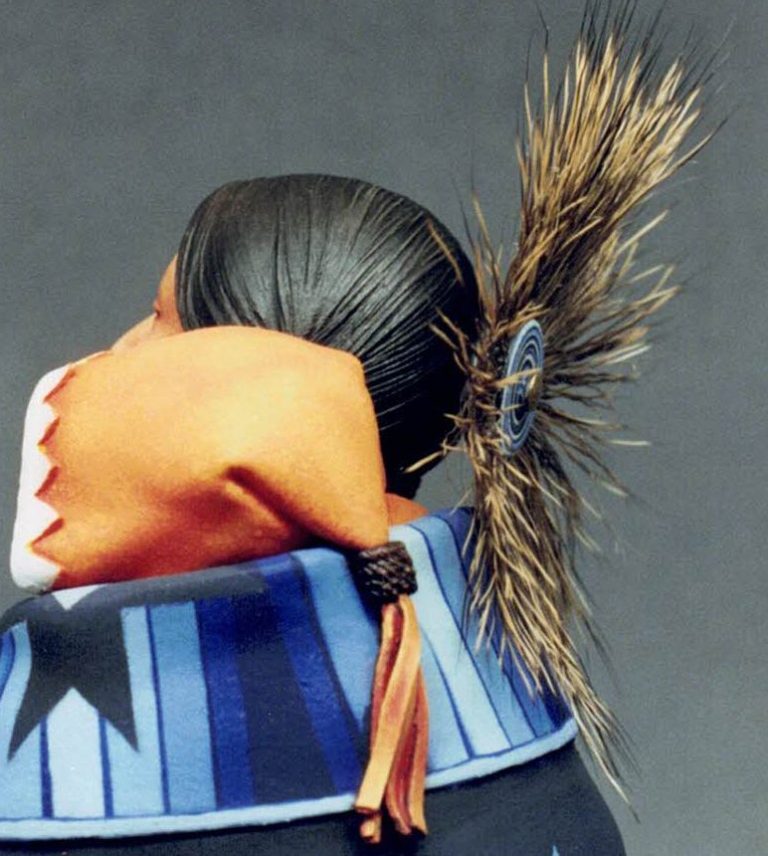

“What do I mean ?”you ask. Well simply put, I spent about an hour trying to stick the assembled decoration onto a drill bit so that I could spin the drill to get a perfectly circular pattern painted onto the head of the central decoration.
The language during this time was "choice" to say the least. I eventually drilled through the ornament and inserted a pin, this going into the drill chuck and hey presto a spinning thing to put paint on - slow speed advised here or the paint flicks all over the place - more choice words !
Anyway my advice here is to either polish or paint the head of the pin-like component before gluing it in place, and use white glue to fasten it rather than superglue, so that the finish on the pin isn't "fogged". Simple really eh !
With that all done, the decoration can be glued to the back of the woman’s head, and the model is just about finished.
The only additions I've made to the model being the base - supplied very kindly by Oakwood Studios, and a nameplate made from a bit of the milliput that I'd have loved to use as filler on the kit, but didn't, due to the good fit of parts - can't have a write-up without using Milliput I'm afraid ! This was painted to represent a buffalo hide, and the name painted on once the skin colour had fully dried.
Final words
Well the verdict - as if you hadn't already guessed - is that yes, this is another good kit, I'd go as far as saying excellent is an understatement.
I don't know whether this one will appeal as much as Charlie did, the cragginess of his face cried out to even the most jaded people to have a layer of paint put on it. this is still a fine model though, and one well worth considering adding to a growing collection of Native American subjects.


If I was to criticise it in any way, I could only question the apparent age difference between Charlie and his wife, and ask would he still active enough to have children this age ? Yes, I know the elders did take younger women to wife, but it's just a thought that's all !
Finally I would like to thank Poste Militaire for supplying this kit for review.
We need your consent to load the translations
We use a third-party service to translate the website content that may collect data about your activity. Please review the details in the privacy policy and accept the service to view the translations.