
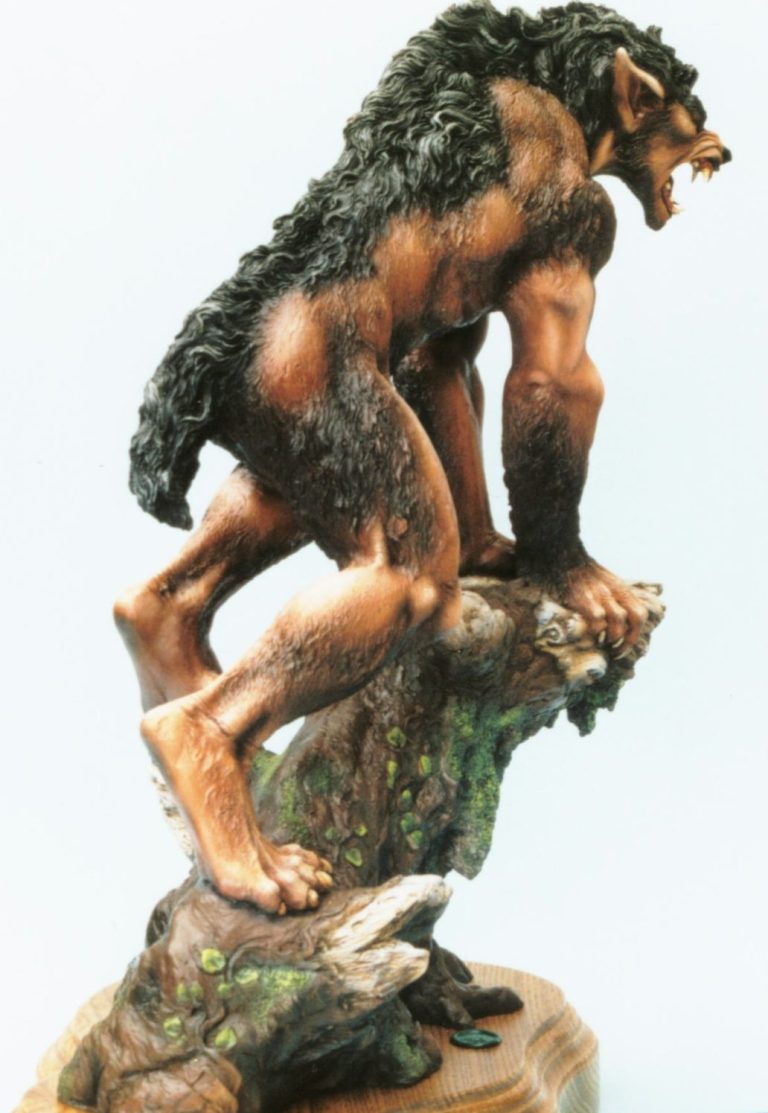
Moonsinger
1/6th scale Cold Cast Resin kit from Newmanoid Models
Painted in 1996
Vampires and Werewolves, two of my favourite subjects from the horror genre, and I think this has to be my favourite model of the latter.
Three of these ( as far as I’m aware ) were imported and put on sale at the NEC’s Sci-Fi and Horror show in 1996 and I was lucky enough to have the money and be in the right place to buy one along with the Neil-Andrythal figure, also from Newmanoid Models.
Mark Newman was a new name in sculpting to me, but these pieces were fantastic, so much so that I still take them out to display at shows all these years later.
Mark is still sculpting, and although I’ve not bought any other of his sculpts – I wouldn’t mind having a few ) I simply haven’t come across them for sale in the UK.
So, this was painted at a time when I really didn’t think so much about taking progress shots, and finished pictures are all I’ve got.
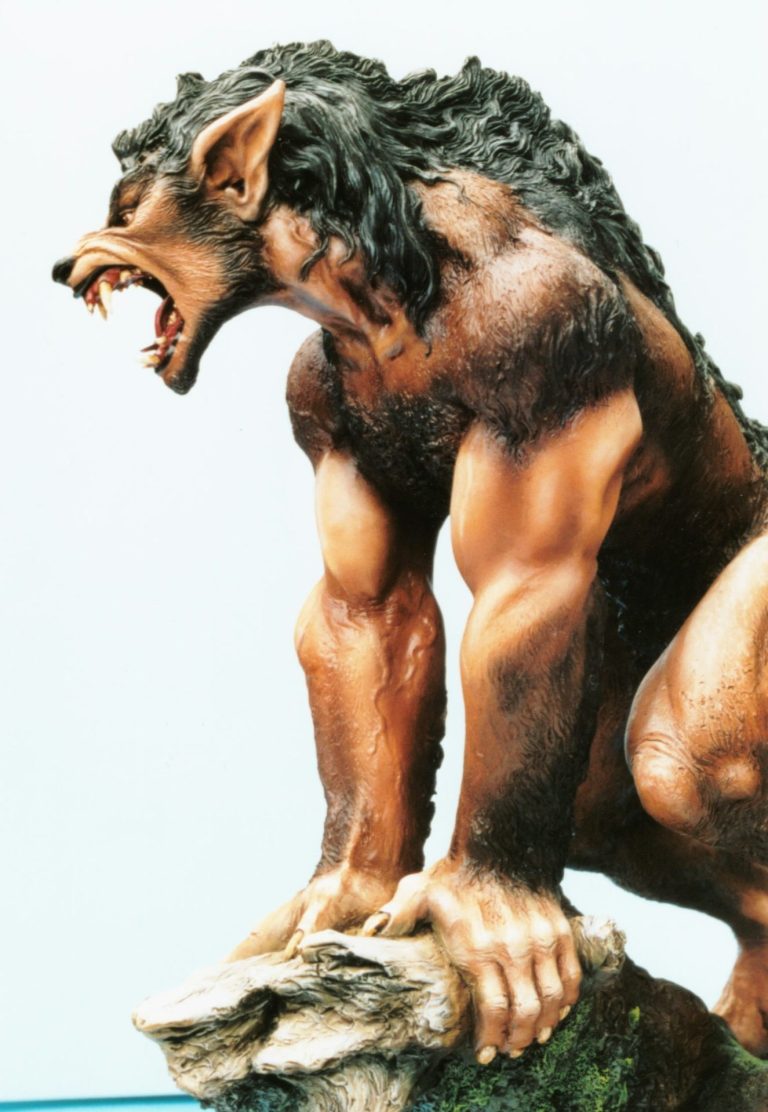
What I can say is that the sculpting and casting is superb, fit of parts is spot on, and there is little or no clean-up.
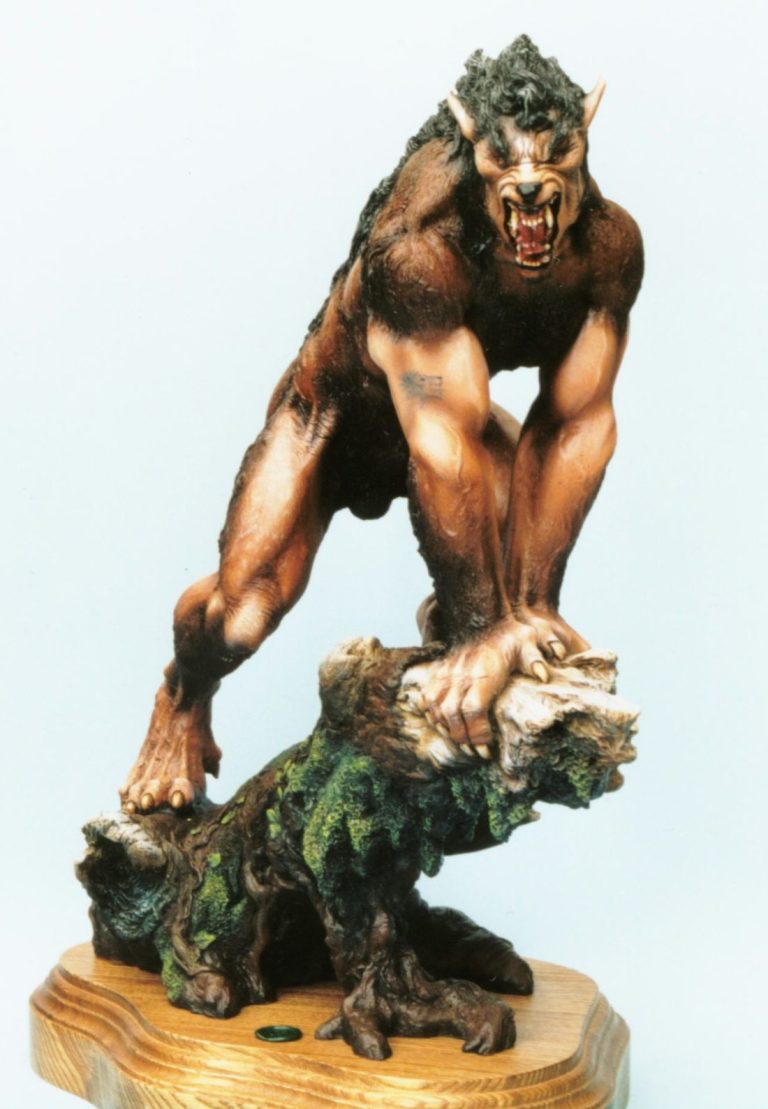
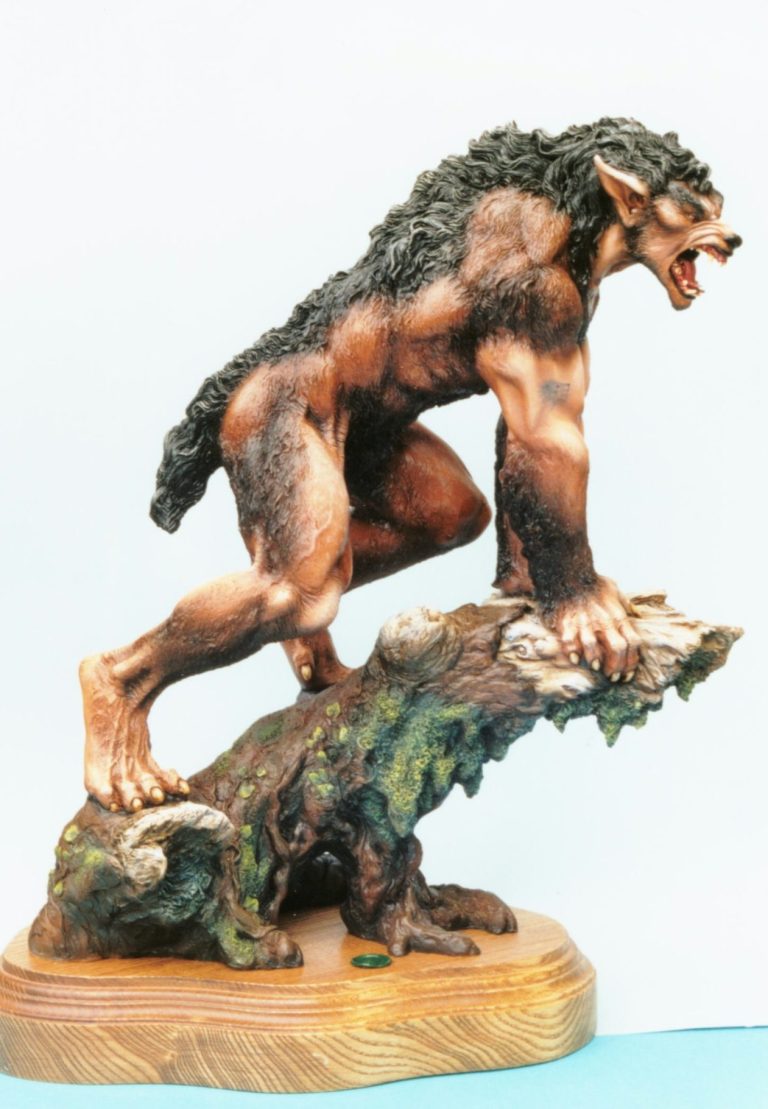
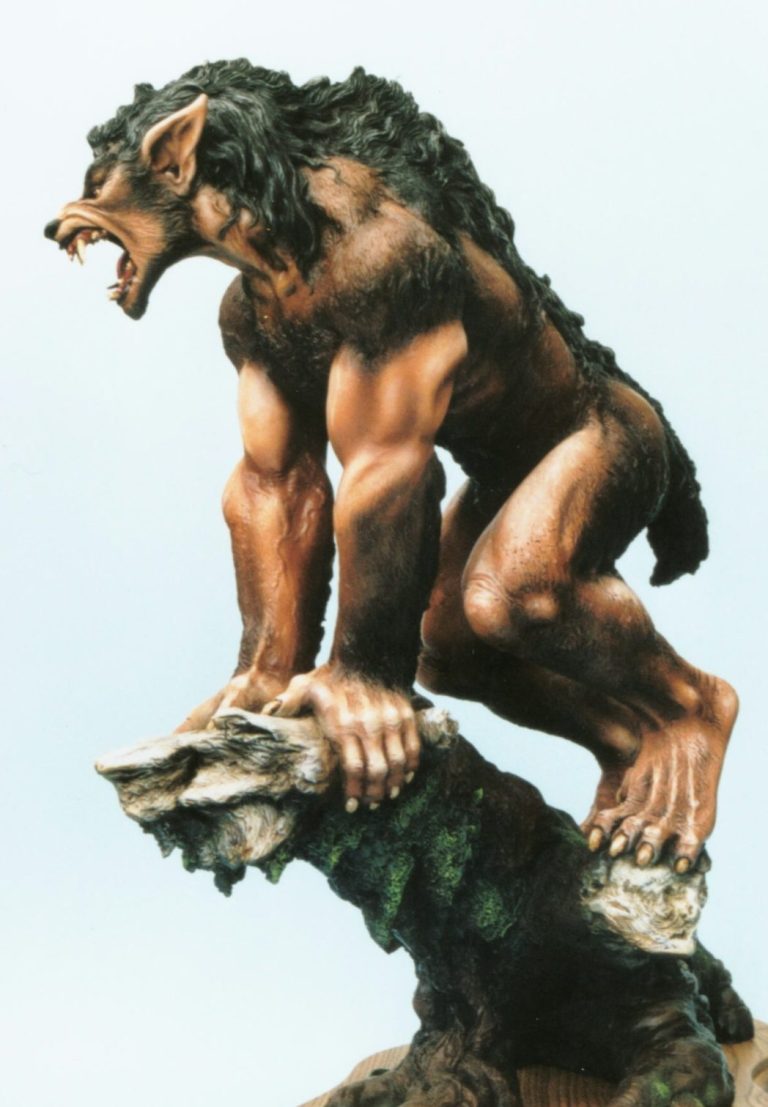
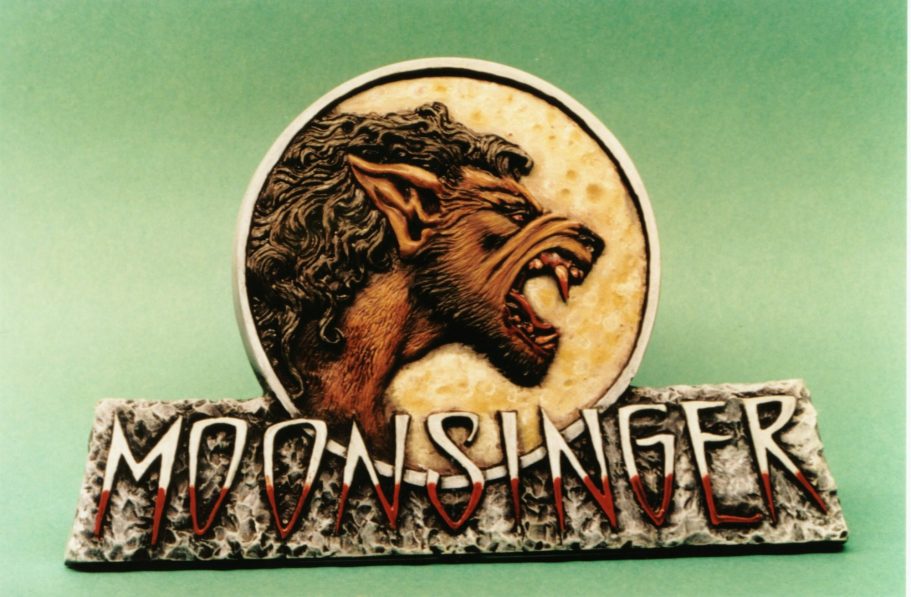
The model is split up quite cleverly – the arms each being separate from the body, but each one holding a part of the tree log that he’s posed on, the head, torso and back legs are all one piece, and the bulk of the log that he stands on is a further casting. Added to this there’s a separate “flat” nameplate that is rather a cool addition to the model showing a side view of the Moonsinger’s head along with the model’s title.
And I think ( bear in mind I’m writing this 18 years after painting him ) that the teeth are separate castings…… Can’t be sure though – old age and memory to blame.
OK, there is a down side, well two really.
One is the joint mid-way up the bicep on each arm. It’s difficult to hide and it’s worth spending some time filling and then sanding the area smooth.
The second is the weight of the model – seven and a half kilos. I couldn’t figure out a way to paint the model in sub-sections, so it’s got to be joined together prior to adding paint, and although I did come up with a novel way of supporting it – rigging up some hooks and thick string to a ceiling beam in my cellar – it’s still a hefty piece to twist and turn around whilst painting it, even with the added support.
The lion’s share of the painting is done with an airbrush, using Tamiya paints thinned down with Isopropyl Alcohol and using various browns and white from the range to make the flesh colours running through to the areas covered in fur.
The model did look rather pale and pasty with these colours added, but I allowed it twenty-four hours for the paints to dry fully so that the next layers of paint didn’t lift the Tamiya colours.
After I was confident that the Tamiya acrylics had dried fully, I set about adding an overall wash of Burnt Umber oil paint, thinned quite heavily with White Spirit.
It doesn’t need to alter the colour much, in fact the brown colour is there to show which areas have been coated already as the process goes forward.
Once this initial wash is added to the surface of an area – say the left hind leg, a denser mix of the brown paint – less White Spirit and more Burnt Umber – can be added to deepen the shadow areas, and also flow into the thicker hair sections.
By working round the model, using this method to add greater or lesser amounts of the brown, the Tamiya colours are enhanced, the shadows and areas of longer hair are given more depth plus as drying takes place, there is a slight satin finish added that brings the figure to life far better than the dull matt effect of the Tamiya colours did if left as they were.
Again a period of time was needed for the oil colours to dry fully, and such a large model cannot fit into the drying box I have. SO the model was left in a warm room for a couple of weeks before anything further was done.
Now to finishing touches.
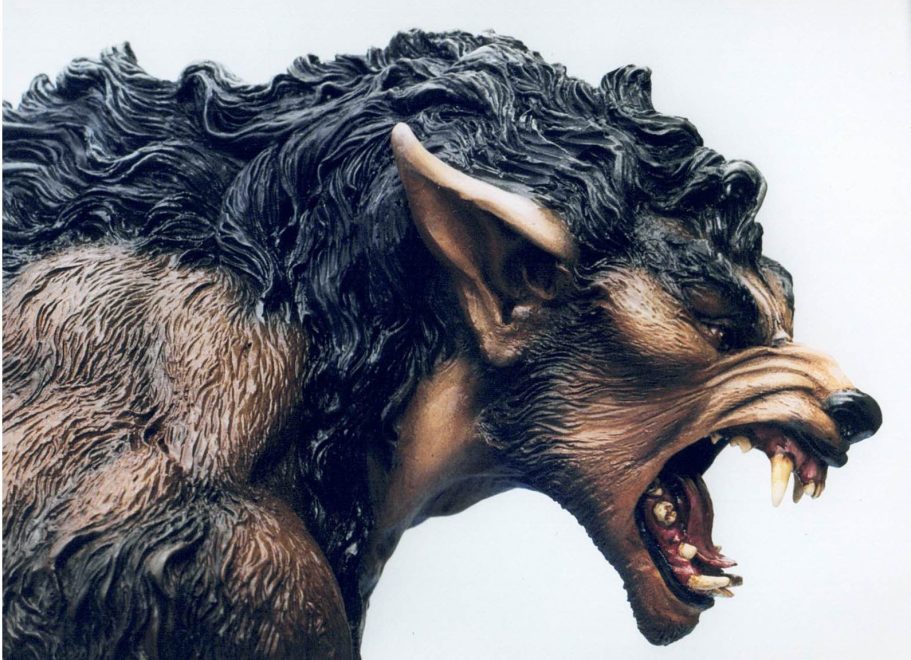
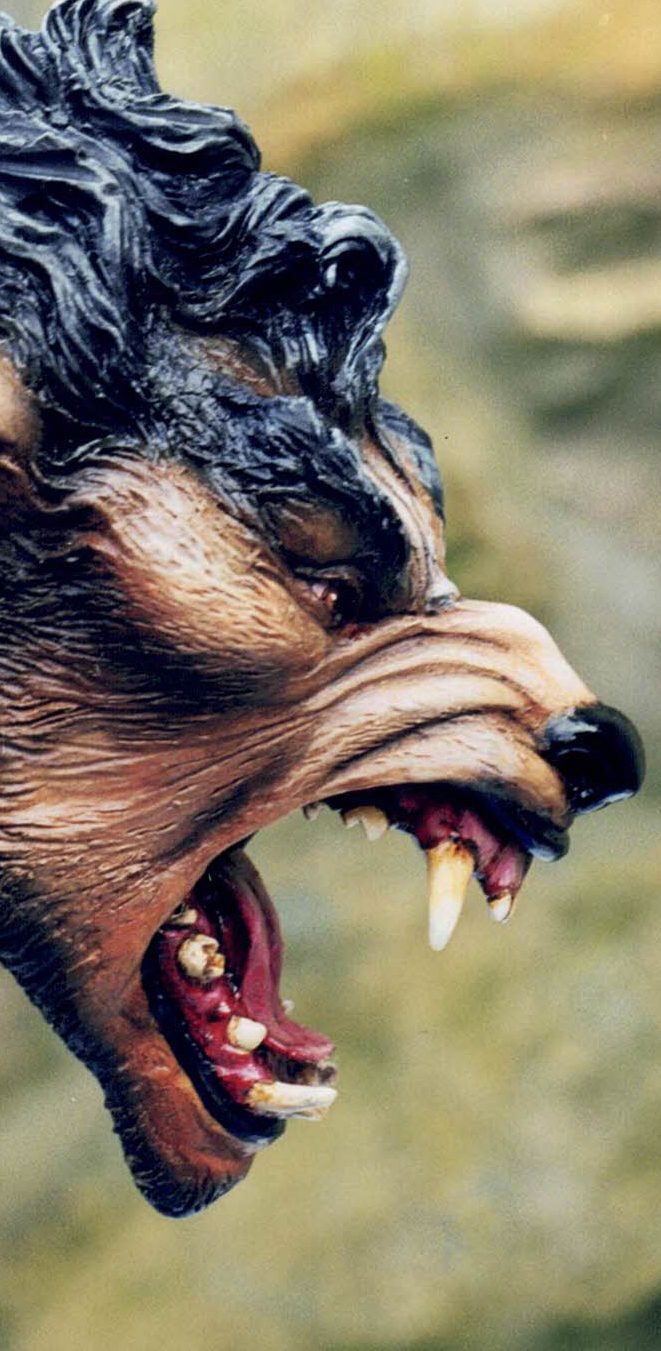
A very light drybrushing, using a large brush with only a minimal amount of paint on it - was passed over the areas that had thicker hair, the neck, back and tail in particular, and then it was onto the finer details of the eyes, teeth, tongue and gums.
The eyes are relatively tiny compared to the size of the kit, but were rewarding to paint as they add to the aggression of the pose. I chose a yellowy brown for the iris, outlined with Burnt Umber, and a black pupil. Tiny catch-lights were added once the rest of the eye was dry, then a little gloss varnish with just a spot of Alazarin Crimson added, that once settled, forms a slight redness at the corners of the eye.
The pink of the gums and tongue were done with an acrylic undercoat of GW Skull White, and then a coat of Alizaring Crimson with small amounts of Titanium White added in to bring out mid-tones and highlights.
Again a period of time for this to dry, then recoat the teeth with the Skull White, and used Burnt Umber, Yellow Ochre and Titanium White to paint in the teeth.
The same method was used to paint the claws too.
With the figure finished, I could paint the woodwork that he’s standing on.
I’d allowed some of the darker Tamiya paint to fall onto the areas around the hands and feet, which gave me a start to add acrylics to the wood around them without having to work too close to them.
The bared part of the tree trunk was painted with a cream colour mixed from Desert Sand and Skull White acrylics, and the bark painted with Swamp Brown and Chaos Black mixed in equal amounts.
The whole of this, once dry, was coated with a moderately thinned Burnt Umber oil layer, and the excess wiped off with a soft cloth.
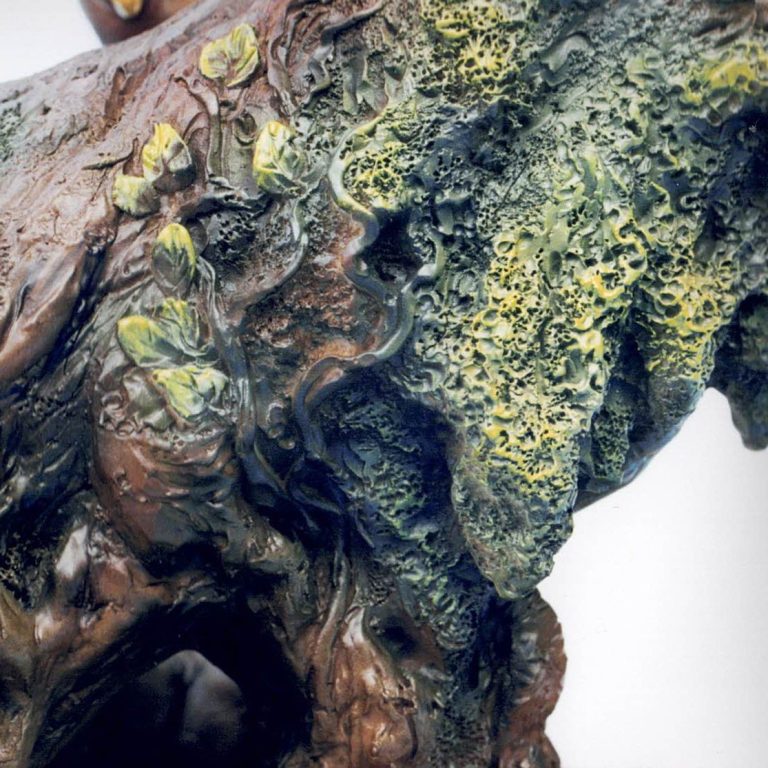
The mossy areas had Olive Green added – mixing this into the Burnt Umber, which was still wet at this point – and then lighter greens were added to bring out the sculpted details.
The final thing to do after the paint had all dried was to source and fasten the figure to a base.
Dave Armstrong of Peterlee’s Armstrong Bases kindly sourced a large enough piece of wood and cut it to shape to match a stencil I provided. Dave unfortunately is no longer producing wood plinths, but this one is a testament to his skill at working with wood.
With this being a hefty piece of resin, I took the time to drill into the underside of the model, making a hole large enough to accept a nut that was then fastened in place with Milliput.
A matching hole was drilled into the wood plinth, adding a deep countersink that would accept the head of a bolt that matched the nut already fastened into the model.
An extra bit
Along with the model components comes a plaque with the head of the moonsinger sculpted almost as a flat, and the name “Moonsinger” in stylised script. I painted this up to match the colours of the figure, and this can be seen in this shot.
Final thoughts.
Expensive, but for all that it is a centrepiece to any display. It also almost paints itself, because the sculpting is so good. It’s big – the size of a small cat, and as I mention the weight can be a bit of a problem whilst painting it.
However, after 20 years or more, it still comes out to displays at shows now and then and still gets a lot of attention, deservedly so for the sculpting, if not necessarily for my painting.
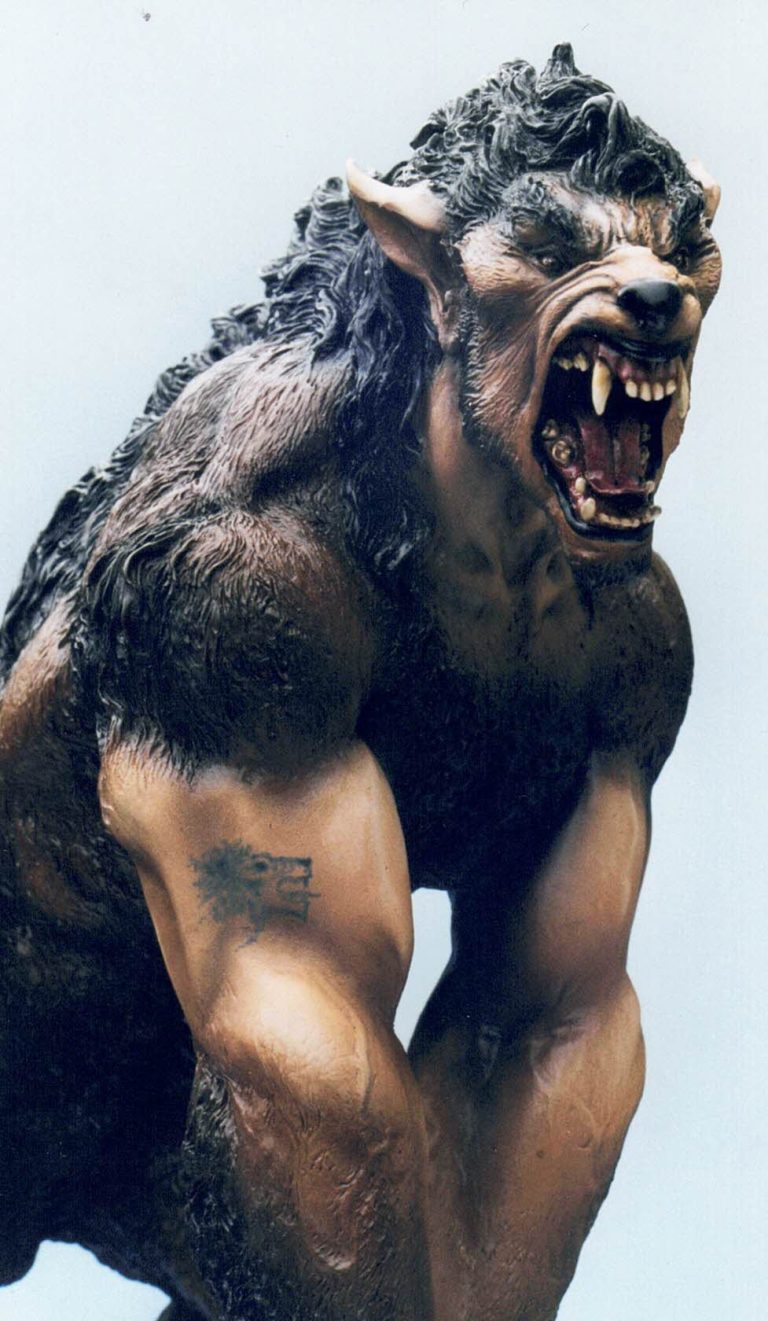
I did go back after a couple of months and added a tattoo on the right bicep of a wolf’s head, although it’s not very noticeable in these shots.
I doubt very much that a genuine on of these would come up for sale, although occasionally pirate copies do appear.
I think 900 were produced originally, and I would suspect that these are far, far better castings than anything the pirate companies can provide.
I would say this is highly recommended, but far better to look up Mark Newman and Newmanoid models and consider buying something he currently has kits of.
He’s a very good sculptor, although some pieces are single commission pieces, I highly recommend anything he does put into kit form.
We need your consent to load the translations
We use a third-party service to translate the website content that may collect data about your activity. Please review the details in the privacy policy and accept the service to view the translations.