The Minotaur Attacks
1/8th scale ( 200mm ) resin figure from Pegaso Miniatures of Italy
Painted in 2013
The Greek myth of the Minotaur is based around the island of Crete and one of it’s rulers.
It begins with the death of an old king, and with his three sons seeking to gain the crown. One son, Minos, prays to Poseidon – the Great God of the sea – to send a white bull to show how he is favoured. Minos promises a great celebration and the sacrifice of the bull, should it be sent, all to the glory of Poseidon.
The bull appears, but is of such perfection that Minos cannot bring himself to have the animal killed, and instead, substitutes the best animal from his herd. Poseidon is infuriated by this, and curses Minos’s wife – Pasiphae – so that she finds the bull irresistible.
Such is her lust that she seeks the help of the inventor and craftsman Daedalus to help her gain satisfaction.
The result of this unnatural union is the Minotaur.
King Minos is so horrified by the child, it being half man and half bull, that he seeks the help of Daedalus in order that the craftsman create a labyrinth so complex and cunning that there would be no chance of escape.

Once the labyrinth had been built, the Minotaur is captured and banished there. The monster is infuriated so much that it’s maddened progress through the tunnels cause earthquakes on the island. To assuage it’s anger, seven young men and seven maidens are brought as tribute from Athens, and locked inside the labyrinth with the monster for it to feed on.
This stops most of the earthquakes, and becomes a ritual. Dependent upon which version of the myth you read, the sacrificial victims are brought as often as every year, or with as long as nine years between tributes.
At some point, the hero Theseus hears of the men and women being sent to their death, and convinces the elders of Athens to allow him to be sent instead of one of the men in the next selection. Upon his arrival in Crete, he becomes involved with King Minos’s daughter, Ariadne, and she offers him a way of escape from the Labyrinth, if he will promise to marry her when he escapes.
When he agrees, she hands him a large ball of string.
Theseus ties one end of the string to the gates of the labyrinth, and pays out the thread to mark his path as he ventures into the tunnels.
He is lucky, and comes across the monster as it sleeps. Before it can wake, Theseus beats it to death ( nothing like a good bit of violence to spice up a tale ), and then uses the string to find his way out, thus saving himself and the other victims of the sacrifice too.
The model.
Pegaso stunned ( well it was a bit of a surprise, you’ll have to admit ) the modelling world with their entry into large scale fantasy with this model.
O.K. I can hear you muttering that the first large scale piece was the “fire” bint with the large…….curly bits of resin swirling all over the place. But my argument is that they already did a range of 80mm tall women / girlie figures, so the step up to something larger for those with dulling ocular capability, was an eventuality and not necessarily a surprise.

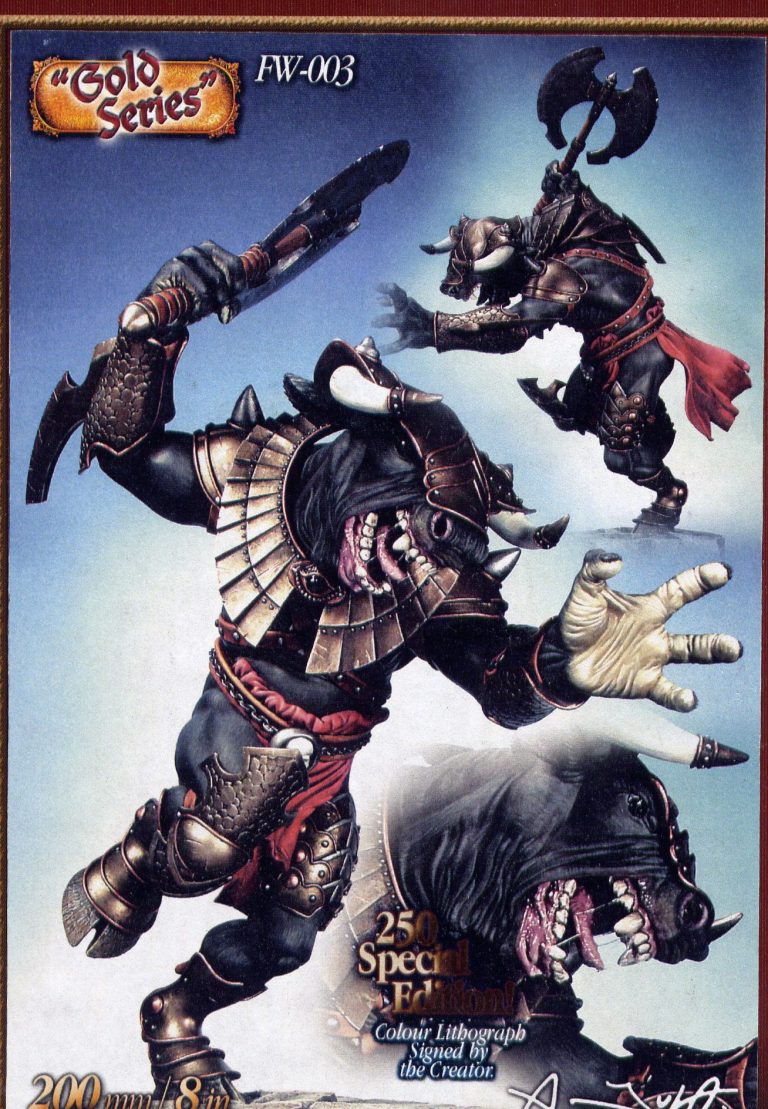
A Minotaur was a bit of a shock, but the finished kit displayed on their trade stand at Euro certainly had me reaching for the wallet. I’ve included the box art – in photo #1.
This was a departure again, in that the box art was quite fancy; hell the box itself is quite plush, being glossy and patterned, and was to herald the way in which these larger kits were packed, and marketed.
Now I like Pegaso, I love their metal soldiers, whatever the scale, and although they’re a bit pricey sometimes, they are usually excellent quality. I’ve even bought a few of the girlie figures too, and yes, even the “Fire” woman.
However, on opening the box, I was a touch disappointed. The sculpting is beyond reproach, but the hollow parts, whilst lightening the piece, do make for smaller grab areas for the glue. The worst bit though is the inclusion of many little triangular fillets. I suppose these are there to allow the resin to fill the mould better, with less chance of air bubbles.
They’re a pain to clean off, and not terribly effective either.
Granted the mould makers were probably learning with larger parts and a new medium, but for the price ( the right side of £100.00, but only just ), and the company name on the box, I was a tad disappointed.

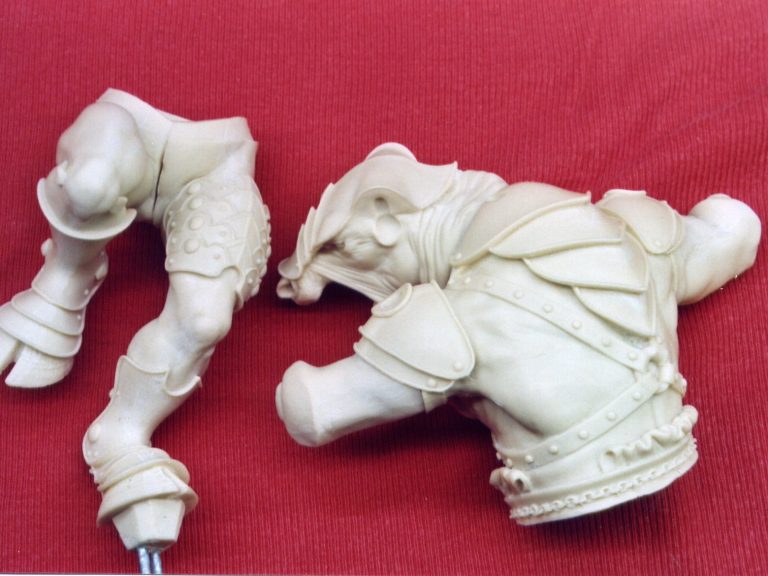
There was some evidence of mould slip too; this had to be cleaned up, and in the case of the legs, some filler applied. Again, not something I expect from a Pegaso kit, or a Pegaso price tag.
So the clean up is a little more involved than with their normal offerings – enough said.
Once you’ve got over that, there are a lot of parts to deal with; and you can begin to think about adding some glue.
If you’re like me, and paint in sub-assemblies, then this model is a dream to paint. One thing that Pegaso have got right is the fit of parts.
I’ve shown all the parts laid out in photos #2 and #3. As I’ve mentioned there are a lot. I was tempted to replace the back of the loin cloth with something made from Magic Sculpt, but to be honest, with some careful work with a file and scalpel, the edges can be thinned quite dramatically so that they look fairly realistic.

Otherwise, detail is very good; the veins on the backs of the hands, and the cracked fingernails are particular highlights.
As I said, I painted the model in sub-assemblies. I worked with the upper body and head fastened together, and also the two legs fastened at the groin. I drilled into both these large portions, so that I could insert support pins to fasten the sub-assemblies into wood blocks that allowed me to hold the parts safely.
Photo #4 shows the upper body being painted. I worked with a very dark brown for the face and neck, using a mix of Mars Brown and Mars Black for the mid-tone, and then adding more of the black to build up the shadows, and more of the Mars Brown to add in the highlights. For the highest points I added a little Light Red to the model, stippling this in to blend the colours together.
I returned to a more normal Caucasian flesh tone for the rest of the body, using my normal mix of Flesh Tint, Mars Yellow and Titanium White for the mid-tone, Mars Brown for the shadows and more of the Titanium White for the highlights.
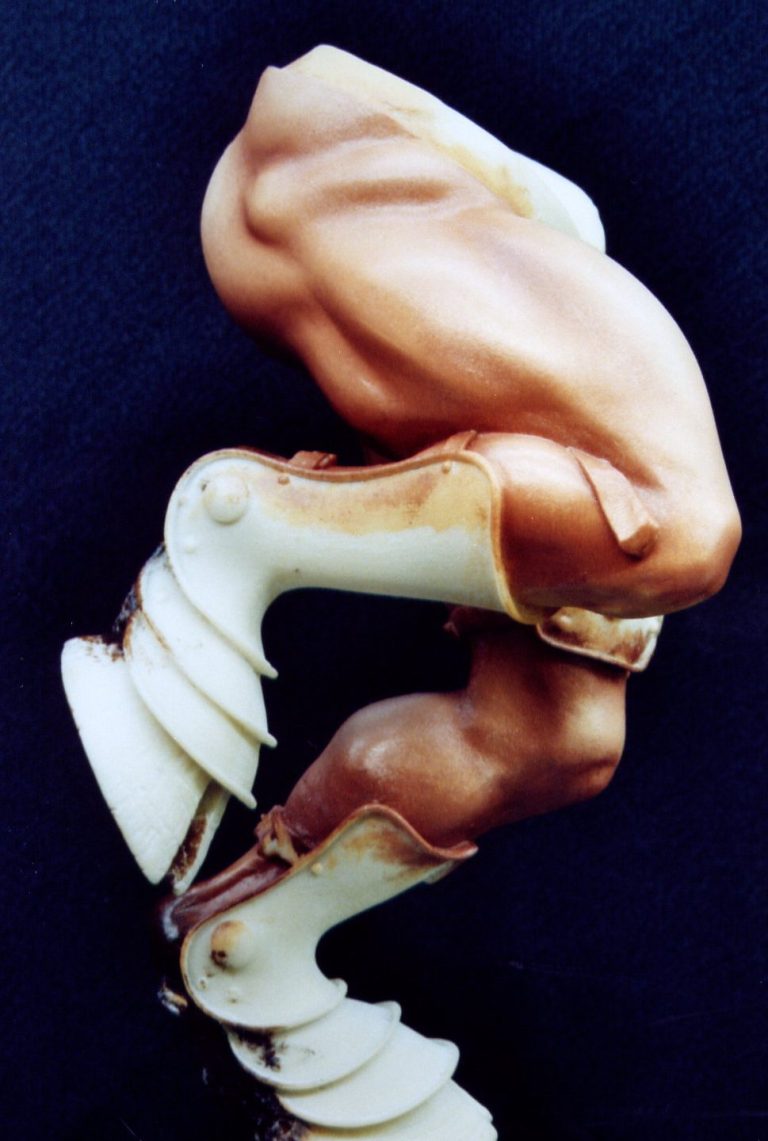
I carried these colours onto the arms, hands and legs ( see photo #5 for the latter ), and worked some of the Titanium White in under the chin and down the neck, and used a large brush to blend the darker colour of the neck in to the lighter flesh tone of the shoulders.
This took an age to dry, partly because I couldn’t fit it onto the radiator where I heat my smaller figures, and partly because I had no container to go over the top of the model to keep dust off him, even if he would have fitter on the heat source. So he had to dry at room temperature – and took about a week.
So in the mean time I thought I’d begin playing with the base.
Originally my idea had been to use the old “prisoner of Zarlon” Verlinden figure to be the enemy that the Minotaur is attacking. Although the figure is the right scale, and I actually had one of these ( granted missing a hand – but thanks all the same to Lynn Sangster of Historex Agents, who passed it on to me ), it didn’t actually fit in with any of the story about the Minotaur.

Victims were sent in unarmed, and Theseus “beats” the Minotaur to death whilst it struggles to wake from sleep. So the figure just didn’t fit.
I didn’t have a suitable female figure to go with the model, nor a suitable male figure either, so I thought it’d probably just be best to leave that part of the scene to the imagination of the viewer.
Having said that, I did want to hint at there being more to the scene, so I decided to add a Greek column, and then found a suitable Greek shield that might also come in as stage furniture.
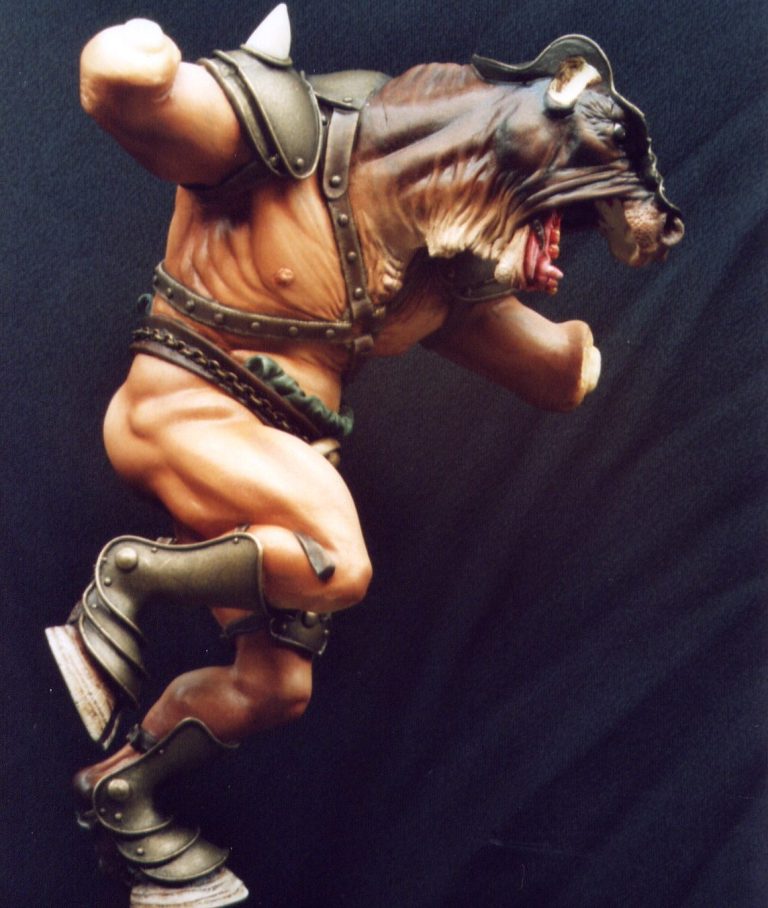
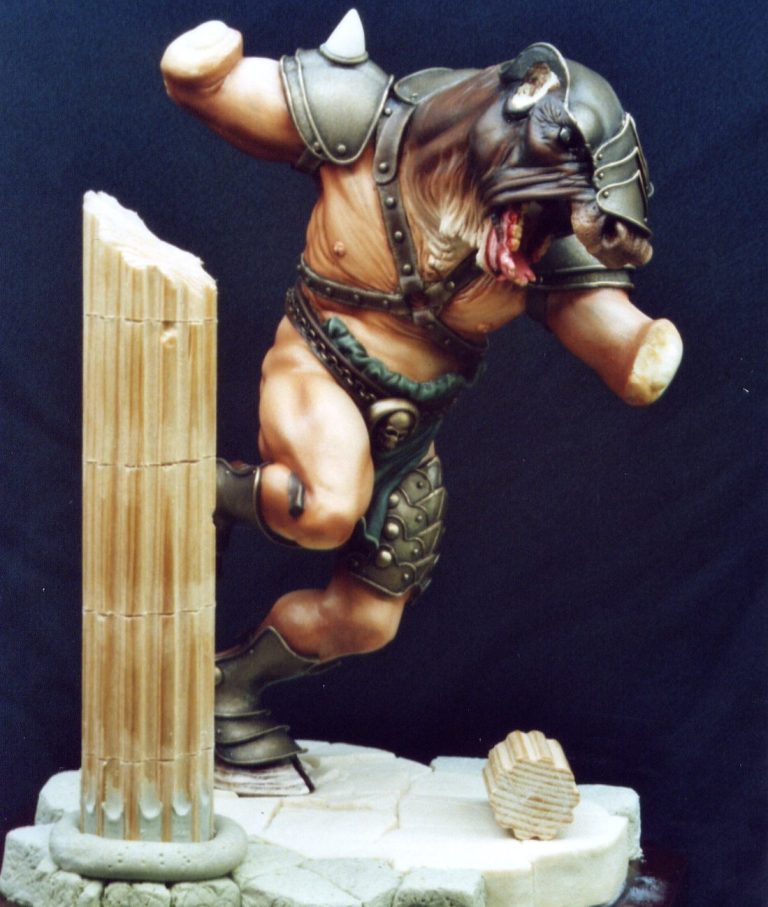
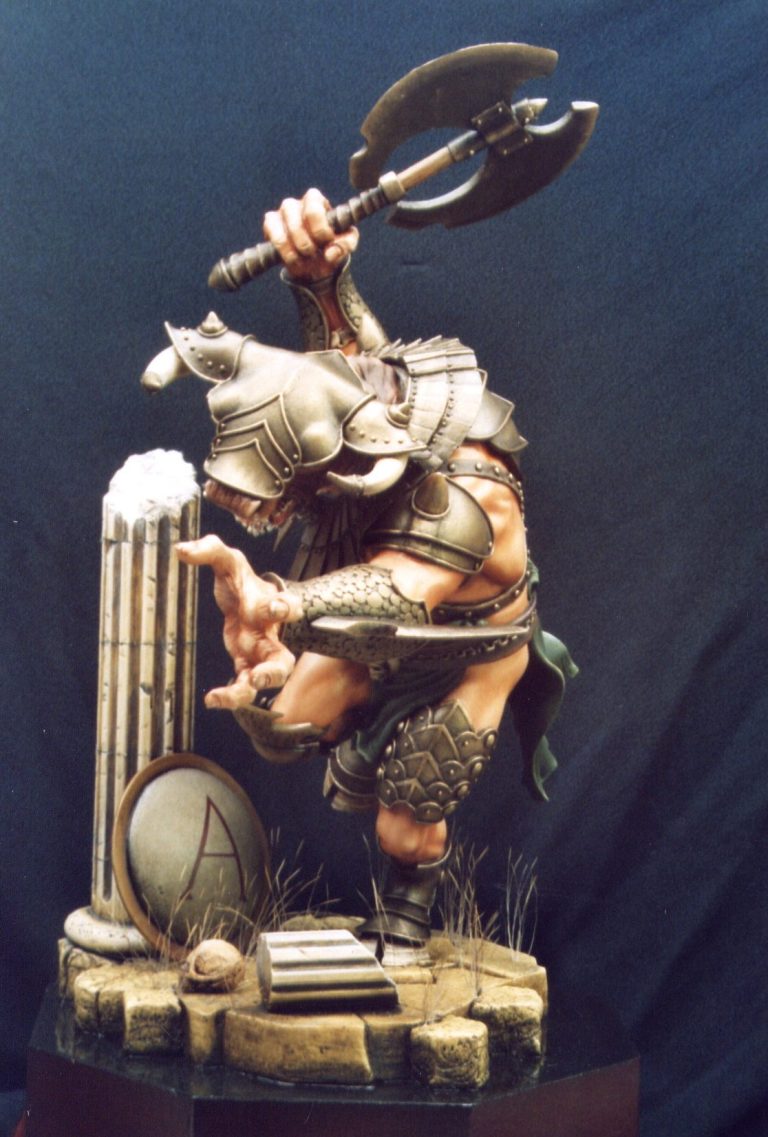
In photo #6 I’ve shown the beginning of the groundwork construction. The base supplied with the model has been used as a starting point, and is in the pale cream resin. The grey coloured blocks are made from Milliput, and the fluted columns are some decorative wood from the DIY store ( B & Q ). It comes in three diameters, and is about a fiver for a 2m length. It’s worth picking up if you do fantasy or ancients, as you can use it in all sorts of places with models of different periods. Photo #8 shows the part painted model slotted into place on the groundwork, and I was testing here for the overall “fit” of the composition. It seemed to work nicely, and I was quite relieved, because up to this point, I’d only been able to roughly judge the relative sizes of the model to it’s setting.

With photo #9 onwards, the piece has been finished, so I’ll just run through the other areas of painting that were done to get it to the final state.
When joining the upper and lower halves of the body, I added brass pins, but also filled the rather large void in the upper and lower torso with Milliput. This acted not just as a glue, but also as a means to strengthen the joint.
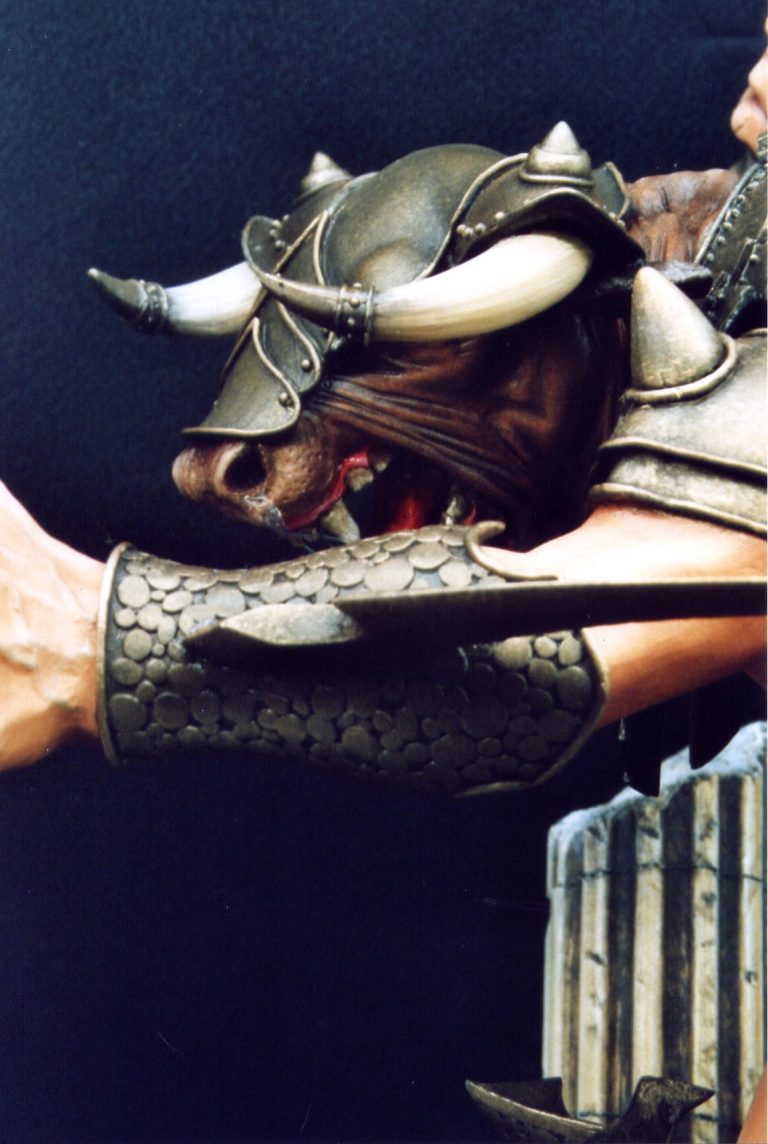
I wanted all the armour and the axe blades to seem to be made of bronze. For this I first undercoated with GW Shining Gold acrylic, allowing this to dry fully and then added a coat of Raw Umber oils. This was then dabbed off with an old piece of cloth, to reveal the gold colour underneath. Small amounts of the gold colour were then used to build up some of the highlights and fresher scratches.
The clothing really gave me problems. I wanted the loin cloth to be a greenish colour to harmonise with the bronze armour, and so undercoated with GW Forest Green acrylic. For the upper coats, I again used oils, this time making a mix of Prussian Blue and Mars Yellow so that a very dark green was arrived at. This was then painted on and to make mid-tones and highlights, more Mars Yellow and some Titanium White were blended in on the surface of the model.
This all seemed fine, I was happy with the colour, and it seemed to enhance the bronze areas. Until it dried that was; because it dried an absolutely unbelievably fantastic gloss green.
I couldn’t believe it ( que Victor Meldrew impression ). I used three colours noted for their matting down effectiveness, and I end up with a flawless gloss finish. In a further fit of madness, I added a very thin coat of Matt Varnish.
Now I know I shouldn’t have done that, it’s just I wasn’t thinking straight. Because, yes, you guessed it, the Matt varnish went a lovely powdery white.
With the aid of a couple of coats of satin varnish ( household stuff at that ) I managed to get rid of the white deposits, and then added a thin wash of a dark green to lose any gloss effect, but the whole experience was highly traumatic ( There might not have been tears, but there was some colourful language, not to mention a gnashing of teeth ).
Once my sanity had returned, the leather belts were painted with my usual mix of dark to mid- brown oils over acrylic undercoats, and then finished off with some weathering to the edges in Mars Yellow and titanium White.

The tongue and teeth were painted as separate parts, then glued in place once dry, along with the arms, hands, and that very strange necklace.
The groundwork was painted with an undercoat of GW Orc Brown for the stones on the floor, and Skull White for the fluted columns, so that the colouration evened up, and also to seal the wood. Then Raw Umber oils were painted over the top, dabbing and wiping off the excess paint to reveal the lighter acrylic beneath.

I added some deer hair to the cracks between the broken flagstones, hinting that the labyrinth was old, and that the Minotaur had been in there some length of time.
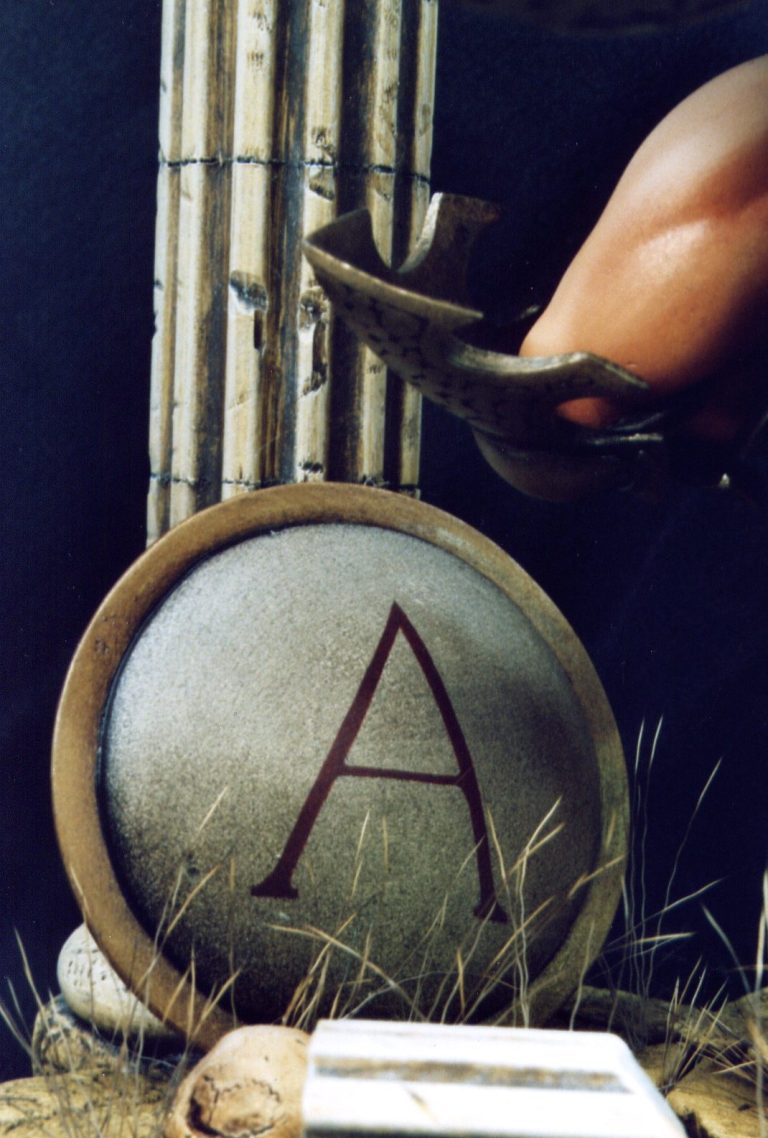
The final addition was the Verlinden shield. This was painted to be historically accurate, with the back in a red / brown, the front in a dirty white, and the edge with the gold / bronze metallic colours.
I painted a large “A” on in a dark red, partly for “Adrian” and partly because the Athenians did this on some of their shields too.
The skull towards the front of the groundwork is from the 120mm Forgeworld Space Marine, and was painted to look old and damaged.
A simple nameplate was made up on the computer, although this will probably be replaced with something more fancy later on.
Verdict.
I was disappointed with this model when I began to clean it up. For a Pegaso kit, and the attendant price tag, it wasn’t good.
Having said that, given the patience to clean it up, and fill in air bubbles on the chain decoration on the belt, it goes together well, and can be painted up into an impressive piece.
Now that it’s finished, I’m pleased with it, and it’s garnered quite a few nice comments. Judges at shows don’t seem too keen on it though, but when have they ever been right ( Um…I judge at Euro Militaire; and according to the punters, we’re hardly ever right, so why should anyone else be ! ).

How this model will cope with travelling to shows, being balanced as it is just on one hoof is anyone’s guess. I’ve pinned it as best I can, but because of the way in which the ankle bends, there isn’t the option of running strengthening rods up the whole length of the leg and into the lower torso.

So at some point, in one hand I might have a lovely Greek groundwork base, with a Minotaur hoof attached; and in the other, a lost and lonely Minotaur, with no base, only one hoof, and possibly several extremities missing. We’ll just have to see.
This certainly isn’t a kit for the beginner, but an experienced modeller will probably be able to make it into a nice addition for the display cabinet.

As an addition to this article that was written in 2010, I have since given this to Thomas ( my son ) as he expressed a particular liking for it, even going so far as buying another kit of this model from Pegaso to ( eventually ) make and paint himself.
As I reread this article, I really do like this Minotaur, it is very difficult to photograph though, and I feel that none of the shots I’ve taken do the kit real justice.
I would be tempted to put a 90mm Greek warrior with him if I was to make another version of this model, the size difference might be quite extreme, but it would perhaps hint at the terror of such a beast, and the bulk that the transformation gained from the use of the Bull.

We need your consent to load the translations
We use a third-party service to translate the website content that may collect data about your activity. Please review the details in the privacy policy and accept the service to view the translations.