Mounted Mongolain Archer
120mm Resin kit from VLS
Article in Military Modelling magazine in 2003
Historically, the Mongol armies can be summed up quite simply. They were superb.
Comparison of their successes will show that they far outstrip any there nation for the amount of land conquered, with such speed, the enemies killed, and the number of battles fought.
Theirs are the only armiesto not only have entered Russia in the winter and survived, but to actually have won the battles fought during that season of most inhospitable weather.
As a matter of fact, they planned to enter Russia in the winter, simply because the rivers would all be frozen over This would allow them to cross
over with their horses, rather than having to utilise fords and bridges.
The Mongols are often viewed as a barbaric horde, riding diminutive steppes ponies, cruel and unforgiving of their enemies and of such numbers
that any force would be foolish to stand against them.
In actual fact, upon studying historical reports, whilst their acts were in the main very violent and barbaric, they had superb organisation, unquestioning loyalty to their leaders and often fought battles where they were severely outnumbered.
The organisation of the armies was built on a decimal system A basic troop ( Arban ) being ten men, ten Arbans making a Jagun of one hundred men, ten Jaguns making a Minghan of one thousand men and ten Minghans making a Tumen totalling ten thousand men.
To simplify orders, each man had only to tell his ten subordinates what to do, they then passed he information on to their ten subordinates, and so on down the line of command.
Because the armies were so loyal ( a carefully orchestrated balance taken care of by not having too many men from any given tribe ot family in close approximity ), orders, when given, were carried out with little or no problem.
Add in the fact that there were probably two or three Tumens in the average Mongol army, and that the majority of these men were mounted, the
total force, its command and mobility was incredible.
The only problem the Mongols had was with fortifications.
Give them an open field of battle, and an enemy with no wall to hide behind, and they could outflank, raise dust and dart in and out of bow range to hammer home arrows with such speed and skill that most opposing forces had no real idea of what size of force, let alone where they were, was facing them. Then to find this fanatical enemy charging with lances and swords at the ready, well is it any wonder that they were a force to be respected.
But, and here's the problem. Give 'em a wall to attack, and all the outflanking, dust raising and mobility advantages, well they just go out the window.

And although Mongols did employ ballistae, catapults and trebuchets in alarmingly large numbers, they don't seem to have done so with half the relish that a pitched battle would raise.
This is thought to be one of the reasons for their barbarity towards towns and cities that took to siege rather than surrendering.
The Mongols when they eventually broke the sieges, performing terrible retribution, with such ferocity which was probably in part to frighten the next target into a premature surrender.
The art of propaganda seems to have been commonly used by the Mongols too. They weren't adverse to sending rumours ahead of them to soften the resolve of their soon to be enemies.
The armour and clothing of the Mongols gradually became better and better as they stripped goods from their conquered foes on the field of
battle, and also through trade and absorption of indigenous population.
Their use of larger horses, such as the one modelled here, a Karabair, also contributed to their success.

Tactics were refined, so much so that foes feared to chase the Mongols should they seem to retreat, as they were noted for turning once an infantry
line was strung out, and returning with renewed ferocity to take up the battle again.
At its peak, the horde had most of European Russia to modern Rumania, and deep into Siberia under its control. Even parts of Greece to the south, and the Black sea were under it's sway.
The Model
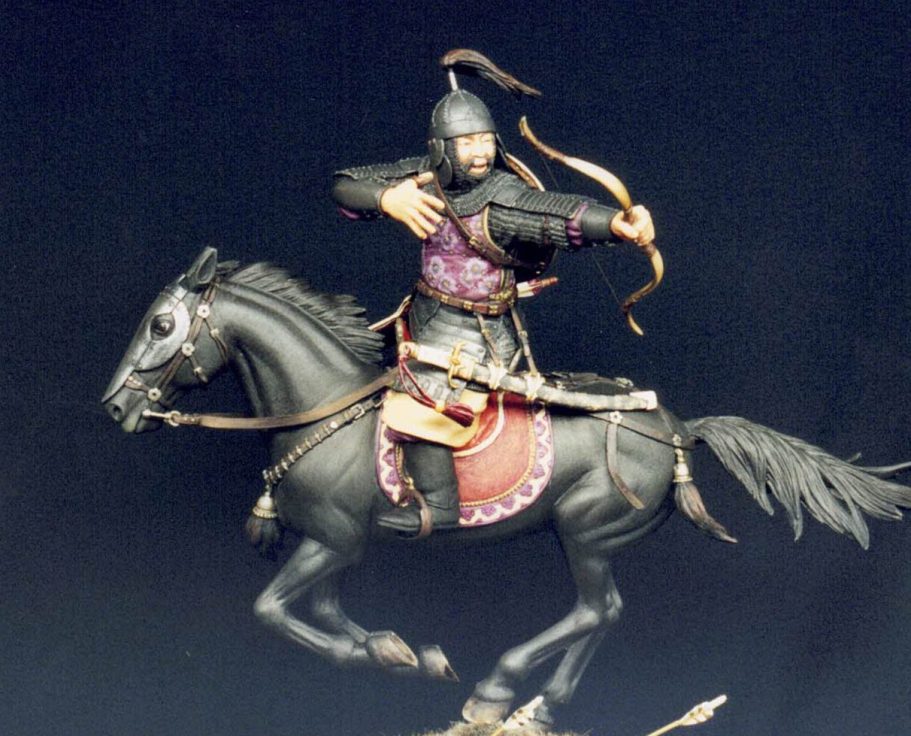
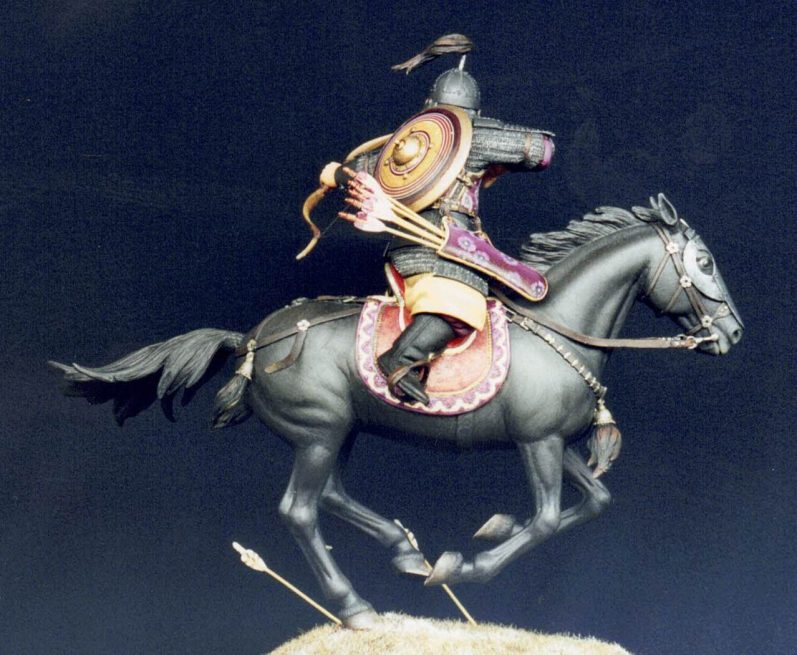
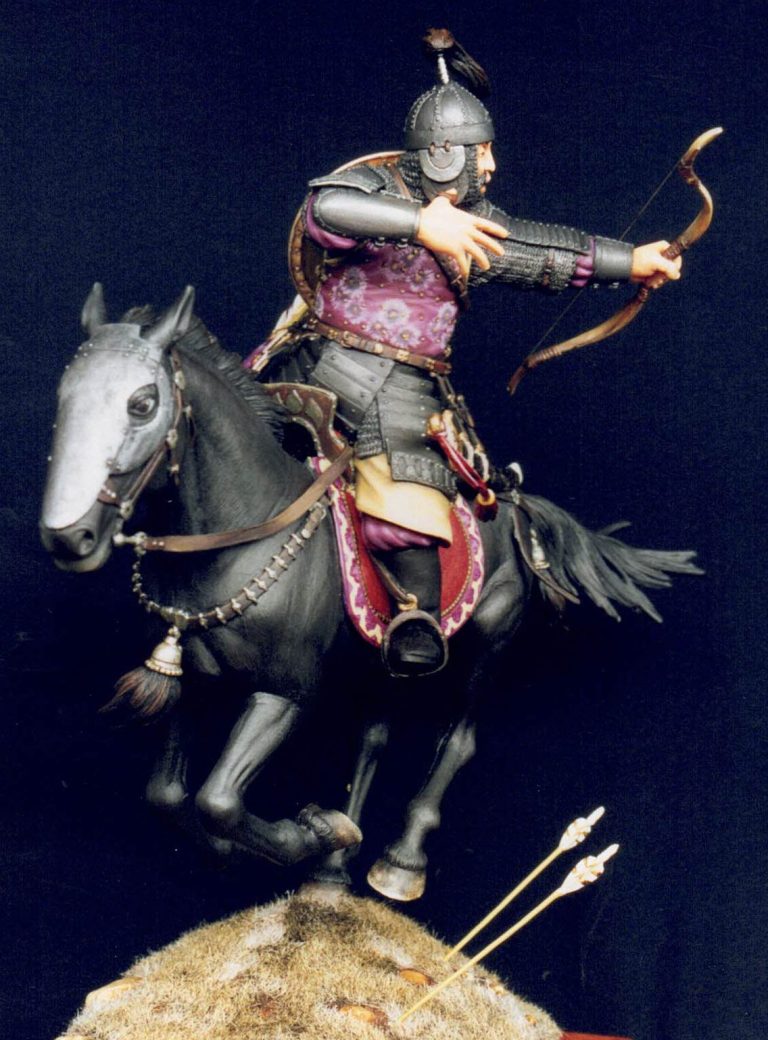
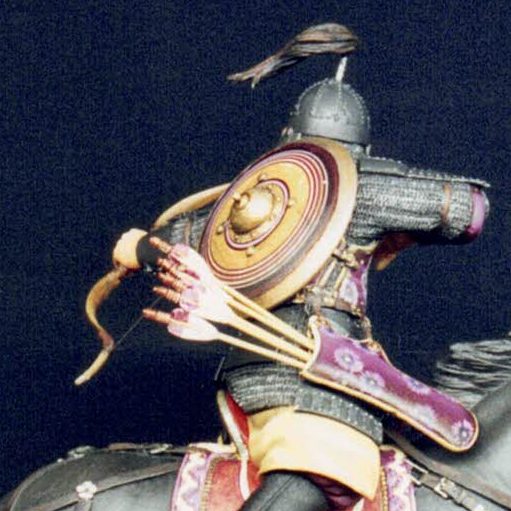
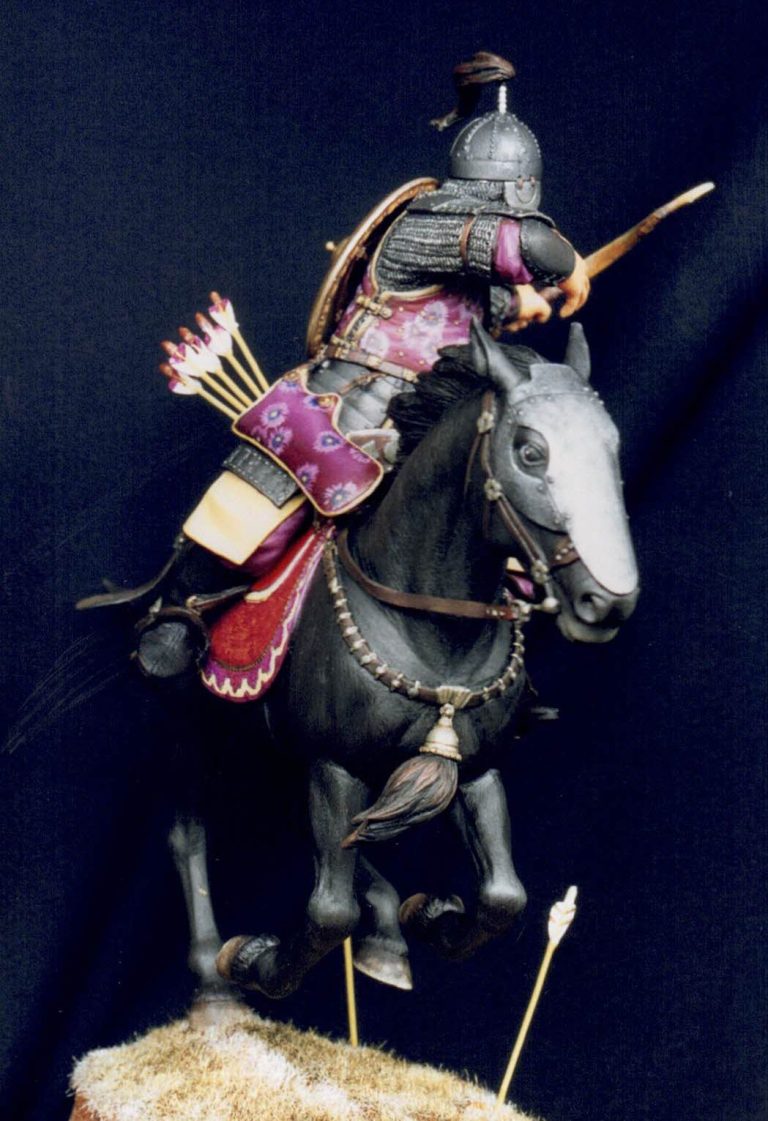
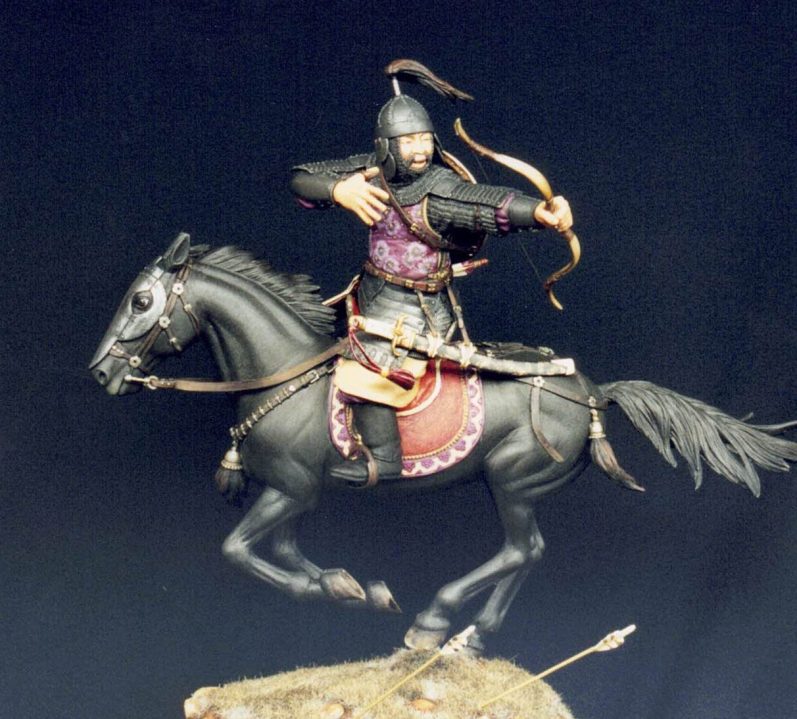
Modelled here is an offering from the VLS Corporation, depicting an archer in one of those mocking retreats, firing an arrow to his rear into a
pursuing force.
The horse, as stated, is one of the larger Karabair breed, which were usually around fifteen hands high, and the rider's armour shows him to be of rather a high standing within the force. Possibly the commander of a Minghan ?
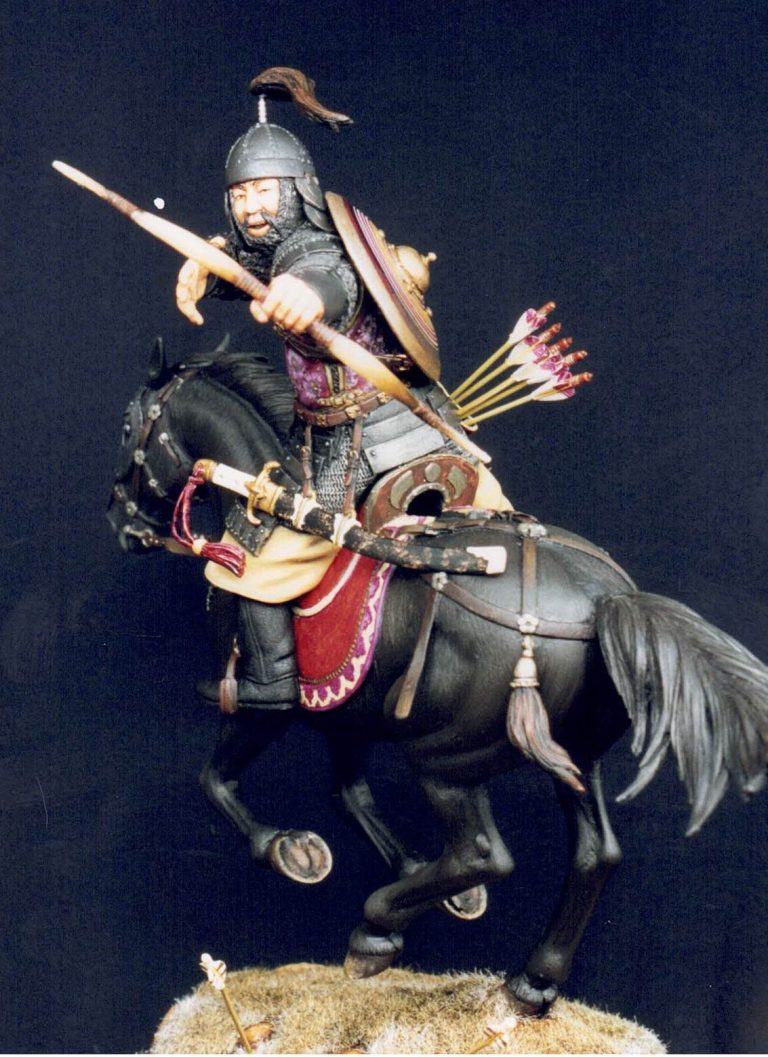
Certainly only the more powerful Mongol officers would have accumulatedthe wealth to have such armour and accoutrements as this.
The armour certainly could have been taken from some unfortunate Turco - Mongol enemy, as this was a relatively common design at that period.
This offering is the latest from VLS, cast in resin, and packed in a surprisingly small box, certainly not much bigger than the Andrea Norman Knight I reviewed last year.
The scale is supposed to be to 120mm, although with the Mongols being quite a diminutive race, perhaps this borders on 150mm. Pedants will no doubt have their little discussions.
But while they do, I'll be busy looking at the quality of the sculpting and the casting.
Hmmm, not bad, not bad at all.
The horse halves need a little work as there were some slight offsets to the mould, but nothing too bad, a bit of filler, a swipe with a file and they were done.
The smaller components were better certainly, with more acceptable mould lines which, due to the softness of the resin, were very easy to clean up.
There's a lot of parts, forty in all ( shoes and socks off to enable me to count so high, and a piece of paper when I ran out of digits ).
Did I have any whinges ?
Well yes a couple, but nothing too serious I suppose.
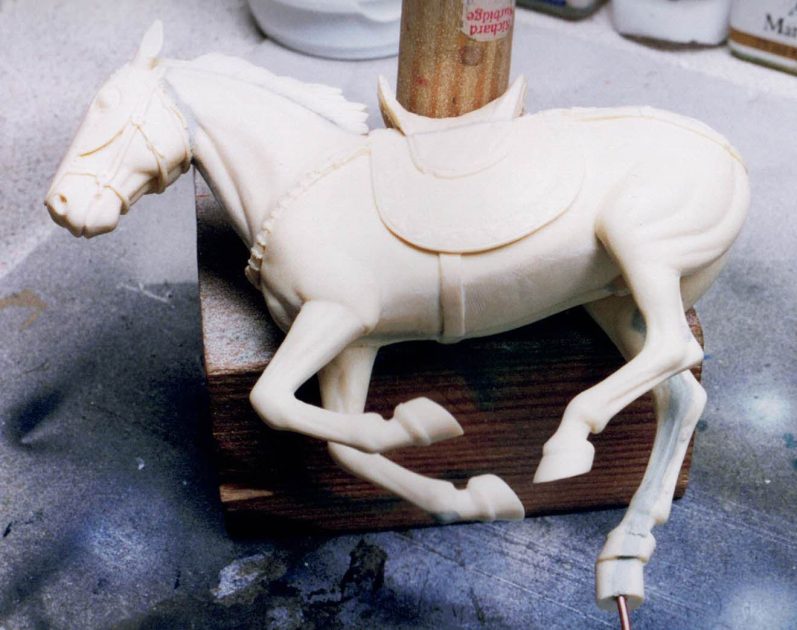
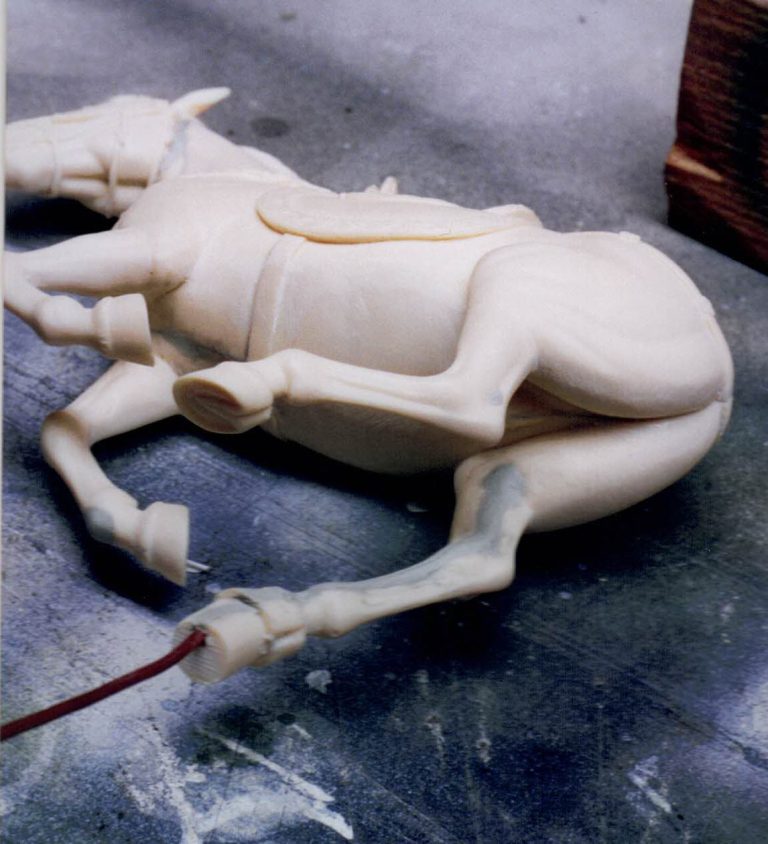
I would have liked a wire strengthener in that single supporting leg.
Yes' I'm a wimp, and the resin is very light, what with the hollow horse and all ( Oh, the horse halves fit together very well indeed ). But I do attend quite a few shows, and it does wobble alarmingly once it's all done and dusted - even though I did install a wire and photo's #1 and #2 show this in process. The resin as noted is soft enough to make work like this no real chore.
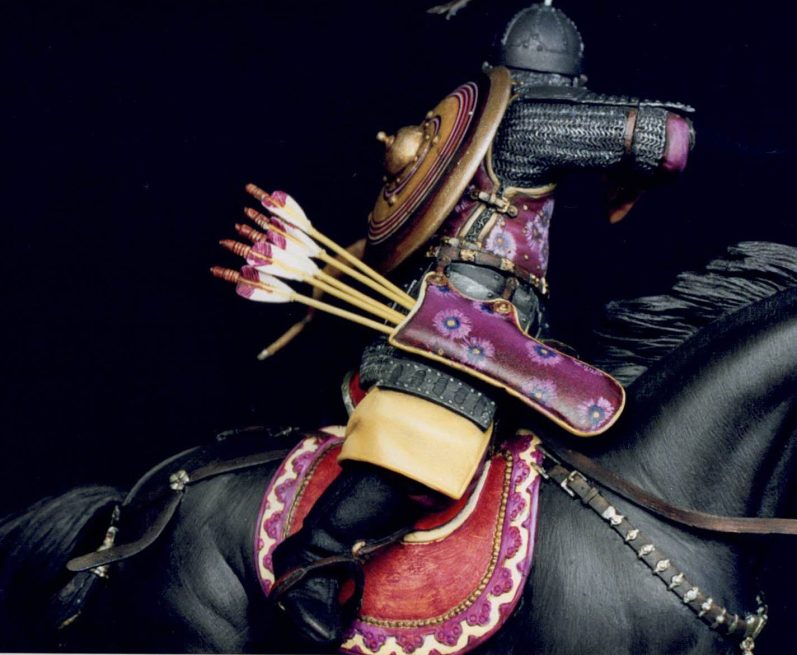
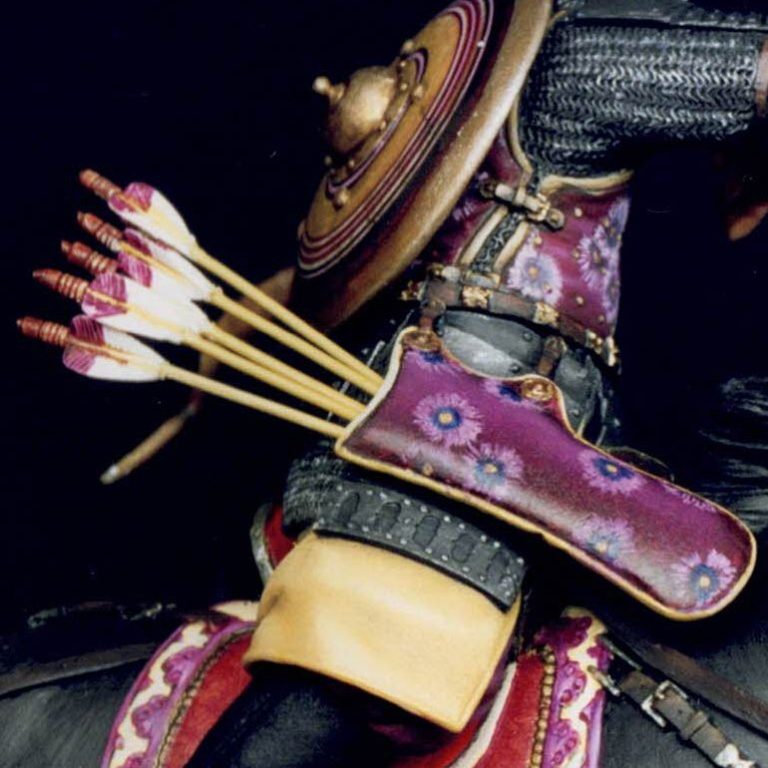
The arrows would perhaps have been better cast in white metal. As it is, the flights are supplied, and the modeller has to glue them onto pieces of wire. I lost one flight on the first trip out, and although there's plenty of spares supplied, it'll probably be a reoccurring problem.
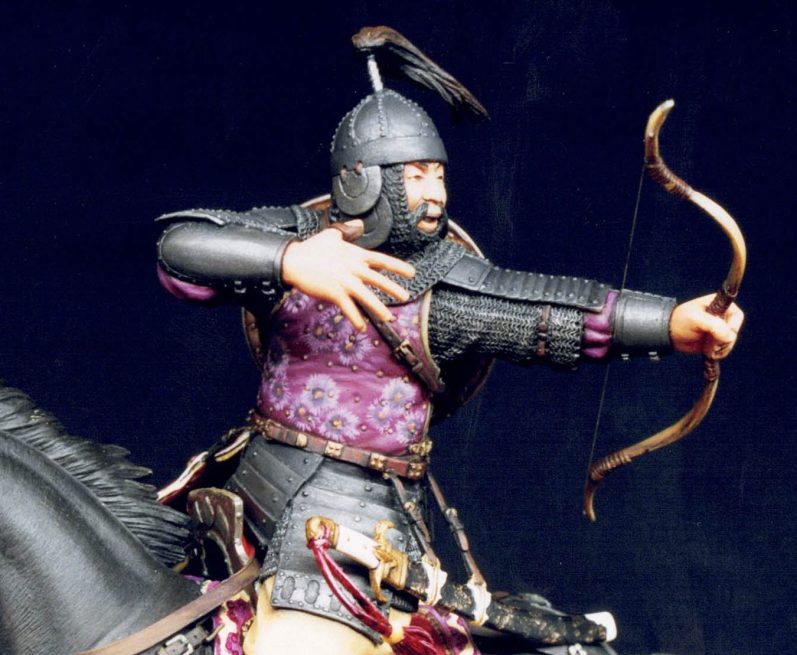
The last whinge, and perhaps it's me being a pedant, is the size of the hands. The right one looks a tad too big, probably made worse with it being in the open position. I did consider swapping it, but then I'd have to change the other hand to match, and it did seem rather a lot of work just because of me being on a par with a rivet counter.
With a little judicious shading, the hand can be made to appear smaller.
So with the parts cleaned up, I studied the extensive instructions and then went my own way - well it is me after all.
No, seriously, the instructions are good, but I just like painting in sub-assemblies that doesn't quite match the sequence shown.
There's not too much to get wrong anyway, the sculpting and casting is good enough to be quite forgiving, and allows the horse to be completely assembled, minus the three plume decorations on the harness. Then the figure to be assembled minus the right forearm - which fits in place well once painting is finished.
I left off the scabbarded sword, the shield, the bow case and the arrow case, these again are cleverly engineered so that the straps slip into slots below the belt, and the resin is stiff enough to allow them to float free so that a sense of the bouncing gait of the horse is given to the finished model.
So where to start.
Well to begin with I coated the whole model, all the bits too, with a couple of thin coats of Games Workshop Orc Brown - a sand coloured acrylic.
I added isopropyl alcohol ( windscreen washer liquid as used by the tankies for their airbrush acrylics will do ) to the first coat only. This stops the resin repelling the paint, the beading of the liquid paint which takes forever to dry, allowing the pigment to be painted on in one nice even coat.
Further coats must be added using water as the thinning agent, because the isopropyl alcohol will attack previous coats of acrylic even once those earlier coats are fully dry.
As usual, I painted the face first- oils over an acrylic undercoat, using a darker and more yellow mix than normal, adding this to the hands as well, and shading with a Burnt Sienna and Yellow Ochre mix. Highlights as usual from pure white.
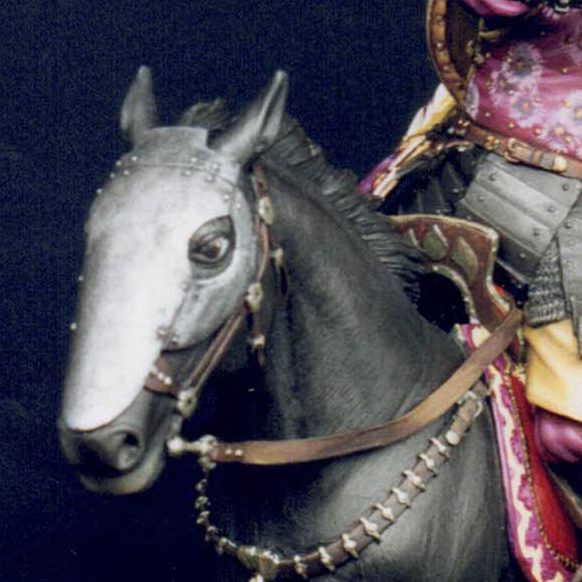
Then the horse. Having looked up the most usual colours for Karabairs, black seemed to be a good option not least because I've not got a Black horse in my collection.
A couple of thin undercoats of Games Workshop Chaos Black built up a nice solid ground for the oils to be applied to.
I used an overall covering of Mars Black, adding highlights of Burnt Umber, which are so glaringly invisible as to be unwarranted. But at least I know that they're there. A small addition of the base flesh colour was used to lighten the muzzle, and also to add onto the ears and upper flanks to try and pull out the muscle detail.
This was allowed to dry for a couple of days whilst I returned to the rider.
For no real reason - other to see if it'd work, I undercoated the armour with GW Chainmail acrylic, and instead of adding all the shading and highlights as normal, I left these further additions until much later.
I then undercoated the cloth areas of the figure, deciding on a purple and pale yellow overall scheme. This would eventually have a patter added, as though our Mongolian friend here had either traded or looted some fine cloth from an oriental source.
The main purple areas were then given a thin coat of Purple Madder Alazarin, shading this with small amounts of the Mars Black, and highlighting with Titanium White.
The Yellow areas were coated with Yellow Ochre, shaded with Raw Umber, and again highlights of Titanium White were added.
Now to allow it to dry.
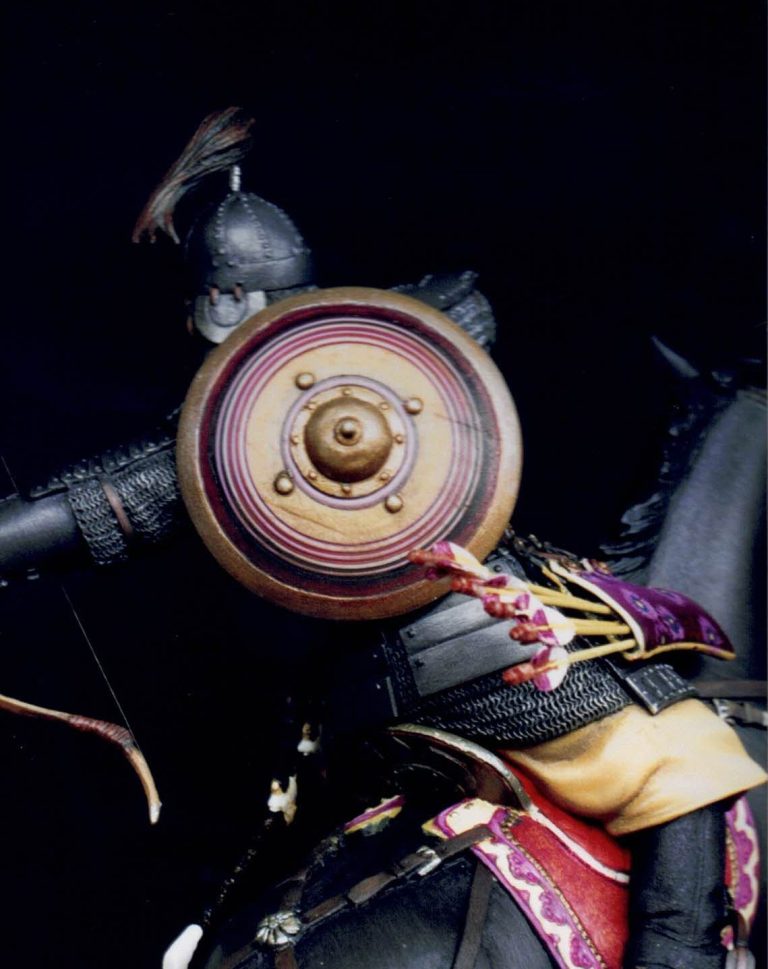
Whilst I waited, I painted the shield.

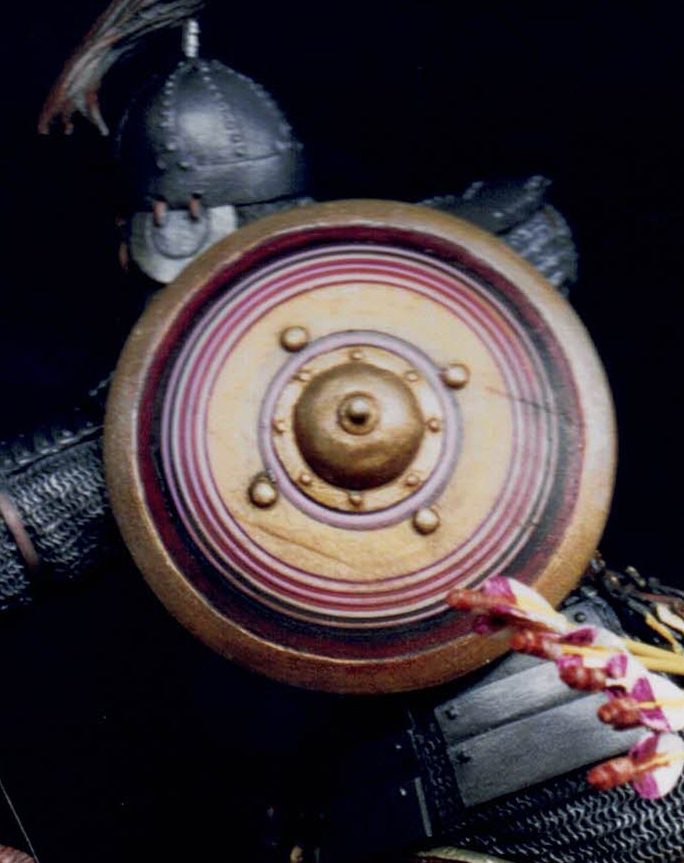
I wanted something similar to the Macedonian shield I did a while ago, spinning the shield with a minidrill, and applying paint so that the circular motion created a design that was perfectly circular. I'd advise the wearing of goggles ( as a minimum safety measure ) if you try this, just in case the shield decides to part company from the mandrill.
I did at first try setting the shield up on the wheel of one of my son's Action Man vehicles, but in the end, because this shield is somewhat smaller, I ended up using a mandrill with a slitting disc on it.
The slitting disc being used to guide the initial setting of the shield in it's central and level position.
That was the exacting bit. Now the fun of adding paint could begin.
Again I used the purple paint to set out a design on the already sand coloured shield.
Oh the fun I had, thinning the paint - too thin, too thick. The shield not quite being level. It all seemed to have been such a good idea at the time.
Eventually, after the fifth or sixth attempt had gone pear shaped, I noticed that the sand coloured undercoat was degrading and seemed to be chipping off. This was due to the constant application of paint, followed by White Spirit to clean said pigment off when things went wrong.
This actually looked excellent, the shield appeared to have been used and damaged. I added the purple circles again, followed by some Mars Black and then White. One of the purple circles splattered to the outer rim, and this too looked good.
Finally the mandrill was removed from the drill chuck and put in the airing cupboard, with the shield still safely attached, to dry.
Back to the horse now, and all the tack was painted in. I was going to use a semi-gloss black for this, but opted for a dark brown, just so that it broke up all that black on the horse. Decorations, fastenings and buckles were added with gold, shading this with Olive Green oil paint.
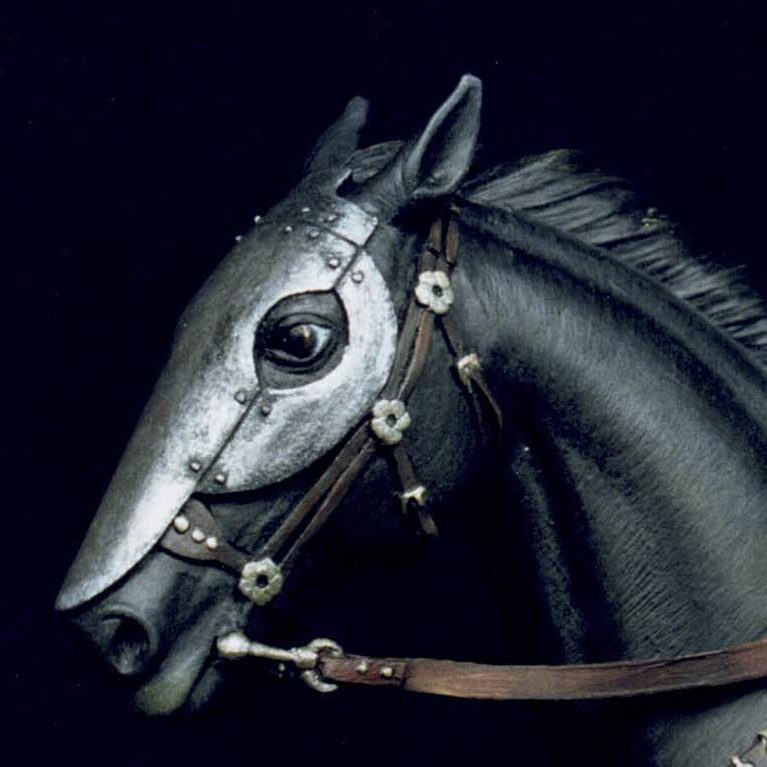
The eyes were added too, using the browns and black, and having a small amount of the white showing. The rider is letting the horse run, concentrating merely on his target and the rough direction of travel. With the noise of receding battle alone to spur the horse to get away, so I thought that the horse, however well trained, might be exhibiting a little bit of fear.
The hooves were painted with a thin coat of Raw Umber, adding to this some Yellow ochre and then patches of Titanium white to render the chips and damage to the hardened "nail" of the unshod hoof. Having had the chance to look closely at the horses stabled next to where I live, I've realised how incorrectly I've been painting hooves for all these years. Granted it's only a relatively small area, but having got them closer to how the real thing actually looks, does make quite a difference.
Now the plumes. These would be awkward to hold for painting, and as they would have minimal contact with the horse when in place, I decided to strengthen their final anchorage point by drilling into each one and inserting a piece of wire. I had to place them in position first, and judge carefully what part of the upper ferule of each would be in contact with the horse, the drill a corresponding hole into the horse. With this done, and the plumes glued to the wires, I was free to paint them before fastening them to the horse once the paint had finally dried.
The saddle was just about the last thing to be painted on this sub-assembly. I stippled on some more of the Purple Madder Alizarin, after first having mixed in some Alizarin Red. I didn't want too much of the exact same colour on the model. I painted in the outer decorations using GW acrylics, shading with some of the purple oil paint, but highlighting with a lightened mix of the acrylic.
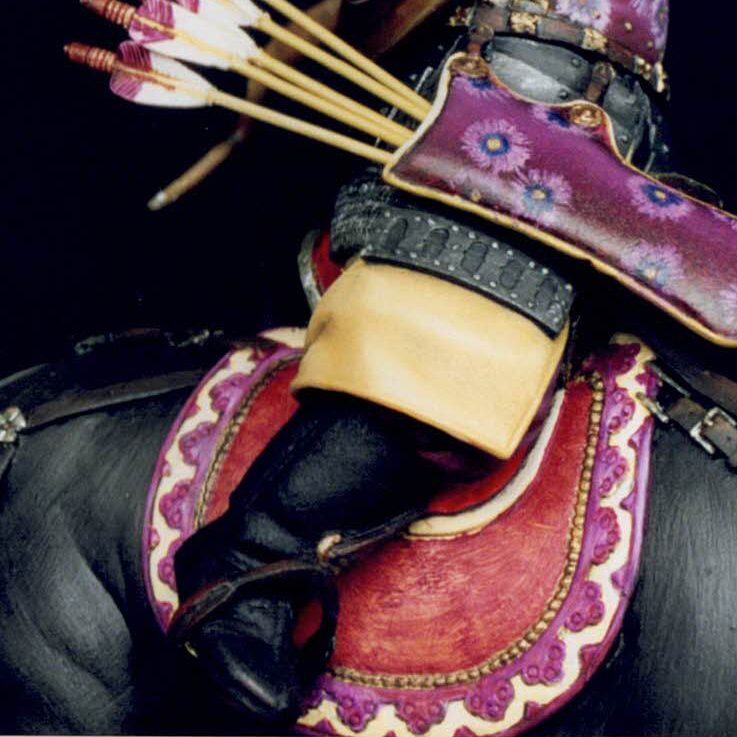
The yellow areas were just recoated with the Orc Brown, and highlighted with the same colour lightened with Skull White.
The face guard for the horse, which had been painted with acrylic at the same time as the armour on the figure, was treated to a stippled coat of Mars Black, allowing a patchy, ill maintained and "used" look. A very few highlights were added with silver ink.
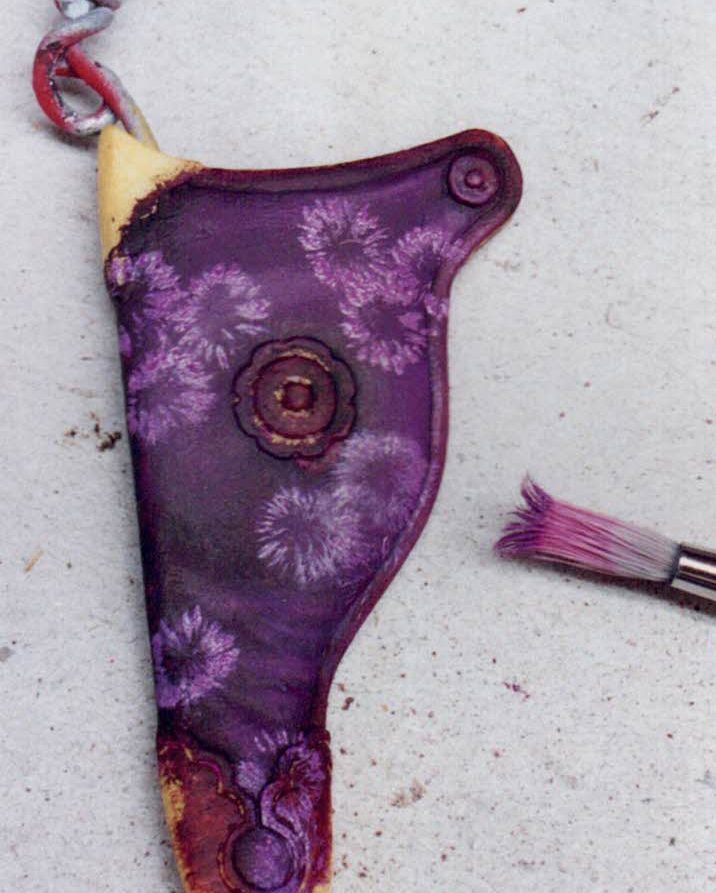
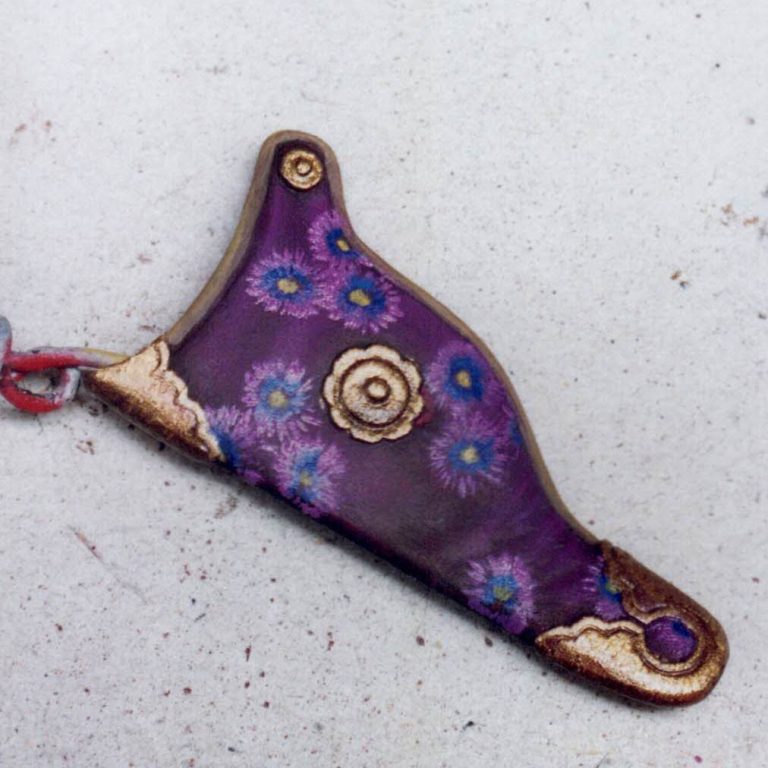
Back to the figure and the flower design.
It's really tempting to say that I painted each flower meticulously, each stroke of the brush carefully gauged to produce the right effect, and to make myself sound really clever.
But then anyone who knows me would see right through that one !
How did I get the flower effect ?
Truthfully ?
A complete accident.
I was using an old Pro-arte synthetic brush - the ones that after a few months of use get that useful "hook" shape to the bristles at the tip, and can be used to get at awkward to reach parts of models.
Well anyway, this brush was being downright difficult, and hadn't just gone into that hook shape, but the bristles had for some unknown reason all gone their separate ways to form a fountain shape.
Hence, there was I using this useless old brush to stipple on white oil paint over a blue-grey base coat, to get a stippled marble sort of effect on another model project.
Ah, but, you see, what then happened was that instead of a nice random white stipple effect, I got this horrible flower-like effect, looking almost like fossils you sometimes see in marble floors.
Hmmm I can use this somewhere else, thought I, my jaundiced eye turning
to stare at our little Mongolian hero.
So mixing up a lighter Purple colour, I stippled on groups of three flowers, adding a touch of blue to their inner circle, and dragging this out onto the light purple, and then finishing off with a Yellow Ochre centre.
Simple see.
For the bow, I tried to hint at the laminated horn and wood construction, dragging colour onto the undercoat and working from a Burnt umber through Yellow Ochre to White.
The tips were painted with some of the gold used on the metal areas of the horse tack.
Once the shield had dried, it was removed from the mandrill, and the inner face painted. The arrows too were done at this point, painting a different set of colours onto the feathers for the ones that had landed near to the figure and those that he was actually carrying in his quiver.
Finally, the armour on the figure was painted in, adding Mars Black, heavily thinned with White Spirit onto the metallic acrylic. The shadows being strengthened with more paint added once the White Spirit had evaporated off a little.
Highlights, as on the horse's faceguard, were added on after this had dried.
Whilst I waited for this to dry, I painted the sword in it's scabbard, adding a gold speckle "lacquered" effect to the scabbard by undercoating with black acrylic, then stippling on thinned gold enamel.
I also added some static grass to the base, painting this once it had dried with several thin washed of Olive Green oil paint.
Then it was time to paint in all the small details. The buckles the trims and suchlike. After which the figure was checked, left to dry and then finally offered up to the saddle.
A slight problem here. He fitted in place very well indeed, but looking from the rear of the horse on his left, a gap could be seen between the saddle and the riders bottom.
The rider was removed and a lump of Milliput mixed up and squashed into place. The sides of this were painted black, and whilst it was still soft, the rider was pressed back into place. Lovely, no gap, and an invisible lump of filler.
The right hand and fore-arm casting was added, then the sword, the Quiver and the plumes on the horse tack. The arrows were added, both to the groundwork and the arrow case, fastening all these in position with superglue.
As a final touch, I borrowed ( on a permanent basis ) a strand of my partner's hair. Well she's got a lot more to spare than I have, not to mention her hair being longer ! This was used to form the bowstring, again using superglue to fasten this in place.
And then some photos. I didn't want to cover the detail of the sword up just yet, so before the bowcase was added I indulged in a quick photo-shoot, and then added the bowcase, then some more photos.
So what's the verdict ?
In all honesty, when I first got this model, and having looked at the parts, I thought it was "alright". Then I saw the price tag - and my jaw went supersonic on its way to the ground. One hundred and ten pounds.
Oh, ouch.
Having said that. and now that it's finished, Yes I do think that it's a good model. I think that maybe it's worth the money too.
I'm not sure that folk will rush out and buy one without having seen a well painted example in the flesh first though, which seems a shame. After all it could be painted up to be a very beautiful centre piece to grace any display.
Perhaps it's one of those models that'll be on a "wish list" for that much needed Christmas present.
Then again, a lot of the mounted models being released at the moment seem to command similar prices, so is it me who's behind the times ?
Maybe. I hope so.
I like this model. It's well produced, and well presented. No parts were damaged nor were there any badly formed parts either.
Airbubbles ?
Phah, not a one !
Judging by the comments it got on its first outing to a model show ( Huddersfield - Feb 2002, a very good show ! ),well, folk seemed to like it, and like it a lot.
Time will tell.
I'd certainly recommend it to anyone wanting a good project to get their teeth into,
We need your consent to load the translations
We use a third-party service to translate the website content that may collect data about your activity. Please review the details in the privacy policy and accept the service to view the translations.