Cold Cast resin Dragon and Narwhal from Creative Beast Studios with a 90mm figure from Black Sun Miniatures.
Assembly begun in 2012, painting completed during 2023
Of Dragons and Narwhals

This was a model that Thomas found while searching the Internet, and Creative Beast Studios preduce some lovely looking kits, mainly heavily researched dinosaurs. I’d never dealt with them before, so it was a bit of a leap of faith Thomas and I deciding to spend $780 for two of them.
The painted example looked superb – shown in photo #1 and I’ve got to admit, expectations were high.
I always want to be honest in these articles, and I try to be as positive as possible; if I can’t say something good about the kit, and balance positives way more than any negatives, then I’ll simply not write about a model.
And this is a superb model, honestly it is, and you know there’s a “but” coming…… But, there are a few strange things about the components, the separation of parts, and the way it’s been sculpted.
I’ll give short notes here of the points above, but go into more detail later on.
Let’s start with the components and their strangeness.
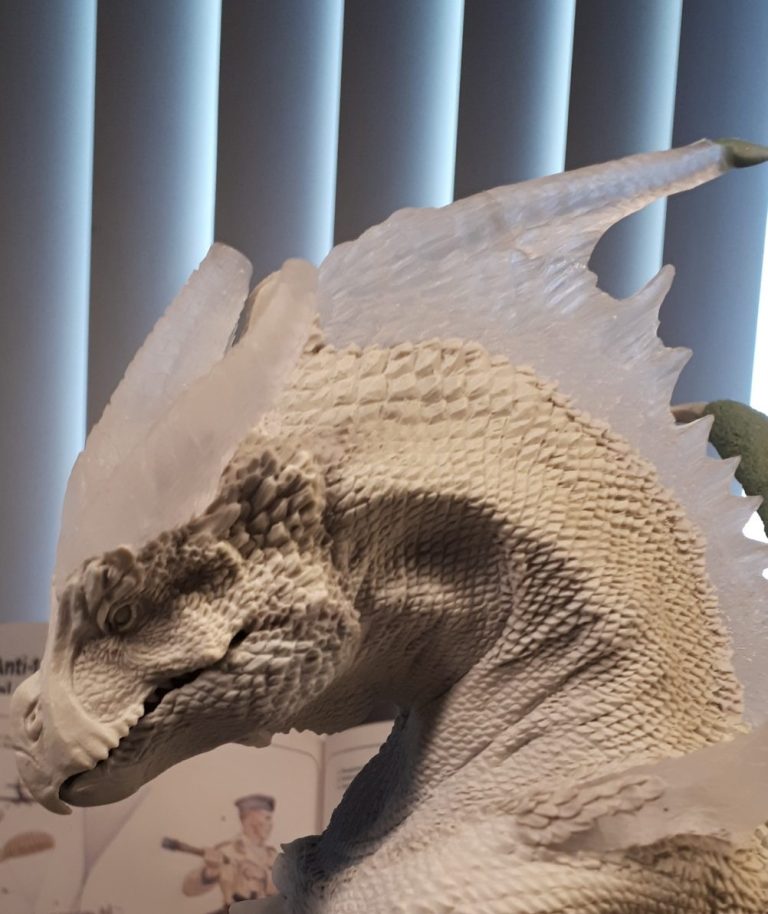
The main parts of the dragon and all of the Narwhal are cast in white resin, however, the spiked appendages that appear to be short wings, the crest on the neck and head, the last 5 inches or so of the tail and the base are all cast in clear resin….. I can see the point of the base being cast in translucent resin, as lighting could perhaps be added in the hollow space beneath it, but I’m not convinced of the other parts.
Separation of parts.
Joints are not easily hidden particularly on the tail sections, and where the legs and neck joint the body. Expect to add filler and sculpt in some scale detail. Added to which the resin used doesn’t seem to like either superglue or epoxy glue, so be prepared to drill holes in parts to add wire pins – and better to add more than one per joint.


Sculpting.
This was a BIG project; size wise the dragon is on a par with a small cat, and once assembled is quite heavy. The sculpting on the head and neck is superb, in fact, it’s better than that even; the main body is good, then legs and feet are ok, but I get the feeling that the sculptor got a bit bored or fed up with the project once he got along to the tail.
In comparison, the scales on the head and neck are way better defined than those on the tail, and whilst they’re acceptable, they appear a lot more simplified than the ones elsewhere on the body.
Was I disappointed ?
Honestly, opening the box and looking at the parts I’d spent £250 on….. No, not at that point, lets just say I could see that this wasn’t going to be a quick build, and that it would need a little TLC.
A note on Garage Kits.
I’ve been buying pieces classed as “Garage Kits” for about 30 years now, some are superb bits of engineering, some are “must haves” simply for the style and presence they have, some are downright pigs to put together, correct the joints, and make them paintable, but every single one I’ve done has been worth the effort.
So I was aware that this might not be a perfect kit, Then again, if I wanted something like that then I’d have bought a few Pegaso figures instead.
I expected this to be a long project, probably with some “fun” long the way, and including a necessary amount of thought and adaptation along the way.

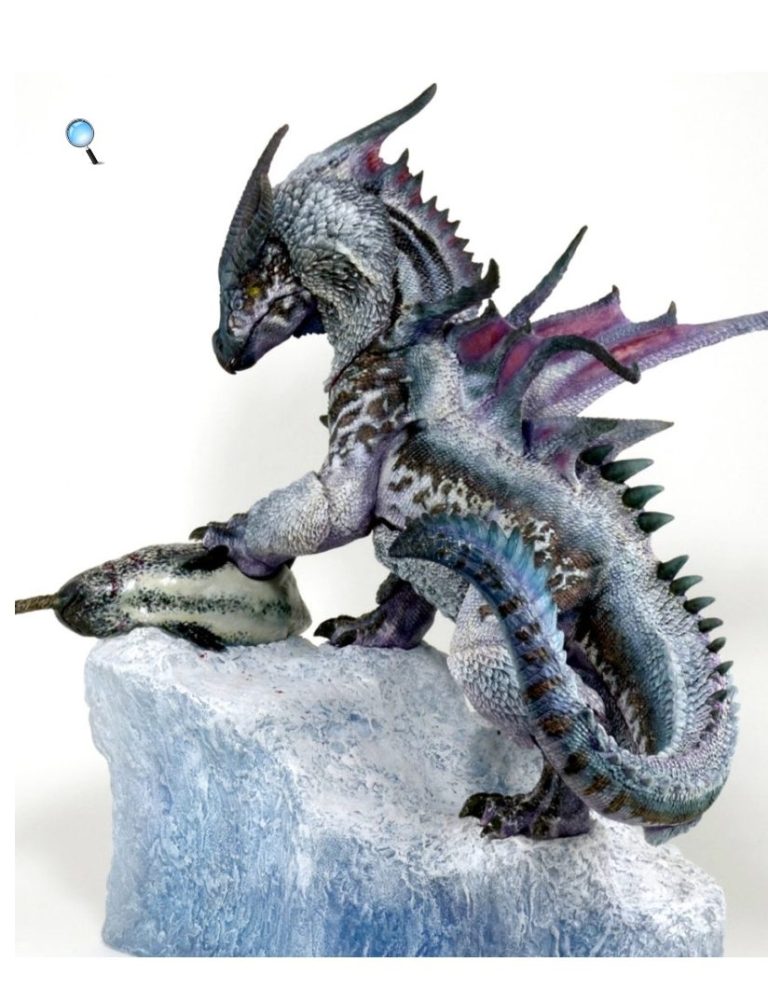
So photo #1 shows one of the pictures posted online with the dragon and narwhal very well painted and looking fabulous; fabulous enough for Thomas and I to buy one each in fact.
Photo #2 shows the major dragon components having been drilled, pinned and glued together and posed on the semitransparent base along with a figure I though would be around the right scale as a rider / handler. The figure is from Black Sun miniatures, and is in itself a gorgeous production.


Photo #3 shows a close up of the head and body of the dragon, in this shot you can perhaps see the joint that has had to be filled on the left leg that runs from the elbow. There’s a few resculpted scales to help cover the joint, as otherwise it’s very obvious to anyone looking at that area.
You can also see the clear parts on the head, neck and back in this shot, and again there’s an amount of resculpting of scales to cover the joints.
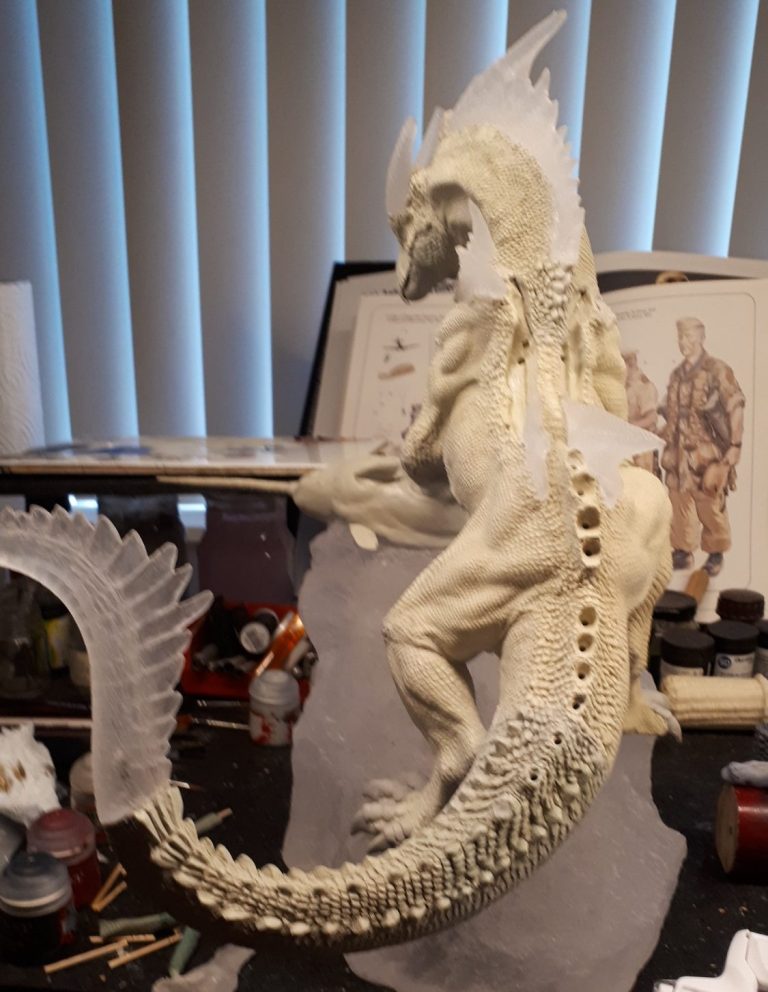
Photo #4 shows the lower half of the body, and I think the addition of extra scales is obvious in this shot across the knee. There’s a line vertically up the tail – from this angle it extends from the ankle joint - where I’ve attempted to hide another joint in the components.
I’ve added larger claws on the feet here, the ones supplied were a bit dumpy looking and again cast in clear resin. I wanted the dragon to look a bit more savage.

All sculpting was done with Magic Sculpt by the way.
Now in all honesty I was losing a bit of heart on this one, it was a struggle to get the glue to work on the resin castings, the fit of parts wasn’t the best, and there had been a lot of scales sculpted in to hide the obvious joints. But while I was in the process of all this I still took him out to shows as a “work in progress” addition to club displays.
Photo #5 shows what happens when you put a big, heavy model into a plastic carry box that is a bit more flimsy than you thought, the box cracks open and the model loses and argument with the ground. The points of several horns were snapped off the head and neck crest and an amount of swearing ensued.
But it arrived in bits, I’m a modeller, and I can fix this kind of stuff…… Usually.
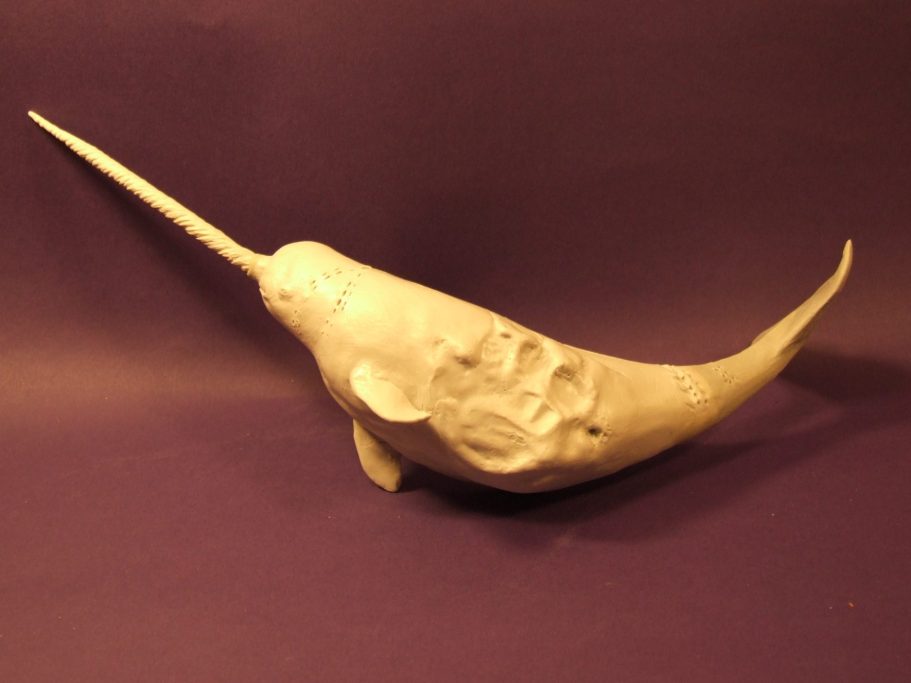
The Narwhal. Photo #6 shows the narwhal, which has caused a division of comment amongst some of my closest friends. It appears that some of them dislike narwhals – reason unknown, maybe being bothered by a wandering narwhal as children – whilst a very few of them seem to think they’re OK. This latter group is small, but make up for lack of numbers by occasionally mentioning narwhals to the opposing group.

I think it must be a modeller thing.
Anyway, the narwhal goes together well, joints are easier to hide, and the footprint on its side adds a good solid location for one of the dragon’s feet.
The attention to detail here is good as well, in photo #7 there’s a close up of the teeth marks from the dragon having attacked the narwhal.

A dragon without wing ?
Wouldn’t be right would it ?
I thought not, although I might be wrong. However I decided that my version would have wings, and I think ( if you include dropping the model out of the cracked and knackered plastic box ) this would be by second mistake.
The model is big – I might have mentioned that, but if not, then think of something the size of a small cat – so wings to carry such a beastie would also have to be large. Photo #8 shows the ones I began making – a whole wire coat hanger straightened out to form the main outer “arm” with extra wires from a second coat hanger to supply the two middle spines. In this shot I’ve added Milliput to the wires to fill the=m out, with the joint to the shoulder added with Magic Sculpt and textured as this part would remain visible.
I built up the bicep muscle on the upper arm, and the muscles on the forearm would have similar muscles built onto them later on.
The three spines that would hold the pinions of the wing I regard as akin to fingers ( I was thinking of how a Bat’s wing is shaped ) and so these would have thickening at the places where the knuckles of the fingers would be.
I made the wings so that they could be detached from the body for easier transportation, although people have said they can see slight joint lines where the wings fasten in, I prefer that to the putty cracking and breaking due to any vibration when transporting the dragon to shows.

Photo #9 shows the dragon being test fitted to the base and with the narwhal in place.
In photo #10 I’ve completed one wing. This was made out of a large lump of Magic Sculpt putty, rolled out with a coating of French Chalk to stop it sticking to anything and texturing each side ( easier said than done, because as you’re doing one side the other one is getting the texture flattened out of it ) with a piece of Loofa.
The soft putty is then draped over the wing spines, doing one section at a time, and gently pressed into place whilst running very thin superglue into the joint between the soft putty and the wing spine, to hold everything together.
The trailing edges are torn away randomly and some rips cut in gently with a sharp craft knife.
It took a lot of putty, even though the membranes are very thin.

Photo #11 shows the Loofa texture a bit more clearly.


In photo #12 I’ve attempted to get a shot of the assembled dragon and narwhal. It’s a big piece to try and photograph, and this would be a continued challenge throughout the modelling and painting process when I wanted to show the whole model, rather than just focus on particular parts.
More additions, or more accurately, the holes for them.
Photo #13 shows the holes I drilled into the locations for the spikes what would be glued to the lower back of the model. I’d already encountered the problem with the glue not working on parts, so I thought that drilling and pinning even small parts was a precaution best taken prior to painting.
And if I was going to do that, why not make longer more decorative spikes.

Photo #14 shows these being made, cocktail sticks to form a spike on, with the trailing edge squeezed between a wet forefinger and thumb to make a thin and wavy edge.
A plinth would have to be pretty big, and I got hold of a chopping board from TK Maxx that fitted the bill – see photo #15.


Having got the figure painted, I started looking at the exact spot she’d have to stand, and in photo #16 I’ve got her positioned in a forward section of what will be the front of the base. And although I think she’s spot on for the size a rider would be, she’s completely lost and upstaged by the dragon itself.
A shot of the back of the dragon in photo #17 shows both detachable wings in place and the extended spikes on the dragon’s back fastened on.

Painting begins in earnest.
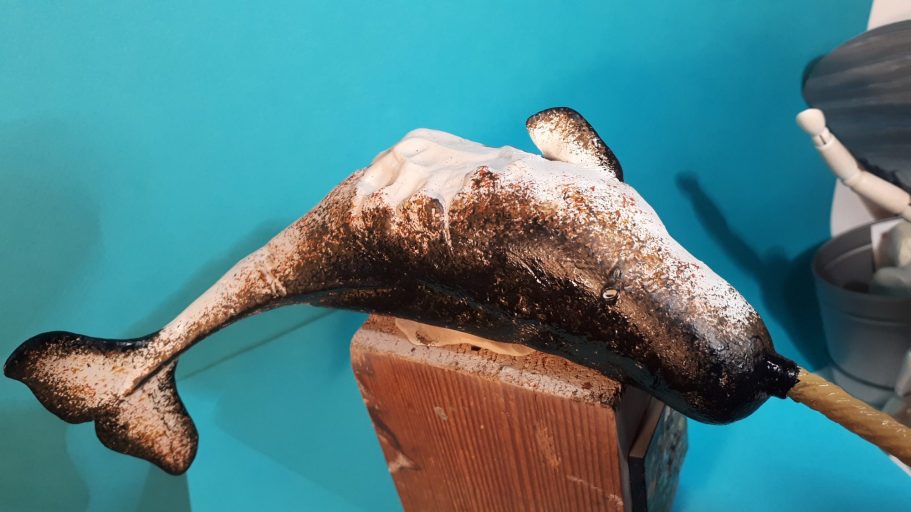
OK, let me state at this point, the narwhal is not, and never has had a name, Earnest or otherwise. However I did start painting him first.
Photo #18 shows this with a pale grey colour airbrushed over all of the body, and once fully dry, I began adding Mars Brown oils with a coarse sponge to give the random spotted mottling I’d seen in photos pf narwhals on the internet. I gradually added Burnt Umber with a sponge over some of the top of the Mars Brown, and finally some Mars Black.

Photo #19 shows the belly of the narwhal, and again, following research on the internet I left this with it’s grey colouration, adding only a thin pinkish / brown wash of oils to form shadows.

The horn ( it’s actually one of the animal’s teeth and not a horn at all ) was painted with a sand coloured acrylic and then coated with Burnt Umber oils which were then wiped off with a soft cloth to allow the dark brown paint to remain in the recessed detail – see photo #20.
And while I’m detailing the painting of this part, I’ve got to mention how much work was necessary to get rid of the mould line that ran on two sides of the horn down it’s full length. At one point ( and I’m not sure if I was right to discard the idea ) I considered just making a new horn altogether and discarding the kit part.
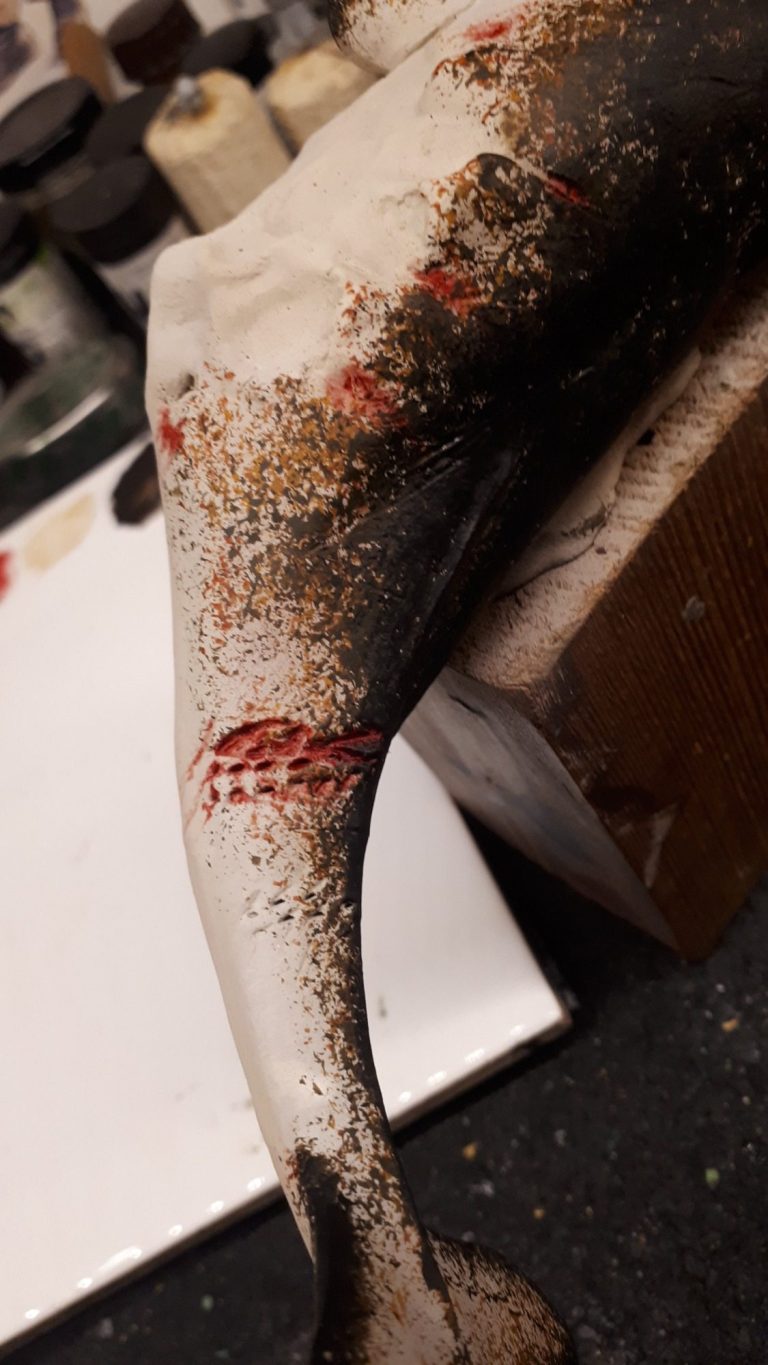
In photo #21 the deep wounds on the narwhal’s tail can be seen. I did add some blood running down off these and those at the front, but made them quite small and un-gory.
This shot also shows off the stippling effect from the sponge painting, with the different colours overlaying one another.
Now for painting the dragon.
My good friend Mario Delgado had mentioned that my painting of subjects had become a little dull and dark, far removed from the bright colours I used to apply to fantasy subjects a few years ago.
I took this comment onboard, and decided that the dragon would be painted quite brightly – working along the lines of make plumage / colouration in animals and fish during the mating seasons, and so began with a primer of Halfords Grey, followed by lighter grey Tamiya colours through to almost pure white that were sprayed on through an airbrush.

As for the pattern, I thought back to a cool camouflage scheme I’d seen on a German halftrack a few years back painted by Tony Greenland. I’m not quite sure exactly how he did it, but it looked to me like he’d torn some paper to give a random jagged edge, and placed it on the model, spraying the edge of the paper and allowing the colour to mist out to nothing on the opposite side to the paper mask. Perhaps this is shown better in photo #22, where you can see the hard edge provided by the mask that is held close to the body of the dragon, and the paint fades out back towards the tail.
To darken the red colour even more, a similar mask was used to spray black over the hard edge of the red – as seen in photo #23, where I’ve just begun this process.


Photo #24 shows the dragon with just the red camo stripes painted on.
And photo #25 shows it with the black overlay done.
At this point I wonder if I should have stopped as far as adding colour was concerned to the body, but, well, I didn’t. However, whilst I was thinking….


Photo #26 shows the first idea I had for the wings.
Painting Paper Panzer AFV’s had led me to produce a spot camouflage mask – a sheet of photocopy paper with holes punched in it at random, that could be moved about to give a totally random appearance to camo.
I thought ( misguidedly ) that this might work quite well on the wings…. Um, maybe not then….

And photo #27 shows the wings done and I really wasn’t keen on the effect at all.
Photo #28 shows the wings having had washes of Carmine and then Burnt Umber oils added to see if the effect gets any better….. Nope, not really, so time was taken to return to the main body and do something with that….


.....like fix the leg that fell off during painting – see photos #29 and #30 – told you that glue wasn’t adhering properly, even Industrial Strength epoxy glue from the oil and gas industry didn’t seem to hold that well.


However, photo #31 is an opportunity to show the much sharper looking claws made from Magic Sculpt, nice !
Photo #32 I felt that maybe there was some green needed to brighten up that red and black camo – so the trailing edges of the spikes on the dragon back were painted with some viridian green ( a dark green oil ) and some Chrome Yellow added to make mid-t0nes and highlights. Carmine was added to the spikes themselves and then highlighted with orange.
To allow me to handle the model without rubbing the paint off, I taped a soft food storage bag around the trunk of the body, which can also be seen in this shot.

Wings, part 2
OK honestly, I have no idea why I thought these colours would be a good idea. I don’t do drugs, and not much alcohol either, so age induced stupidity can be the only answer.
Photo #33 shows how far away from reason I went, and making the admission here stings a little bit.
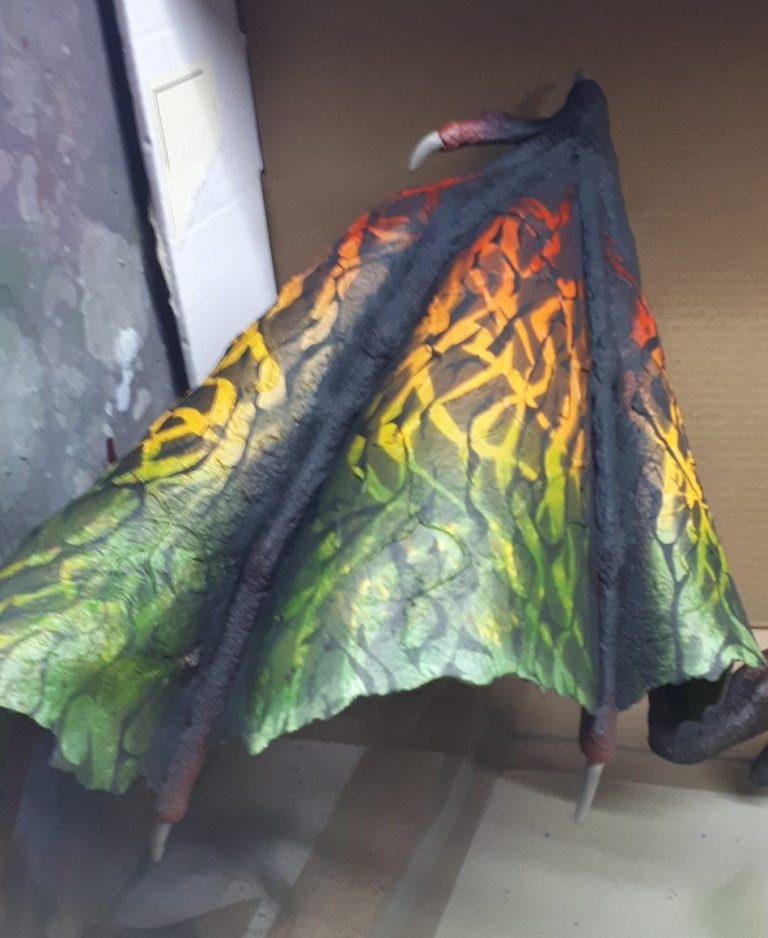
Actually, there’s a lot of time went into this, the main pattern being made by putting strips of masking putty over a grey undercoat and then spraying black acrylic over everything. After removing the masking putty, Tamiya Clear colour lacquers were used to spray overlapping bands, beginning with the yellow central band, then adding the red at the top and the green at the bottom, the overspray of these latter two blending in to the yellow.
It still wasn’t a good idea, and it didn’t work. I actually hated it that much that it got another coat of Halfords Grey primer straight away.
Photo #34 – see, it isn’t even close to working.
Please note at this point that I share the disasters as well as the triumphs, no matter how dumb I look in retrospect. It ALWAYS seems a good idea at the time, and every modeller I know has these problems now and again. If they tell you they don’t….. Well, they might be massaging the truth a bit.
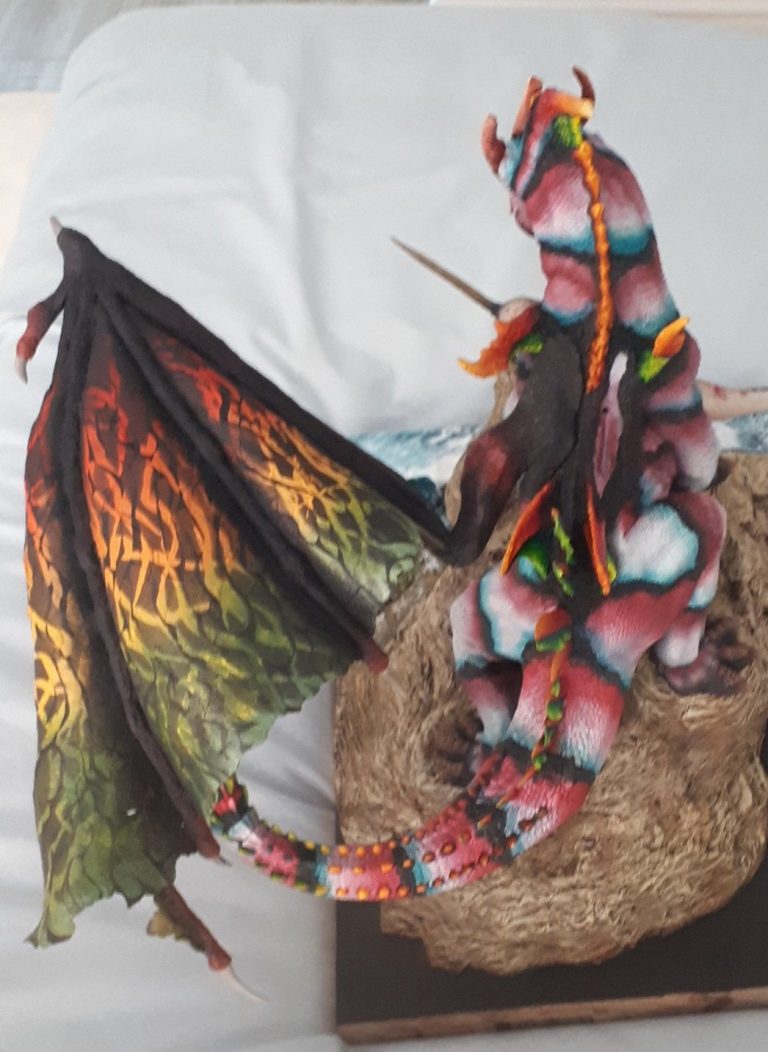

Before the colours were hidden, I did try calming the bright colours down with some over-sprays of more black. Still didn’t work mind, but it was worth a try – see photo #35.
Also visible in this shot, but maybe not so well, is the addition of narrower viridian stripes on the body next to the black bands.
The neck spines have been painted in to match the leading edges of the lower back spikes and the head – which I’ll move onto in the next shots, was painted up too.
The head.
This is by far the best bit of the model. It’s saving grace, and I enjoyed painting it immensely. It looks bad tempered and angry – just brilliant.
The horn sections were painted with an undercoat of a sand coloured acrylic – two or three coats of this to get a solid coverage, and then a thin coat of Mars Brown added to begin the addition of the oils. I used quite a bit of Light Red oils mixed with Mars Yellow for the main areas, both very strong pigments, followed by more Mars Yellow, and finally Titanium White.
This took a while to dry off, but after it had, I added some thinned Burnt Umber oils to punch in the deeper recesses and shadows.

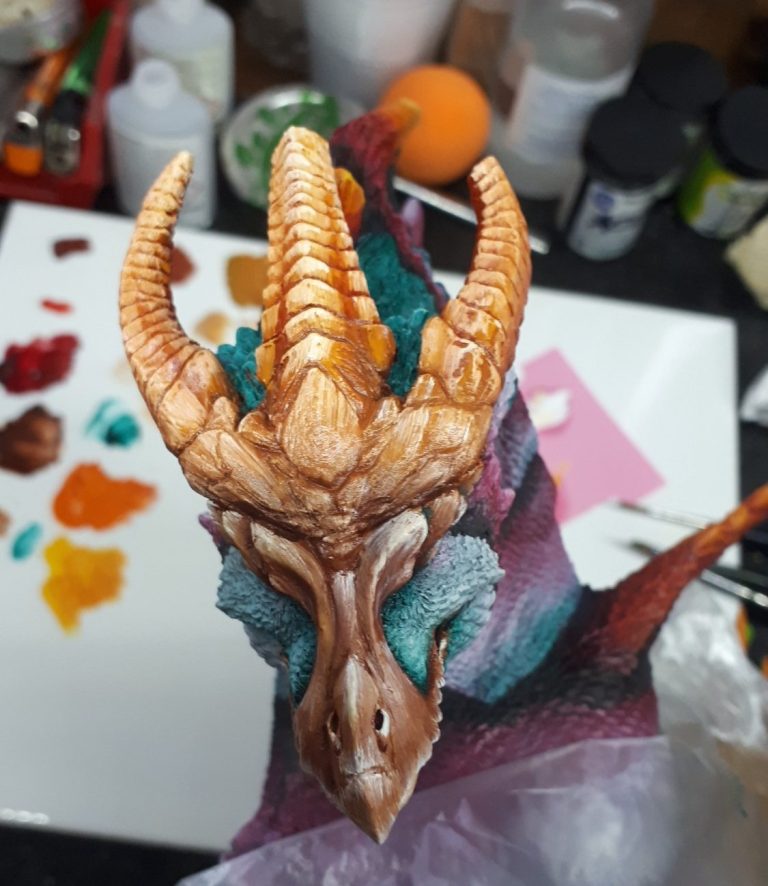
The Viridian, which again is a pretty strong pigment, can be seen next to the snout of the dragon, and I painted it on by adding thin lines of it unthinned where I needed it to be darkest, then using a clean brush dipped in White Spirit, drew the paint out to feather it into the areas of pale grey scales.
The eyes were painted in with some bright red, followed by some yellow highlighting blended into the iris, and then a black pupil with a tiny white catchlight added to finish them off.
Photo #37 shows a view of the top of the head prior to the dark brown being added to define the scales on the crest. You can see the difference this addition of a darker colour makes with the comparison to the area above the eyes and on the snout.
The Wings part 3
Really, I should have thought this through properly and done this pattern from the start. Why I didn’t do it in the same order as on the body I have no idea, but painting a similar coloured pattern on the wings does now seem so much better than doing something completely different.
So photo #38 shows the Viridian colour sprayed on with the torn paper mask method.
A note about spraying oil colours – it ain’t easy. You’re starting with a thick cream-like sludge, thinning it with White Spirit to form a liquid that is thin enough and lump-free enough to go through an airbrush, and trying to keep a tight pattern without blowing lines and runnels of paint out from the area of wet paint, because it’s still very runny when it’s got onto the surface of the model.
A light hand, a lot of patience and copious swearing are the necessary requisites, I kid you not. And some bright spark decided he’d do this with more than one colour…
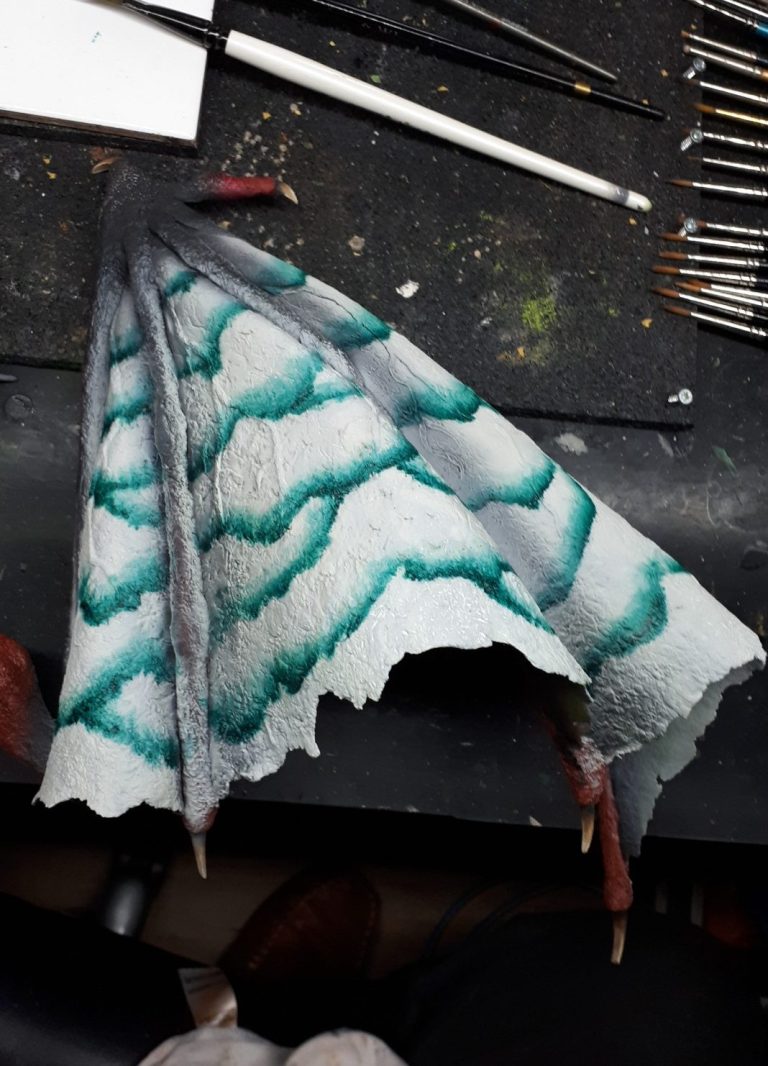

Photo #39 ( my, my this is taking a long time, isn’t it ? ) shows the addition of the Carmine oils, again through the airbrush. The wing struts have also been coated in sensible Tamiya Flat Black – oh so much easier to do.
Now this wing painting was taking a while to do; the painting process was slower than normal airbrushing, and the drying cabinet ( an old kitchen cupboard ) could only take one wing at once. So while we’re waiting for all that to happen, and by the magic of article writing, I bring you a step back in time to making the base…..
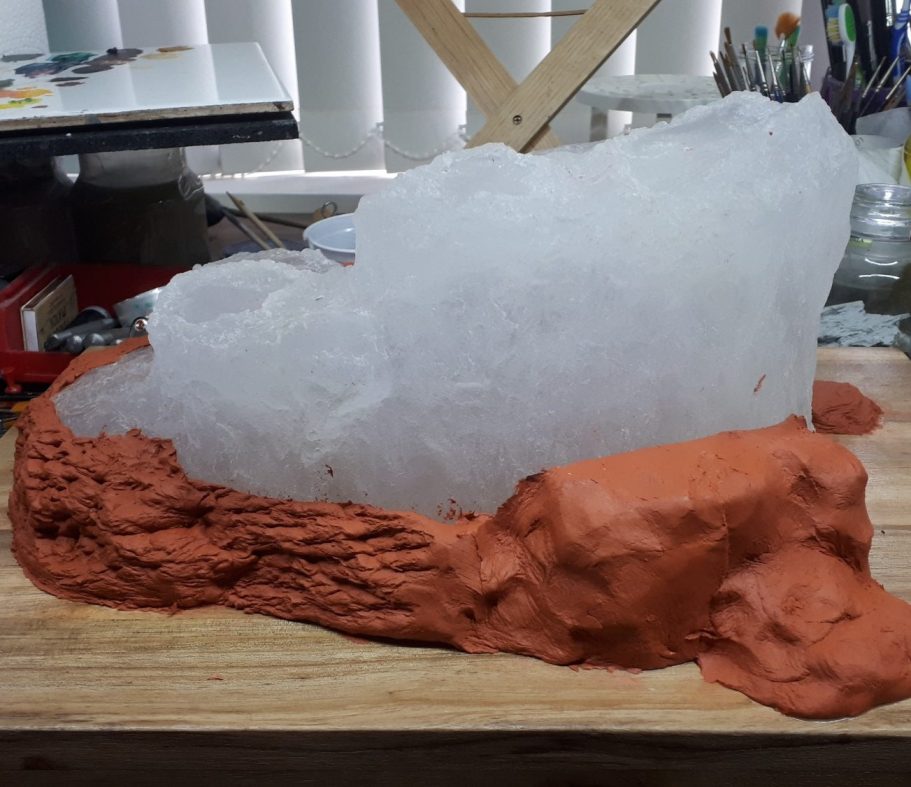
Photo #40 – you remember the purchase of a suitably sized chopping board of course, and to that I’ve fastened the translucent base that comes with the kit. Here I’ve begun adding DAS clay to the bottom of the kit part, texturing it with a piece of rock to make the clay look like, well, um, rock… On the left, the clay that had just been added being on the right.
DAS is not my favourite medium for doing anything with, it cracks when it’s dried, areas of it move about when you’re detailing somewhere completely different, and it smells. Oh, and it doesn’t seem to like adhering to itself when broken into manageable pieces, no matter how much you press and squash it together.

It’s redeeming features, it takes detail fairly well, but most of all, bulk-wise, it’s pretty cheap. I needed a lot of bulk adding to the base, so two packs of DAS at around £4.50 each were needed, The equivalent of this amount in Magic Sculpt would have come to over £80, so I’d put up with it’s shortcomings quite happily.
Photo #41 shows a bit more work done and a flat section to take a nameplate added – that’s the bit painted black once the clay had dried.
I’d planned to have waves coming in from the left as you look at this, breaking on the rocks, and so the little bit of textured DAS in the middle of nowhere is going to be just breaking the surface of the water.
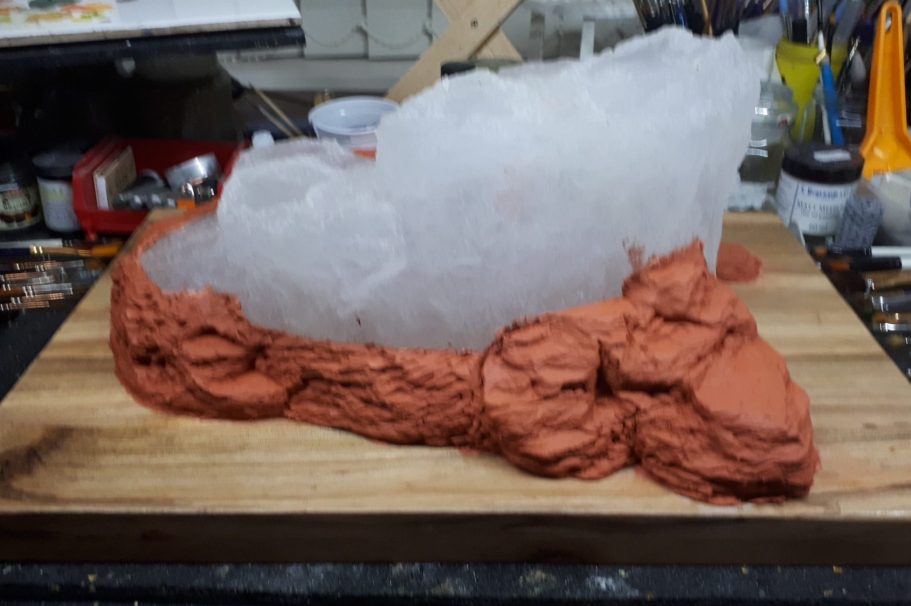
Photo #42 shows the other side of the kit base surrounded by more DAS clay. I like my models ( where possible ) to have detail at the back of the base. Something that rewards the onlooker for taking the trouble to look at a model from more than just the front. Sometimes it’s not possible, but in this case I could add a lot of detail on this side, and the addition of the mass of clay would partially balance the model when being carried. Yes, in answer to your question, this is heavy.
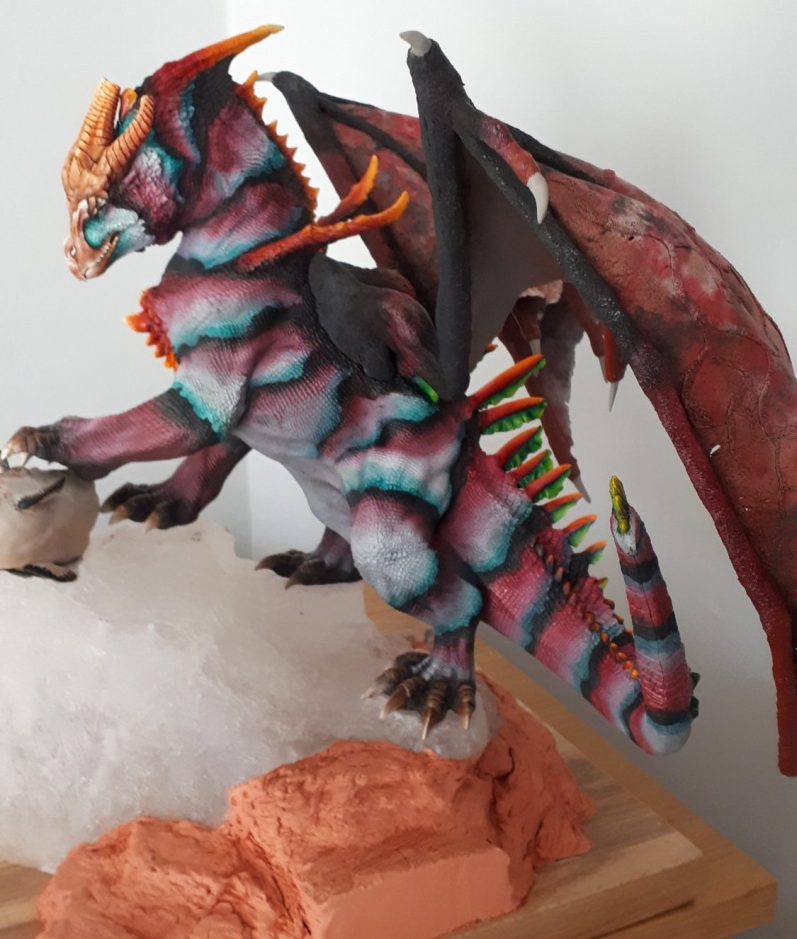
Photo #43 shows the dragon and narwhal being test fitted to the base. The longer claws on the dragons feet have thrown the fit of things a bit, and I would have to add an amount of putty under the narwhal to sort that out, but otherwise things were looking good.
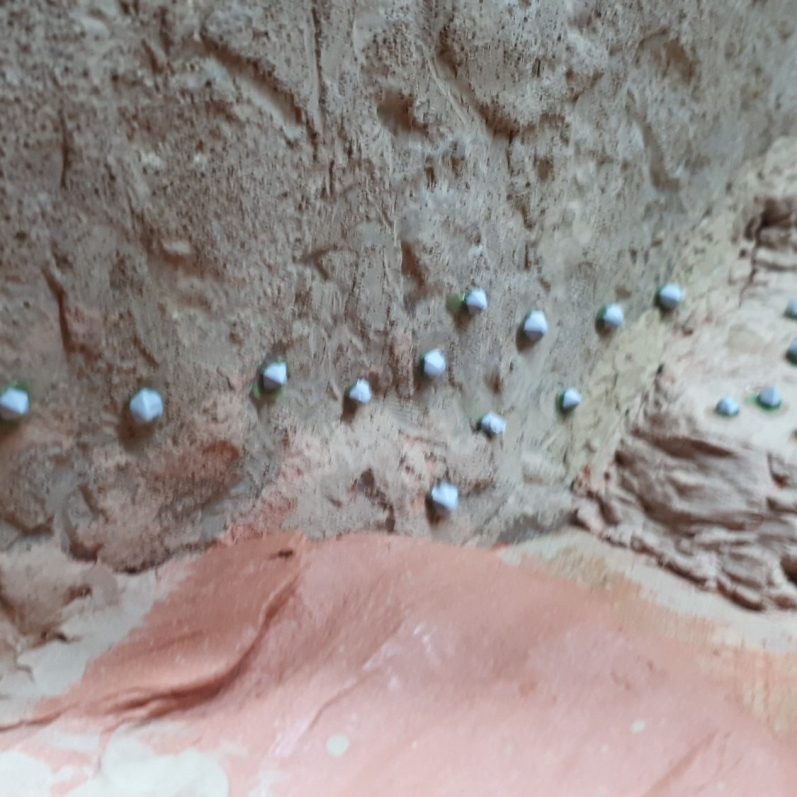
Limpets and anemones.
It’s the seaside, so there’s allsorts of little animals living around the margin between sea and land. Photo #44.
Limpets were easy to make, use a fine drill bit to make a hole in a large diameter piece of plastic sprue, hollow out and expand the hole to form a hollow cone shape with a sharp craft knife, and then dampen the hollowed out end with a spot of water or Vaseline – whichever is easiest to get hold of, and press small balls of putty onto the rocks then press the cone shaper into the putty – hey presto a limpet.
Anemones were little stubby, rounded cones of putty, some with fine tentacles still trailing, but in real life, when above water as the tide recedes, they look more like a small lump of jelly.
I added a lot of the limpets, although some would get absorbed by the addition of the waves later, it was a case of estimate where the water level would be and work roughly around and above that.

In photo #45 I’ve made waves. Again using what was left of the DAS clay, I added inverted V shaped sausages to the plinth, pressing the front edge of the sausage down firmly and blending it smoothly into the plinth’s surface first, then did the same for the wave trailing edge, and finally, using a bit of water to smooth things out even more, dragged my finger repeatedly over the wave in the direction it would be moving to create a rolling type of wave crest.
I had to work out the reflection of waves around the “rock” sticking out of the water and also for where they are breaking against the main section of the groundwork “land”, which is more theory and a lot of thought, but I think I got it about right.
The waves were then left to dry for a week before I could consider adding paint.
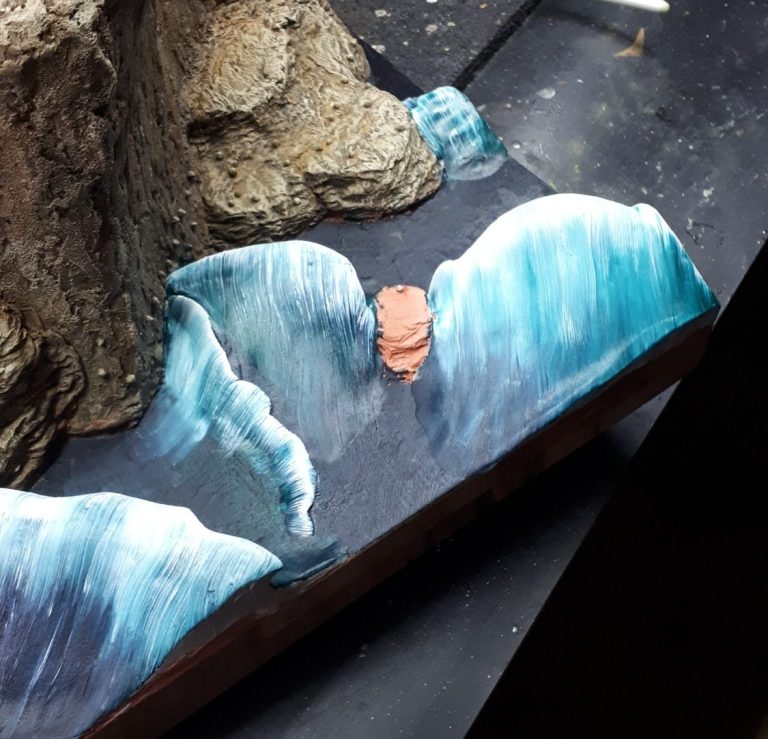
I wanted the water to look deep, and the waves not too violent, so I opted for a deep blue green oils over a couple of coats of pale blue acrylic. The first coat of acrylic soaked into the DAS clay, and the second one ensured a good seal for the oils to be painted over.
Then using a hogs- hair brush, which has particularly coarse bristles, I began adding a mix of the dark green / blue with a lot of Titanium White. This was painted on adding the colour in single strikes from the leading edge of each wave, and wiping the brush after each stroke to remove any darker paint it had picked up, then recharging the bristles with the light coloured mix and doing another single stroke. The paler blue /green effect seen in photo #46 has been done this way, and then Titanium White on it’s own applied in the same manner has been used on the very front of each wave crest.
The colours looked OK, but lacked movement and a certain amount of power somehow.


Photos #47 and #48 show the same stage, but from different angles, where you can see the trailing, but linear fade of the paler colours away from the wave fronts, imitating the air that is trapped by the wave beginning to break.

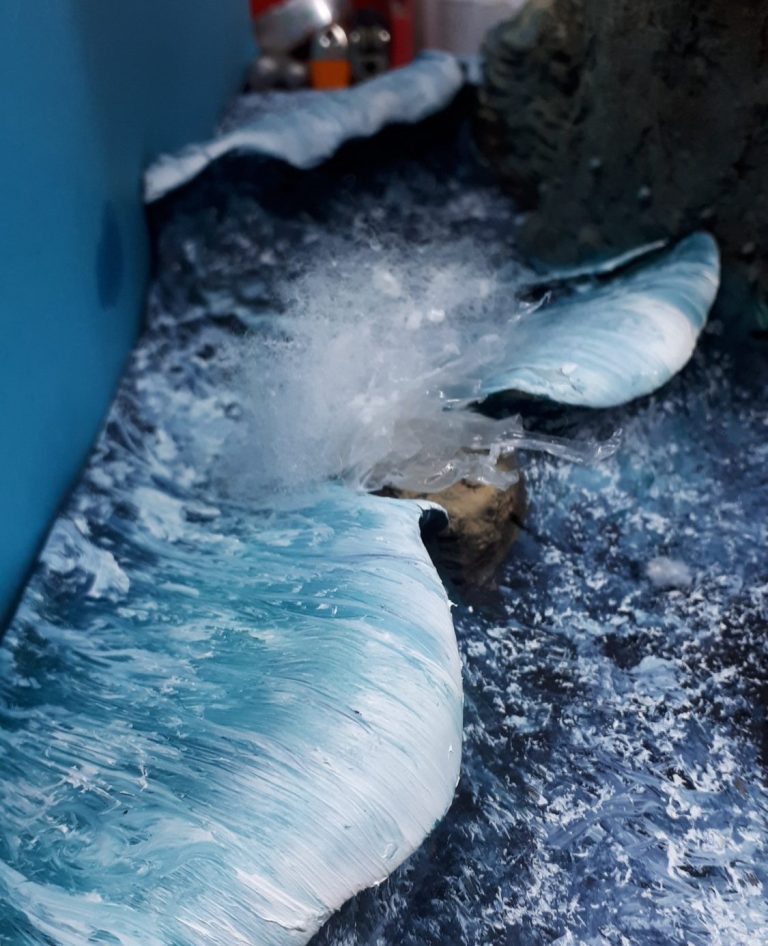
To imitate the “froth” caused by constant wave action, I needed to add bubbles between the wave fronts. This was done with more of the lightened Blue / green mix and also Titanium White, this time instead of a brush I used a couple of different sponges as seen in photos #49 and #50.
Also in this shot I’ve added some fine fibrous material usually used for stuffing soft toys, sprinkling a little Superglue onto it to act as larger flecks of foaming water thrown up by the wave hitting the exposed rock.

Photo #51 shows the effect from the side, although be warned that this fibrous material does not react well to spray varnishes, as I found out later and had to re-apply the fibrous material and superglue.
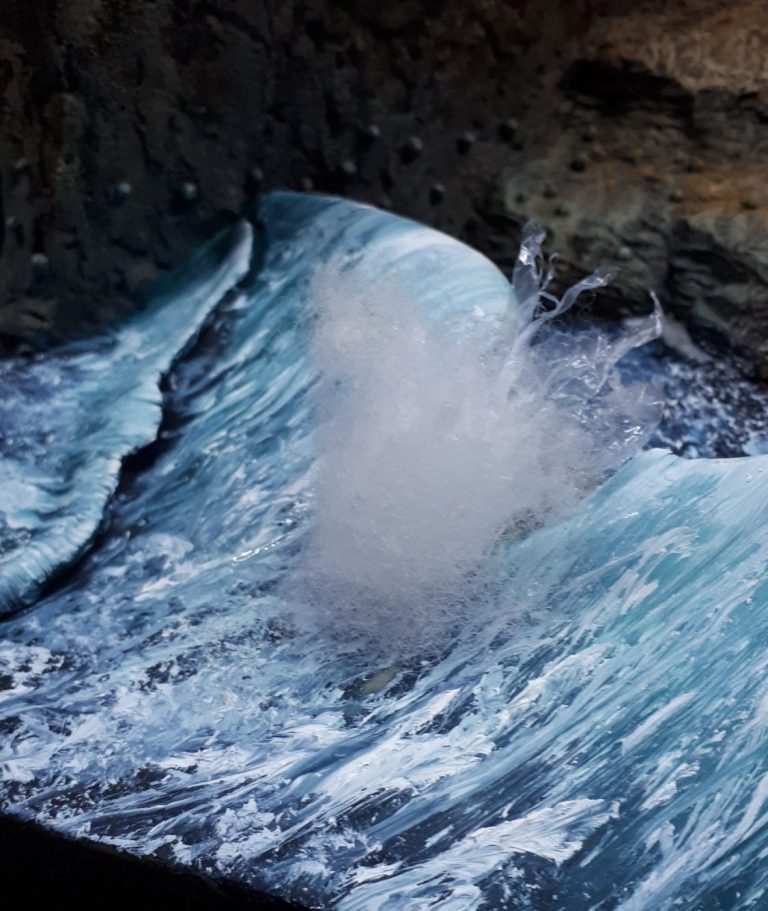
That’s what is shown in photo #52, where a new piece of the fibrous stuff has been glued in place ( again with superglue ) and is yet to be pulled and teased into shape.

Photo #53 shows a broader view, and the waves are looking a little more lifelike. The Fibrous material is still untouched, in that shot, but in photo #54 I’ve brought it back into a more realistic “splash” by using a combination of Acrylic Gloss Medium and some drops of superglue.


Although it did look a little too watery, with not enough water vapour, I added a little more of the fibrous material as shown in photos #55 and #56.

This particular area was all a bit hit and miss and certainly experimental, but once I was pretty happy with how it was done, and that it seemed to work fairly well, I could add more of the fibrous material to other areas of the waves as shown in photo #57.


The seaweed that I’d sculpted earlier needed painting now, just a few different green shades of acrylics and some gloss varnish to show that the water was wetting sections of the lower rocks – photo #58.
There’s a lot of repeated test fitting goes on with any project, and this one in particular had a lot of tests to see that the dragon and narwhal still went into position, and whether adjustments needed to be made.
The model was getting so big though that it became difficult too photograph, and in photo #59 I’ve completely given up with trying to get it to fit in the usual photo area that I use and simply placed it on the landing carpet – sometimes you just can’t do much else.

Returning to work on the base, I’d painted the main rocks with a mix of Vandyke Brown oils, and then added Buff Titanium and finally Titanium White to bring out the details. Photo #60 shows this ( OK, so do several of the earlier shots ) but also the addition of fine sand and gravel over the painted areas, imitating the detritus that would be thrown up during violent storms and that would lodge on flatter areas of the rocks.
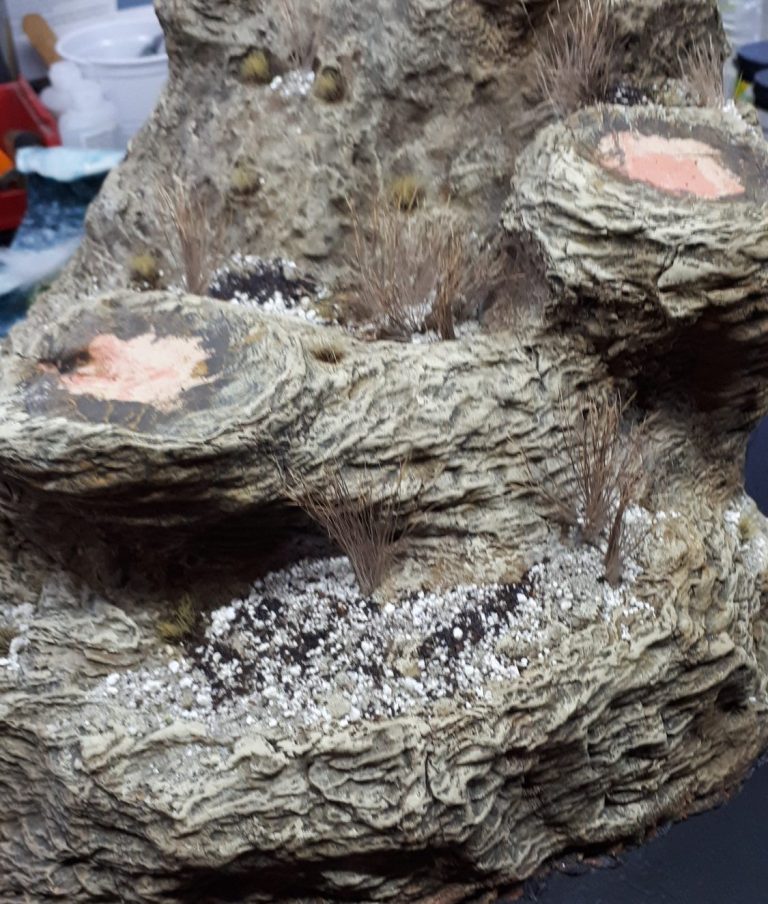

Whilst the superglue was drying I returned to painting the seaweed and anemone’s that are exposed by the movement of the tides – see photo #61.
And now to the figure.....
As mentioned right at the start I chose one from Black Sun miniatures, a 90mm resin casting of a somewhat Japanese styled woman. Well, the Katana’s are a bit of a give away, but she’s dressed in a kind of post apocalypse fashion, and just seemed to fit in with the dragon and narwhal both for scale and for pose.
Initially I had the idea that a saddle would be added to the dragon’s back, and she would be holding a set of long reins. Having thought about it, then found myself adding all those spikes, I couldn’t fit a saddle on there, and how would you control such a large beast, other than forming a relationship with it as an equal partner for hunting or for protection. So the saddle and reins idea fell by the wayside, and I opted for her just to be standing near the dragon, with her back to it, showing that whilst the dragon is capable, he poses her no threat.
The parts for the figure are shown in photo #62, and I kept them separated like this whilst I painted them.


Photo #63 shows the beginning of the painting process, with pale grey pants, and the addition of red stripes. The grey is done in acrylics, and once fully dry, the red is laid on with oils, beginning with a dark outline for each stripe, then a lighter red down the middle, and highlights from a bright scarlet to pick out the highlights.
All of this is a bit difficult to see as the oils are still wet and shiny, but they’ll matt down once dried out.
Photo #64, and I wanted the waistcoat to match the red of the trousers enough to look like she was co-ordinated, but added some Mars Brown oils as an initial coat to difference it from the brighter colours on the pants.. The main colour used was Carmine, topped off with a little of the bright scarlet, and Buff Titanium blended in to the edging to keep the colouration,, but add a trim to the bottom edge and up the fastenings of the waistcoat.
Also in this shot I’ve used acrylics to paint the inside of the cloak that is visible between her legs. Beginning with Humbrol Scarlet mixed with a spot of Black, and then gradually more and more scarlet added in thin layers to build up to that highlight colour.
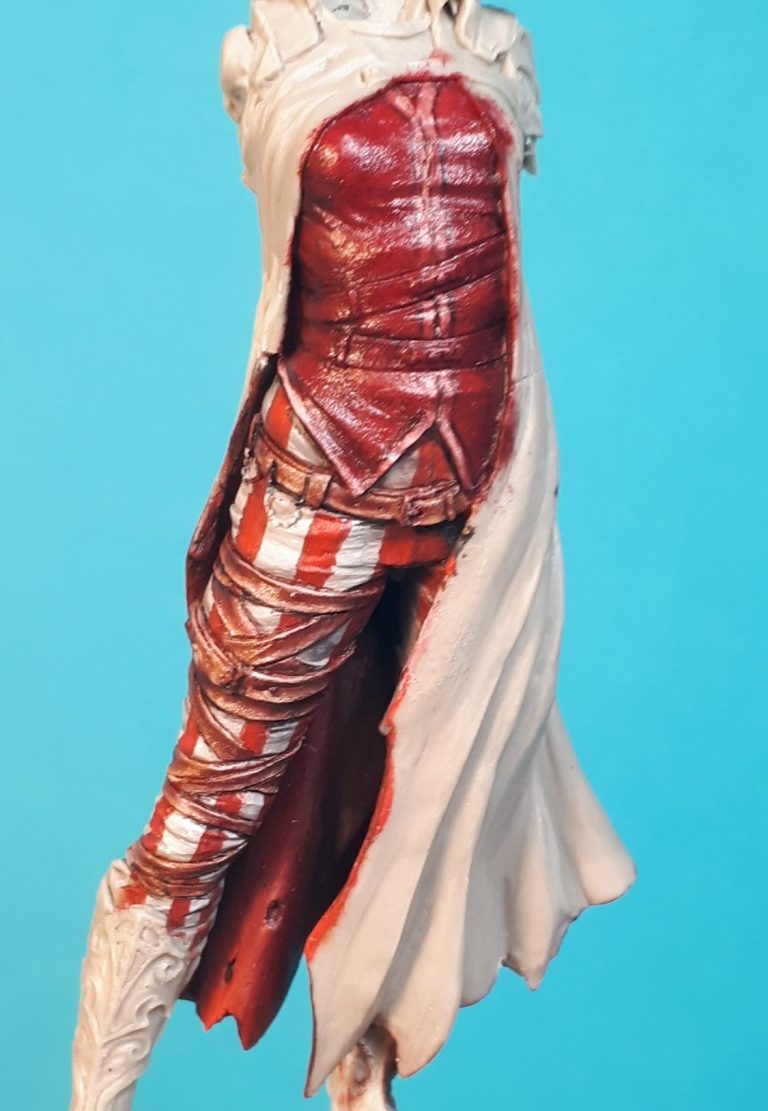

I like doing lighter colours in acrylics, whilst it is more time consuming, it does tend to stop too much paint building up on the surface of the model, which can easily happen with lighter colour oils.
Sometimes there’s a disaster happens, and I think it’s only fair to show photos of these hiccups too. In this case the acrylics were “rejected” by the resin, or more likely by some mould release agent that I hadn’t managed to clean off. The acrylic bubbles once dry and detaches from the surface, and when touched, sloughs off like a second skin.
The area needs completely stripping back, thoroughly cleaning with detergent and warm water, drying and then repriming for the painting process to begin again.
Photo #66 shows the beginning of the painting of the cloak, although this was stripped back after a few layers had been added as the yellow bias in the colours didn’t look right with the reds of the striped pants and the waistcoat.
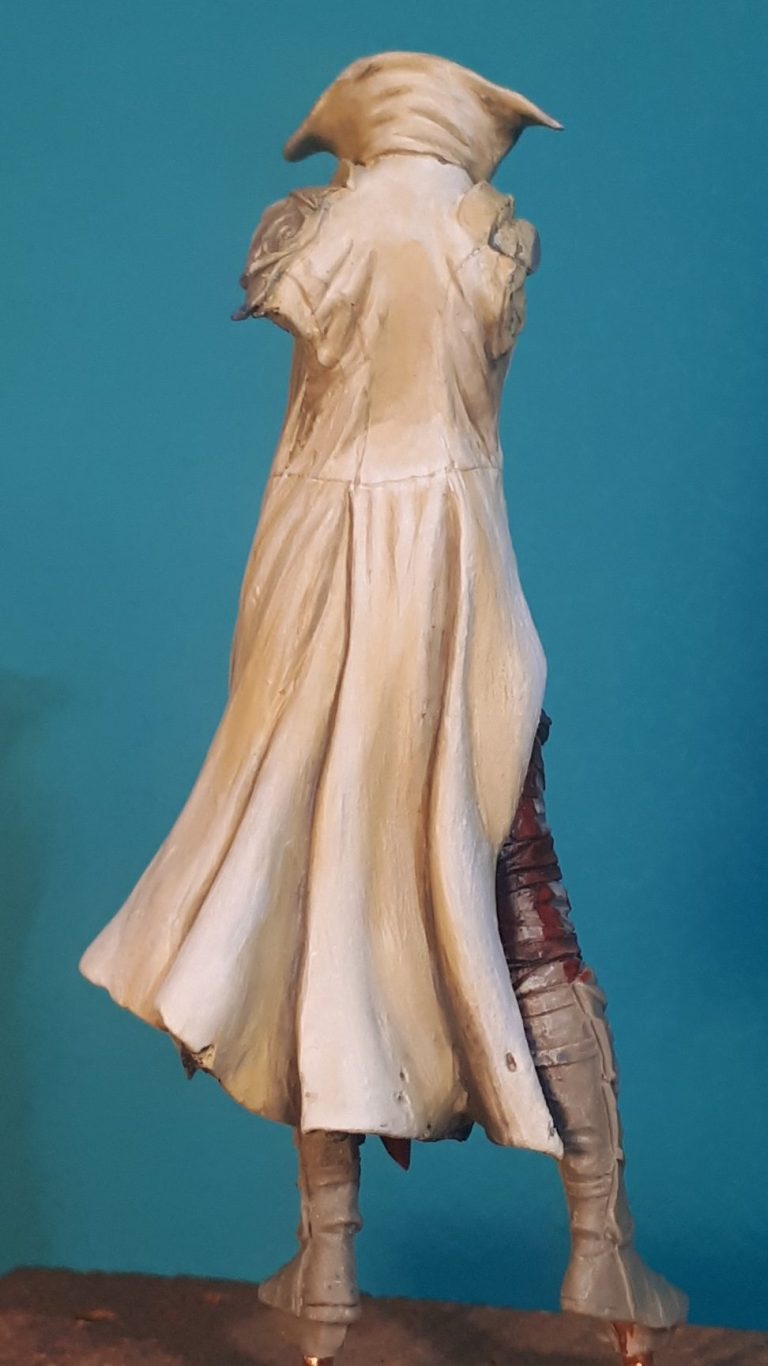
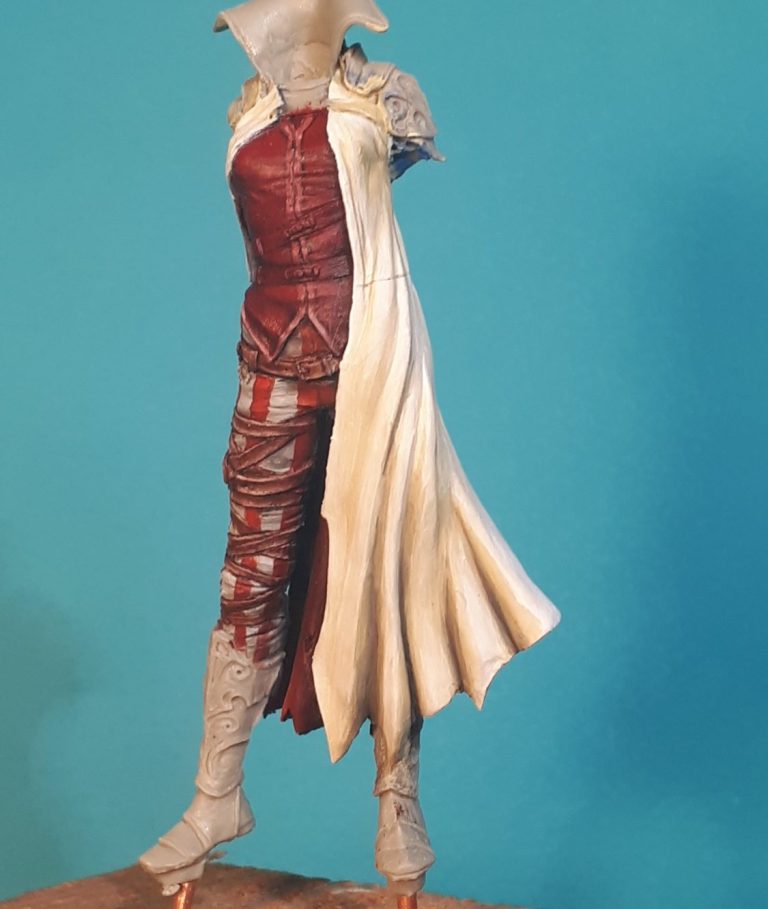
Photo #67, Ahhh, that’s better, the yellow toned back and the cloak finished off. The colours used are a small amount of Iyandan Darksun ( A desert Yellow colour ), Skull White ( the last of my store of it ) and some very small washes to the deeper shadows of Vandyke Brown oils once the acrylics had dried.
Also in this shot I’ve painted the leather straps around the legs, I used my basic leather colours, beginning with Burnt Umber, then some mars Brown, a little Light Red and finally some fine scratching and damage added to the edges with Buff Titanium – all of which are oil colours.
With the face painted in oils, I decided on ginger hair, and the test undercoat of this is shown with the head temporarily set in place on the main body casting in photo #69. It’ll be a lot less “in yer face” than this, I promise, I just wanted to see how it’d look.


Arms, hands, metallic boot shields and hair all finished off in photo #70. Nothing much new here in the way of paints, as the sections named had to match in with other areas of the model. The metallics were all done with an undercoat of black acrylics, over which I added a mix of Bronze printers ink and some Mars Black oil paint, working this into all the recessed detail. The just some Bronze printers ink on it’s own, brushed lightly over the top, and some Bright Gold printers inks to form the highlights.
The printers inks need to be dried off in a warm place for at least twenty four hours, and to seal them – because they’re migratory ( they aren’t stable and can be transferred from one area to another without very much help ) I seal them in with a couple of thin coats of Tamiya Clear Smoke ( mixed 50:50 with water )
So, to return to the comment about the back of her cloak not really being on show – to be honest there’s a few people who, when asked what they think of the figure, say they never noticed her….. and as you can see from photo #71, it’s a fair comment really and even without the wings on, she is totally dwarfed by the dragon, the rock and the sea.


I’m glad I painted her though as she’s a really good figure, I just with I’d done her more justice perhaps by not having her upstaged by a whacking great lump like this dragon. But there we go. Black Sun Miniatures do some really cool stuff, you should go look and more importantly, buy some.
Photo #72, see, there she is, and you now get a sense of scale between her and the main event.
Final shots, final thoughts.
Let’s begin with the fact that BIG models are somewhat difficult to photograph, getting the camera to focus on all the parts can be awkward, so sometimes it comes down to taking pictures of sections. The final shots include some of these for that reason, and some shots taken from a couple of yards away to try and get the whole scene in.
Am I pleased with the finished thing ?
Yes, I am, although from getting the main components together to taking the final shots it’s been about eight years of doing bits, putting it to one side, getting frustrated, getting enthused and starting doing more, etc. etc.
Then there’s the question of storage and transport.
I bought a better, heavier duty box after the incident at Darlington, although the wings still need a separate box to be carried about in.


It hasn’t been to many shows – space in the car has been limited,, but you can expect to see it appearing at some in the future.
Storage. Oh yes, obviously it’s big and needs a shelf of it’s own, preferably at the bottom of a cabinet. But it just happens to be about 2cm too wide to let the doors close on my widest cabinet, so I’ve had to amply a piece of soft foam packing to the end of the tail so that the paint doesn’t get damaged.
Do people like it ?
My favourite comment was that it made someone feel a bit dizzy and nauseous looking at the coloured stripes – Might have been a compliment, but maybe not.
Would I paint it differently, given a second chance ?
Nope, I’m happy with how it looks, it’s a dragon in its mating colours, and so it’s very bright. It’s hunting and has caught a narwhal to prove to a prospective mate that it can provide food for any offspring, and although the presence of the girl does add in the symbiotic relationship human and dragon have, I hark back to reading Anne Macafferey’s Dragon riders of Pern series for my inspiration on the balance of power between dragon and human.
All in all, it’s been a bit of a fight, a bit of fun and a bit of experimentation to get this done. I’ve learnt more about the limitations of garage kits – resin can cure and shrink at different rates with castings that are of vastly different sizes – and how much I really don’t like working with DAS, particularly the terracotta stuff that dyes your fingers.


Do I think the dragon kit is worth all that money ?
Um, well, I think I’ll be unresponsive on that one. I felt hatred for it at times during construction and when adding scales to hide joints. But appreciate how well some of the areas are sculpted.
Enough said I guess.
The fun will be to see what Thomas does with his, and as he’s had the same idea as me to add wings, just how many coat hangers he has to find, and how he tackles the making of them will be the fun to watch..
We need your consent to load the translations
We use a third-party service to translate the website content that may collect data about your activity. Please review the details in the privacy policy and accept the service to view the translations.