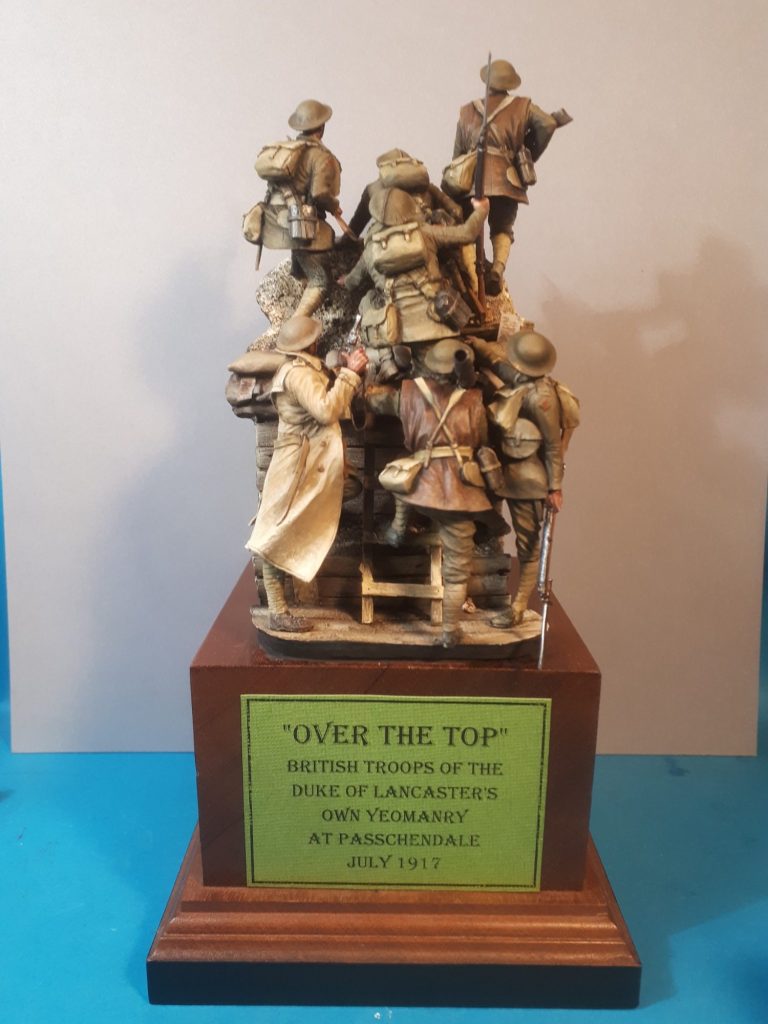
Over the Top
75mm Resin diorama from Mitches Military Models
Painted as a commission in 2024
Whilst I’d normally write a “history bit” at the start of an article like this, I think it’s going to be quite lengthy enough, plus there’s a lot of information about WWI and from both sides of the trenches without me droning on to you about it.
Enough to be said, it was a terrible time for young men to be soldiers, frightening in the extreme and the conditions in the trenches were awful.
I think I’m safe in saying that many of us are very glad we haven’t had to experience such appalling conditions and under such extreme duress.
The model.
I’ve had this since it was first released, with Gordon Mitchell asking me on several occasions whether I was going to actually paint it, perhaps just bronze it, or actually get it out of the box and DO something with it……
Sorry Gordon, it’s only taken a few years…..
And a very kind fellow asking me to paint it as a commission kind of got things moving.
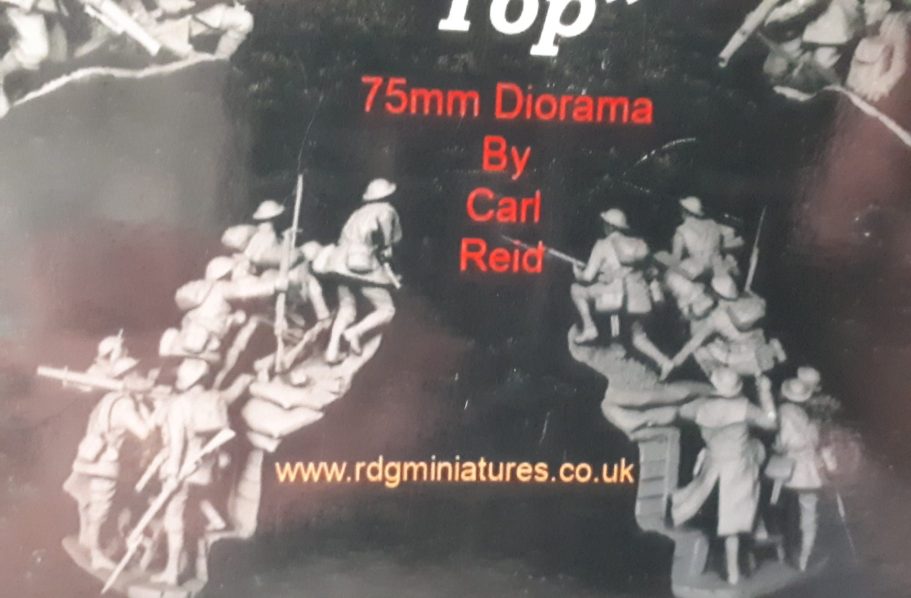
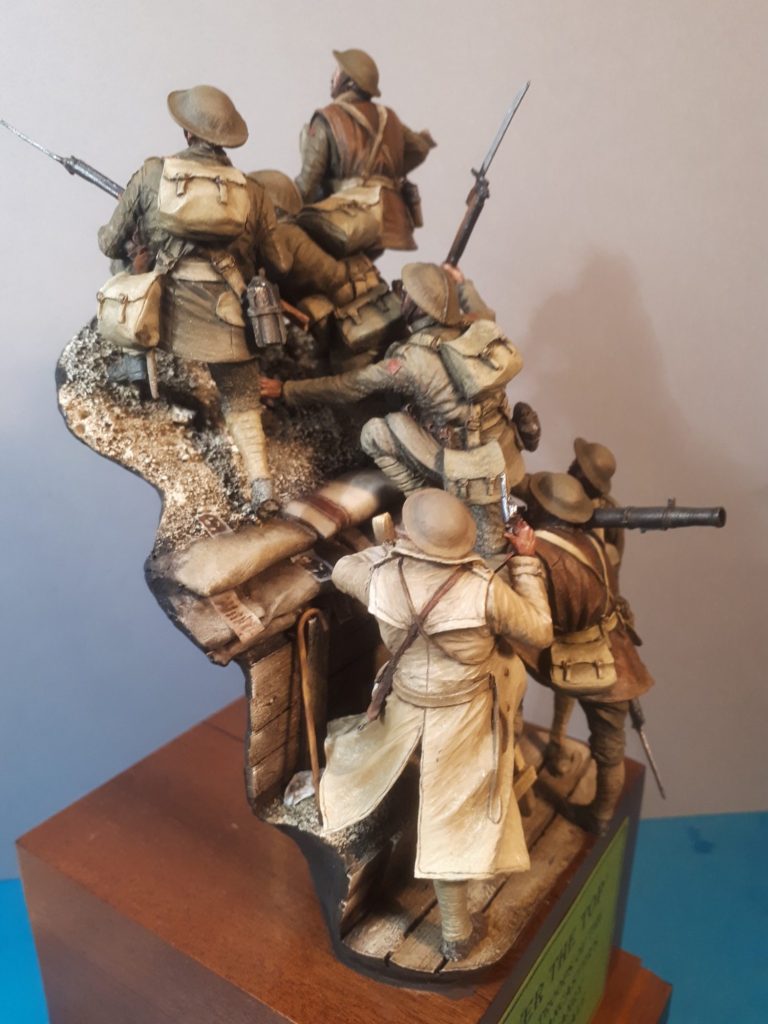
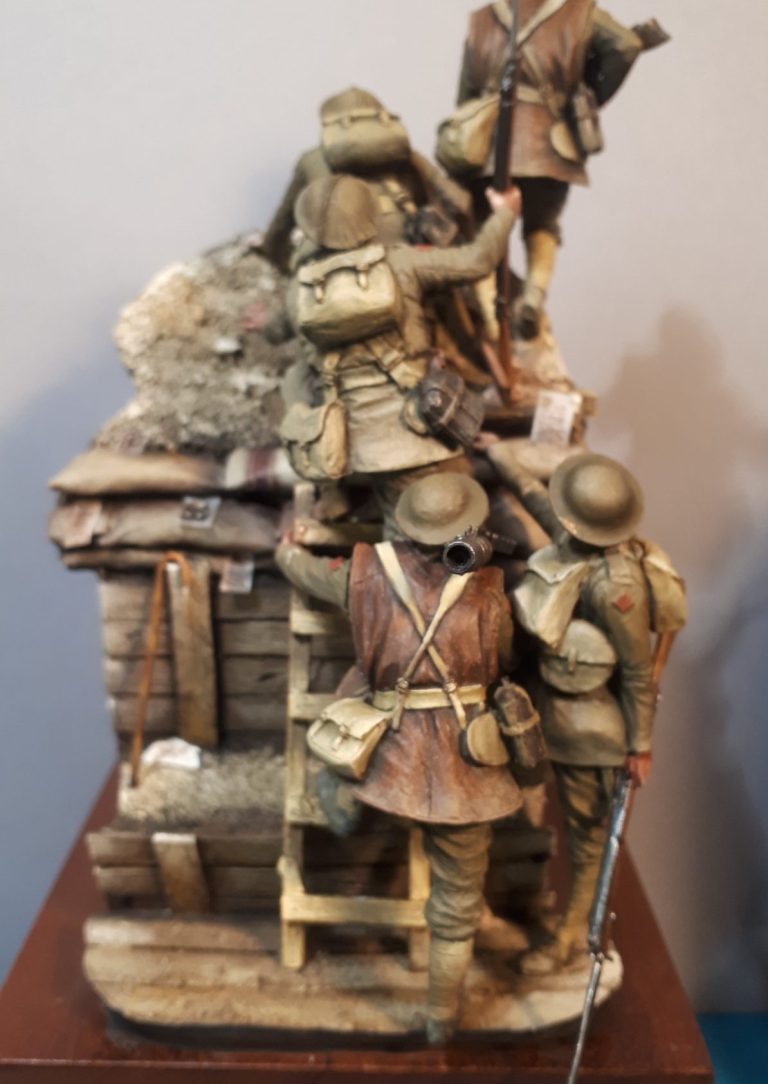
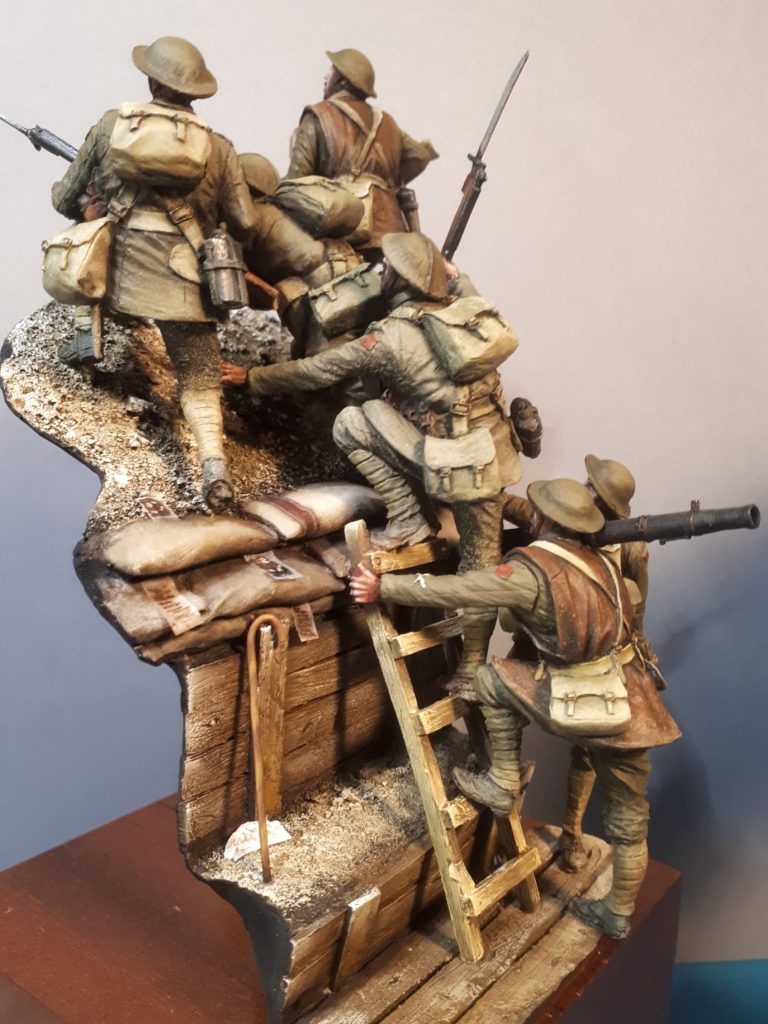
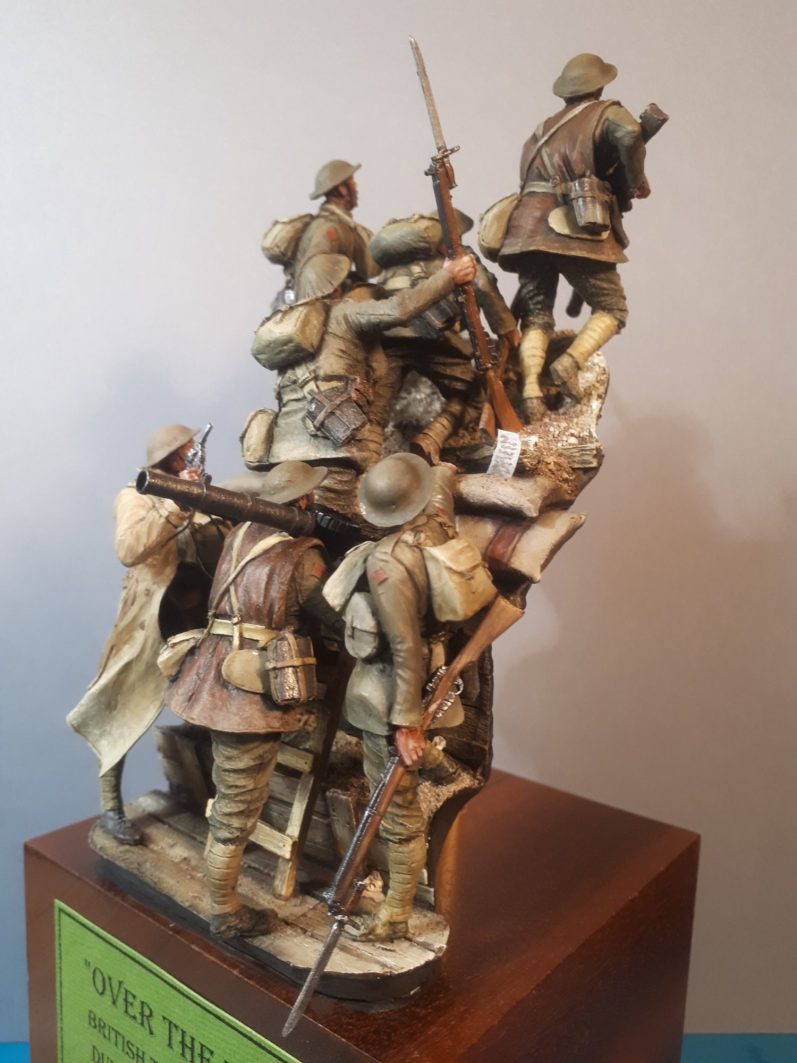
The box art showing an unpainted diorama, sculpted by Carl Reid, is shown in photo #1, the tight spacing of the seven figures is evident, and this gives the scene a sense of urgency.
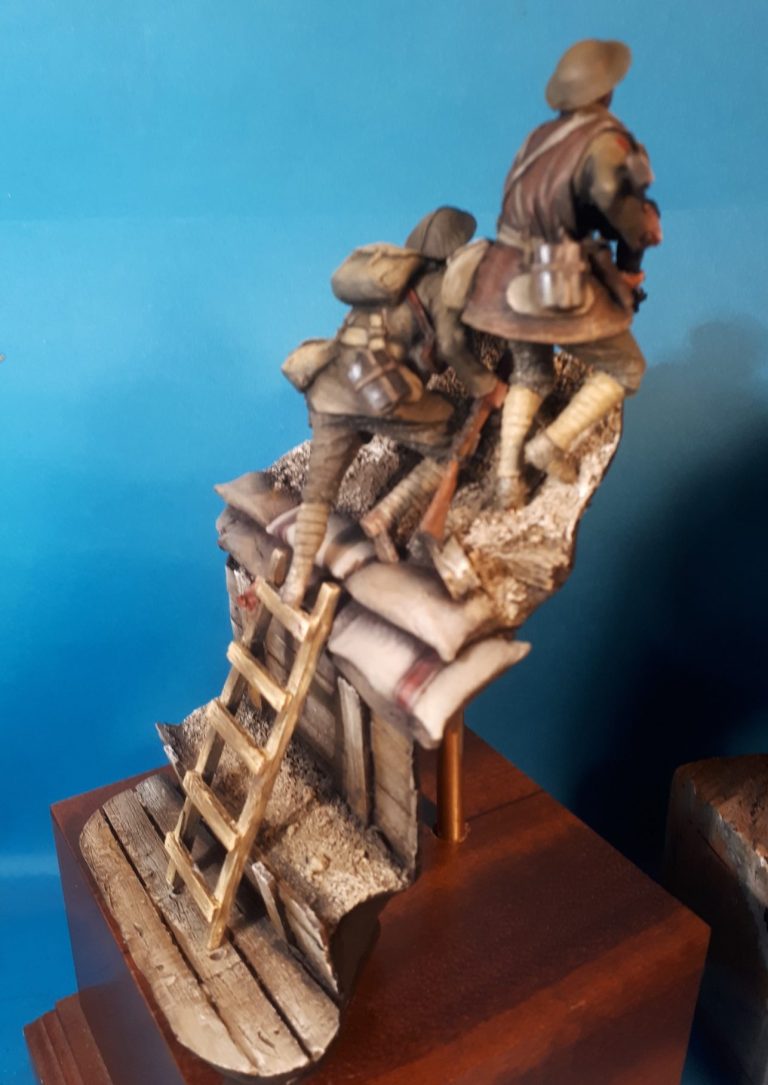
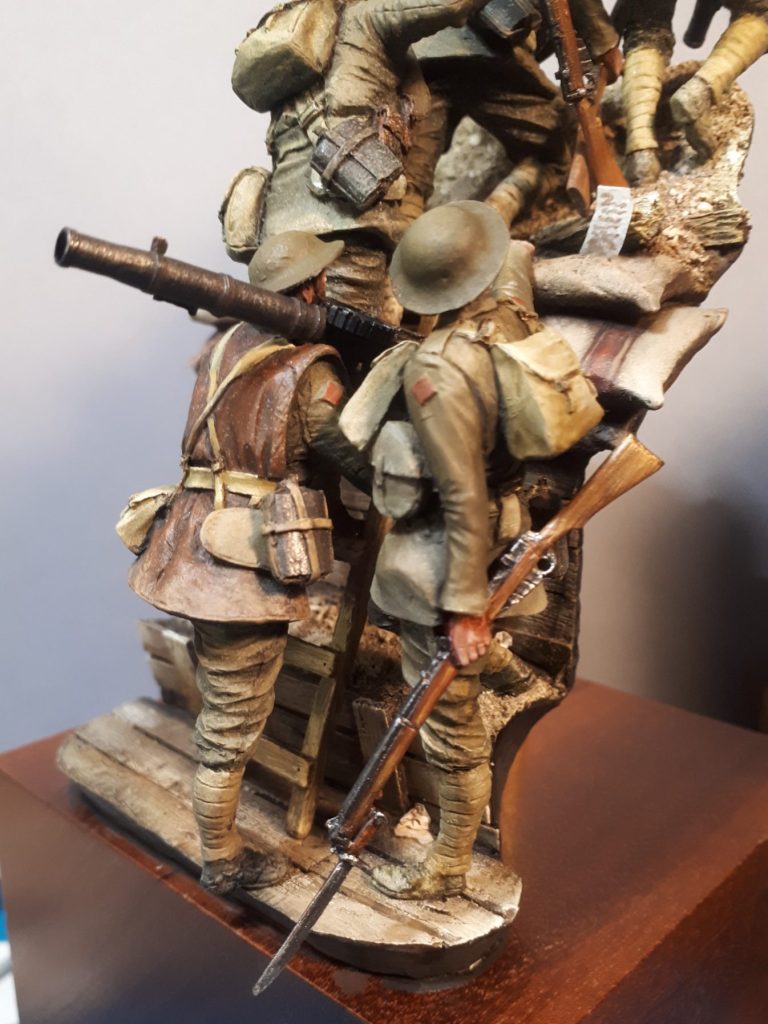
I’m going to be honest here and say I’m mystified by the rise of ground beyond the sandbags, The soldiers would stand on the step in the trench and fire over the sandbags, but this rise of earth beyond the sandbags would foul any shot, and a soldier would then have to crawl up it to take aim at the enemy, so I’m not sure why this is there.
However, it does mean that the viewer is directed to look at the diorama from the back, rather than at the troops as they advance, and forcing a definitive “front” to the diorama is perhaps another reason for having the earth rising beyond the sandbags.
But let’s look at the models themselves, and we’ll start with the figures.
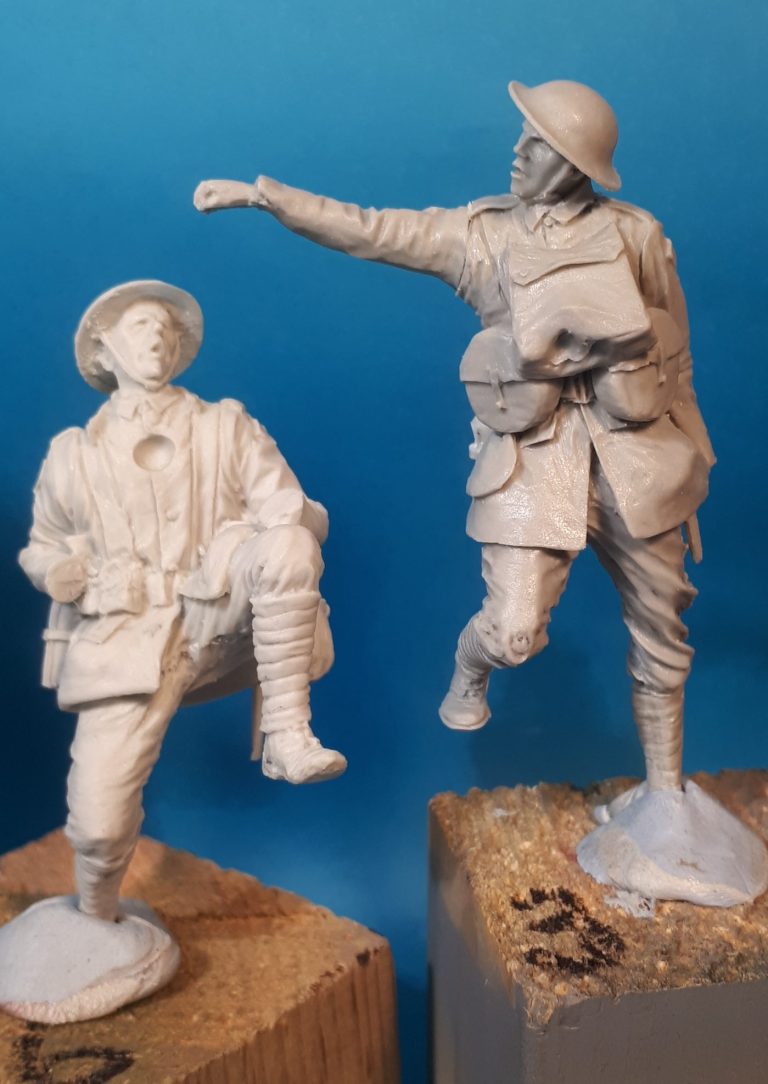
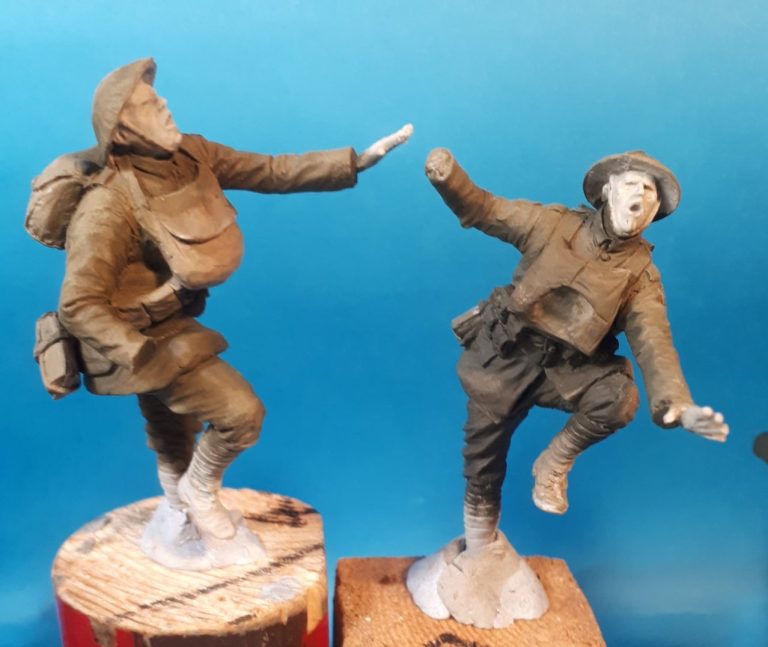
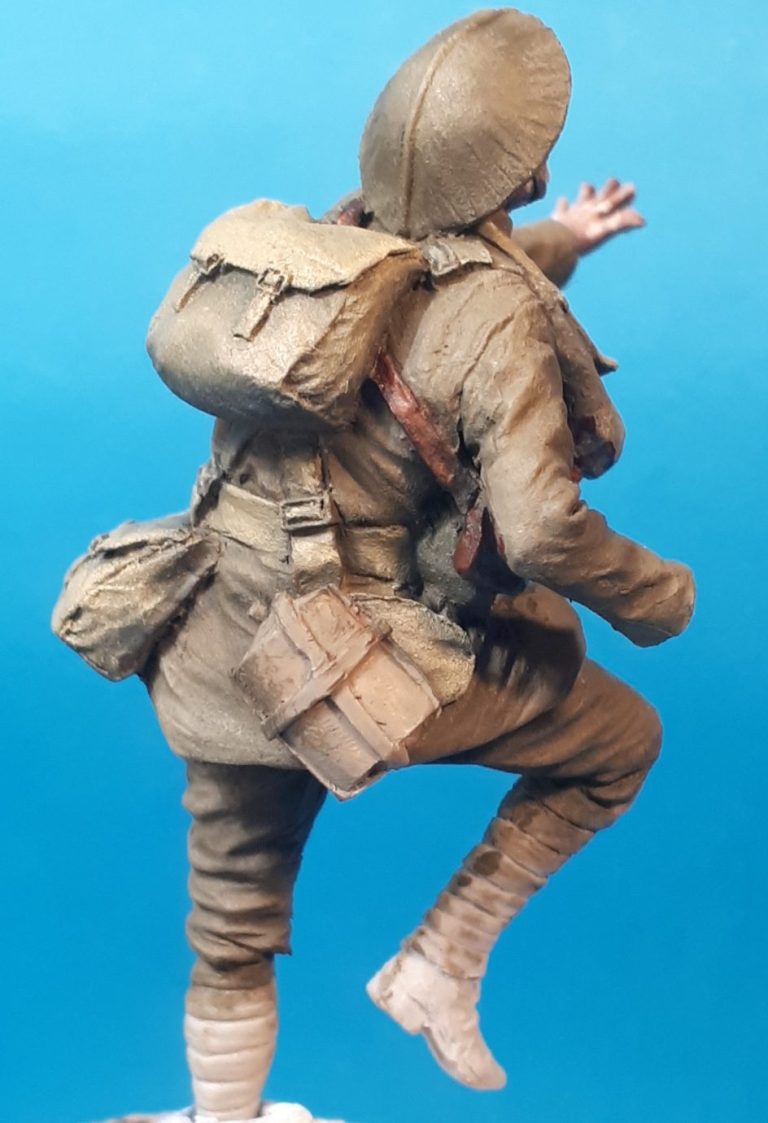
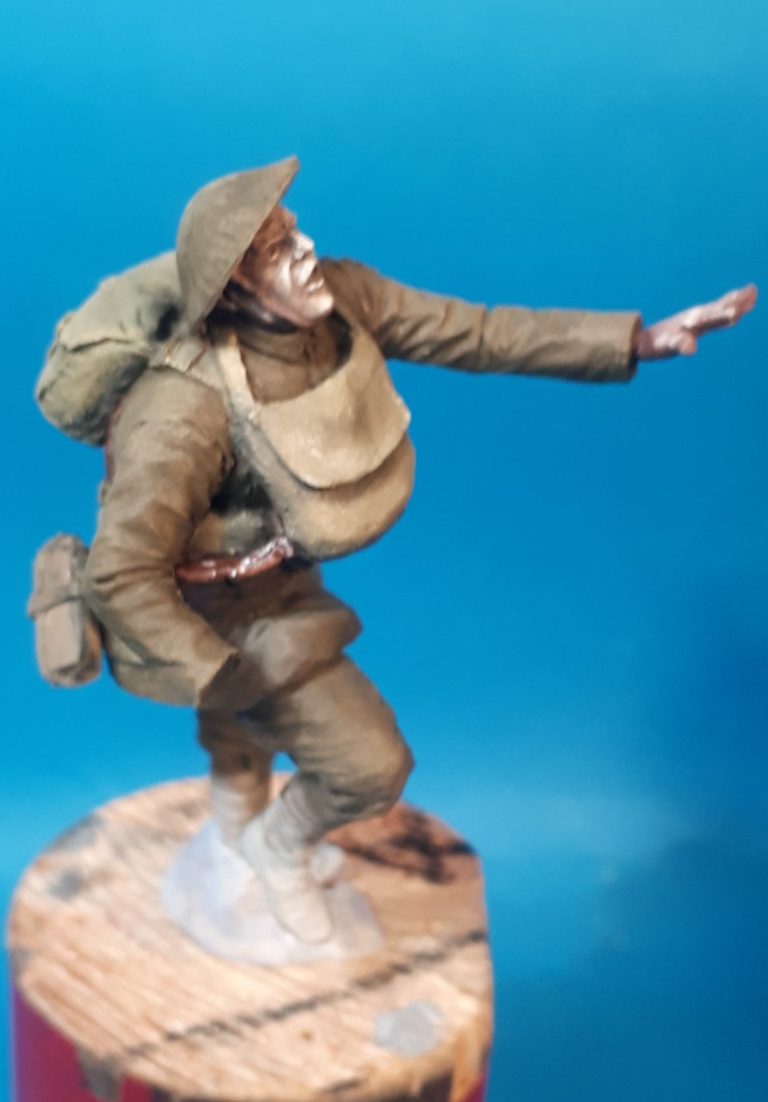
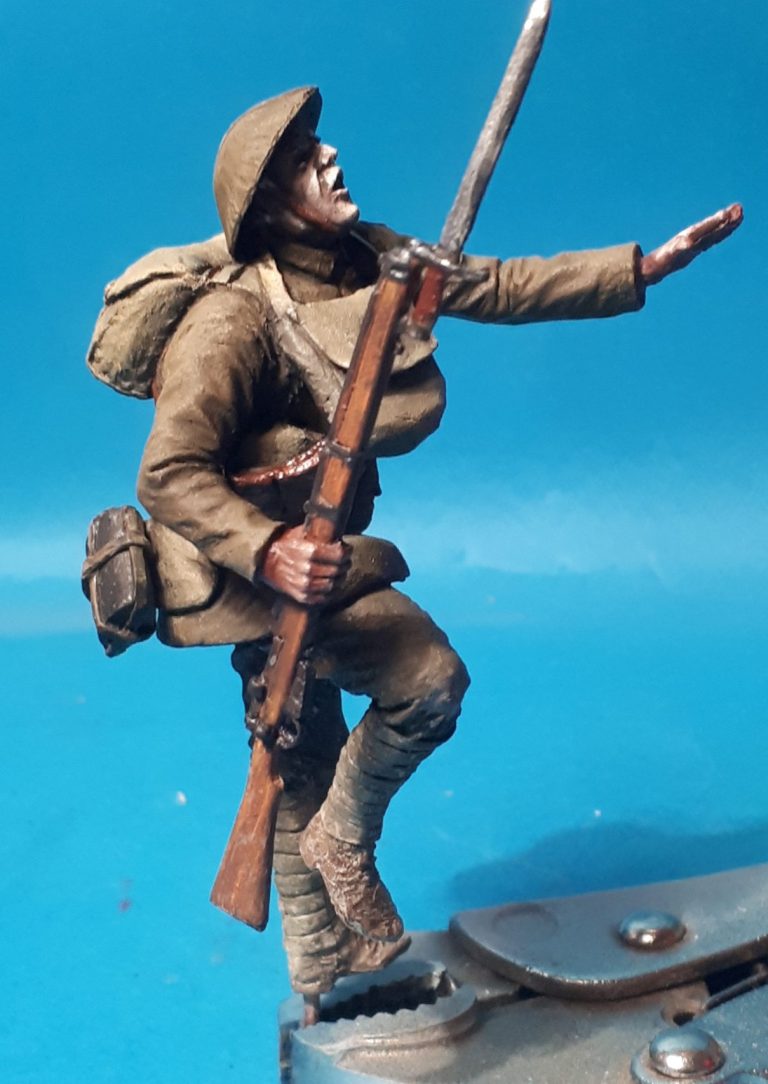
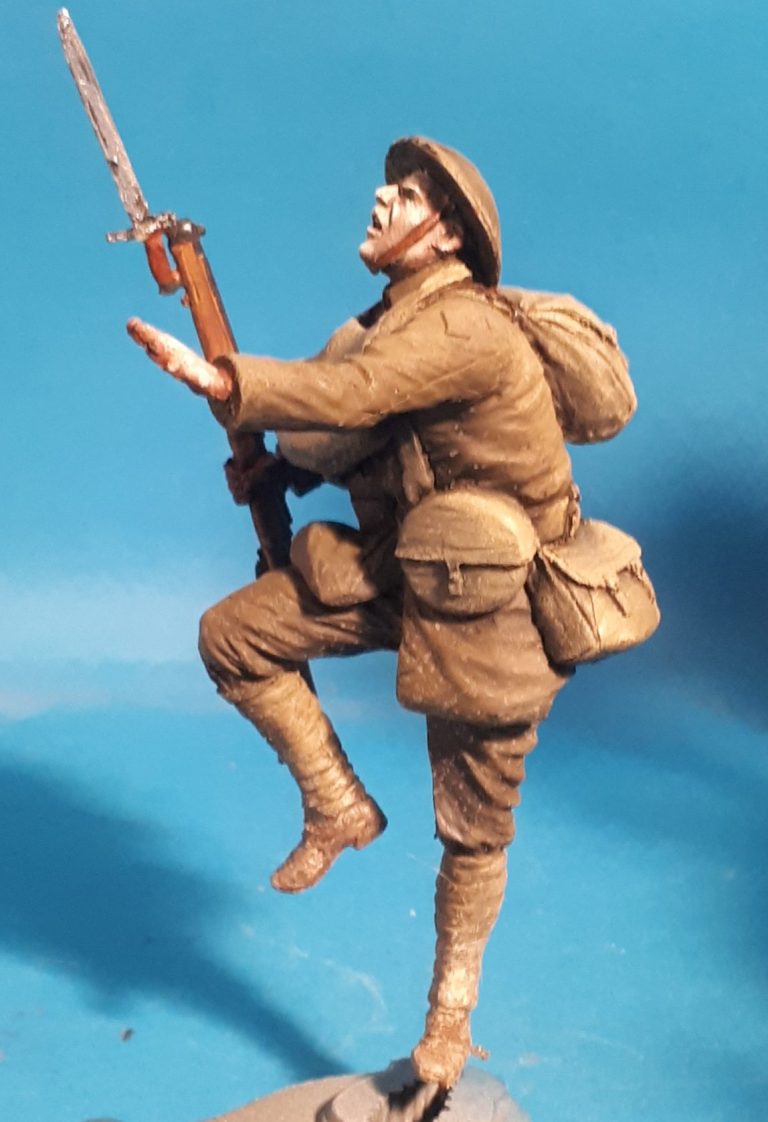
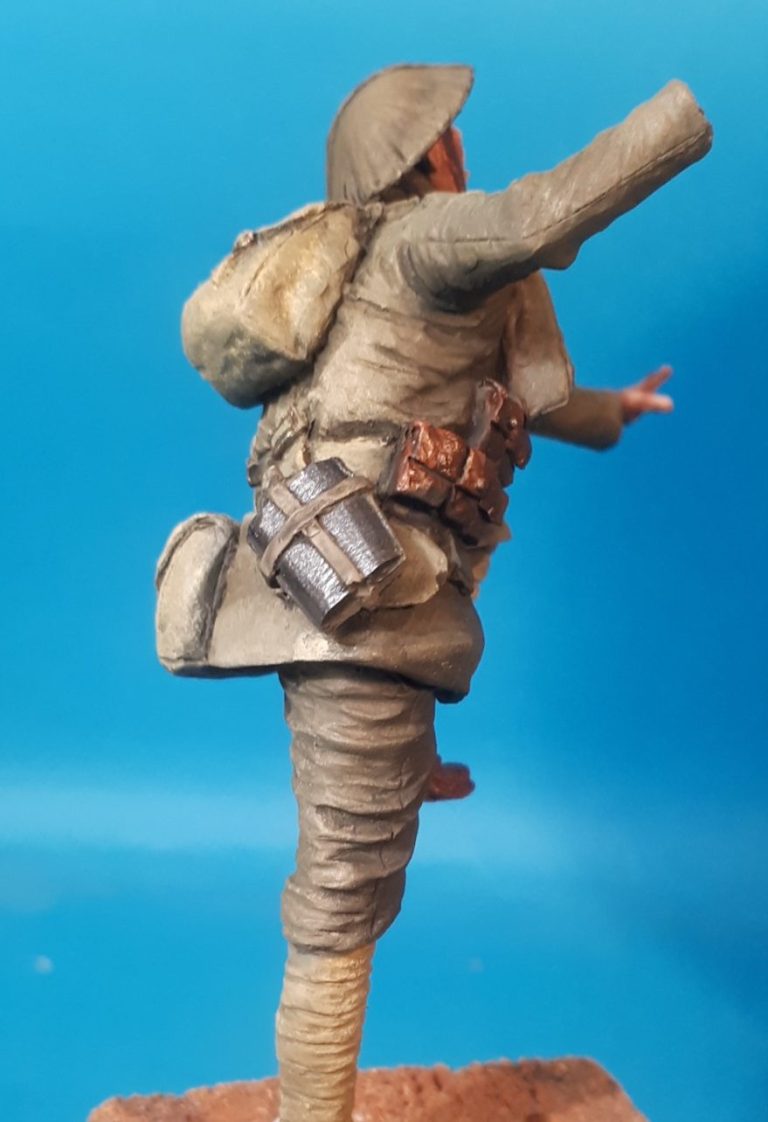
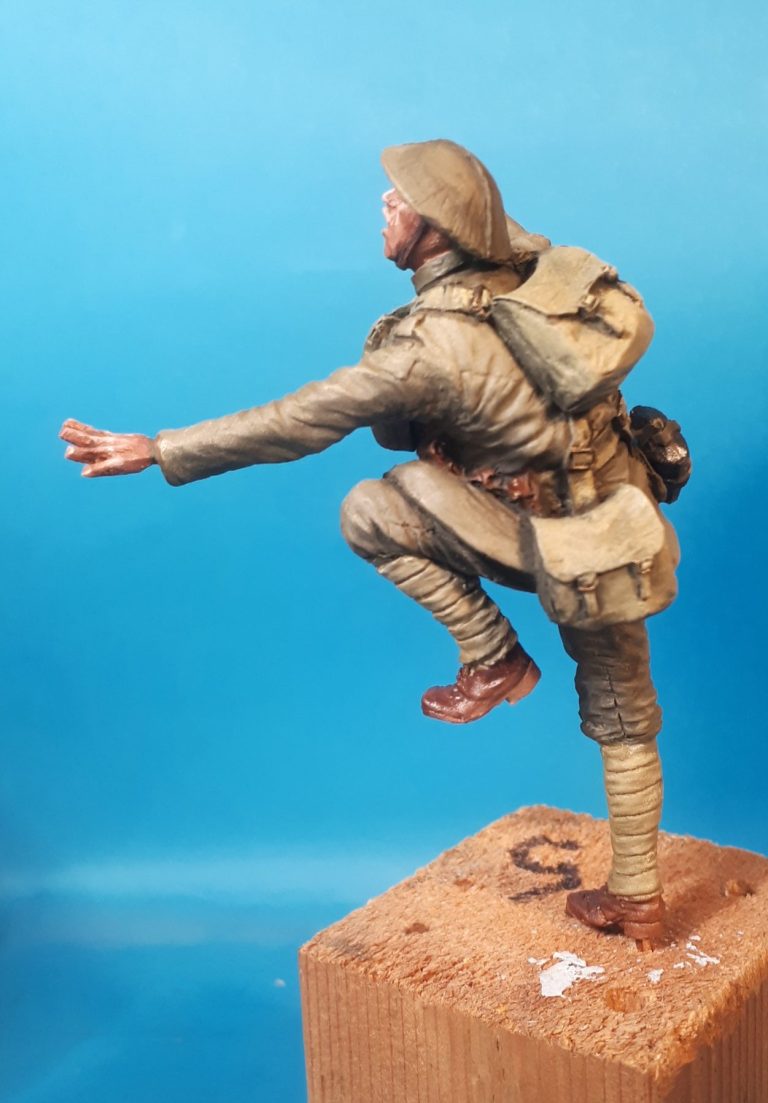
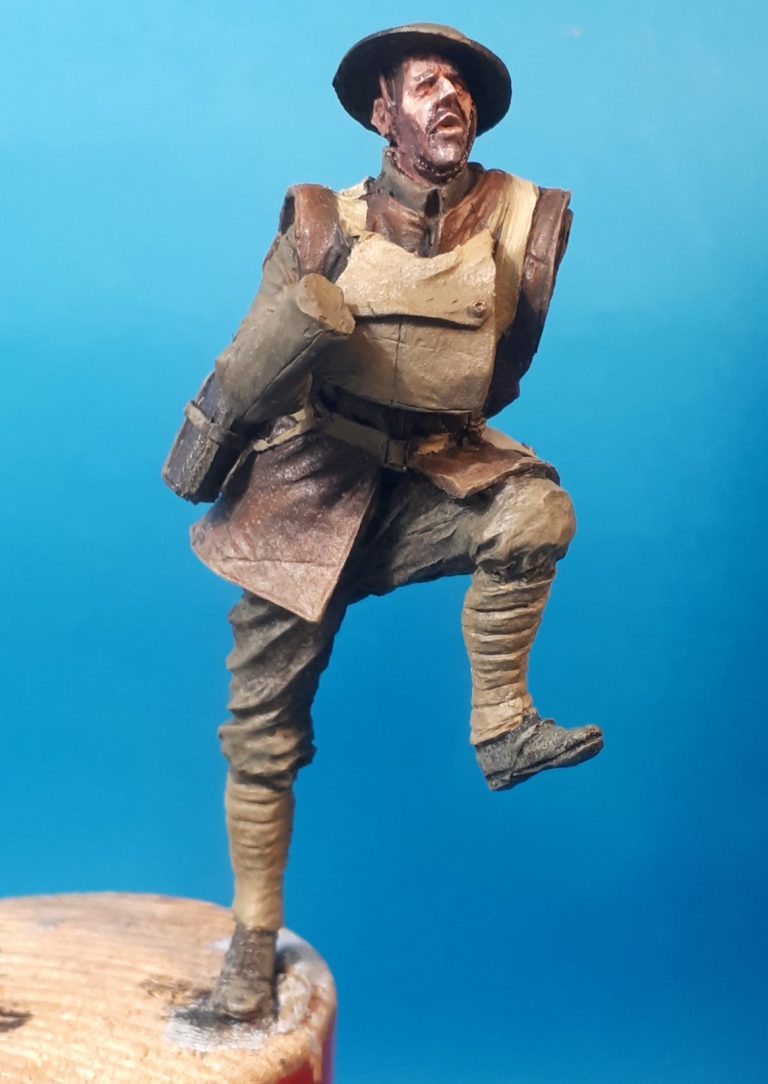
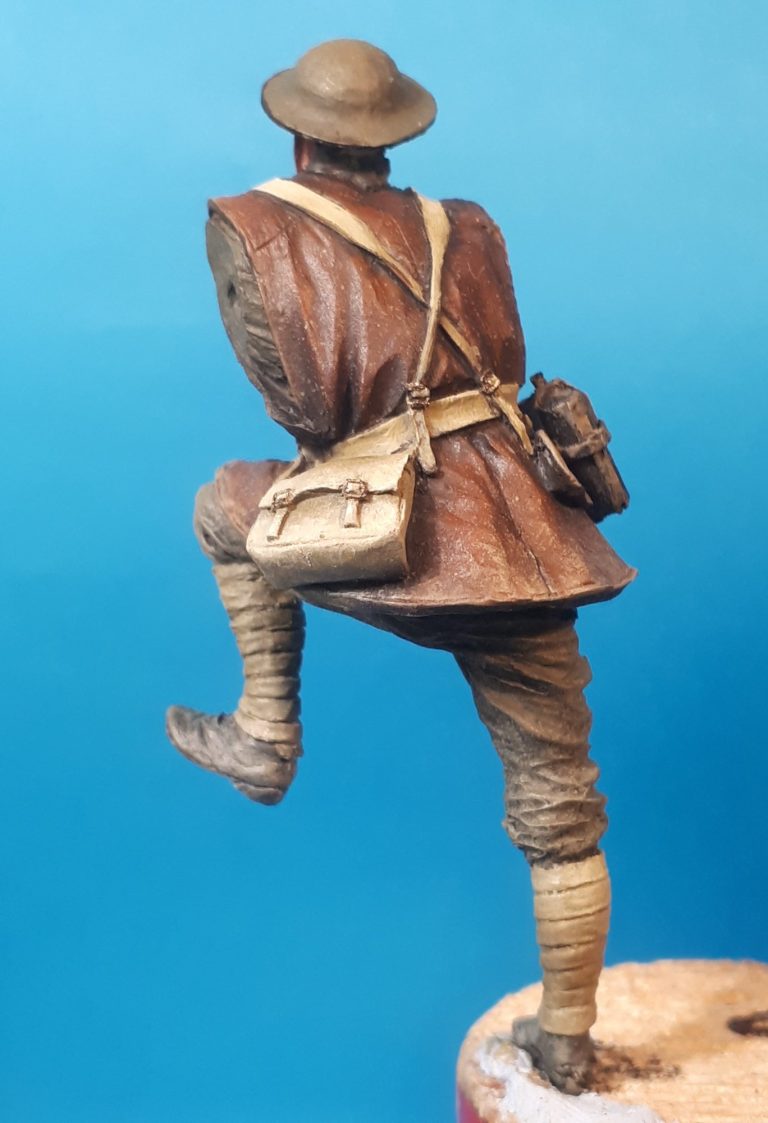
Photos #2, #3, #4, and #5 show the seven figures, that mainly look like they’re doing a strange kind of dance.
The figures consist of multiple parts, and so that these don’t get mixed up, each figure arrives in a separate bag.
As I tend to paint in sub-assemblies, I numbered the bags and the little blocks of wood that I fastened each figure onto, so that I didn’t get things mixed up or lost.
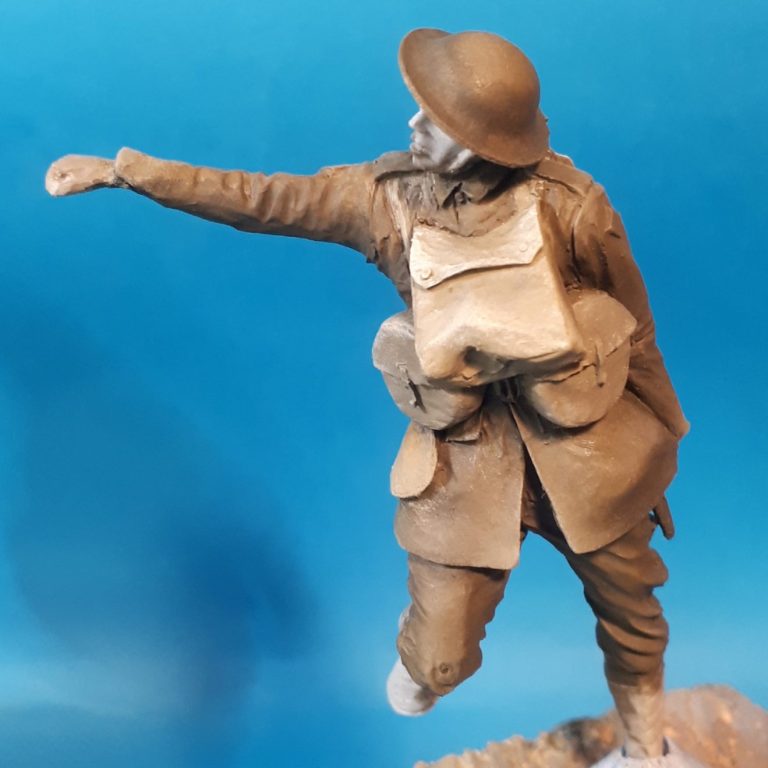
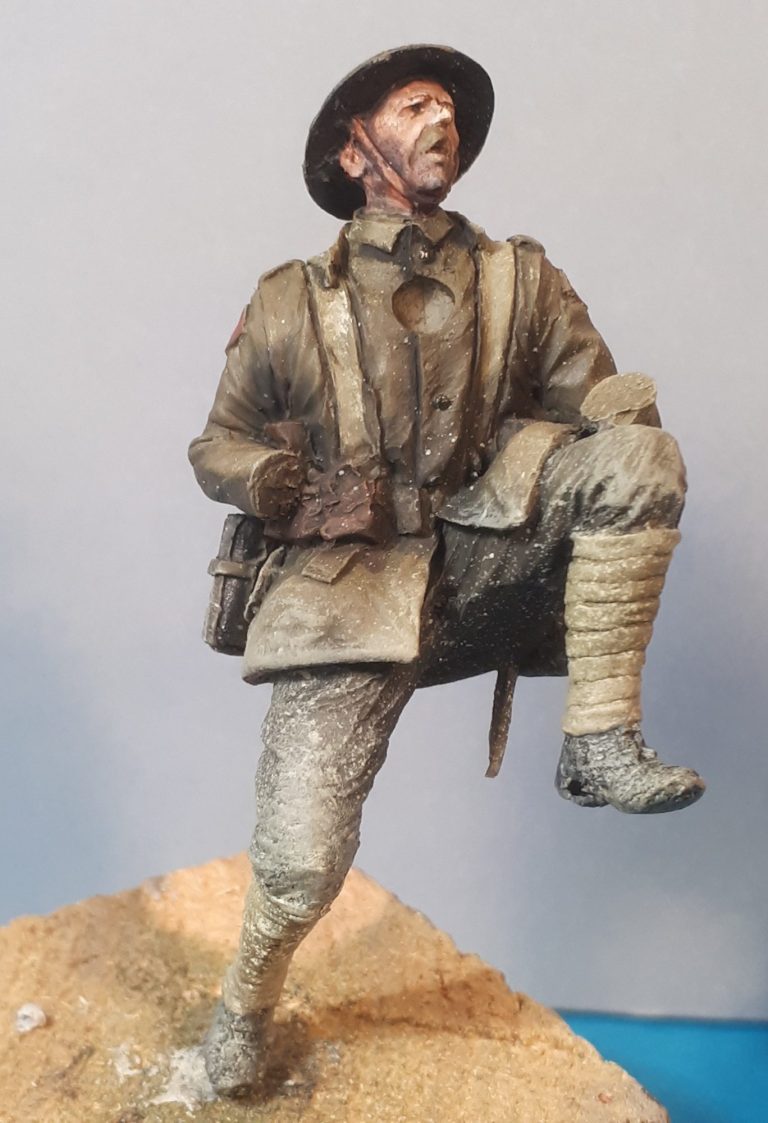
Missing from the right hand figure in photo #3 was his gas mask bag on his chest, so I sculpted a new one, and the officer figure in photo #5 got a lanyard added to his pistol and a small disc added to his left wrist so he had a timepiece to look at, these were the only things I needed to add.
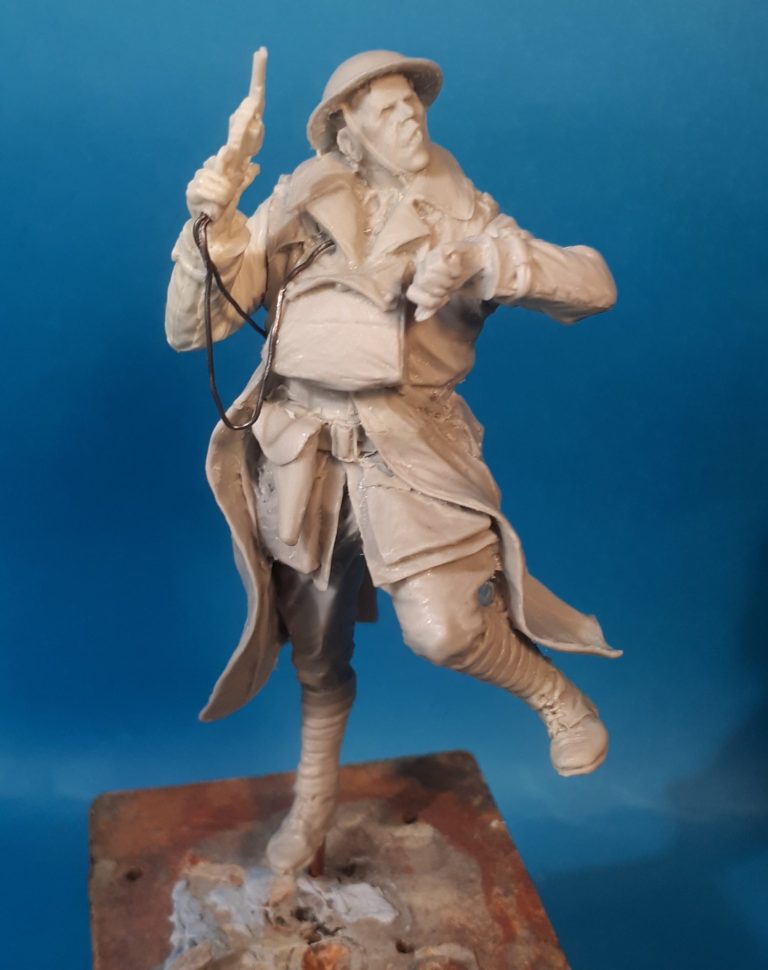
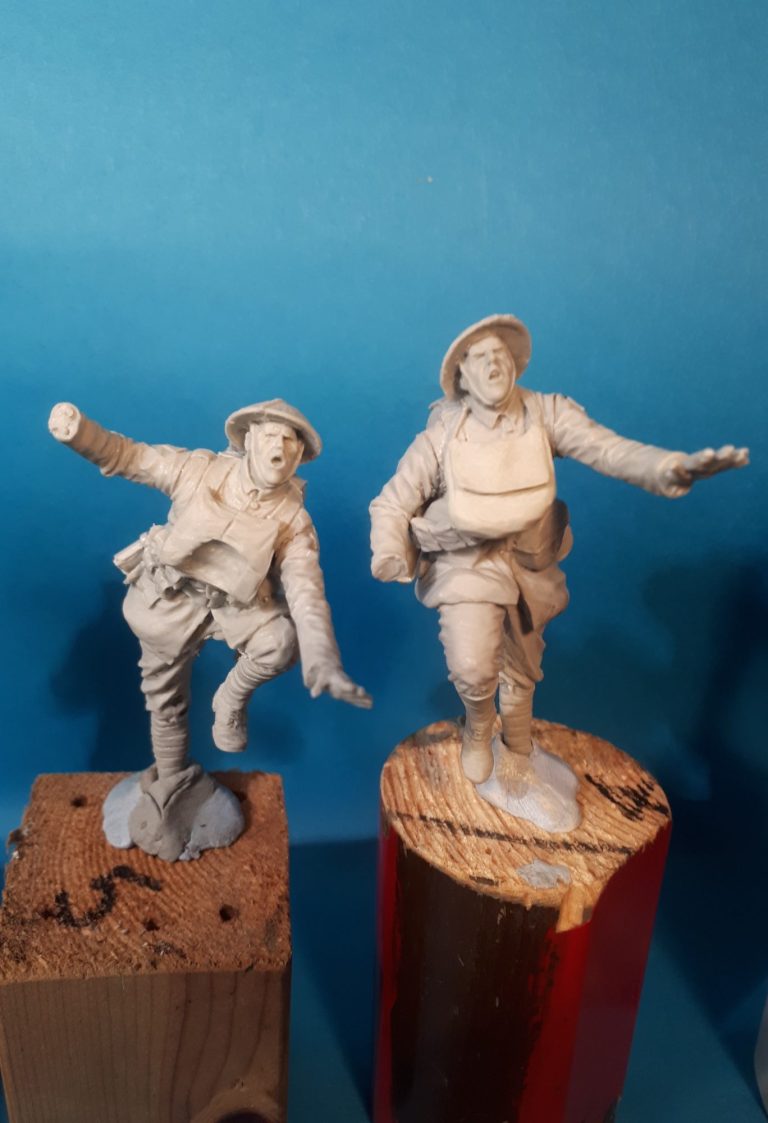
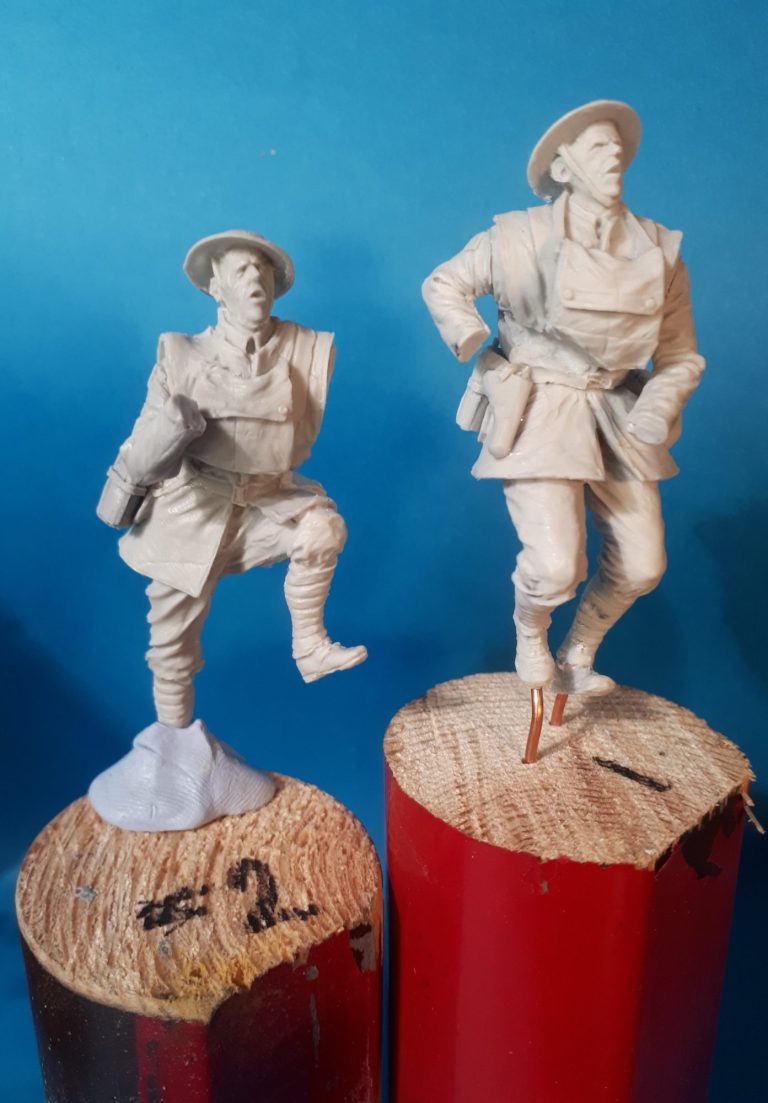
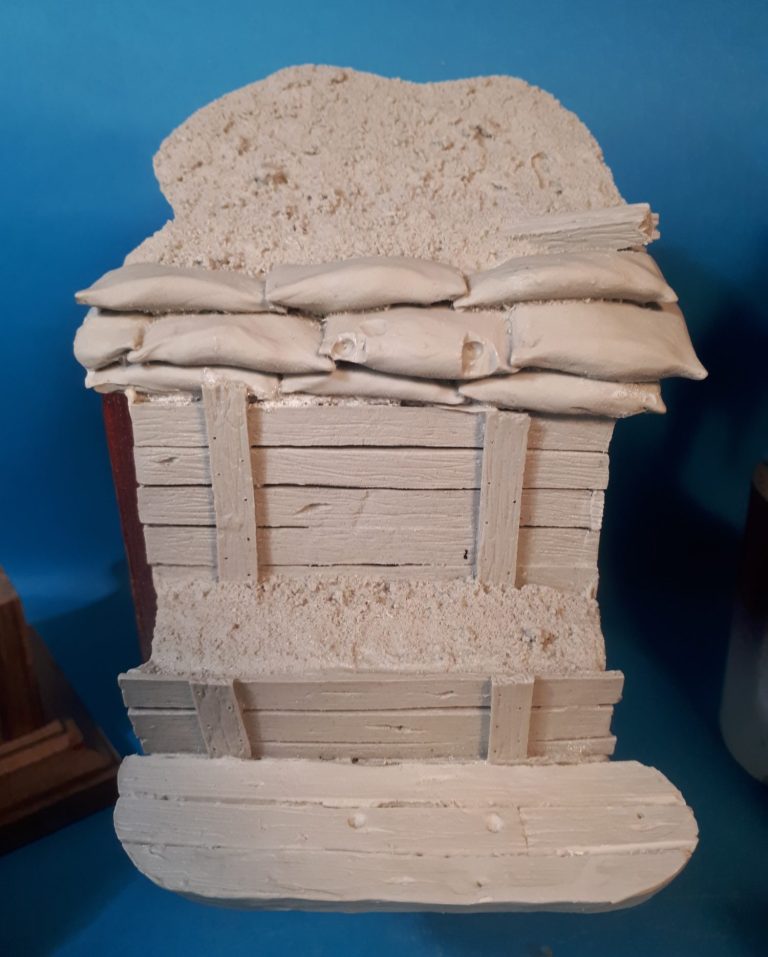
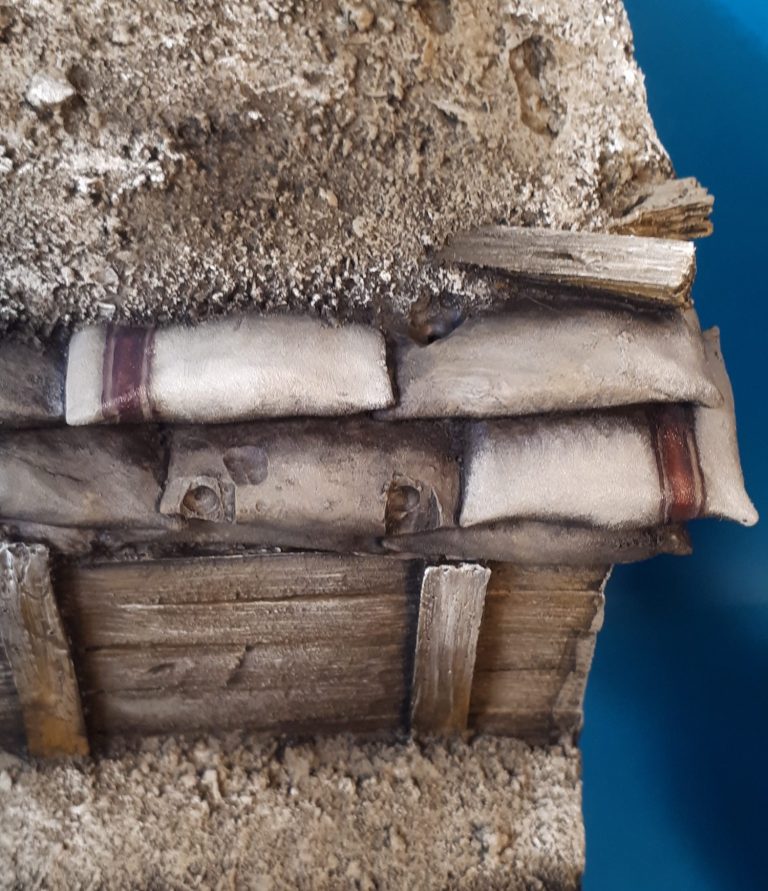
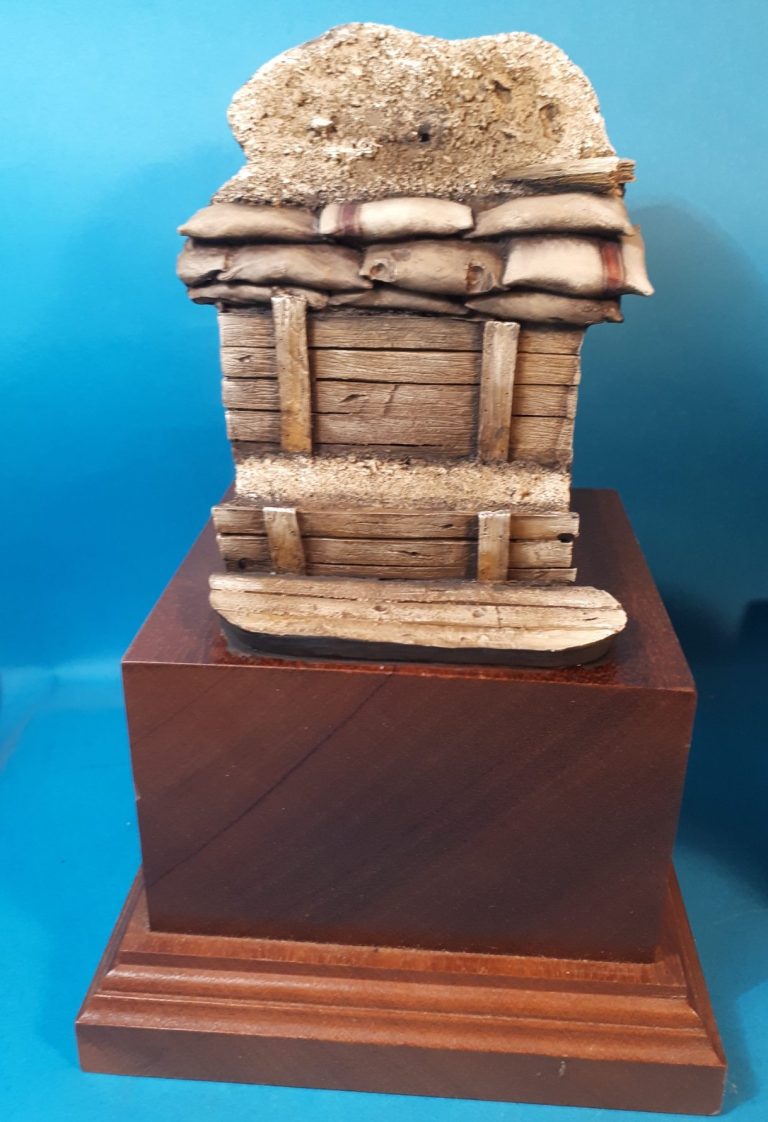
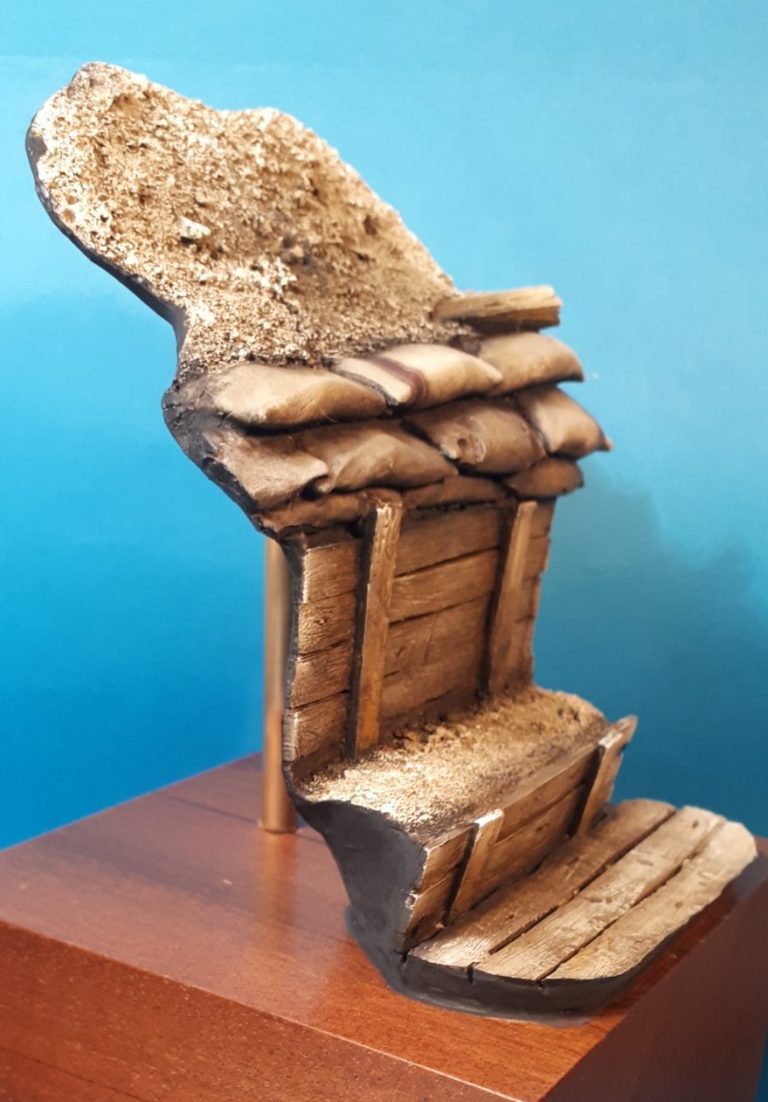
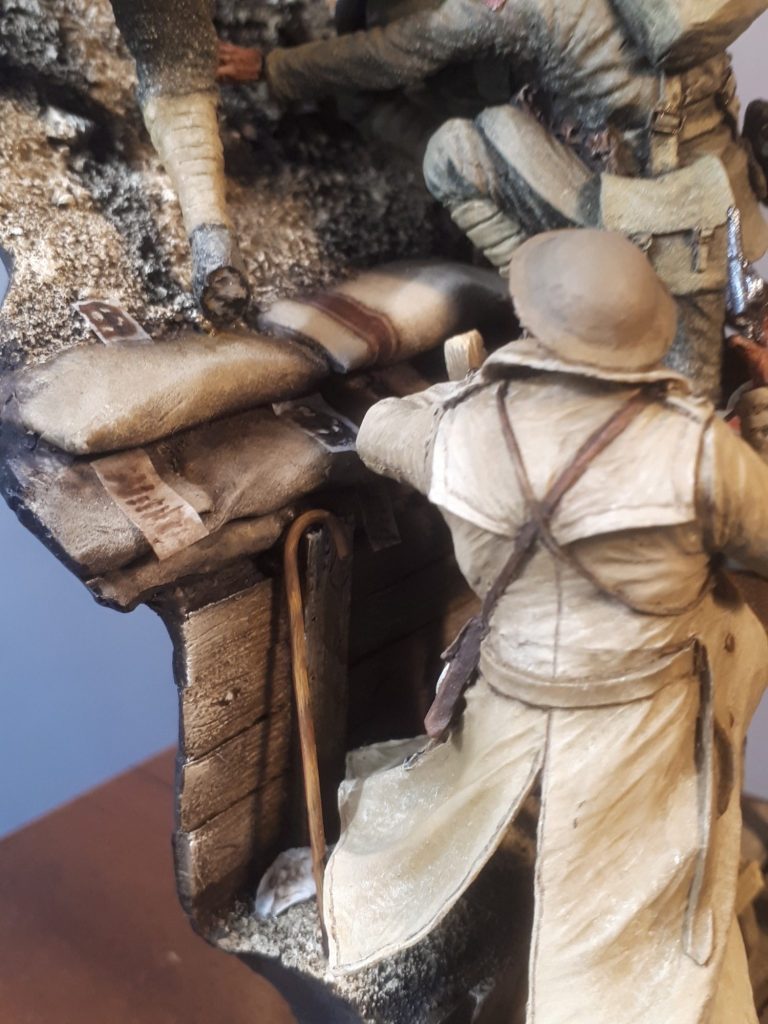
Photo #6 shows the trench setting for the diorama, it’s made up of three parts - the duckboard bottom section, the step with its two retaining walls, and the sandbags and sloped earthwork section on the top.
All the kit parts are well moulded, and the uniforms and weapons are particularly well sculpted.
There is some clean-up of the parts, but not an huge amount, the area between the back of the helmets and the necks needed a bit of attention to clean the flash out of, and the thin brims of the helmets mean that a bit of time spent doing this carefully so s not to damage the helmet brims is worth the effort.
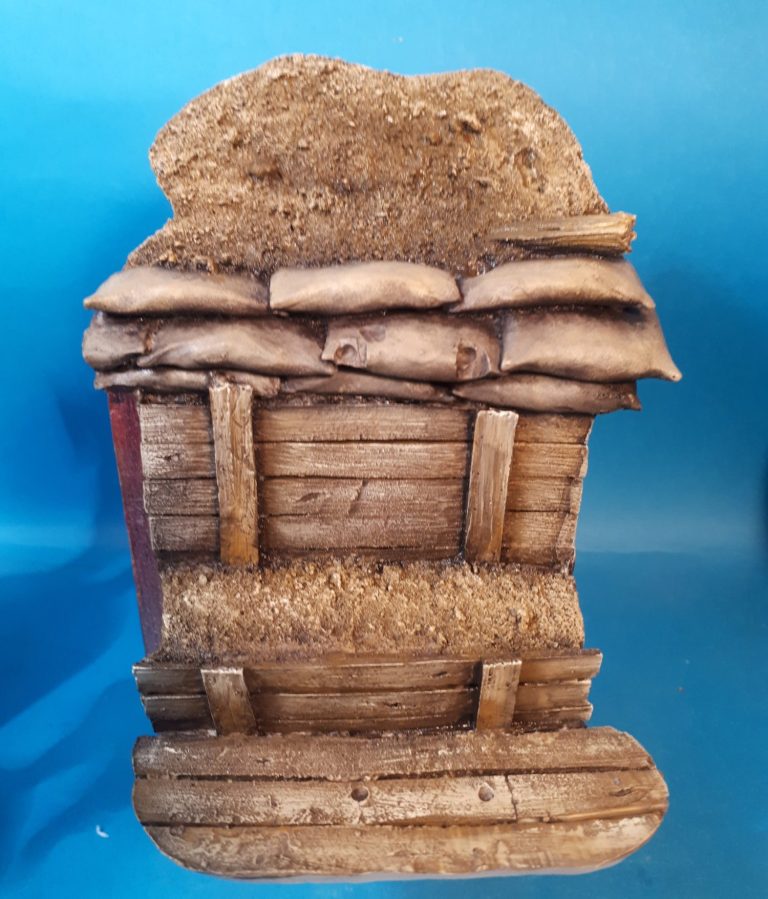
Photo #7 and as if by magic the trench is painted.
OK, it’s a bit basic at the moment, and looks very bare.. The whole area was primed with a sand colour paint from Halfords, and then Vandyke Brown oils thinned down a little with White Spirit were then painted over the whole thing.
Using a hairdryer to get rid of some of the White Spirit quickly, and then using a soft cloth to remove some of the dark brown paint, then allowed me to add some Buff Titanium Oils with a large, soft brush, and then over that some Titanium White Oils were lightly blended in.
I wanted the scene to have a uniform colouration, with only slight variations – the wood was given some Yellow Ochre prior to the Buff Titanium being added, but not much as I wanted the wood to appear old and fairly dry.
The problem was, whilst I wanted it to look a fairly uniform colour, it looked a bit boring.
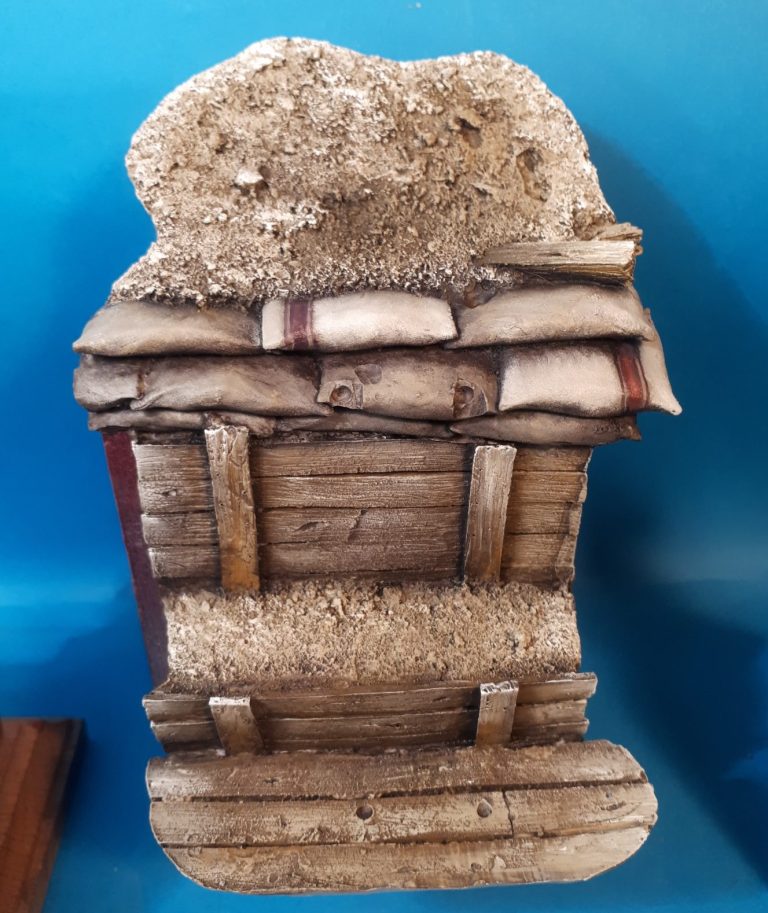
Photos #8 and #9. I’d heard that in some cases thicker material pillow cases and sugar sacks were pressed into service as sand bags, so I thought that maybe painting a couple of reddish brown stripes on a couple of the sandbags might create a bit of interest.
It might not be too visible on the finished diorama, but for now, it added a bit of interest to the empty scene.
The figures
For years and years I’ve stuck to a set way of painting figures and busts, basically working from the inside to the outside – so skin first, then inner clothing, outer clothing, footwear, belts and bags being last.
Recently though I’ve changed that and in the case of painting several similar uniforms, I find it easier to paint the clothing first and do the faces later.
So in photo #10 I’ve added the clothing to two of the figures, a mix of Yellow Ochre, Mars Black and a little Buff Titanium as a base mix, adding more of the black for the shadows and more of the buff colour to build up the highlights.
Photo #11 shows a figure with a leather sleeveless jacket on, this was painted in my usual mix of browns ( Vandyke Brown, Mars Brown, Light Red and Mars Yellow ) that I use for leather areas.
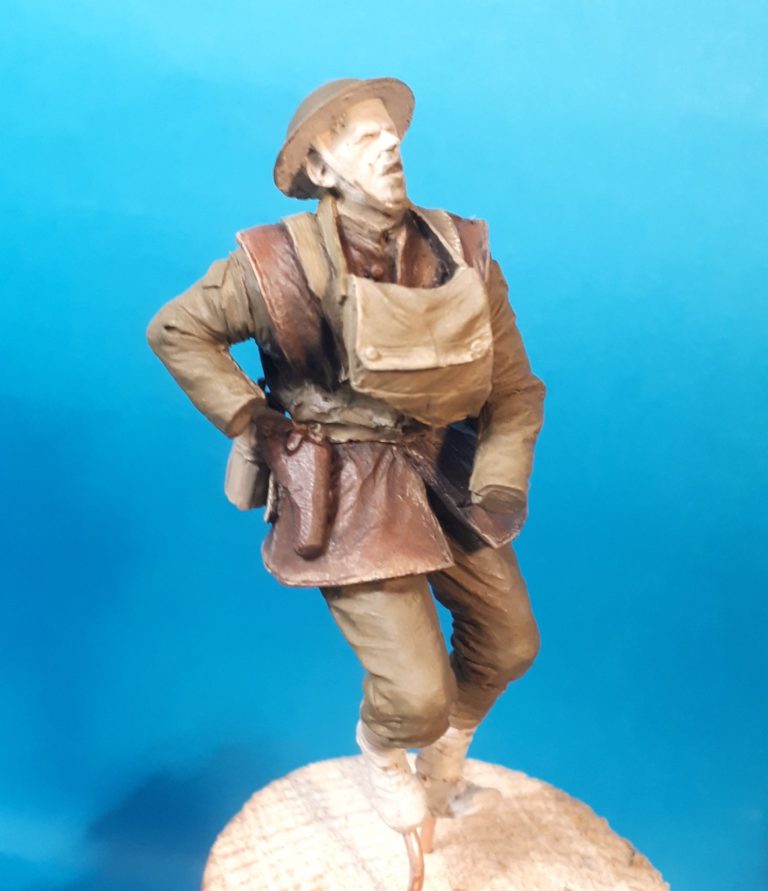

Photo #12 and we’re back to the olive green uniforms. Because of the way I’ve had to pin the feet on some of the figures – like in this figure’s case, I could only drill up into one foot, and so had to use some Blu-tac to hold the figure steady on the wood block whilst painting it.
It means that the puttees and boots will have to be painted last, in fact they’ll get painted just prior to each figure going onto the base.
Photo #13 and more Olive green on the helmet and uniform – there’s a pattern forming here – Whilst I had the paint mixed, I also did the equipment straps and various bags and ammunition pouches.
I added some Buff Titanium Oils to the mix to lighten it substantially, to differ the sections from the clothing and mimic the canvas that was used to produce the items.
Having done all the uniforms, the mixes of paint for each one being slightly different, although probably not very noticeably, I needed to let them all dry.
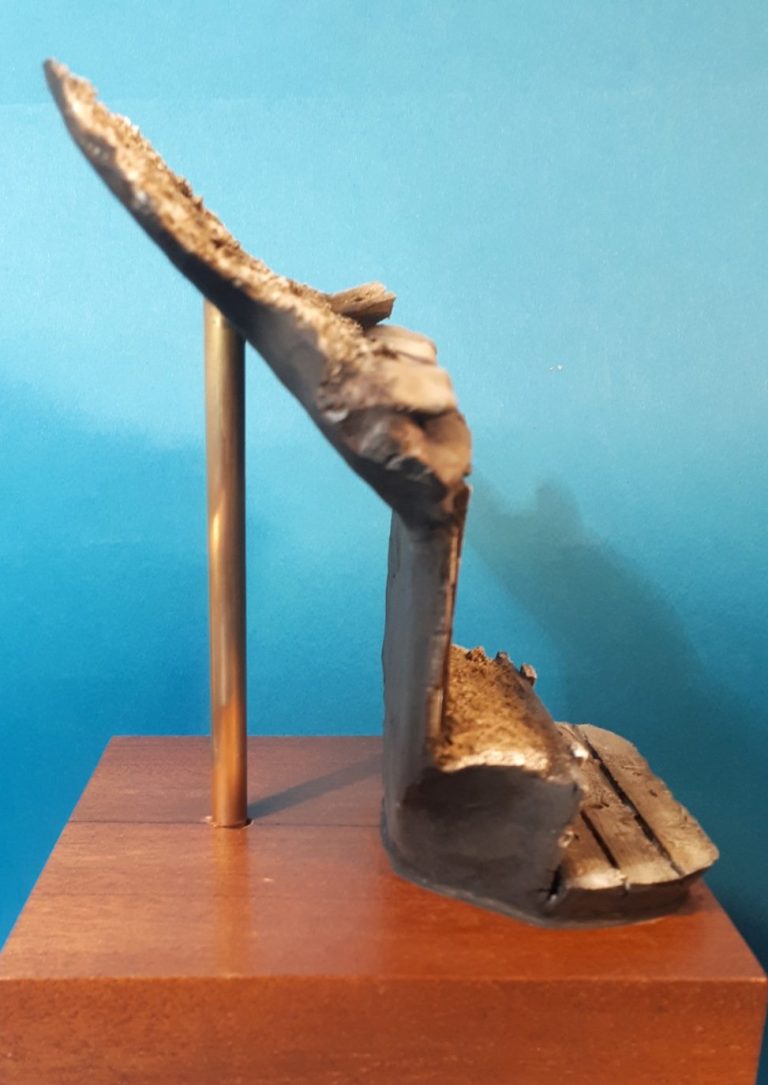
So, in photos #14, #15 and #16 I returned to the base, setting it onto the wood plinth from Oakwood Studios with the help of a brass tube to support the rising ground section and adding just a small amount of putty to fill any small gaps between the plinth and the groundwork.
with that sorted, the back of the groundwork was painted with a couple of layers of Black acrylic and left to dry.
Photos #17, #18 and #19 and we’re back to the figures, this time to paint the face and hands.
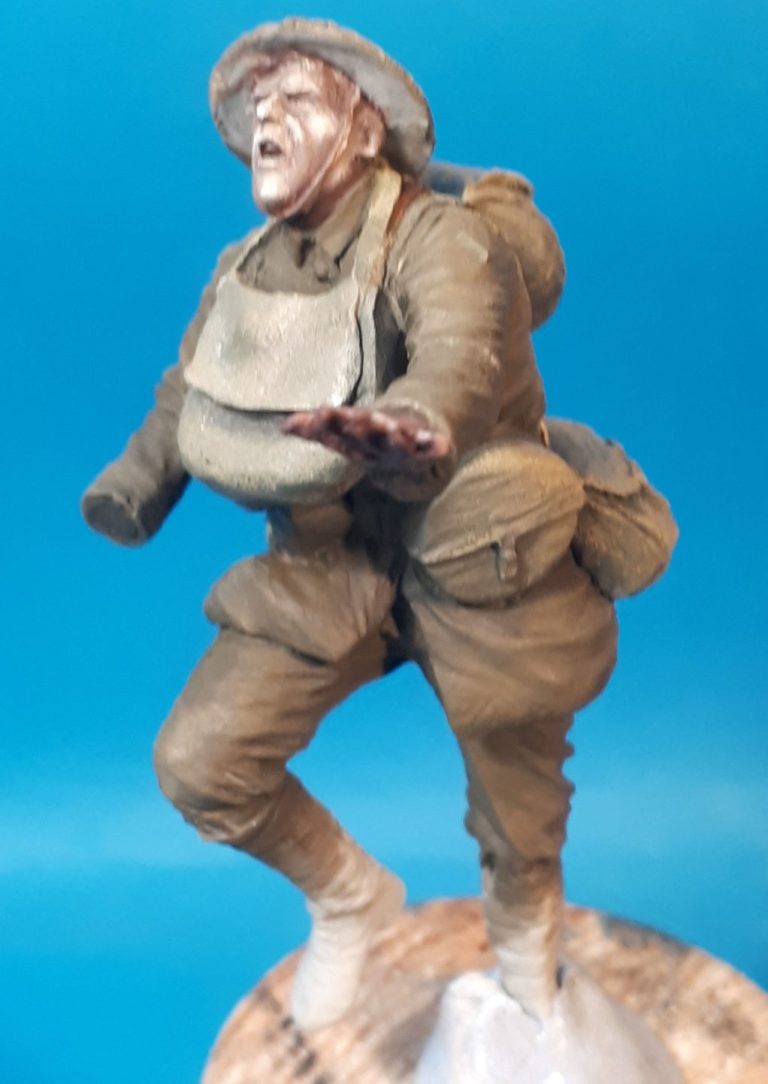
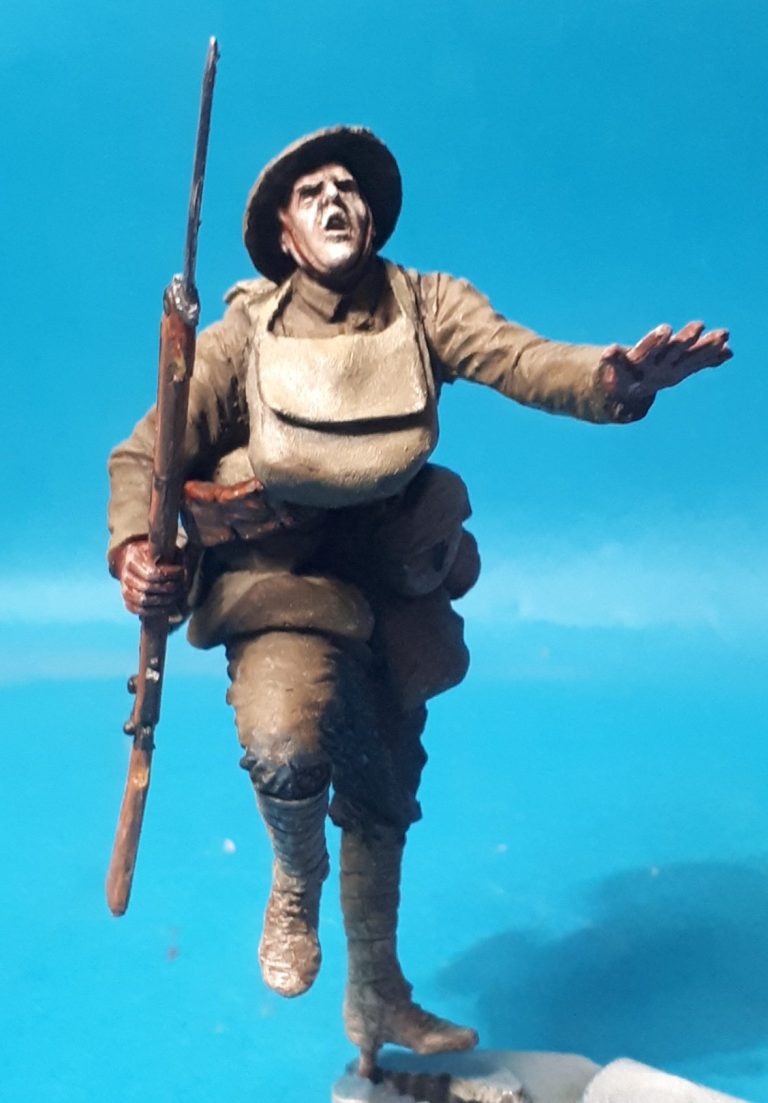
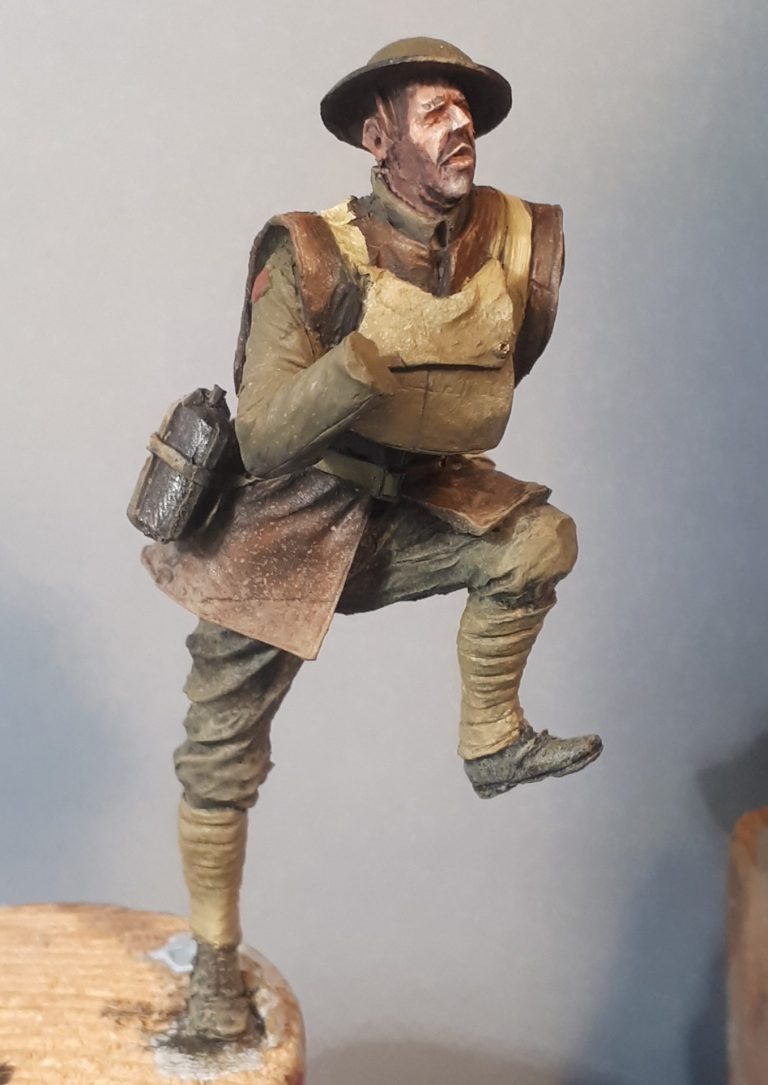
This shot shows the first figure that would be attached to the base, and the one that is in a central position at the front of the charge.
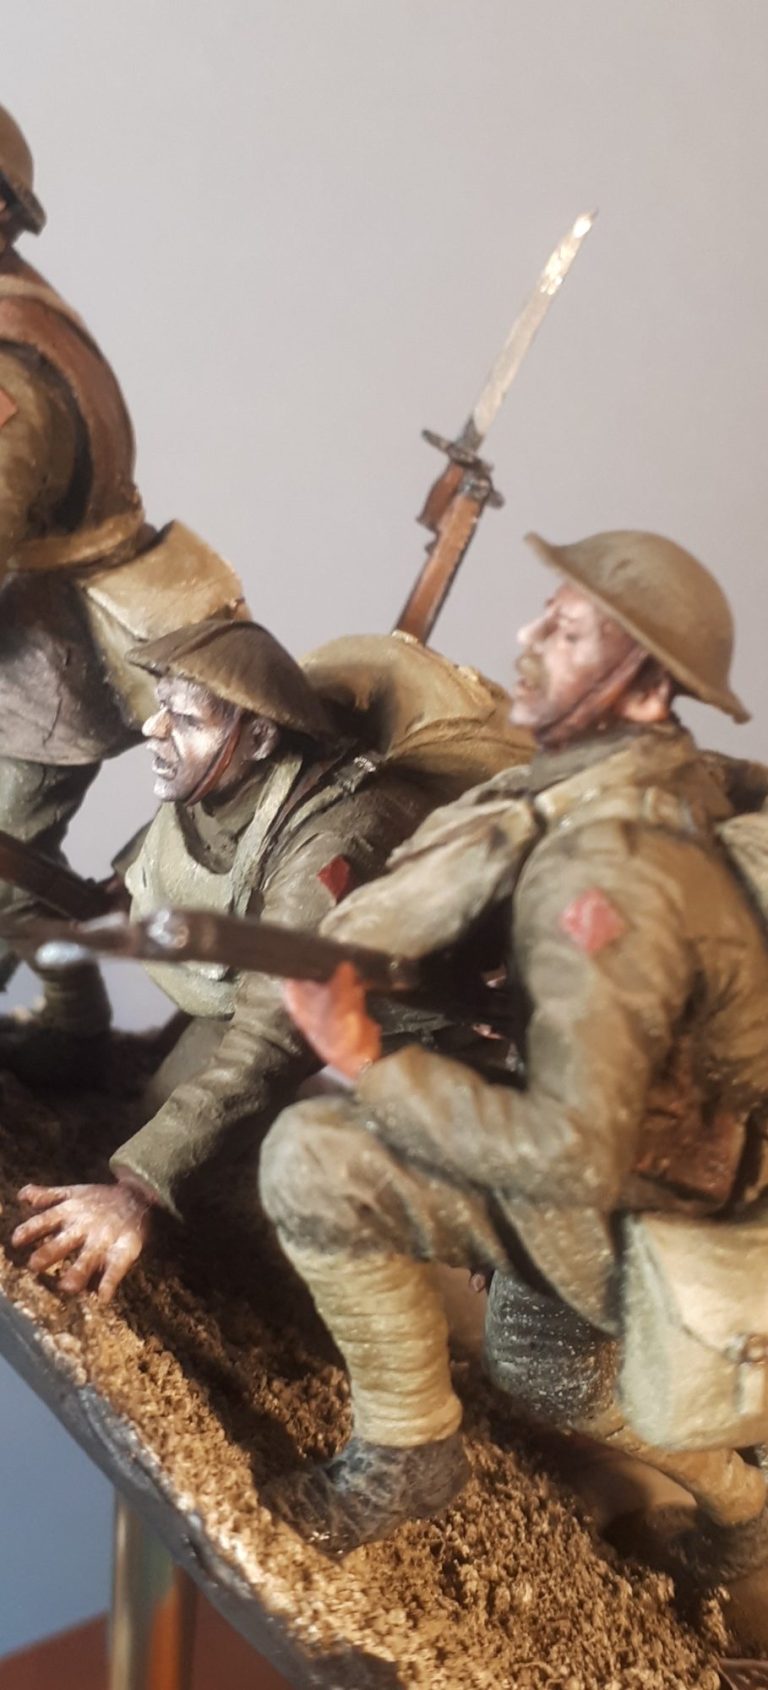
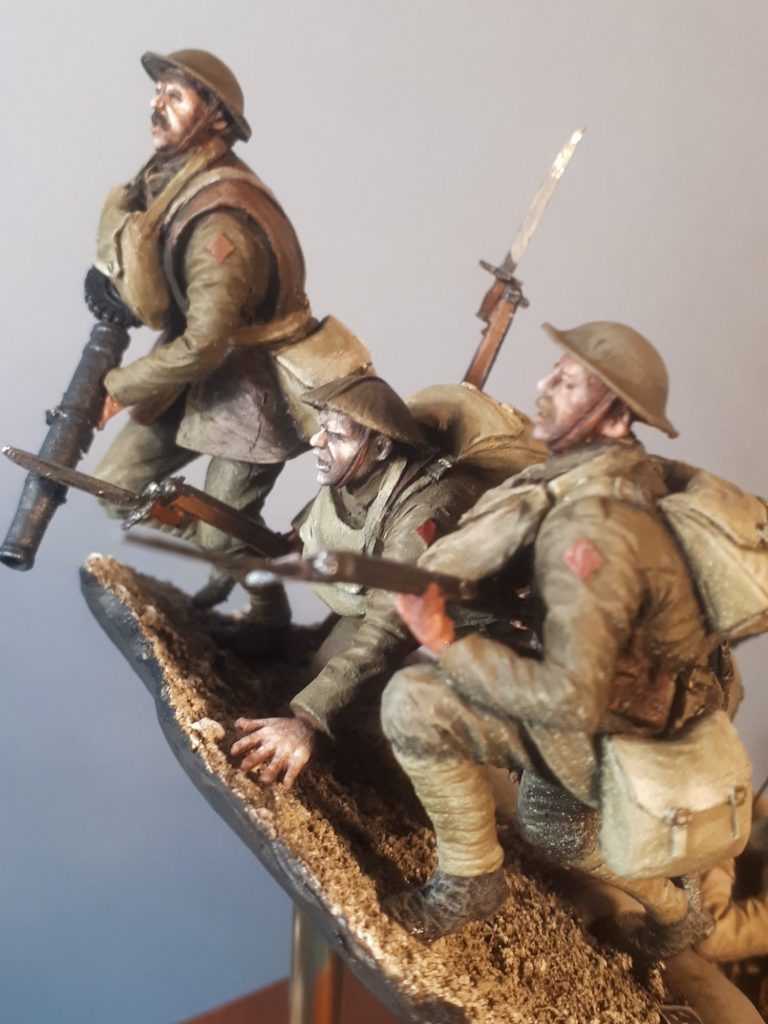
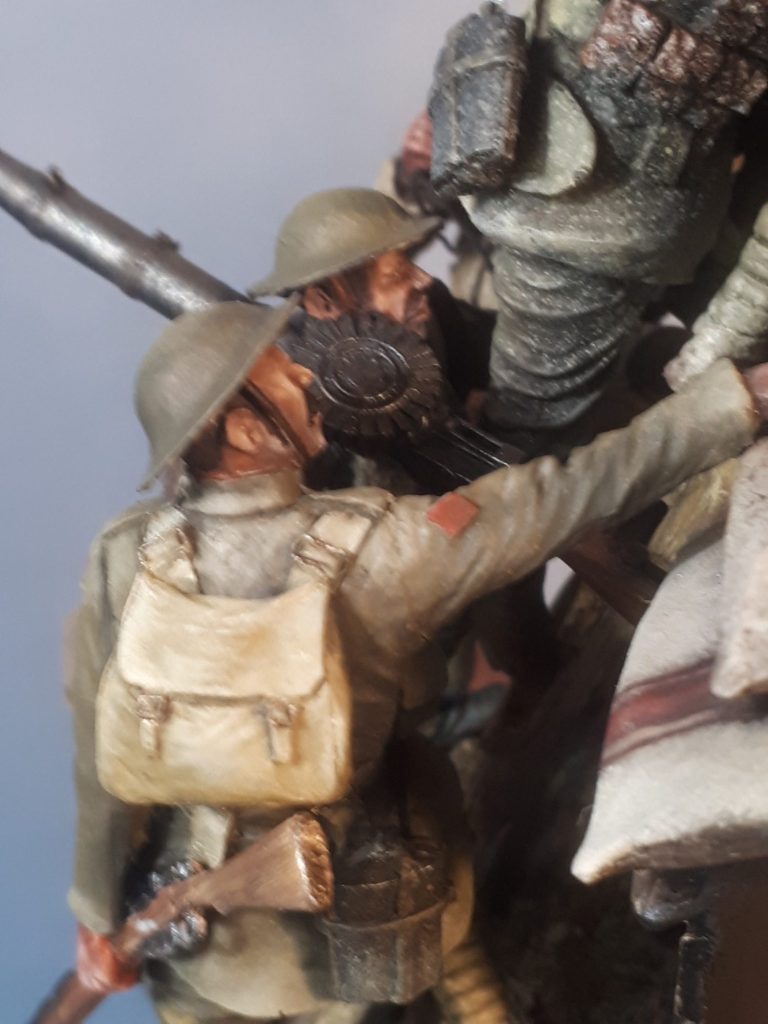
I found the faces to be a little bit basic with relation to their sculpting, although in truth they’re not really what people are going to be looking at, I decided that to give that feel of terror that these young men must have felt charging into the face of enemy fire, I’d paint them with very pale hues, the colour having drained from their faces with the fear of what they would face on leaving the relative safety of their trench.
Small details were added – veins on the backs of hands, and although not on this figure, five o’clock shadow and moustaches were painted onto some of the figures.
Photos #20, #21 and #22 shows the same figure, this time though the rifle has been added with bayonet fixed.
The bayonets come as separate parts and are very fine pieces of resin.
On one or two of the figures they would be the cause of much cursing and some very interesting phrases, uttered when on hands and knees, searching for them when I knocked them off in my clumsiness.
Worthy of note in this shot is the addition of “weathering” on the lower part of the figure. I used a very old method of splattering pale coloured paint onto the model, using a broad brush loaded with thinned oils ( in case the effect needed altering ) and a second brush handle to stroke across the first brush’s bristles, causing paint to flick onto the model in a completely random manner.
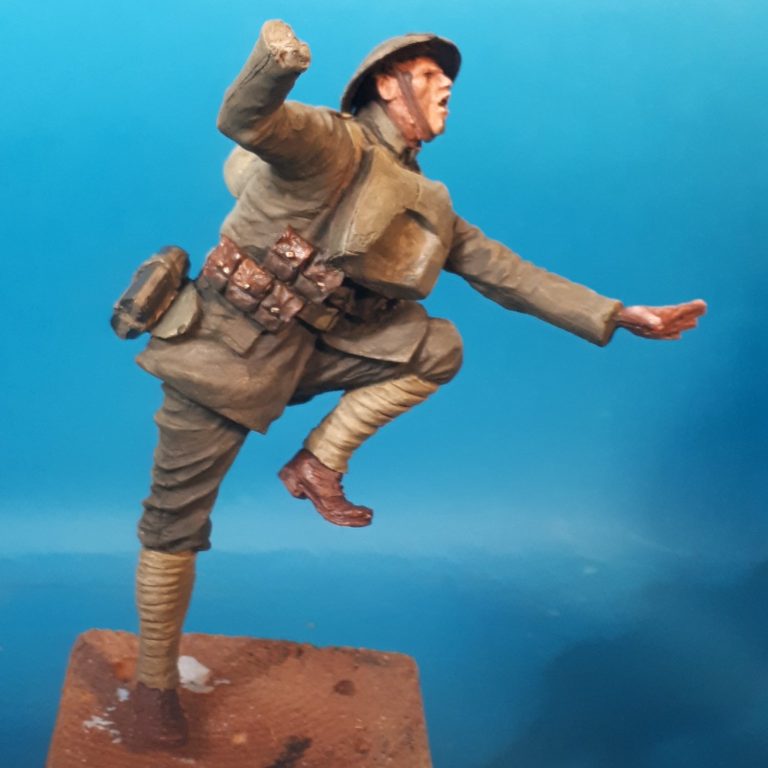
Using another brush to add more of the dusty coloured pale paint to the shoes and lower parts of the puttees finished of the effect quite nicely.
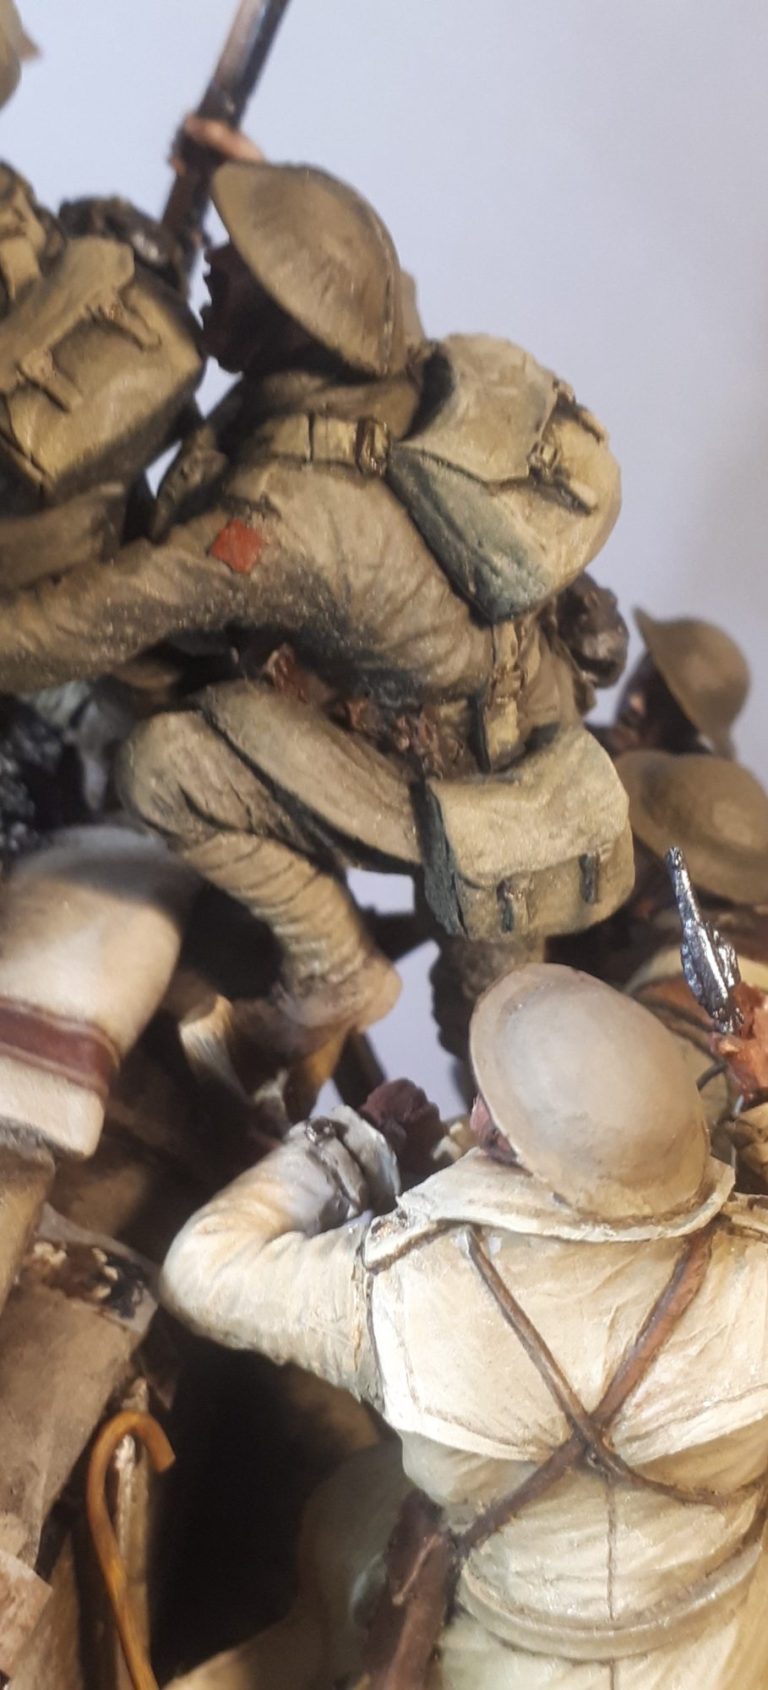
Photos #23 and #24 show the second figure that would be added to the base. He’s very close behind the first figure, so much so that the gas mask bag on his chest has a cavity in it that sits into the Upper leg of the first figure.
Test fitting these two figures for their position on the base is very important, because the second figure needs to be set with one foot on the third step of the ladder and the other foot on the top step. He then needs to be very close to the first figure making an almost horizontal scrabble up the face of the rise.
These two figures will also determine where the other figures are placed, so, as I say, it’s worth taking a little time to test fit them and get their positioning right before adding the glue.
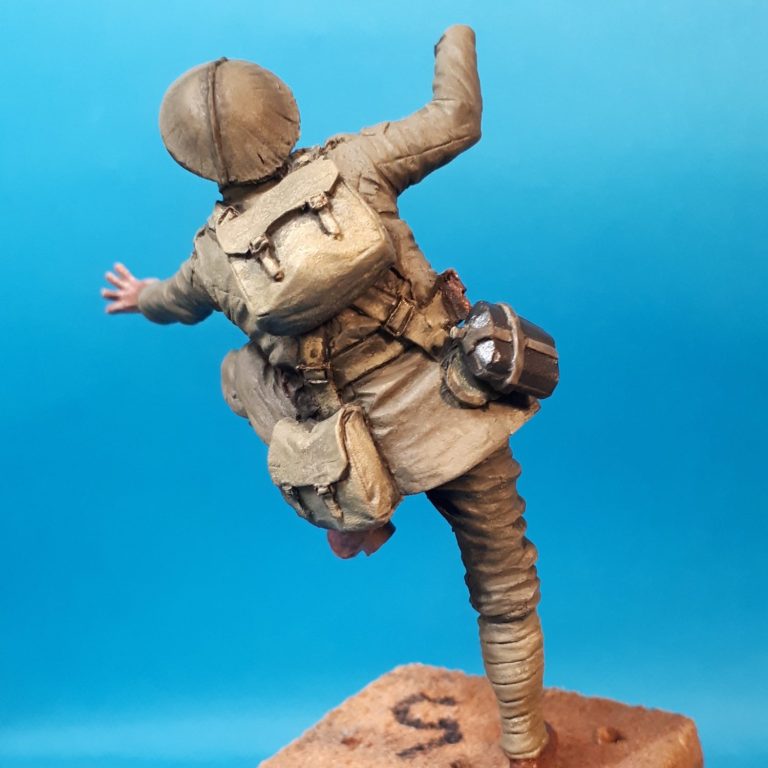
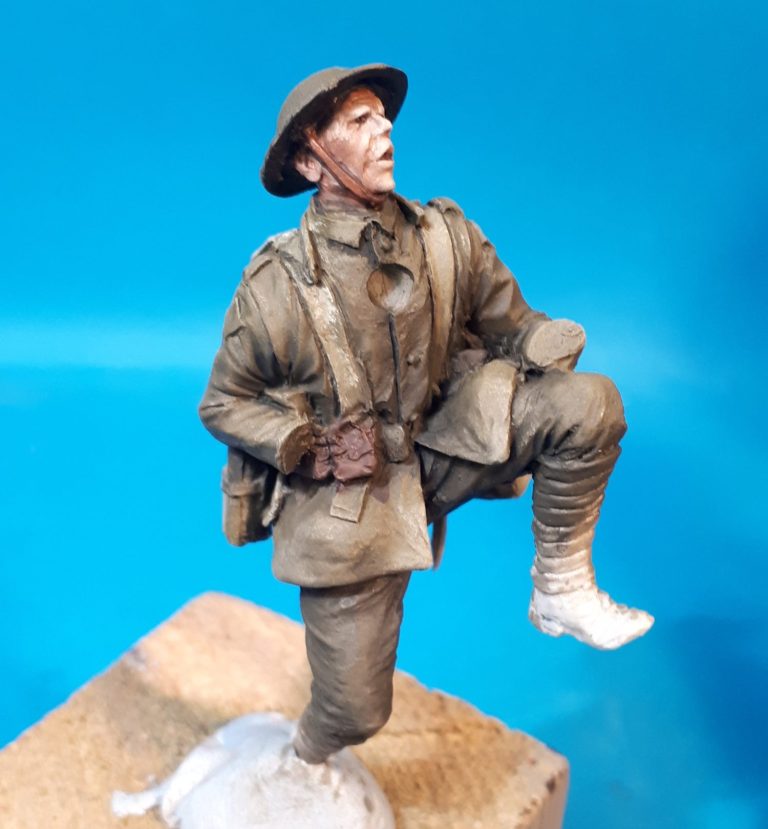
Photo #25 shows another of the figures, this one had a separate gas mask bag, which isn’t in place on his chest yet.
He’ll be on the rising ground to the right of the group and this one caused the most problems regarding the fit of his rifle. The wrists fit onto the ends of the arms OK once you grasp that he’d clutching the weapon a little awkwardly, but it does look “right” once fastened in place.
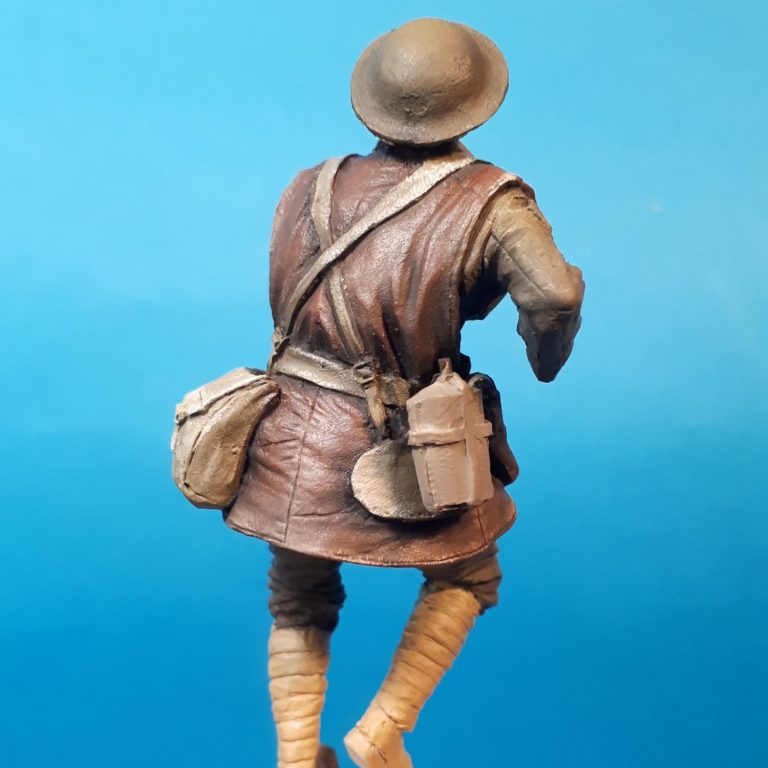
Photo #26 shows the back of the same chap, the difference in colour from the canvas bags and webbing belts is quite noticeable in this shot, and shows how the addition of a colour to that being used for the uniform can create an overall harmony to the clothing and kit.
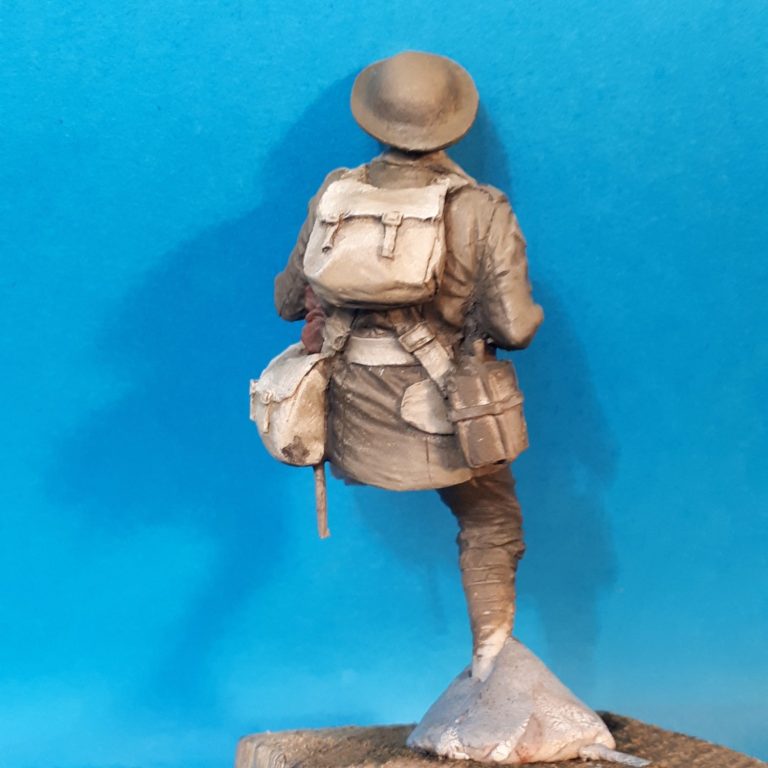
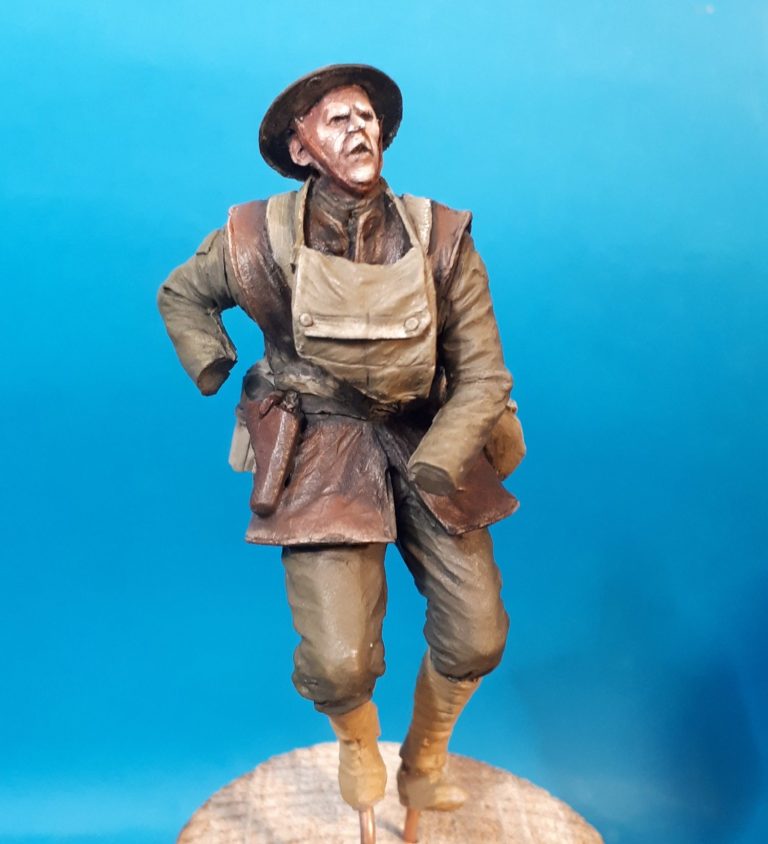
Photo #27 shows the first of the Vickers machine gunners, because of the way I chose to assemble this figure, I later had to do a fair bit of “fettling” and surgery to the butt and magazine of the Vickers to get it to sit in place correctly. I think leaving the right arm off and painting the leather hauberk first, then painting and adding the Vickers and right arm, and THEN painting the sleeves of the uniform might have been an easier way forward, but if it was all easy, where would the fun be ?
Photo #28 shows the back of the same figure, and the sculpted detail, with a little bit of painted on detail on the leather areas really brings this figure to life.
Photos #29, #30 and #31 return to that second figure that will be added to the base, the one with both feet on the ladder.
Whilst it’s fairly easy to figure out where highlights and shadows should be on the figures, it’s not until you start test-fitting them onto the groundwork that you see the true angles of how their bodies are positioned with regard to overhead lighting.
With that in mind, I’d returned to this figure before setting him on the base to add some darker shadows under the arms and chest, add in the leather ammo pouches, and paint on some deeper shadows to the various bags etc to make the separate areas “pop” a little more.
Photos #32, #33 and #34 show different views of the second of the Vickers machine gunners, this one being at the base of the ladder and having the gun on his shoulder ready to make his climb.
The face seemed to depict an older man, and I tried to paint the face that way, hinting at someone more experienced.
Again weathering was provide by flicking paint droplets onto the lower half of the figure, and as with the other machine gunner, the leather hauberk really can be used to bring interest to this particular chap.

Photos #20, #21 and #22 shows the same figure, this time though the rifle has been added with bayonet fixed.
The bayonets come as separate parts and are very fine pieces of resin.
On one or two of the figures they would be the cause of much cursing and some very interesting phrases, uttered when on hands and knees, searching for them when I knocked them off in my clumsiness.
Worthy of note in this shot is the addition of “weathering” on the lower part of the figure. I used a very old method of splattering pale coloured paint onto the model, using a broad brush loaded with thinned oils ( in case the effect needed altering ) and a second brush handle to stroke across the first brush’s bristles, causing paint to flick onto the model in a completely random manner.
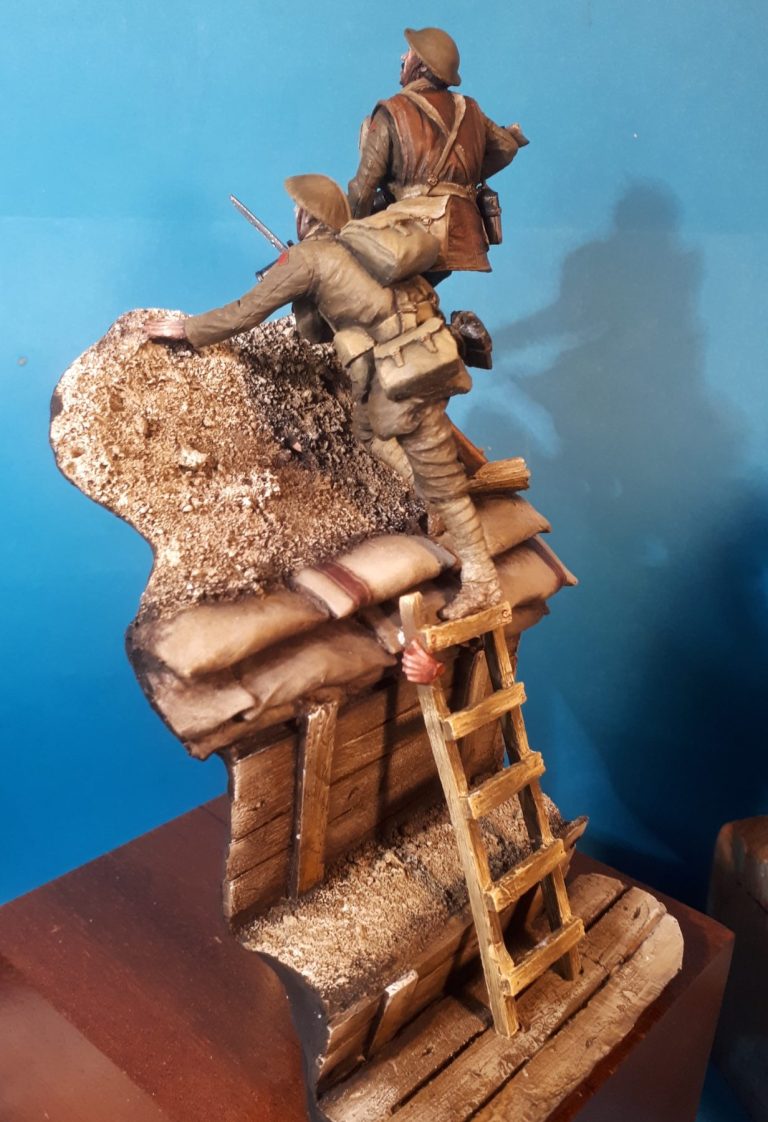

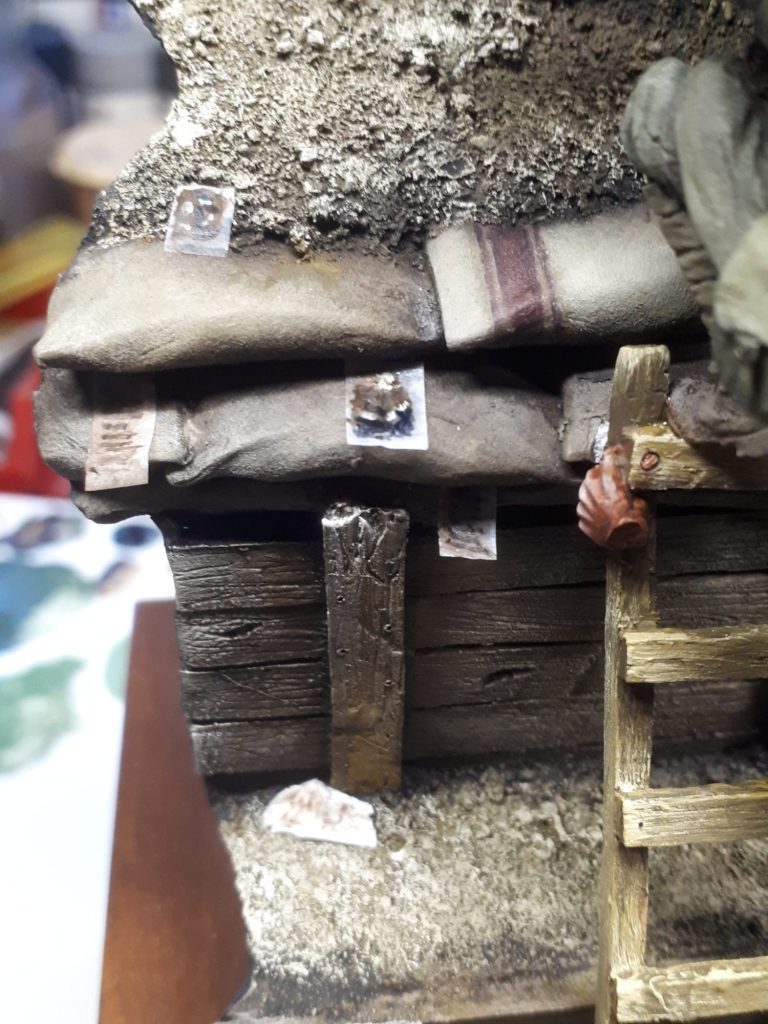
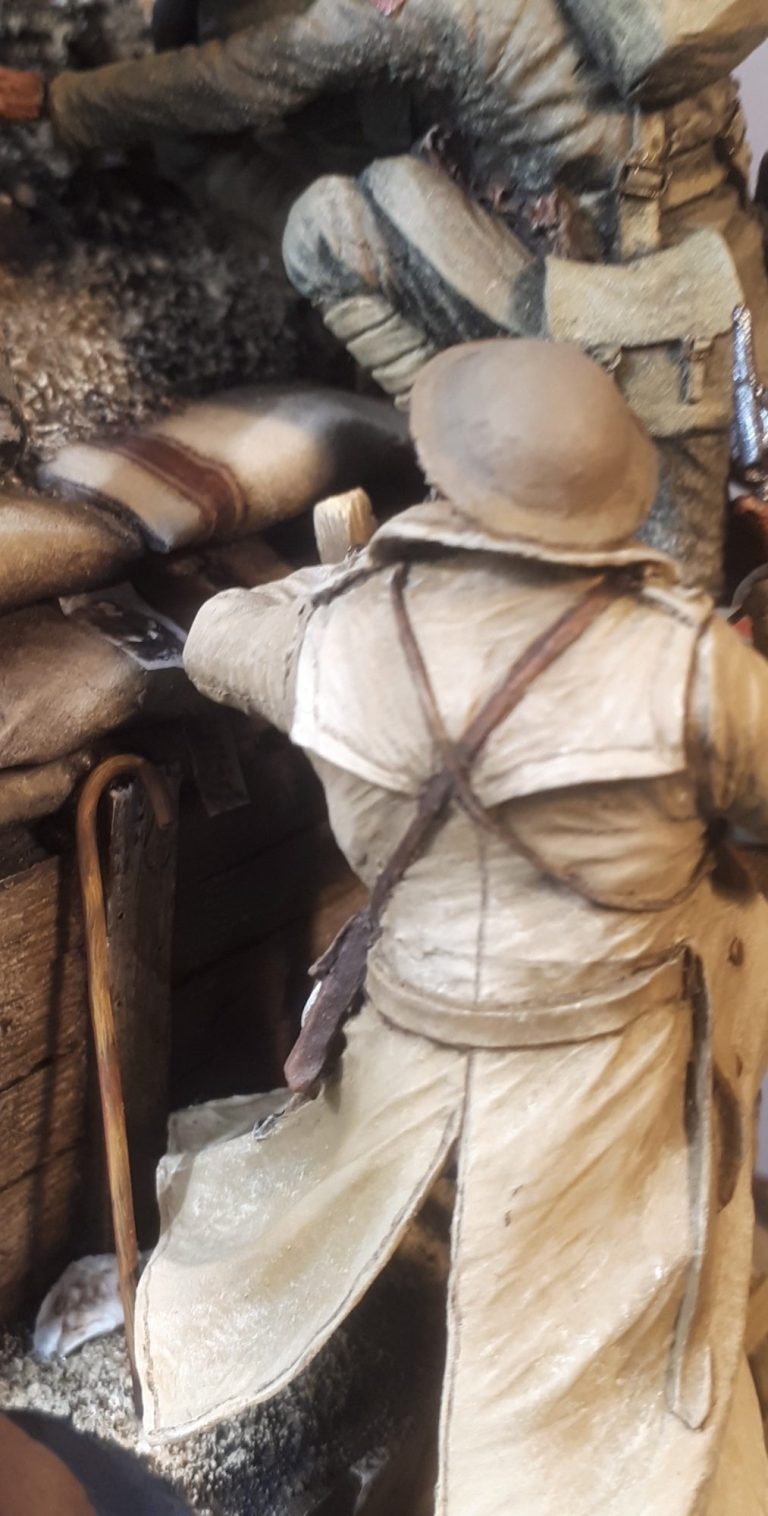
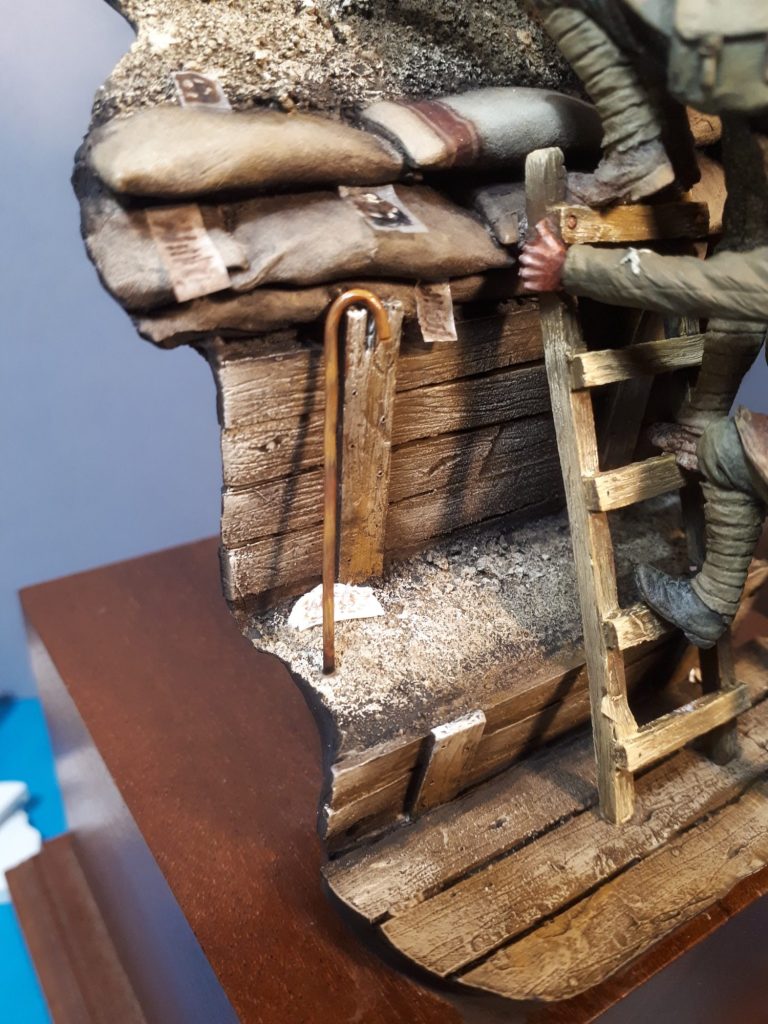
Photo #38, and it’s the little additional details that sometimes add a lot to a scene.
In this case, some soldiers left letters or photographs in the trenches they were leaving, thinking that if they were killed, then maybe their final thoughts might get passed on to loved ones at home.
I thought that adding a few of these might make the scene just that little more poignant, hinting at the hopelessness of the situation for some of these men.
I used small sections of cigarette paper for the letters, painting on fuzzy lines of text with some Vandyke Brown oils, and using slightly thicker paper to make the photos, again painting on fuzzy blobs that might ( if seen by a blind man, riding a galloping horse past at midnight ) seem to be the type of posed photos of men in uniform that were so common in that period.
These tiny fragments were fastened in place with small amounts of superglue, placing them as shown in the picture.
Some “screwed up” or damaged “letters” were added to the arming step, again to hint at those who had been there before.
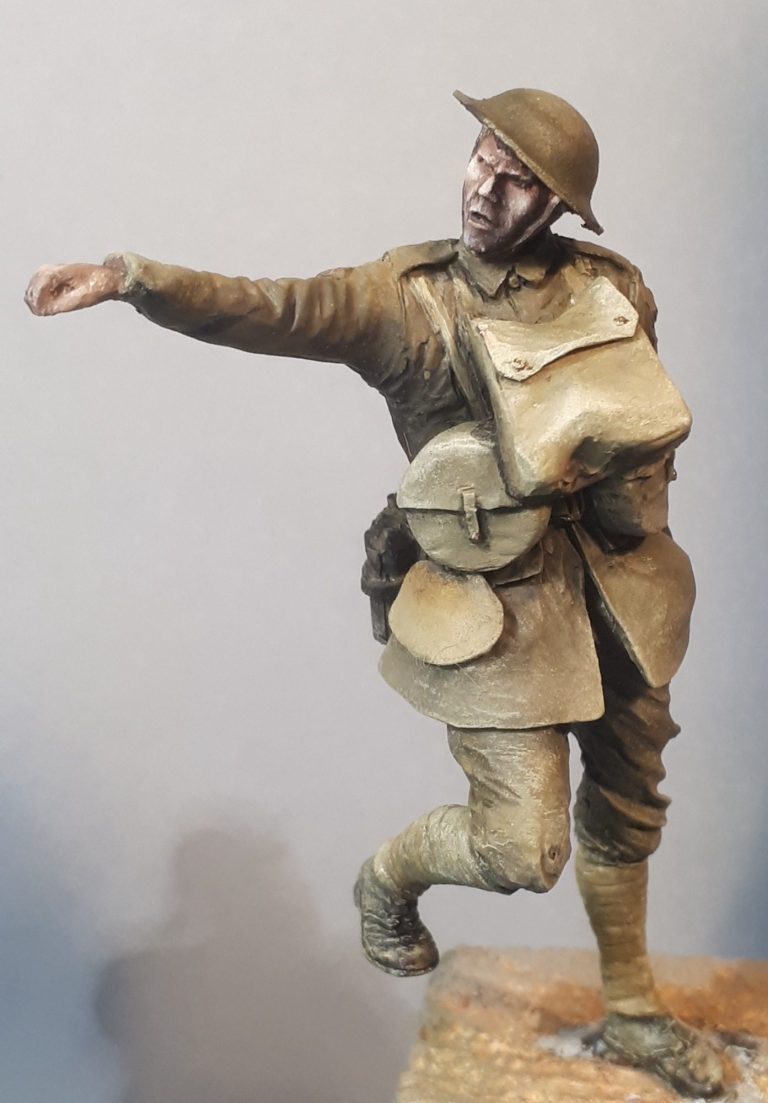
Photos #39, #40 and #41 show the second Vickers gunner and two other soldiers as their painting develops. Small details added to their kit and moustaches added to faces. Again weathering provided with the splatter technique, with heavier weathering on the lower legs and boots.

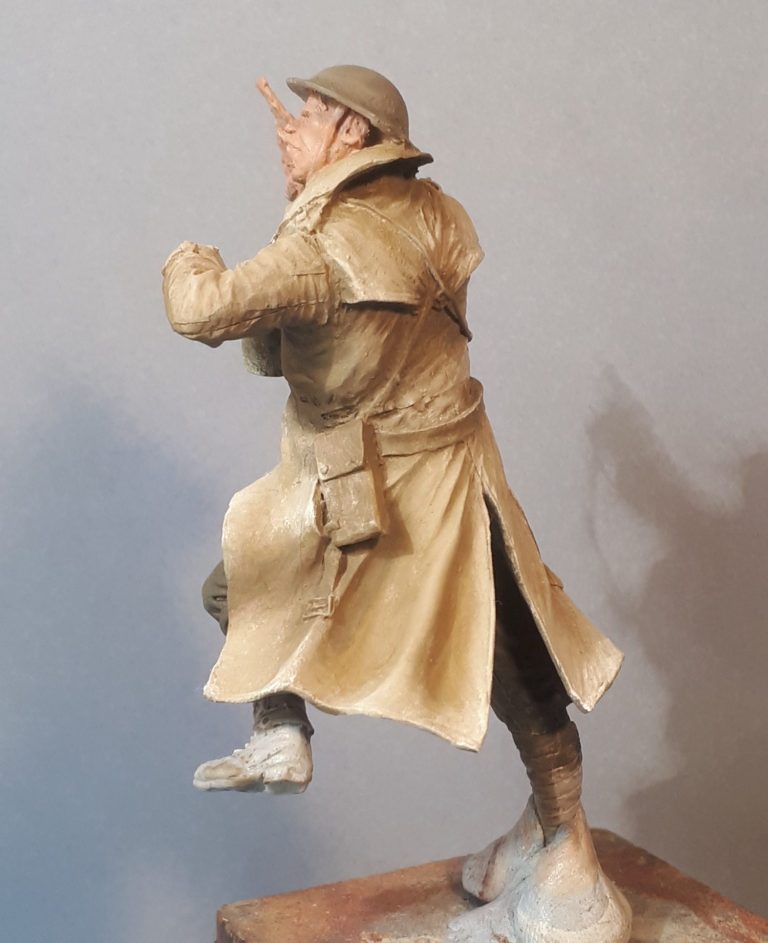
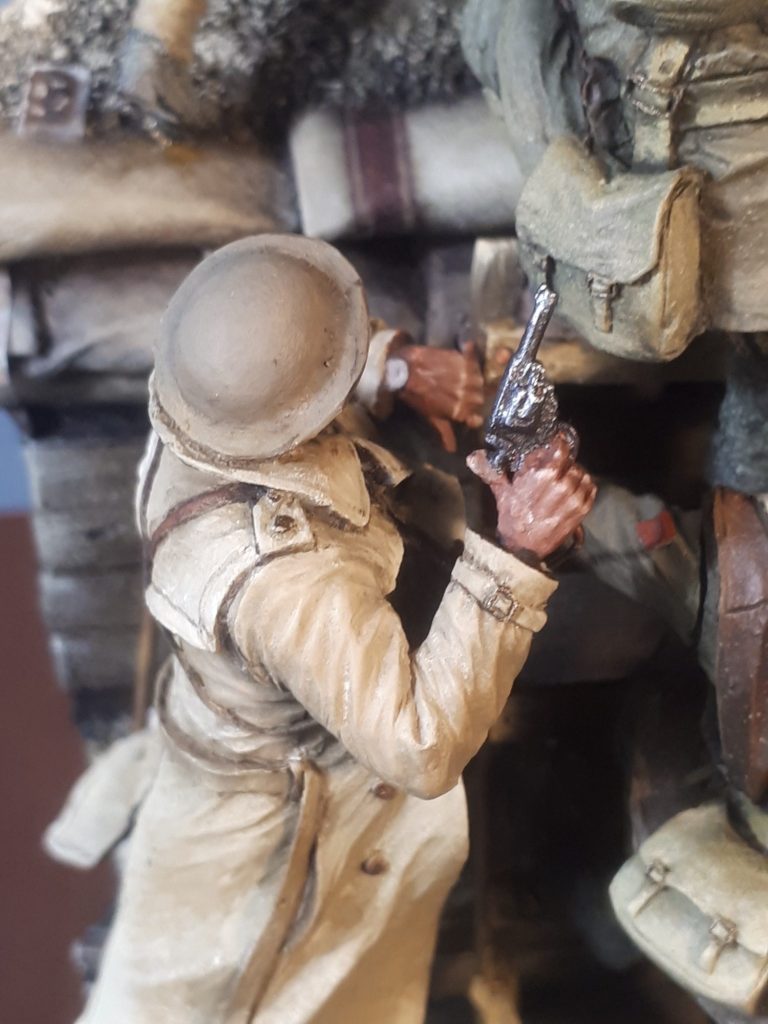
Photos #42 and #43 show the final figure that would be added to the base – the officer.
Of the seven figures, he’s the one I enjoyed painting the most, although there is very little difference in quality between the figures as a whole, I think the fact that I could use slightly different colours for his coat might have been a contributing factor.
At this stage I’ve only got his uniform, coat, pistol holster and gas mask bag painted, but he’ll come to life soon enough.
Photos #44, #45, #46 and #47 – and now it’s coming to life and beginning to get a bit crowded. Four figures added, granted all on the right-hand side of the scene, but interacting nicely.
I have to admit here that the figure closest to you in the second of these shots, also on the right in the first shot, was the bane of my life from this point on.
Why ?
Well his rifle hangs over the front of the plinth, and his bayonet was knocked off several times….. it was a right pain, I can tell you.
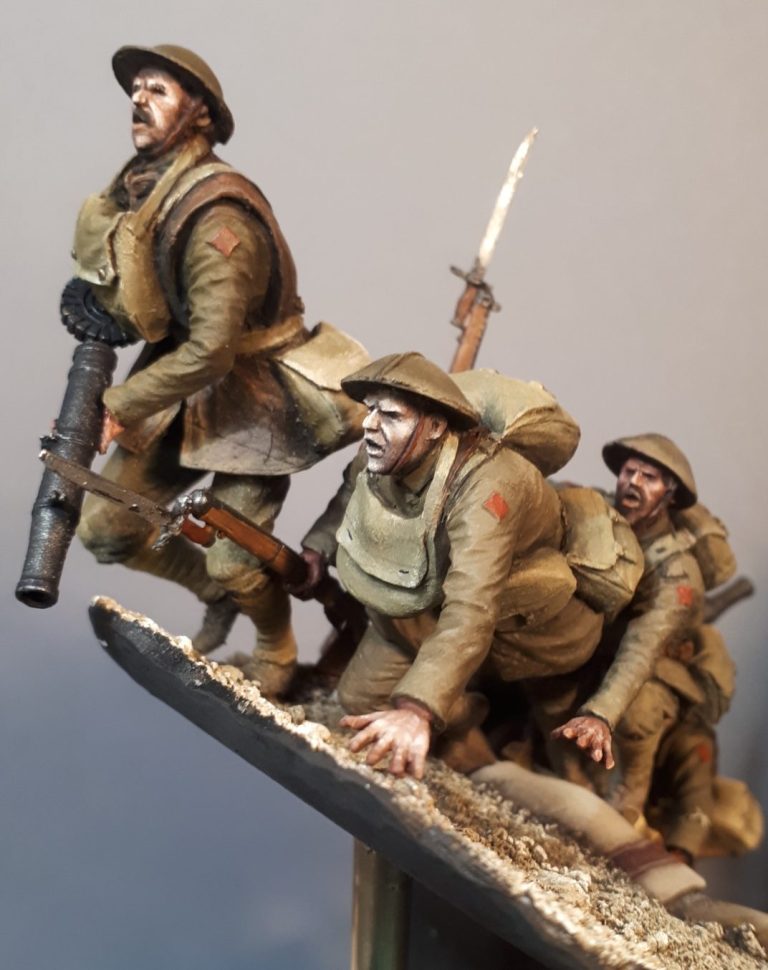

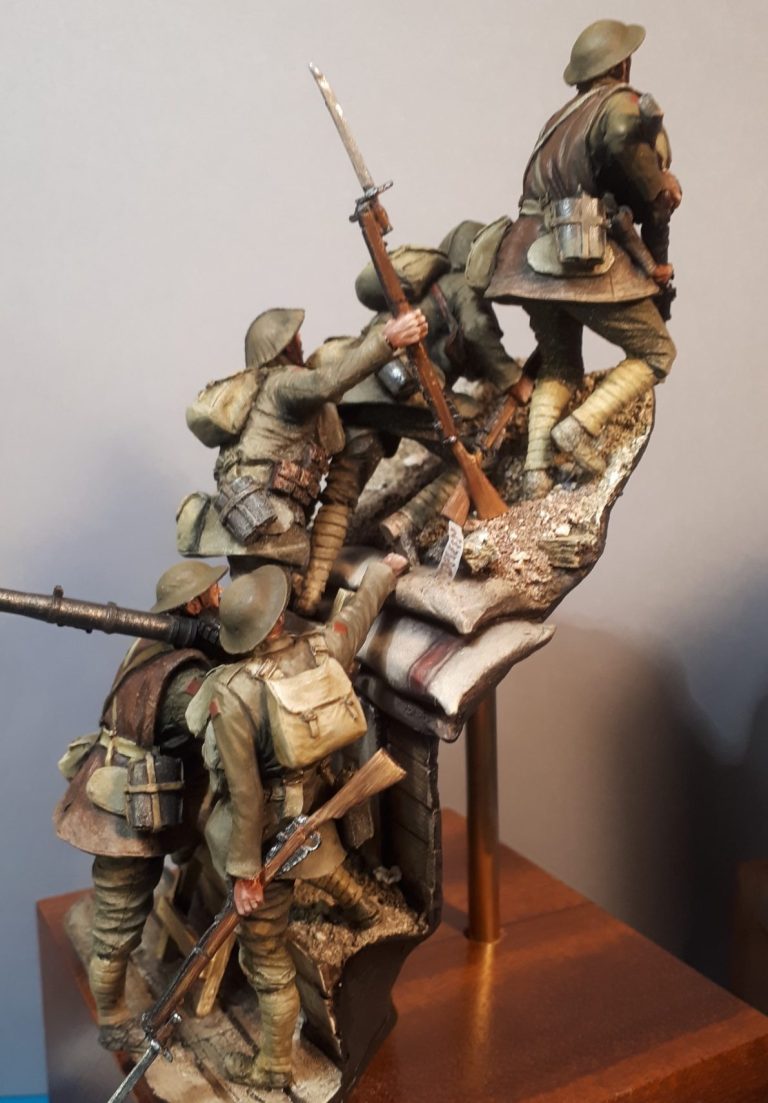
Photo #48 – another little addition was a walking stick. It was simple enough to make from a piece of copper wire, and painted to resemble wood. I was beginning to see how crowded the scene was becoming, and although I suspected the walking tick might well be hidden once the Officer figure was added, I’d know it was there.
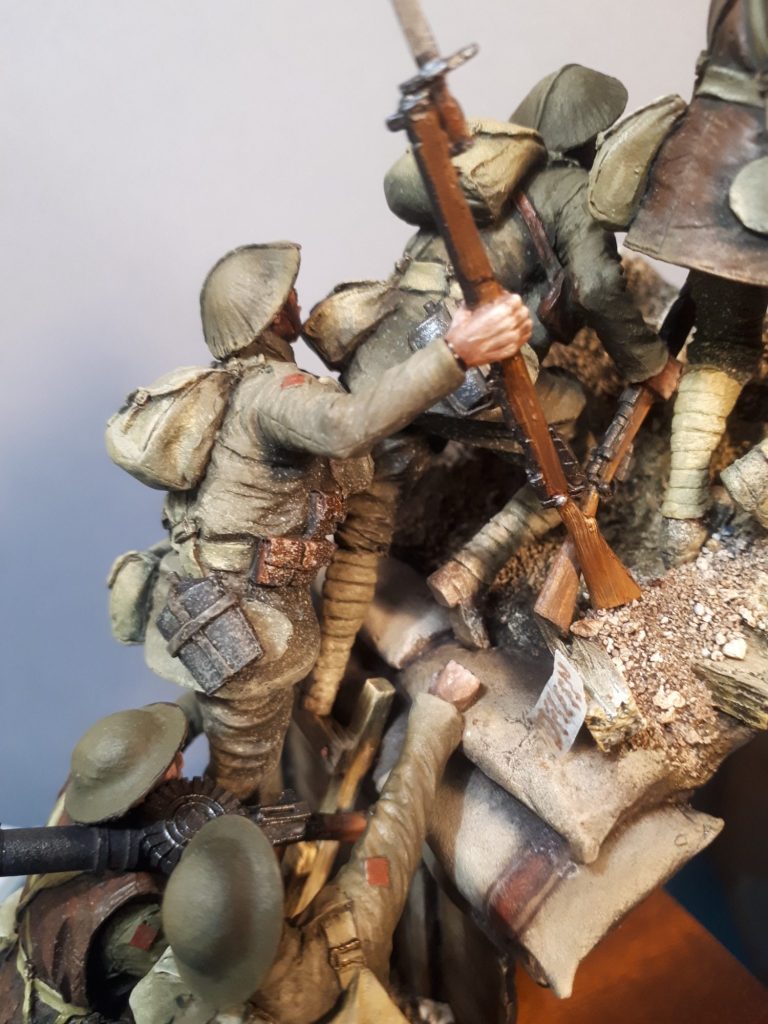
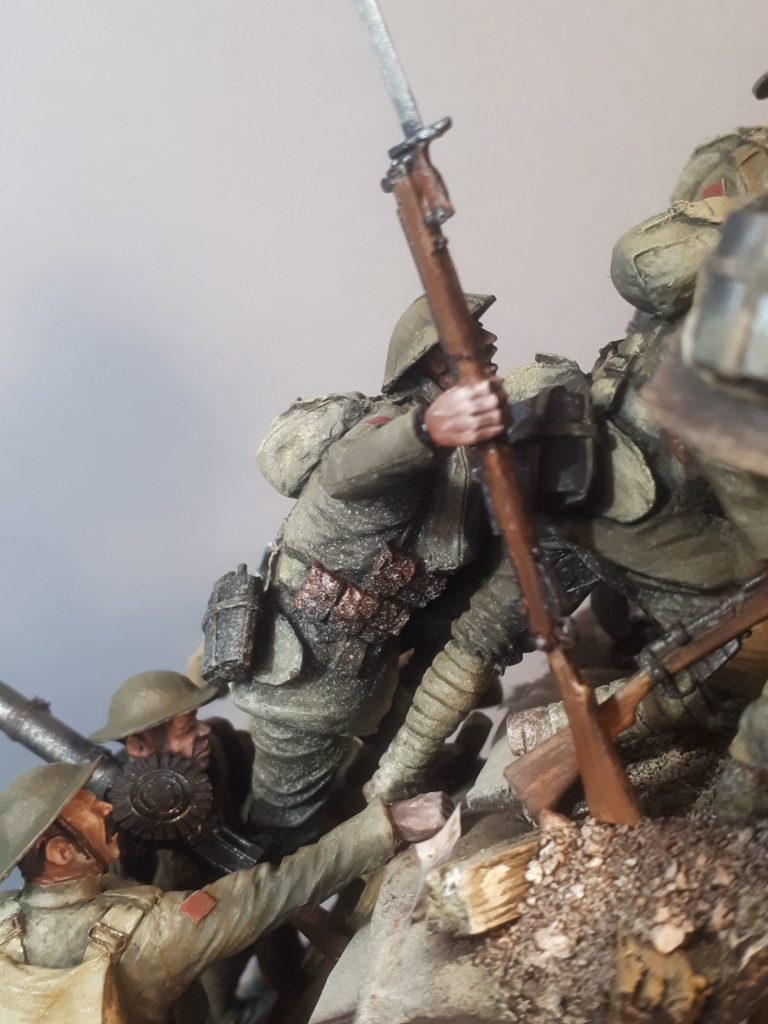
Photos #49 and #50 show further views of the figures on the right hand side of the diorama. The close proximity of the figure at the top of the ladder to the one stumbling up the centre of the slope can be seen in photo #50, and the clever way that the figures are fastened or supported by the groundwork and each other, this particular figure also grounding his rifle butt on the slope.
Photos #51 and #52 show the sixth figure having been fastened in place. I needed to add a little more of the Chinchilla Bathing Sand around his right foot, just to make the amount of contact between foot and the slope a little larger.
Although his bayonet does protrude over the edge of the base at the back, it didn’t cause any problems like the figure in the trench. I managed to not knock this one off at all.
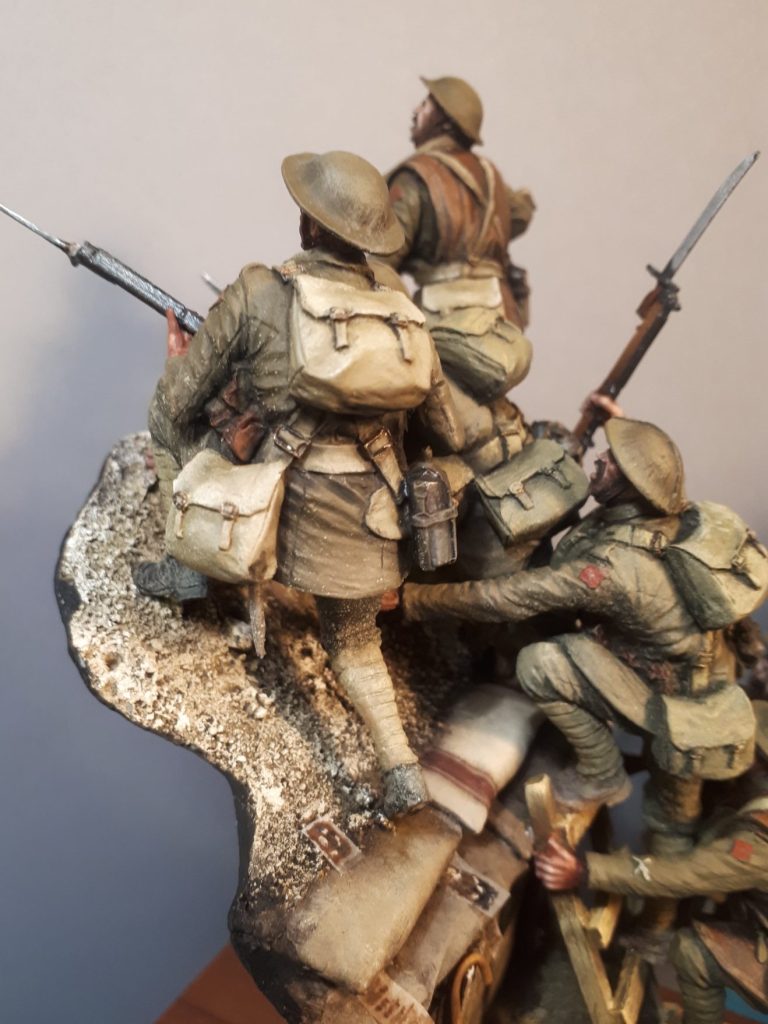
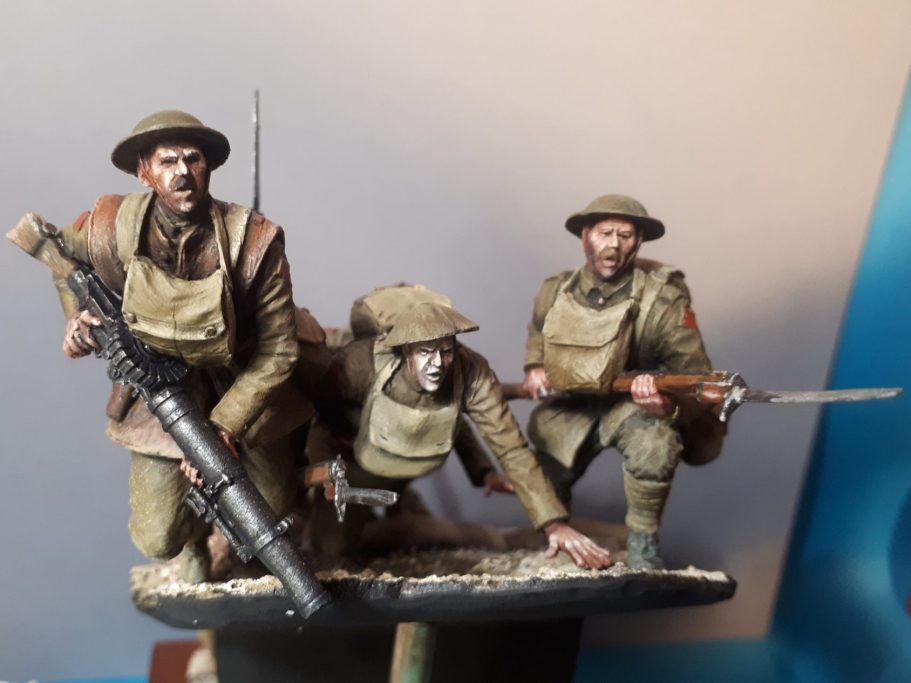
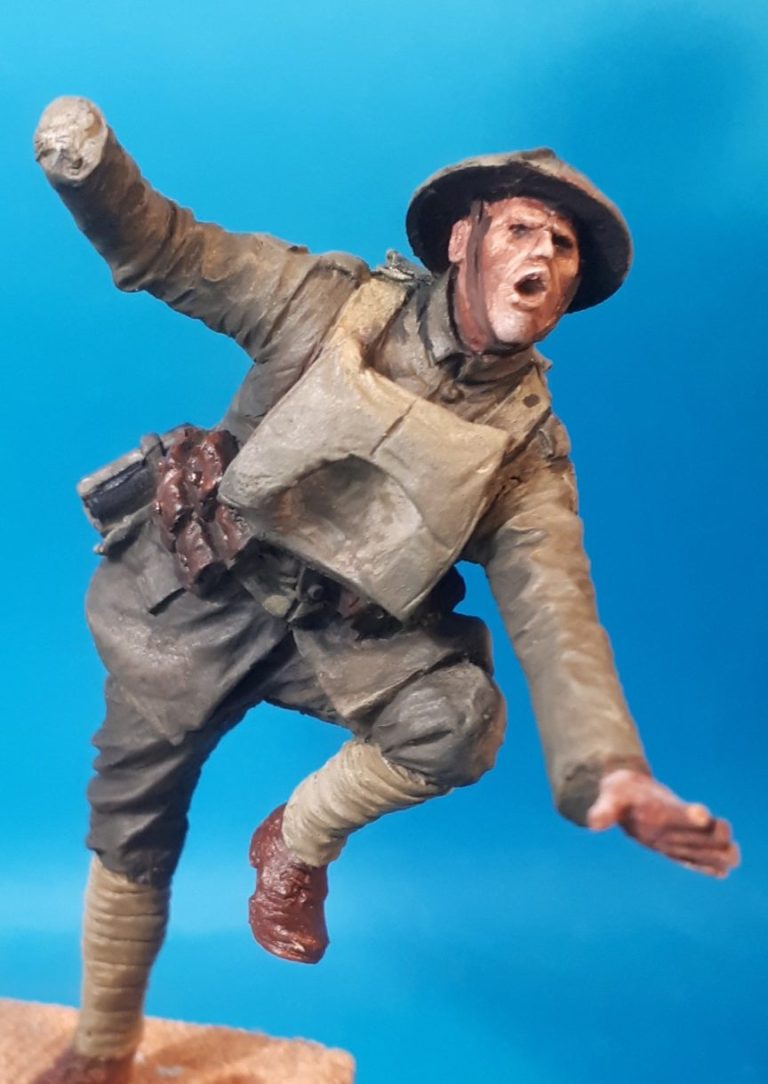
Photo #53, and not my favourite shot of the men charging up the slope.
The faces are not easy to paint, although as mentioned earlier, they’re not really going to be seen from the angle that the diorama is intended to be viewed from.
One of my friends who has seen service in the forces, said that the figures have their “War Faces” on screaming and shouting, grimacing and looking determined, but also with that paleness that comes with fear.
Maybe they do, but I’m not keen on how I managed to paint them.
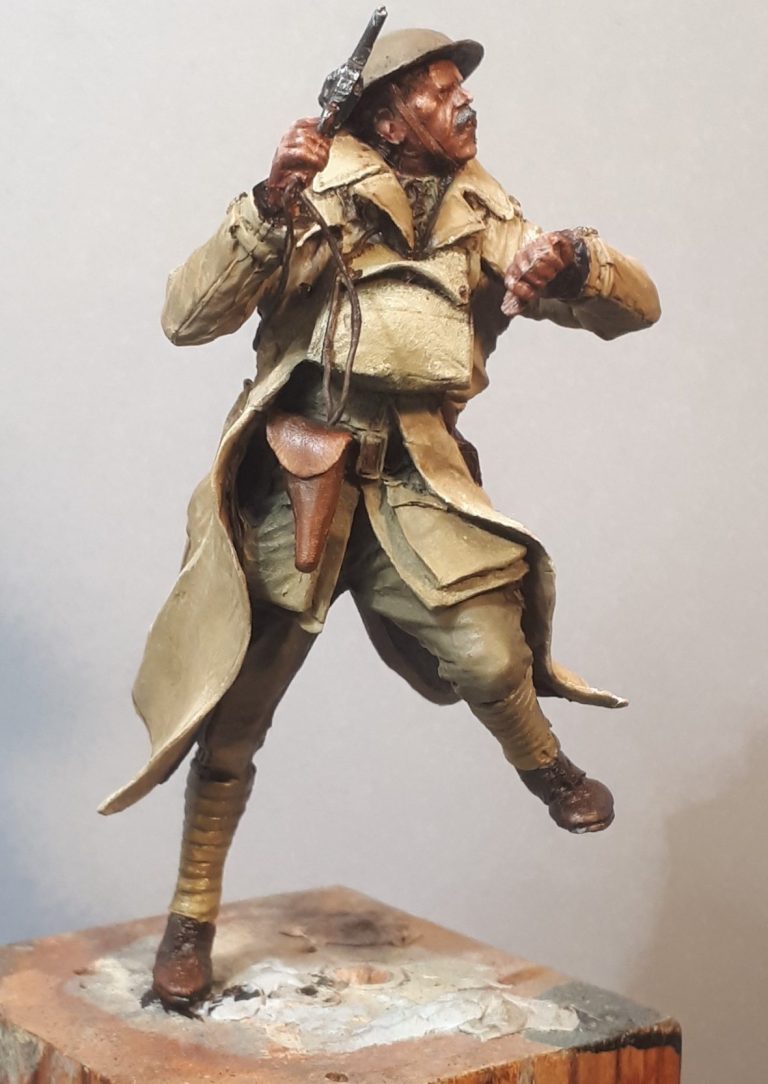
Photos #54, #55 and #56 show the final piece, the officer.
A break from painting quite so much Olive Green uniform, the greatcoat being a joy to paint with the potential for picking out and enhancing the sculpted creases in the cloth.
He was given a moustache and although the mouth area looks a little odd here, that’s because he’s got a whistle in his mouth that hasn’t been painted yet.
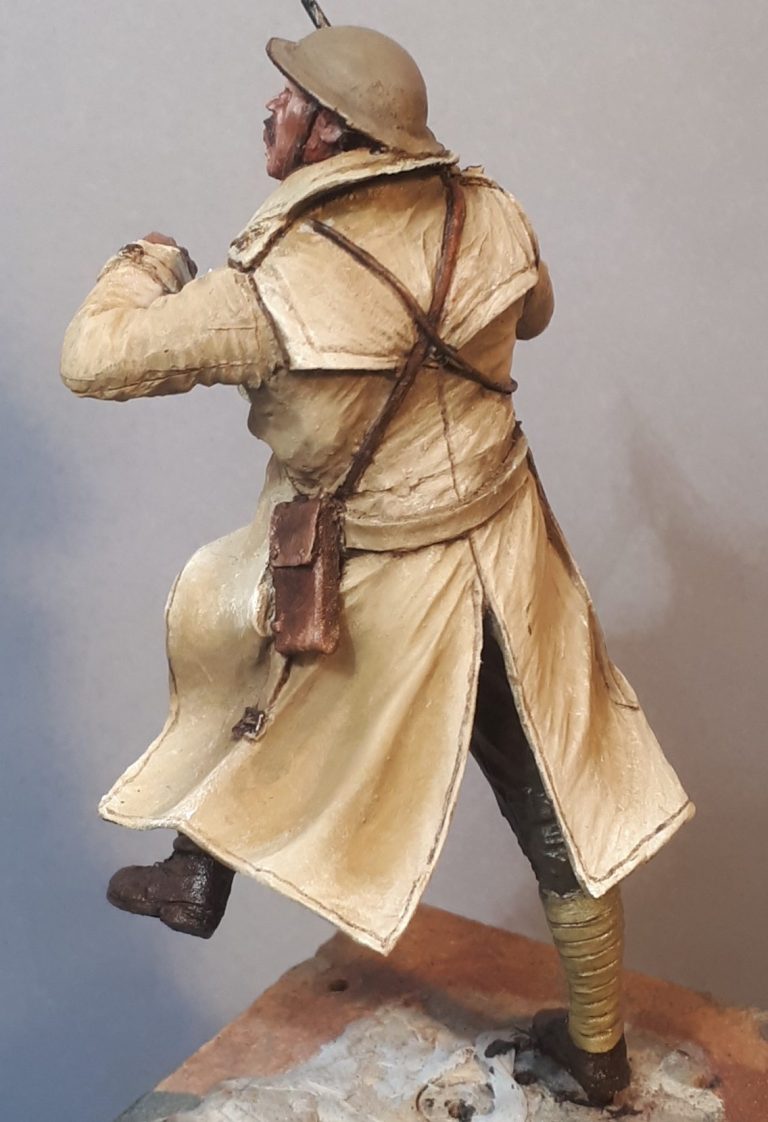
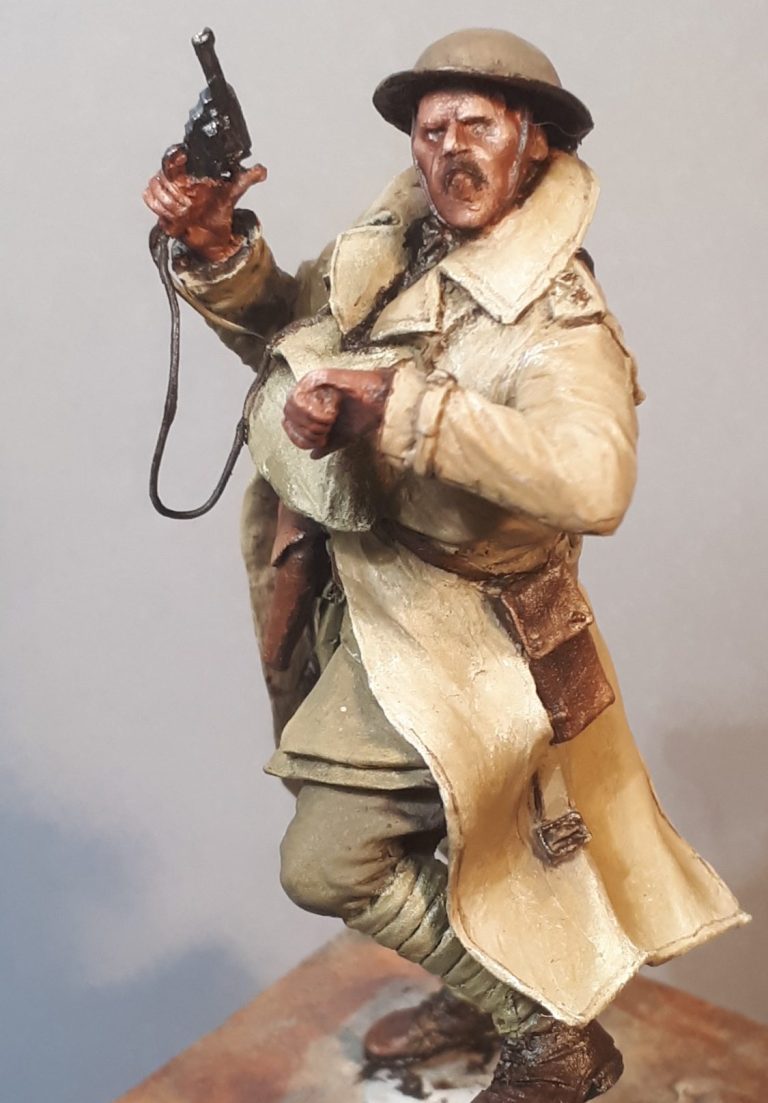
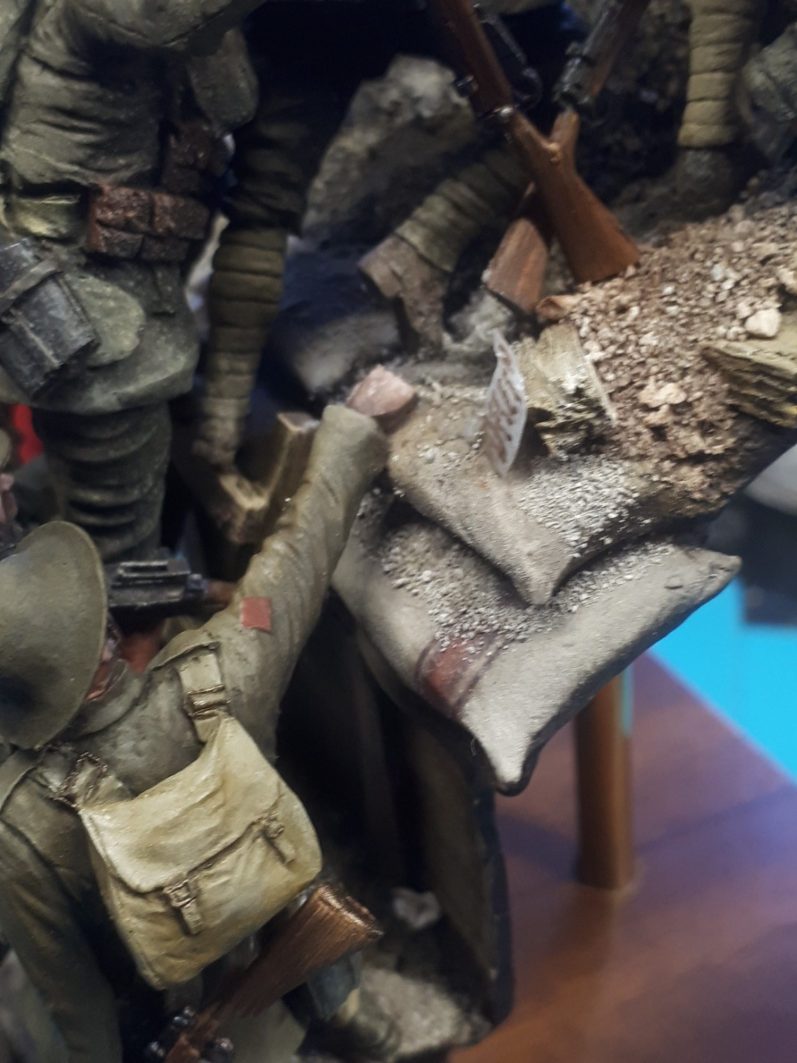
Photo #57, and the final process shot of the painting. A very good friend – Mike Genner – had a look at the “finished” photos and mentioned that with the soil of the slope being quite dry, some debris would likely have slid down onto the tops of the sandbags as the men scrambled up the slope.
So a little more Chinchilla Bathing Sand was added, using watered down Acrylic Matt Medium to fasten it in place.
I made a nameplate for the plinth, and that is shown in the finished shots of the diorama.
Final thoughts.
It’s a hefty and involved undertaking, painting up this kit.
All that green, could, and to a certain extend should, blend in to one large mass. The art being to add slight differences and make sure that the other areas that are a different colour stand out.
Adding small details brings the whole thing to life even more, and these can be relatively simple like the ones I’ve made with cigarette paper and wire, to possibly extending the sides of the trench or possibly removing the sloped ground section, and having some flat ground, and maybe part of a shell crater there instead.
This latter suggestion would perhaps necessitate the changing of a few of the heads, so then we’re into the realms of surgery to remove the heads, trim off the helmets and place them on the new heads.
Would I do any of the above “further additions and changes” ?
I don’t know.
Initial thought about it seems to it being a good idea, enhancing an already great kit.
A little bit longer consideration, and the diorama would be changed drastically, the initial focus for the viewer changing from looking at them men from behind going over the top, to then having the diorama viewed from multiple points, and this I think would lose the feel and urgency of the scene.
So whilst some might point out a few things that might not be totally accurate – the rise of ground, the Officer looking at his watch after the charge has been called, and not leading from the front or urging his men on, I do think that it’s a very good looking ready made diorama, one that inspires the hopelessness of the WWI conflict for the men on the front lines, with some very nicely sculpted uniforms and kit, and that needs little effort from the modeller to assemble and paint.
Once you get that lead figure positioned correctly, everything else falls into place, and whilst I did think “These’ll never go together easily once they’re painted” I was proven very wrong.
Top marks then to Carl Reid and Mitches Military Models. It’s not a cheap kit, but it is a very good one.

We need your consent to load the translations
We use a third-party service to translate the website content that may collect data about your activity. Please review the details in the privacy policy and accept the service to view the translations.