

The King's Musketeer
1/8th scale Resin bust from PiLiPiLi
Article in Military Modelling magazine in 2001
Well Euro Militaire 2000 has been and gone, the dust is settling and we all seem to have more kits on our shelves than before we went. It never ceases to amaze me ( and please me a great deal too ) at the inventiveness and creativity of the sculptors worldwide who bring us new releases at the big shows like this.
The big companies usually have several new offerings, but it's the smaller "one man bands" that draw the crowds just as much.
One of these is Pilipili, and the subject of this article is their latest offering. After last year's release of the Samurai, I didn't think Lee Van Quang could get any better. How wrong I was.
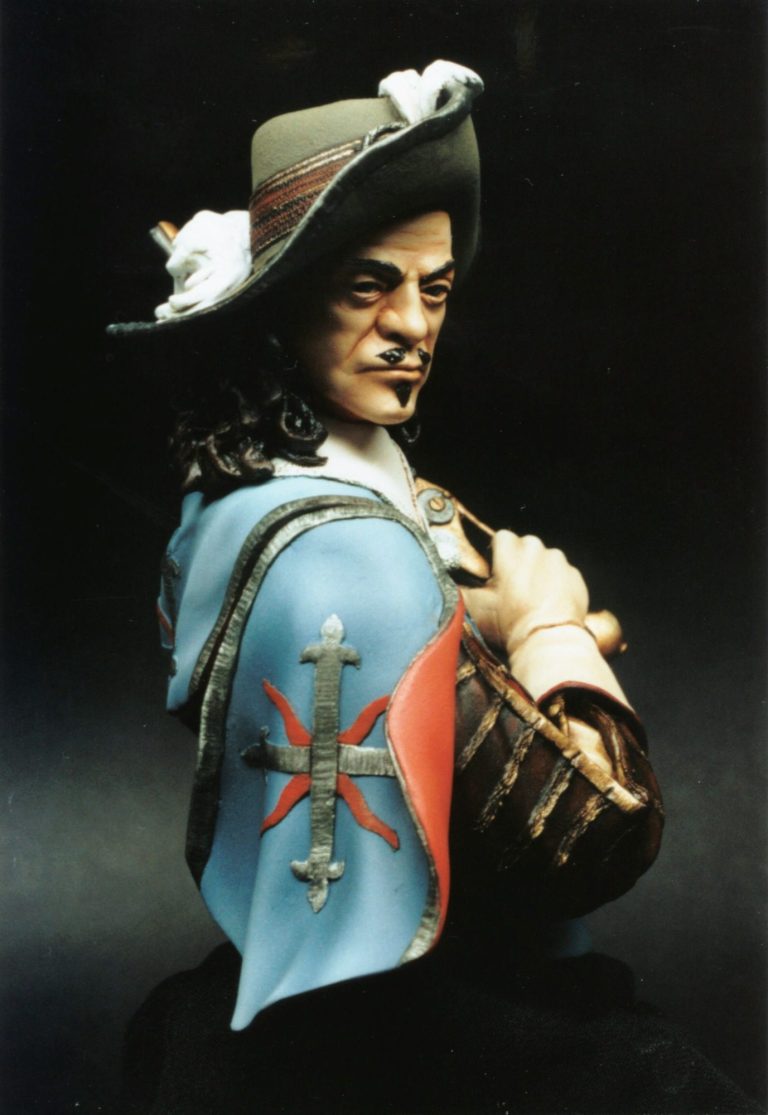
The subject is a King's Musketeer of French origin from around 1650. The Musketeer's official title was "Company of Musketeers on Horse serving as the King's ordinary Guard" which is a bit of a mouthful to say the least.
The company was founded in 1622 by Louis XIII, and continued on to serve the following three monarchs up until being disbanded in 1789 due to the revolution, and at the orders of the Republican regime.
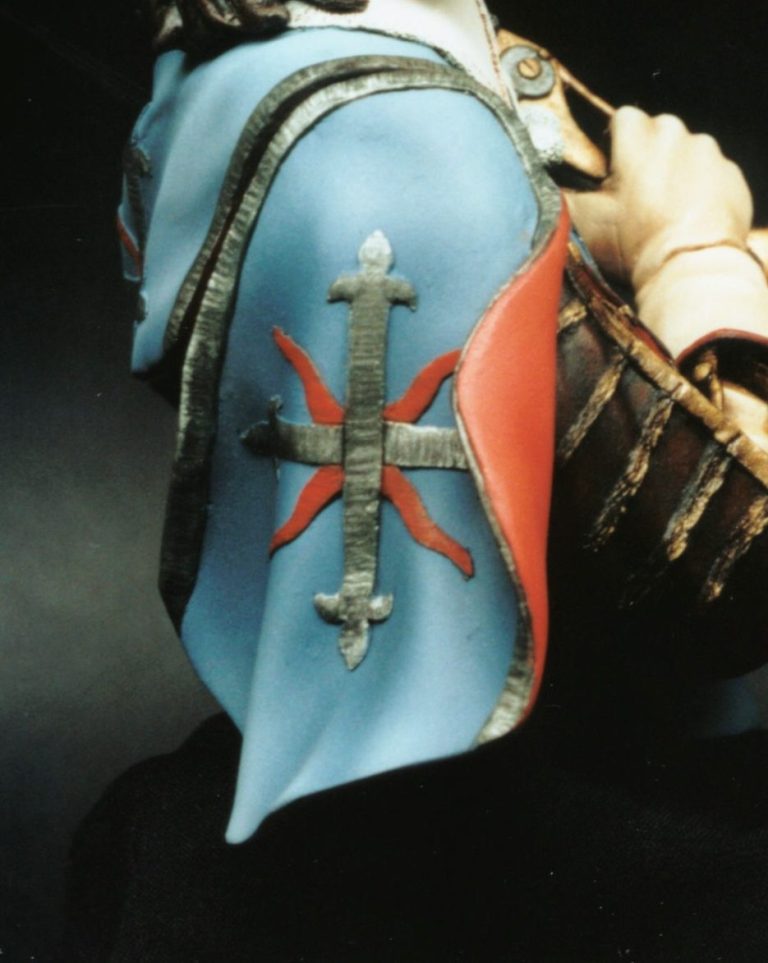
This model depicts the original uniform with the sky blue tabard sporting the French Cross, which through the efforts of the members of its company made the Musketeers into an example of loyalty and daring.
It also contributed to the idea we have today of the "Swashbuckler" when the company was immortalised by Alexandre Dumas in his book "The Three Musketeers" ( 1844 ). This of course being further publicised by Hollywood's several forays into depictions based on Dumas's original yarn.
Dumas based his novel. or at least it's main character, upon a factual person, one Charles de Batz, who died whilst leading a charge at the Battle of Maastricht in 1673.
By this time in their history the Musketeers had been made into two regiments, one the Mousquetaires Gris ( Grey ) and the newer troop, the Mousquetaires Noirs ( Black ).
My main reference source ( Cavalry - V. Vuksic & Z. Grbasic ) focuses more on the weapons in use at the period when the Musketeers were being formed, and says that whilst the basic musket ( one of Austrian design ) would vary in both weight and length, it was a slow and clumsy weapon. It took 99 separate operations to load and fire the thing, and a competent man would need to be conversant with around 143 operations to successfully use the weapon.
The mind boggles !

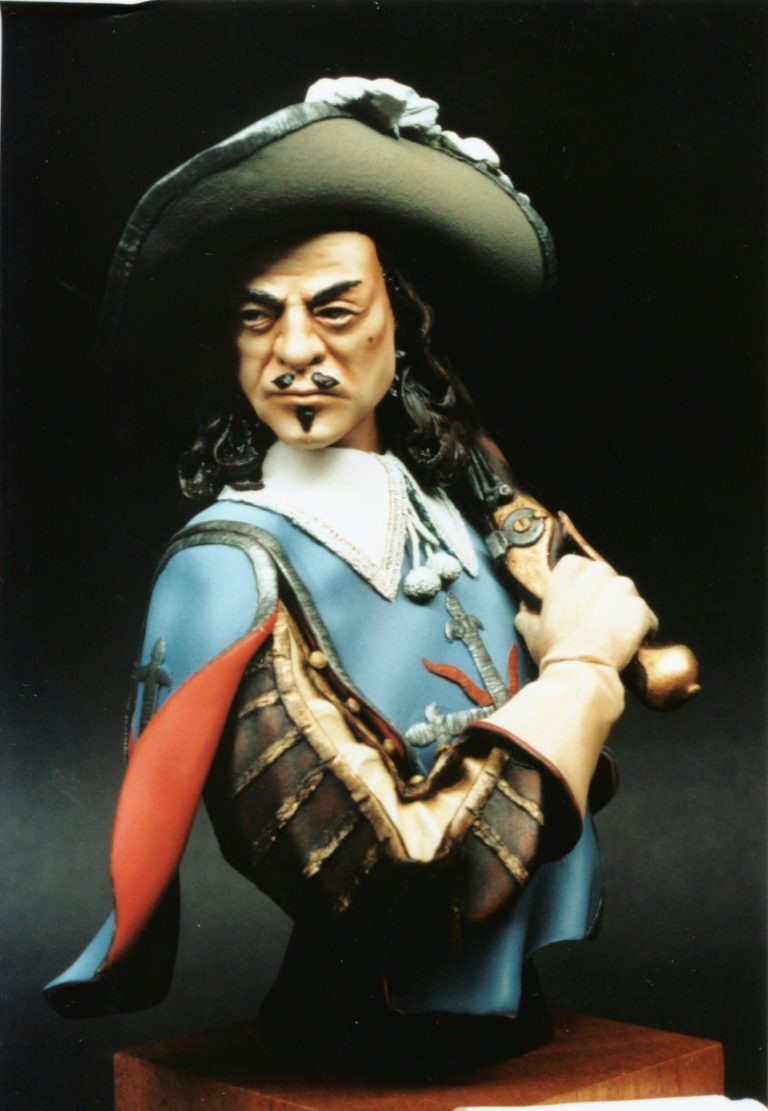
Mind you, this same weapon could fire a 50 gramme ball up to 1500 metres,and one would suspect that anyone standing several hundred feet away would be in real danger should they be the target. That is of course until I read that a marksman of the period could probably hit a barn door at 200 paces. I get the impression that these were a very effective weapon for targets that were close by, but a sniping weapon they certainly were not.
The French were re-armed with a lighter musket from about 1573 although arbusques still remained in favour until after the Thirty Years War.
The Model
The model itself is cast in the usual soft grey resin that Quang uses, this is easy to clean up from the few mould lines in evidence and also enables the mould blocks to be cut away easily.
The components come in eight pieces, those being the hat, the head which joins into a socket in the main body casting, the right arm, the right hand with the pistol is also separate, as too are the two sleeves of the tabard.
There is also a tiny part, which would be very easily missed, for the match holder on the pistol. Everything fits in place well, and the only hardship as such here, is getting the web out of the socket where the neck slots into place. It could be removed with a chisel blade, but I found it much easier to simply grind it out with a grinding bit in my Minidrill.
Once cleaned up, I drilled holes into the parts to accept brass wire holders so that I could paint the pieces without having to handle them directly.
Now for a confession. I've been a bit foolish, and thought I'd best own up now. This was going to be a blow by blow painting article, and I took loads of lovely "in process" shots. The clue that things were going wrong somewhere was when I realised that I'd got to frame 36 on a 24 shot roll of film. I thought I was doing well !
The film hadn't fed through properly. Well, it hadn't fed through at all, so all those nice pictures were lost as I was just then beginning to take shots of the finished model. So my apologies for the lack of pictures, sorry folks !
Painting begins
However, I'll attempt to go through the process without the aid of pictures. I began as usual with the face, painting this with oils. I made the mix slightly lighter than usual, adding a little more white to the base colour oils, and this affected the whole process through shadows and further highlighting.


The method was unchanged from what I've used in the past, adding the oils over a solid undercoat of Humbrol Flesh colour and Desert Sand mixed together. Shadows were Burnt Sienna oils, followed by Burnt Umber for the deepest shadowing under the hat brim, and highlights were simply further additions of white to the base coat of Windsor and Newton Flesh Tint, Yellow Ochre and Titanium White.
The hair was undercoated with a sand coloured acrylic ( Orc Brown from Games Workshop ) and over this was applied Burnt Umber as a base coat. Lamp Black was used to build up the shadows nearest the hat, and Burnt Sienna was used to provide highlights where the hair came onto the shoulders.
Out with the airbrush
I thought I'd roll out the airbrush for some of the clothing, using Humbrol enamels through this, and thinning them with Cellulose thinners.
For the blue I mixed up numbers 109 Blue, 33 Matt Black and added a small amount of Permanent Blue oil paint as well. This was thinned to allow it to go through the airbrush and was applied directly to the model without an undercoat. I dusted over the whole area about three or four thin coats, allowing each to dry for about five minutes in between.
I then added a small amount of Humbrol 34 white as well as some more of the 109 Blue. This was used as a mid tone, hitting the higher points of the folds and also the tops of the shoulders.
More white was added and again the highlights were enhanced, trying to work in ever smaller areas to allow the different colours to fade into one another.
With a final addition of white I added the lightest of the highlights, and then allowed the pieces to dry for about 48 hours.

Now for some masking. I've had some Tamiya masking tape hanging around my workbench for some time now, and decided to try it out. Its low tack and doesn't seem to pull paint off, and also it's quite pliable and willing to form around curves in the sculpture.
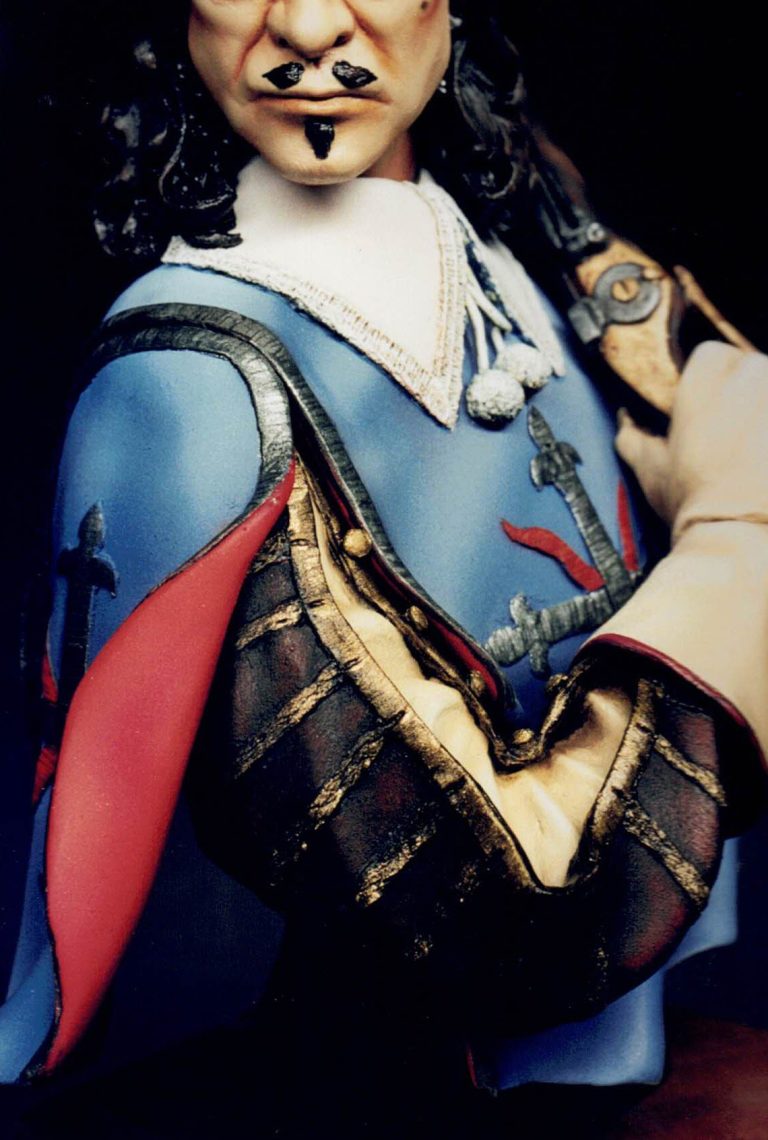
I applied the tape over the areas that I wanted to remain blue, and then began to paint the collar. I used the lightest highlight colour from the blue already used on the tabard, and applied a couple of coats of this so that a solid base was built up on the collar. Then I added more 34 white in four separate stages, airbrushing these mixes on to build up the highlights to pure white.
I found that the lace detail on the edge of the collar, whilst not being obscured or filled in by the paint, still didn't show up as much as I'd hoped, and so I added a couple of thin coats of Tamiya Smoke ( Yes I know it's gloss ) to the lace to deepen the relief. This worked very well indeed as the Smoke colour is fairly neutral and adds convincing shadows.
This area was again allowed to dry thoroughly, and then masked off so that I could paint in the lining of the tabard in red.
I began the lining with a mix of 19 Red and 33 Matt Black.
This was dusted on in several coats as with the other areas, to build up a solid base from which to begin. I then lightened the colour using some more of the 19 Red,
and then for final highlights I added some 18 Gloss orange ( It's the only orange I had O.K. ! ). I left the parts to dry for half an hour, then using blu-tac, I temporarily fastened the arm and the two sleeves to the main body, and using pure Matt Black, dusted in the deep shadows beneath the model, and continued this in a cloud patters down onto the stand that the model is moulded on.
Now the moment of truth, and yes I did do it straight away, patience is not something I posses in great quantities. The masking was carefully removed.
It had worked very well indeed, certainly around the collar to tabard split, there was no need for touching up, and as the red and the blue were split by an edging of silver braid there were no problems with the small amount of spray that had leaked around the mask in this area.

With the masking all removed, I sprayed over the whole model a couple of thin coats of Matt Varnish. This deadened the gloss effect from the orange, but spraying everything evened out any slight satin residue on the rest of the clothing painted so far.
I needed to matt everything down now, because next I was going to add the silver braiding on the edges of the tabard and sleeves, and as this is silver, I wanted to leave as a semi-gloss effect.
Back to brushes
Back to the conventional brushes for the braid and the motif on the tabard. I began with the silver sections, painting these in an acrylic mix of Games Workshop chainmail, Chaos Black and Woodland Green. This gave a dark metallic colour with just a hint of the green to taint it.
Over this I added some short lines of pure black, aiming to make it look like the embroidered threads, and then painted in between these a highlight of the original mix with some silver ink added. Final highlights from pure silver ink were the last part to be painted, and these were added only to the areas on the edges of the braid on the tops of the shoulders.
The red areas of the motif were done in a similar manner, using Humbrol acrylic red mixed with a little Chaos Black for the main undercoat, and again adding black lines over this to denote the embroidery. Highlights of the base colour lightened with more red were added and finally pure red for any bright highlights.
The airbrush again....but not for long
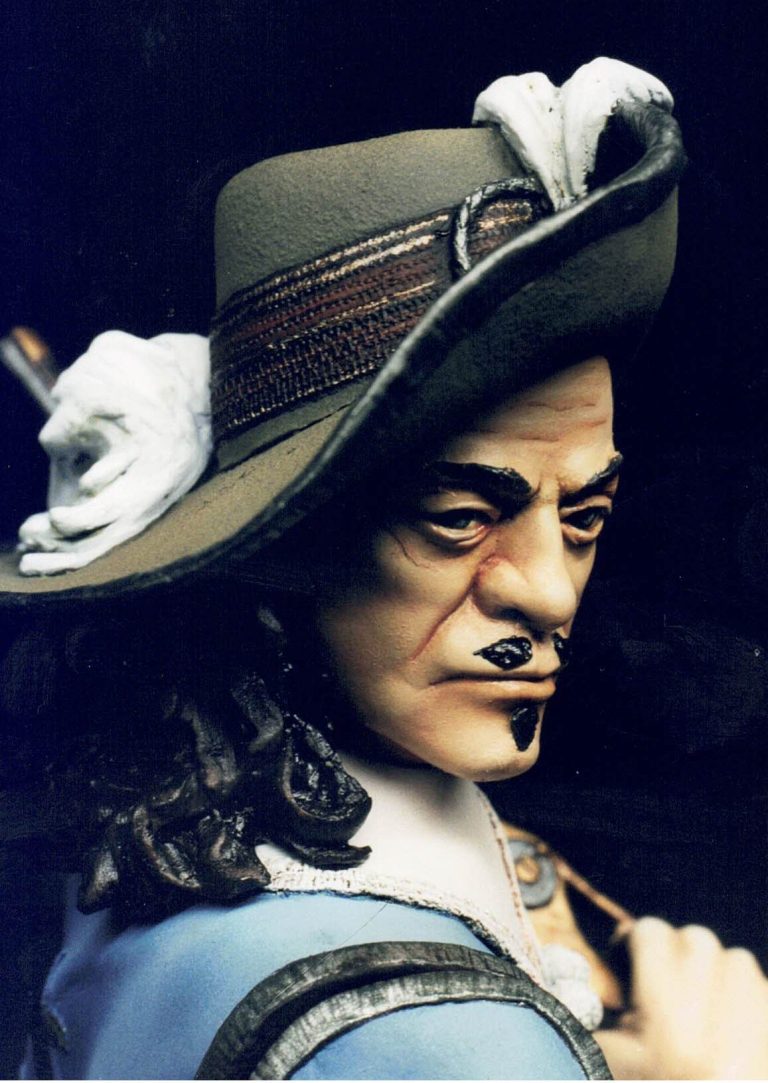
I got the airbrush back out for the hat. This being done with a mix of Humbrol 98 Brown and 33 Matt Black, lightening the mix for a mid tone with more 98 Brown, and then adding a small amount of 61 Flesh colour for the final Highlights.
I did end up adding a wash of Lamp Black oils after a couple of day's drying time, just in selected areas under the brim and around the feather, this was both to darken the shadows, and silly as it sounds, make the white of the feather look brighter.
While I was waiting for the airbrushed part of the hat to dry, I painted the braided edges in a similar manner to the ones on the tabard, and then undercoated the feather with a mix of Orc Brown and Skull white ( Yup, it's those G. W. acrylics again ). This undercoat was applied in three layers to build up a solid colour.
Once that was dry, I mixed up a similar colour in oils, using Titanium White, Yellow Ochre and a very small amount of Raw Umber. This was then painted over the whole feather very thinly. Over the top of this, and whilst the oils were still wet, I added a lighter shade of the same colour, mixing in more and more white so that highlights built up gradually. I allowed brush marks to show, so that the filaments of the feather were denoted by them.
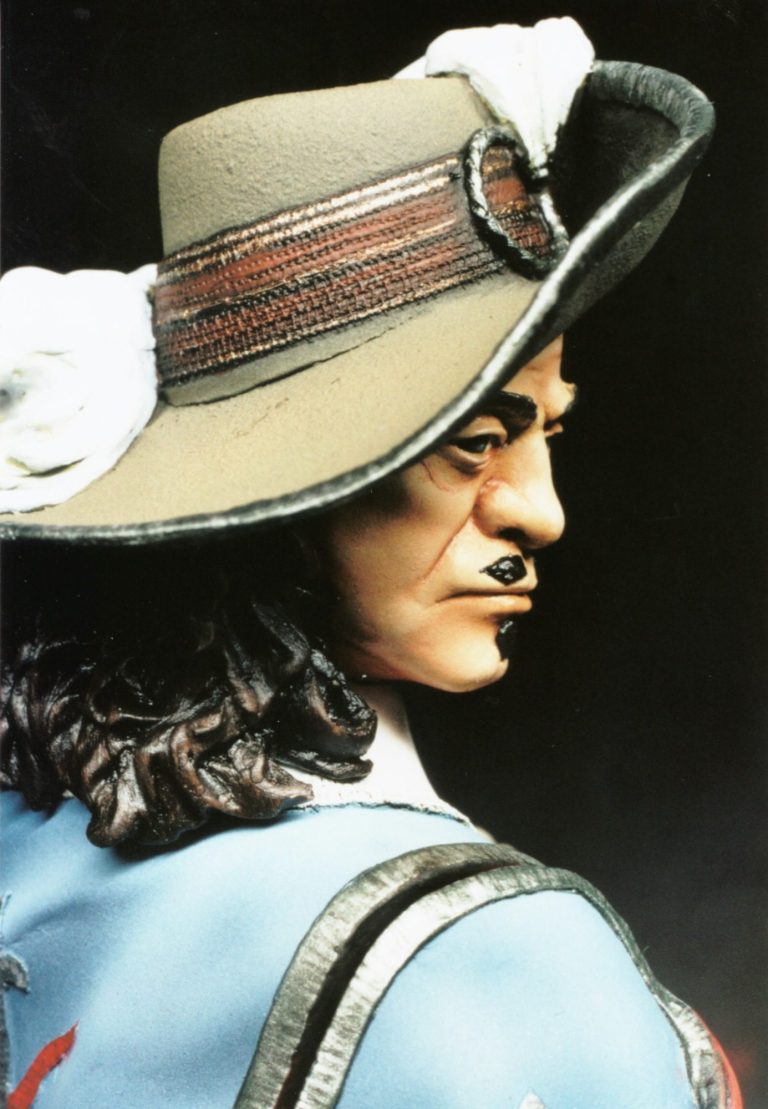

With careful painting the feather can be made to look very convincing indeed, even though it is basically a solid lump of resin. This speaks volumes for Quang's feel for sculpted form.
Back to the face which was now fully dry. I added the eyes, thinking blue would be a good choice for our haughty French fellow, and having him looking to one side as if ready to fire on some unseen enemy.
The eyebrows and moustache were painted in using a slightly darker mix of the hair colour, and a mole was painted on the left cheek, simply using Burnt Umber to get this.
The last part to be tackled was the right arm, hand and pistol ( I began for some stupid reason with the pistol. I should have started with the glove, as I could then have airbrushed it with a light colour without having to do some difficult masking ).
The pistol was undercoated with Swamp Brown acrylic, and over this I added the obligatory Burnt Umber, Burnt Sienna and Yellow Ochre. In addition to this, I also painted on some heavier graining using Black oils, working at getting a definite pattern on the wooden areas. The metal areas were painted with various silvers and golds to denote either iron or brass.
As I was now faced with either masking off the pistol or painting it with a brush, I decided to carry on with the latter of the two choices.
I undercoated the inner sleeve of the shirt and also the glove in an off white acrylic, and then painted over this with oils, aiming for a linen colour on the shirt and a pale cream leather colour for the glove. There's not too much difference between the two colours, but it's enough, together with the texture on the glove from using a little bit more paint, to difference the two materials from one another.


The outer part of the sleeve I painted as a very dark leather colour, using Black, Burnt Umber and Burnt Sienna oils over a dark brown undercoat.
The gold braiding was painted over the decoration sculpted by Quang, using a gold enamel mixed with some of the left over Burnt Umber. I finished off by adding a red/brown trim to the glove after all else had dried thoroughly.
Some assembly required
Now for the glue. This kit slots together very nicely, and there is little or no need for filler on any of the joints, The only place I used any was to add to a curl of hair on the right shoulder, this being done before painting commenced.
There is a problem though. If you do as I had done and glued the hand and pistol into the socket on the wrist, the resulting subassembly will not fit in place if the head is already glued in position. Therefore test fit the placement of the two, and fasten the hand/arm in position first, followed by the head, and finally by the two arms of the tabard.
After fastening the model to a wooden plynth from Armstrong bases, and with the addition of a nameplate made from plain paper and rub down lettering, the model was finished and the photos you see here were taken.
Famous last words
This is a very nice model, it's colourful, and well sculpted, not to mention well moulded. As far as converting it goes, it would be easy to remove the motifs from the tabard, and paint on then the one's of your choice.
I was tempted to remove the feather plume, and replace it with a real feather, but must admit to cowardice. Not only that, the one sculpted on already really does look good with careful painting.
It's quite a large piece too, measuring approximately seven inches tall ( 175mm ), and stands out in the display cabinet. I was tempted to do further research, as I seem to remember the "Three Musketeer's" film having the actors decked out in black. Although Quality Control within our household liked the blue and said that she'd "prefer it blue, thank you very much." How can one argue ?
I'd like to thank Lee Van Quang for providing this kit for review, although from the way these were selling at Euro, I do get the impression that I'm preaching to the initiated. Everyone I spoke to seemed to either have one clutched in their hands already, or had it on their shopping list.
Also, I'd like to mention Derek Holmes, for some background material he took the time to photo-copy and send me.
We need your consent to load the translations
We use a third-party service to translate the website content that may collect data about your activity. Please review the details in the privacy policy and accept the service to view the translations.