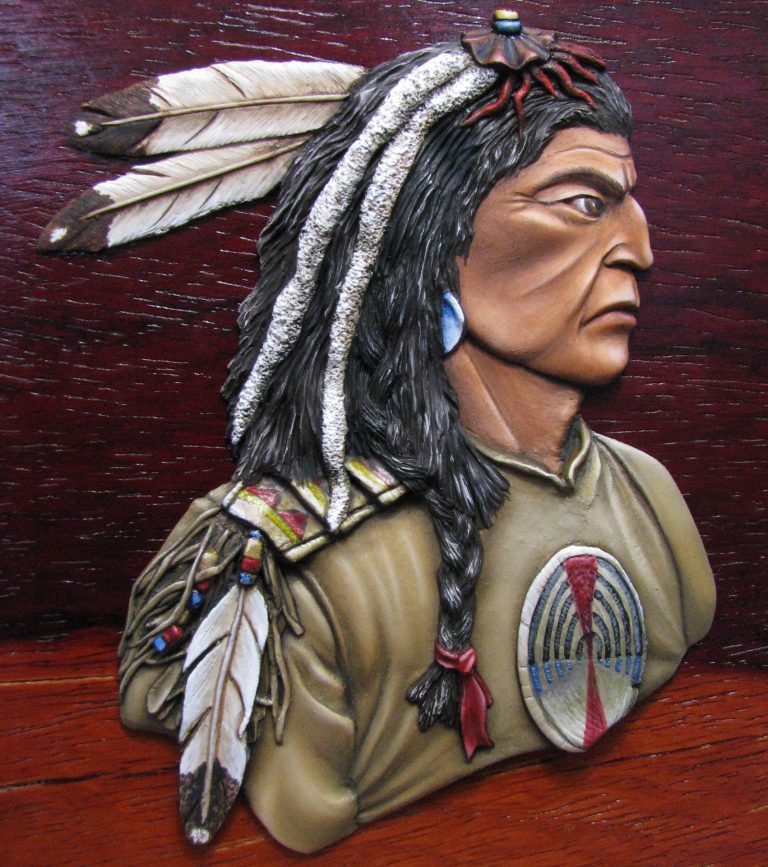
Native American Flat
1/7th Flat from Bash Models
Sculpted and painted in 2009

I suppose it’s rather strange to actually being doing an article on something I’ve sculpted myself – and for commercial reasons too – but I’ll state here and now that I’m not going to wax lyrical about quality of sculpt or casting. I’ll let you work that out from the pictures.
The reason I sculpted this was more of a “see if I can” scenario, than anything else. I had sculpted a couple of fantasy pieces, but wanted to do something grounded in the real world. For a starting point I still used something drawn by a fantasy artist – Luis Royo – a very skilled painter, and someone who’s artwork I’ve admired for a long, long time.
So why use fantasy art ?
Well, the particular drawing could be stripped back a bit so that the sculpture was more generic. I wanted to allow the painter of the final piece some latitude to add things if he or she wanted, plus the pose was just right. The three-quarter twist to the shoulders, but the face pretty much in profile……And no ear to sculpt, as it was covered by hair.
Sculpting was going so well ( on the occasions I had chance to do it ) that I only managed to take one shot of the process – photo #1. This shows the face having been done.
One thing to note about the sculpting, compared to the picture used for the design ( shown here ), is that I tend to only use the starting picture as a guide. To be honest, the pose is similar to the picture, but there the similarities start to split, and I doubt that anyone would see much in common with the original Luis Royo drawing. I’m conscious that whilst I’m inspired by Royo’s work, I don’t want to copy his original ideas – that wouldn’t be right.
I use Magic Sculpt almost exclusively, applying this to a sheet of white Plasticard that has had a very rough outline of the design traced onto it.
The other thing I do is sculpt in sections. Though this isn’t a true flat, more of a demi-ronde ( it’s about 5mm thick and some of the indentations are quite deep ), I try to sculpt from back to front – as the viewer looks at the piece. Think of a landscape picture, and imagine that I start working on things farthest away – the sky, then the horizon, then working on things that are mid-distance, and finally on things closer towards the foreground.
Working like this means that I have to mentally split up the piece into sections, but allows me to layer detail over other parts of the model as I build up the whole thing. It does tend to look rather strange though, when it’s mid-flow, and this has drawn some interest, as I’ve done a fair amount of the sculpting whilst sitting on The Basement’s display stand at shows.

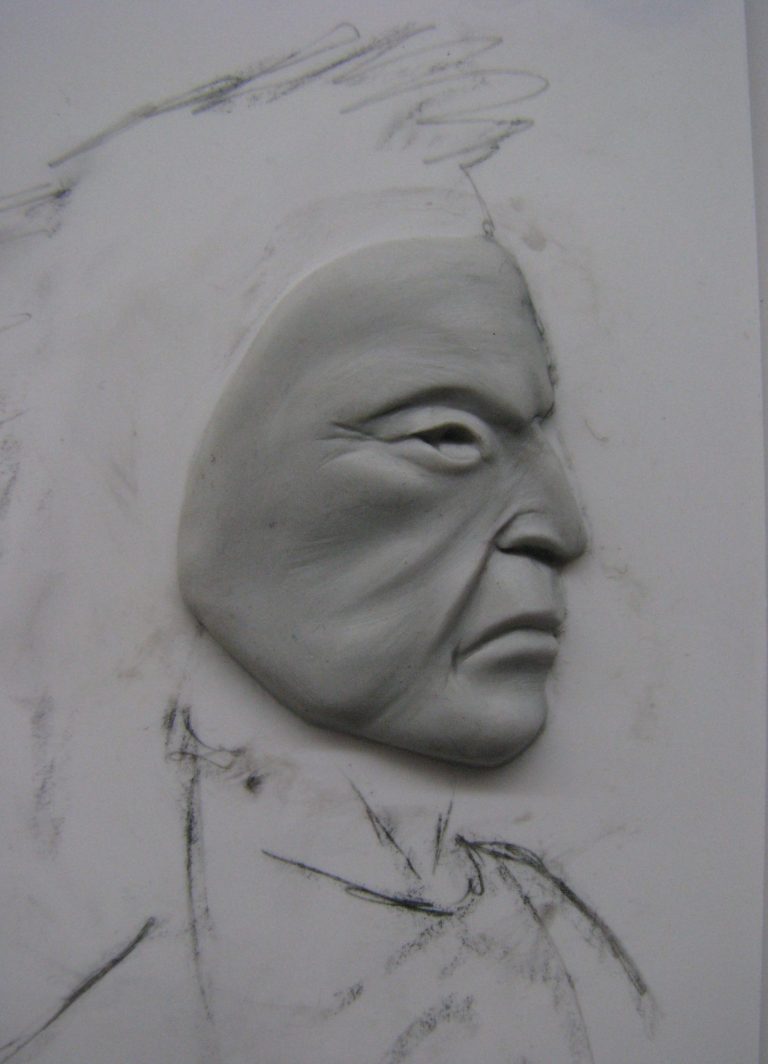
Anyway, back to that first photo, to tell you more of what’s going on.
The shape of the face has been quite well defined here, the major features are settled and almost in their finished state. The putty is still soft, and so I will add a crease into the brow line and some refinement of the wrinkles around the corner of the eyes. The nose is wrong though, as too is the area below it leading to the top lip. Both these areas would have extra putty added once the face in this state had cured - hey, I’m still at the skill level where if I’ve got most of it right, I’ll leave it to dry, then carve back and alter stuff. Rather this than beggaring up what’s looking good !
The eyeball would also be added once the putty is cured, simply an appropriately sized piece of putty, rolled into a smooth ball and pressed into place.
An advantage to sculpting on the plasticard is that if everything goes horribly wrong, then bending the card gently will “flip” the sculpted section off – if it’s cured. This is handy, in that the traced design tends to remain in place, and I can start again. What’s not good is that sometimes sections of the sculpture detach for no reason, and it’s a case of searching for them on the bench or floor – hopefully before my ham-fisted self places any appendage on them and breaks them. If they’re whole, then they can be glued back into place permanently.
So, having sculpted it – hey that was quick, and shows the magic of article writing – I made an RTV ( Room Temperature Vulcanising ) rubber mould of the flat. Once cured, the mould could then be used to make multiple copies of the piece, and photo #2 shows one such casting.
I use a pale cream resin ( it’s a foggy brown, clearish liquid which goes opaque and cream coloured when it cures ), which should be relatively easy to work on, although the only clean-up should cover taking any flash off the edges of the flat.
This picture is superb at hiding a lot of the sculpted detail, although shots further on will bring those to the fore. The block of wood it’s mounted on ( with a couple of spots of Blu-tac ) is just something to hold whilst I paint. I was fearful of breaking off the feathers, but couldn’t find any other scrap of wood that was comfortable to hold.
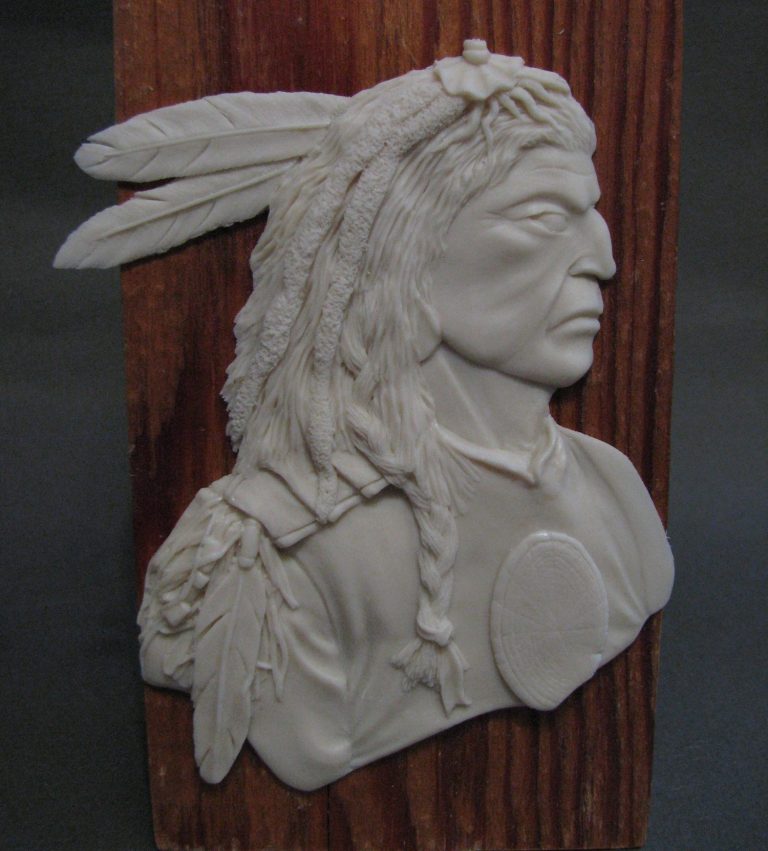

Photo #3 shows the painting process beginning. I’ve undercoated the face, but because I love doing buckskin, I’ve gotten on and worked more on the shirt. The initial mix for this was Mars Yellow and Raw Umber, then some Titanium White added to lighten it up. I’ve begun putting shadows in ( less of the white in the mix ) around the folds in the armpit, and begun marking out the definition lines of the separate pieces of material. These shadow areas will be strengthened and the highlights added ( the latter with Titanium White ) while the paint is still wet, and then finally the deepest shadows placed when the colours have dried.
Moving onto the face – in photo #4 – again, this shows the area almost complete, having worked up from quite a ruddy base mix, then shadows added from Mars Brown and some small amounts of Burnt Umber; highlights being further additions of Titanium White to the base mix.
The difference between flats and round figures when it comes to painting, is that you’ve got a captive audience that you, the painter can control. The viewer gets to look at one angle of what you’re painting, and this allows you to force shadows and highlights to a degree that far surpasses anything you could do ( and remain believable ) on a round figure. It also gives the painter a chance to play with special effects like shadowing, reflections and non-metallic metal ( although this latter is being done on fantasy pieces now with some superb results ).


In photo #5 you can see how far the shadows and highlights were taken on the shirt, and the finished face and neck.
At this point, I was tempted to put a sub-title in; something akin to “Anyone for darts” because photo #6 shows how the beadwork circle developed ( in a “not good” way ) into what I can only describe as a dart board / target look-alike.
I started this off well enough, and having sculpted in some very slight beadwork detail ( so that it could be either filed away or coated with a very thin layer of filler, should the painter wish ), I imagined that this would be one of the easiest areas to paint.
A walk in the park it was not, and although what you see here is the second or third attempt, it’s horrendous. Hate it, hate it, hate it !
So much so that I even thought of scraping the disc off and doing a remould, offering the disc as a separate ( additional ) part.
Having done lots more searching through reference books – you know how you flick though them from the back pages to the front, searching for that picture that might lead you to some good idea, I was pretty stumped.
I’ve got a stand for books on my table – something home made from off-cuts, but which allows me to store a couple of books, opened at an applicable page, so I don’t have to keep picking a book up and leafing through it.
Needless to say, I’ve got quite a few Native American / Wild West books, and a stack of these were on the table. Funny how you rarely look at the front cover though isn’t it. Plenty of searching spine titles when they’re on the shelf, plenty of looking at indexes, even plenty of study of what’s inside.
So do I need to mention what an idiot I felt when the solution to the design was actually found on the front cover of one of my reference books ?…….
Probably not.

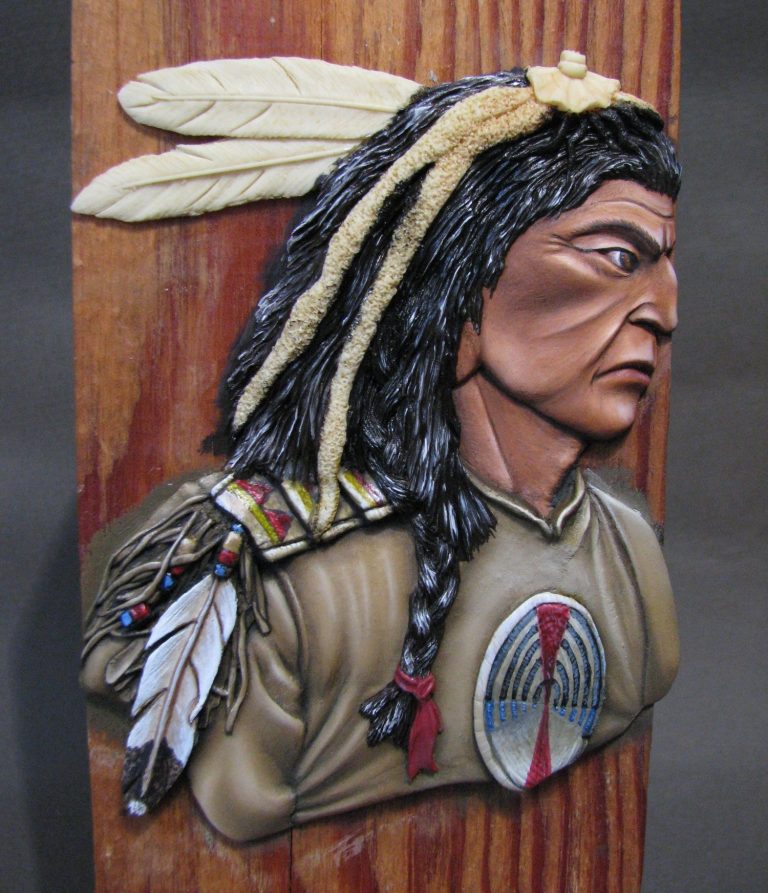
So, photo #7 shows that made good, and also the hair painted in. I had to paint the details on the shoulder prior to that of course – some beadwork and a feather, plus some rawhide strips. These were begun in photo #6, but finished off prior to the hair being done in photo #7.
The hair is very dark brown ( although it appears black in the shots, and quite shiny because the paint is still wet ). I tried a few mid tones, but these then made the hair look brown, so having removed them – just added more of the initial dark paint and then removed any excess – I added some highlights with a pale cream colour, building up to white in some places.
I was attempting the look that goes with hair that is quite shiny and is catching the light, but very dark brown or black hair is always a problem to render, because gradual highlights tend to make it look just brown, and lighter colours – such as used here – sometimes go too far and make it look like a hair product advert.
Not sure of whether I’ve stopped before the comment “Because you’re worth it” becomes applicable.
There’s not much seems to be happening in photo #8, although it’s the details that are getting added now. The shell disc below the ear has been painted, using acrylics, and working from a blue-ish colouration through to pure white at the lower edge for the highlight.
Also painted in there are the two white “tails” depending from the head decoration. Getting a gradual fade of shadow on these was ( I thought ) going to be a headache, mainly because of the very small cross section, plus the undulating form that they take as the flow down the side of the head. It was easier than I presumed, and basic shading / highlighting was worked on to get the round cross-sectional appearance, then once dry, work was done to mane them seem to undulate a little, and thus make them appear to be made from a soft and pliant material.
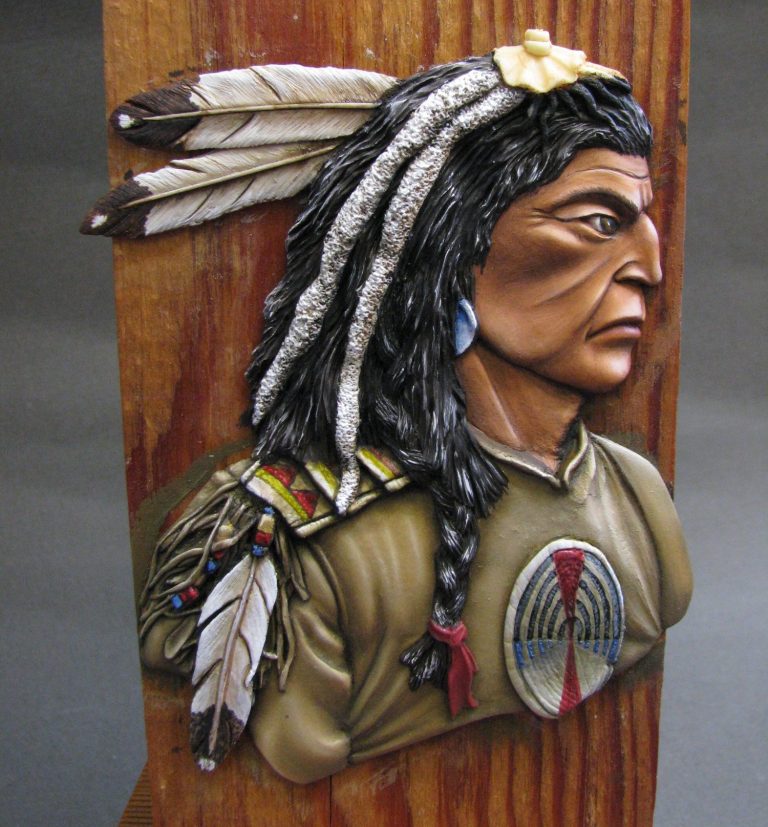
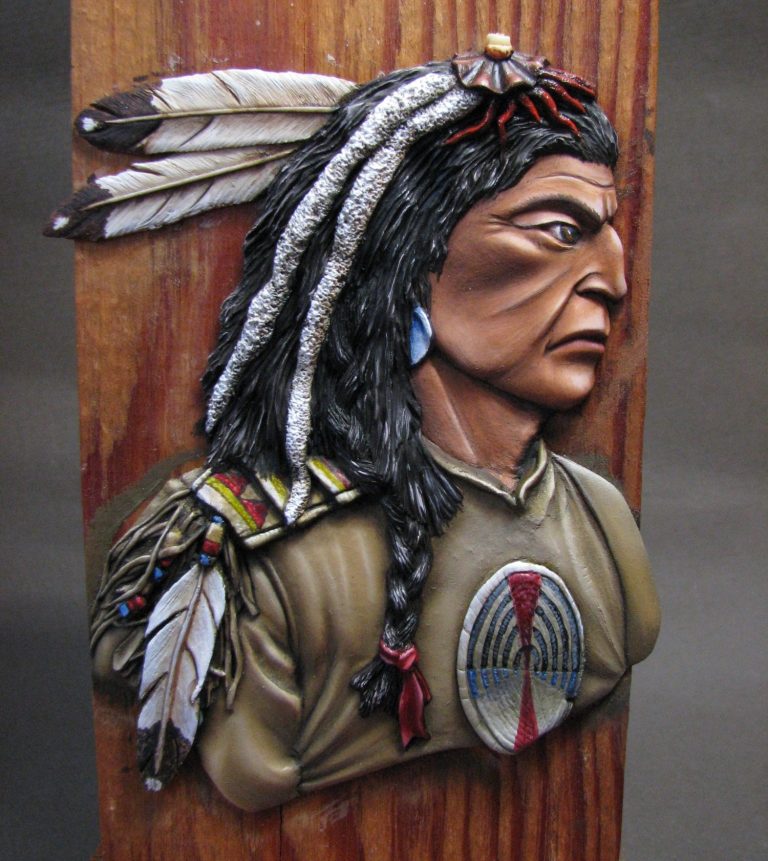
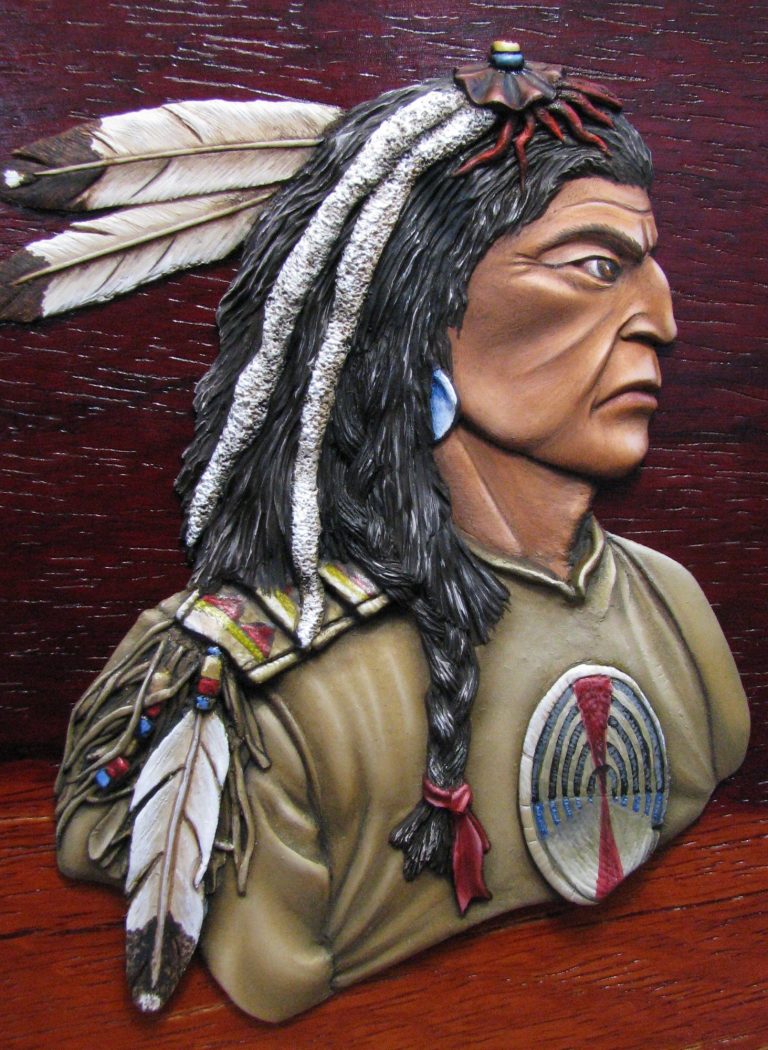
Photo #9 shows the finishing touches regarding painting of this piece. The top of the head has a small piece of material decoration, with a couple of beads at its apex. These were painted in, along with the ribbon that fastens the plait of hair, and that was the flat finished and ready for placing on a decorative plinth.
Making a base.
As a jobbing photographer at shows, it frustrates me no end to se some absolutely stunning flats in frames but behind glass.
I know that this is how they are supposed to be displayed, and it protects the artist’s work from dust and possible damage too. But it makes taking a picture of them very, very difficult.
Flats are something I admire. Moderately well painted they look good. But there’s some artists that can make them look nothing short of stunning. Because of the difficulties photographing through glass, I very rarely get to share these pieces of art with anyone – you’re either there to see them at the show, or you miss out. It’s why I feel that flats sometimes are marginalized, and I truly feel that this is a shame.
So, as with the little Roy Hunt Female Samurai I painted last year, I wanted an alternative way of displaying this piece. The Pitch Pine that I used for her was too slim for this one, which was a shame, so I had to go back and think of a different plan.
About four years ago, we had a cherry tree taken down in our garden. It was overhanging a road at the rear of our property, and a good gale might see it, or part of it, land on someone. It was a big tree, and I didn’t fancy anyone’s chances in winning a fight with it under those circumstances.

So it got cut down – quite drastically – and in the process I saved quite a few sections of the main trunk. These were stored away at the back of the shed, and very quickly forgotten.
I just happened to be tidying the shed out recently and came across them again, several with splits in, having dried out, and one which must have been close to the part of the tree where the branches split to form the leaf canopy, looked quite promising.
Out came the circular saw ( not big enough though, so I had to make two passes, one on each side ), and an orbital sander plus lots of glass paper.
The slab that I cut off to form a base for the flat was made sectioned so that it would sit at a slightly backward angle, when place don an horizontal surface – forward planning y’see – so that it would be easier to view from the front, and less harsh on the viewer than if it was plumb vertical ( like a photo frame is slightly angled backwards ).
So, lots of sanding, then more sanding, and possibly, to finish off, a bit more sanding. Look I’d lost feeling in my fingers, and there were still a few marks from the chainsaw that’d taken the tree down.
A suggestion from “number one son” ( Thomas – one and only son actually ), was that by leaving some of these deeper marks in the wood, might it not look more “rustic and craft-like” ? What he actually said was “I don’t think Injuns had sanders Dad” ( well, he’s a teenager ).
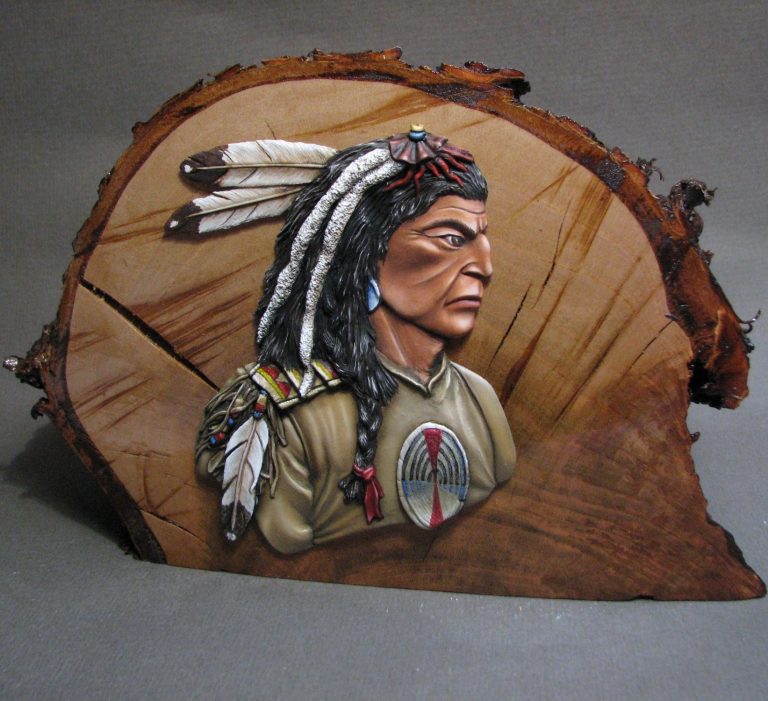
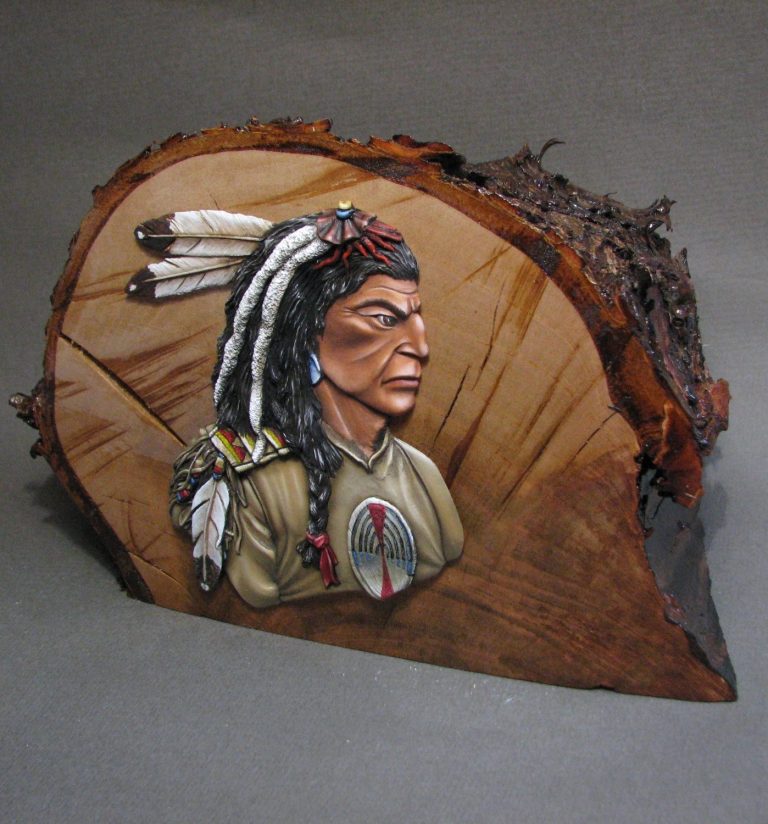
It was a good thought though, and I went with it, putting some coats of satin varnish onto the wood, and once dry, adding the flat to the front face as shown in the last three shots.
I took a couple of these from an angle, to show how thin the flat is. Sometimes, when you only see the front view, it’s difficult to picture how far the painter has forced the shadows / highlights, and just how thin a piece of material he’s been working on. Well, hopefully you get an idea from these shots anyway.
Summing up.
Well, I’d be a bit biased if I said “superb flat, brilliantly sculpted, masterfully cast; boy this guy’s good !”
So I won’t. If you like the piece, then it’s available via eBay from seller ash0040
I’d like at this point to thank Charles Davis for the encouragement and kind words he’s given me. He was the one who can be indicated for putting a genial, but firm, boot in my posterior to get this finished – which was needed, because I’d stalled a bit and gone on to a couple of other projects – so thanks Charles, it’s very much appreciated.
As for the actual casting and sculpting; I’m still learning, although people seem to think I’m passable at this so far. I’m balancing this between painting projects, commissions and a full time job, so whilst there will be more flats added to the range, and I’ll try to make them interesting subjects too, please be patient with me; I’ll get there, it just might take a while.
What’s next ?
Hey, I’m the sculptor, and I ain’t got a clue !
We need your consent to load the translations
We use a third-party service to translate the website content that may collect data about your activity. Please review the details in the privacy policy and accept the service to view the translations.