Gladiator
A Salute To The Vanquished
1/6th scale resin bust from Verlinden
Painted in 2000 and an article in Military Modelling Magazine in 2001
With the interest generated from the film release of Gladiator, several model companies decided to release models connected with this aspect of Roman life.
Verlinden is one of these, giving the task to Derek Holmes to come up with something a little different. This isn’t as big as the Roman Primus Pilus, but it’s a little bigger than the normal 1/10th to 1/8th scale offering from most companies.
The model is supplied with one arm clutching a sword and seeming to be saluting the crowd. It’s nicely moulded in Verlinden’s customary greenish resin, with the expected lack of air bubbles. Mine had just two small ones and both of them were on the underside of the main casting - hardly a cause for concern as they wouldn’t be seen.
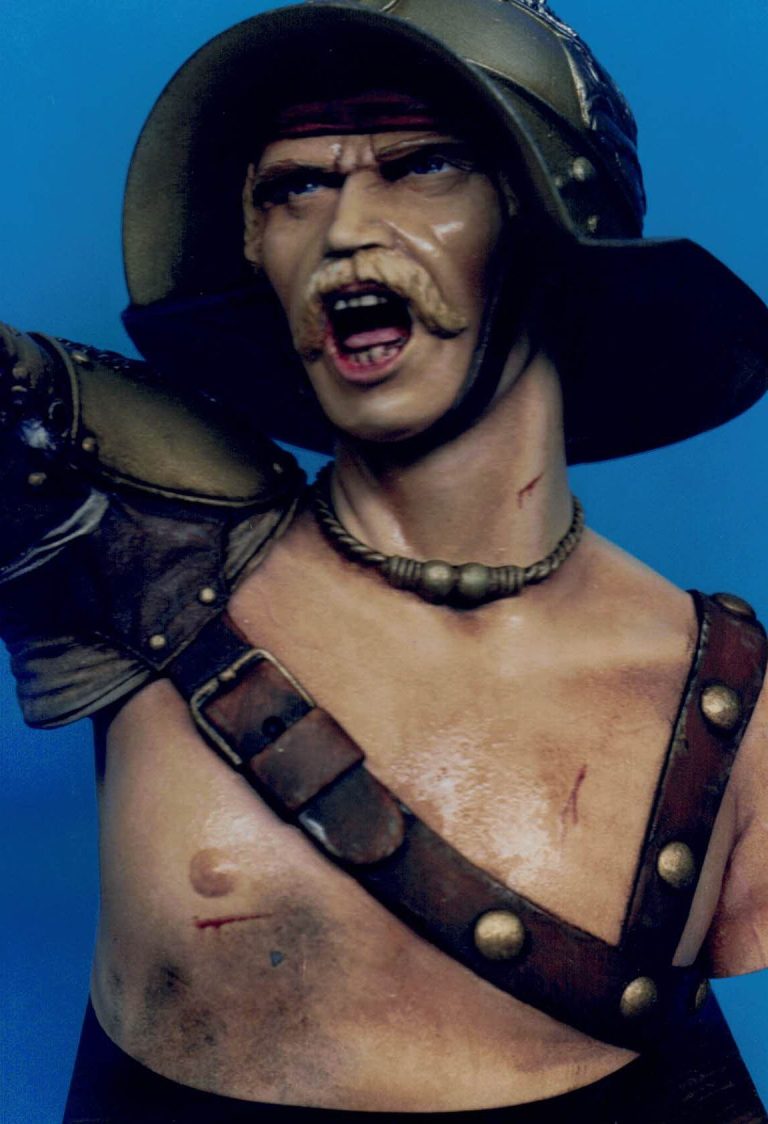
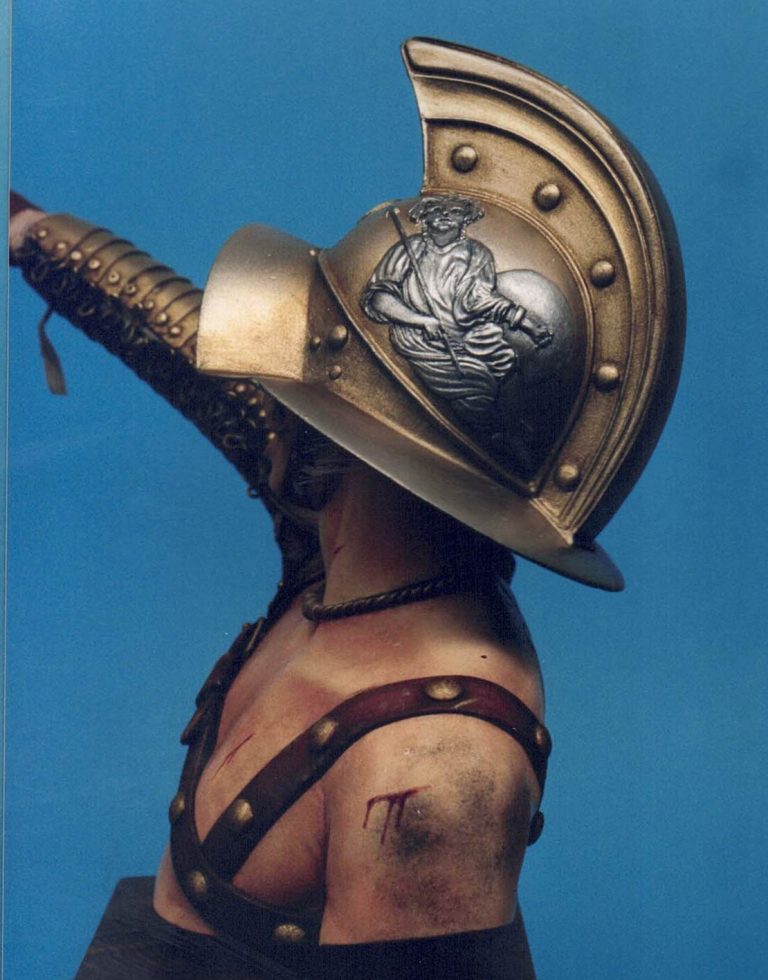
The casting is noteworthy too in that the head and helmet is moulded in one piece. Yes that thin brim on the helmet is already in place and not only in the right position because you don’t have to fiddle about making it fit, but there were no flaws in it either, which considering how thin it is, is quite some achievement from even Verlinden’s mould makers and casters.
The other parts are made up by the main body/shoulder casting, the arm, a separate hand clutching the sword, and finally the front plate of the helmet. This last is moulded solid ( for strength and ease of moulding I should suppose ) and needs the holes opening up in it’s upper half. This front plate gave me a problem though. As a dedicated face painter, I’d consider the face too well sculpted to go and cover it up. I’d have to figure ( pun not intended ) a way round this.
Clean-up was relatively painless. The casting blocks being removed with a razor saw and then finished of with a small file and then a fine grit sanding pad.
If you happen to make this kit, be careful here, I managed to snap a small piece out of the helmet brim, and although it glued back alright, it was a beggar to sand down into uniformity with the rest of the brim. This paled into insignificance with what happened later however.
The inspiration
Now for a bit of history. I’d been sent this model and luckily, with all the interest in Gladiators engendered by the film, not to mention the BBC’s airing of historical programme matter recently, I was all awash with details.
One programme that stood out was presented by one of the Monty Python team Terry Jones - who it seems, has rather an interest in Roman history.
He spent a whole hour divulging various interesting historical findings, not to mention bits and bobs from such well respected historians as Peter Connolly, and all of it dealing with Gladiators, their way of life, the Roman way of life that surrounded their development, and not to mention some of the statistics drawn from preserved writings and also from various mosaics dedicated to “the Games” that have survived through the millennia separating them from us.
The programme was not only accurate, but interestingly presented. I enjoyed it immensely. What I did notice though was a different armour used by the Gladiators, a modern replica being shown to the viewer. It was similar to the one sculpted on this model by Derek, but with one difference. The plates of the armour ran in the opposite direction. Derek had his overlapping each other running from the shoulder down - like slates on a roof, the piece shown had them overlapping from the wrist up.
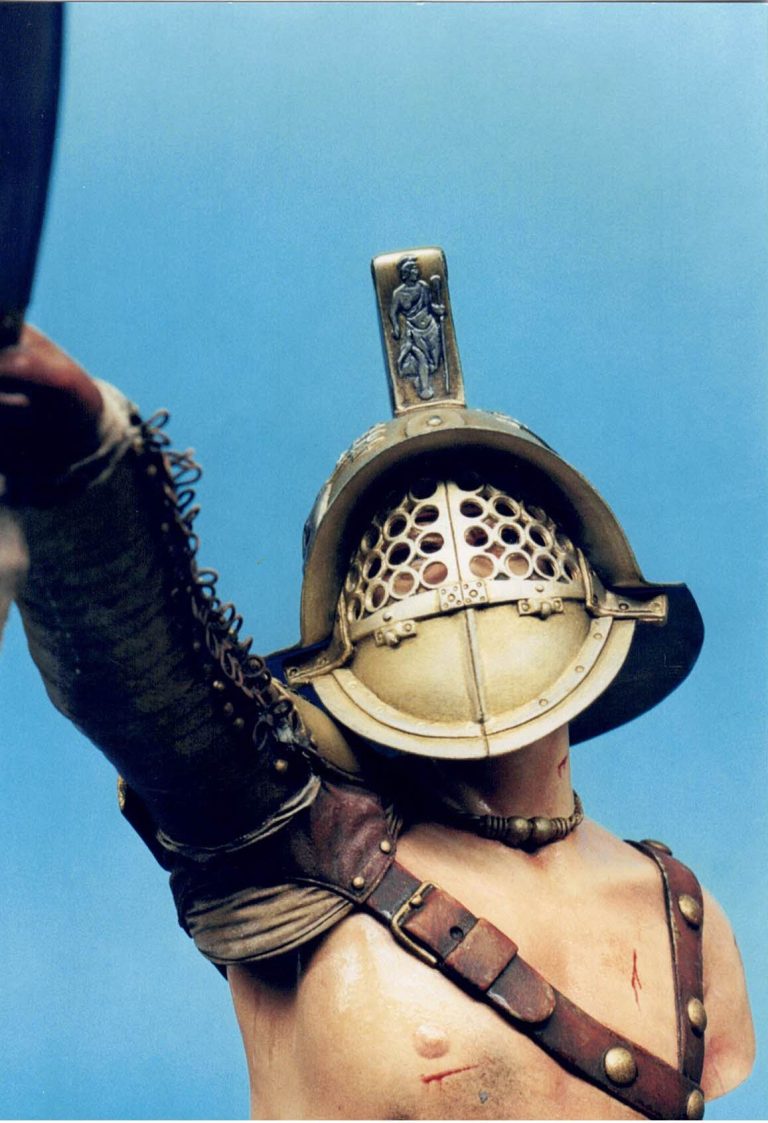

The reason for the ones shown being so different is because as the arm is effectively stiffened and unable to bend at the elbow because of the way armour is formed, a sword thrust would skate up and deflect off the arm if he plates overlapped in the way shown on the model. however if the plates are arranged as Derek modelled them a sword would just enter under one of the plates and pierce the arm quite easily. This seems acceptable enough.
But most modern armour from the medieval period, which was developed over hundreds of years ( remember, mail was being used as protection by the Romans. We were still using it in the First World War ).
So who’s right then ?
Beggared if I know. I should suppose that the Beeb have done their homework, but when I asked Derek, he had taken his references from several sources, not least a couple of articles from Military Modelling a few years ago. So I’ll happily sit on the fence until someone tells me otherwise. My references haven’t been helpful, as any pictures I have don’t give to clear a view, although they do appear to come down on Derek’s side of the discussion.
But why make the change. Well Terry Jones’s demonstration looked convincing. But of course pure idiocy on my part, for wanting to alter a perfectly good casting, can’t be ruled out.

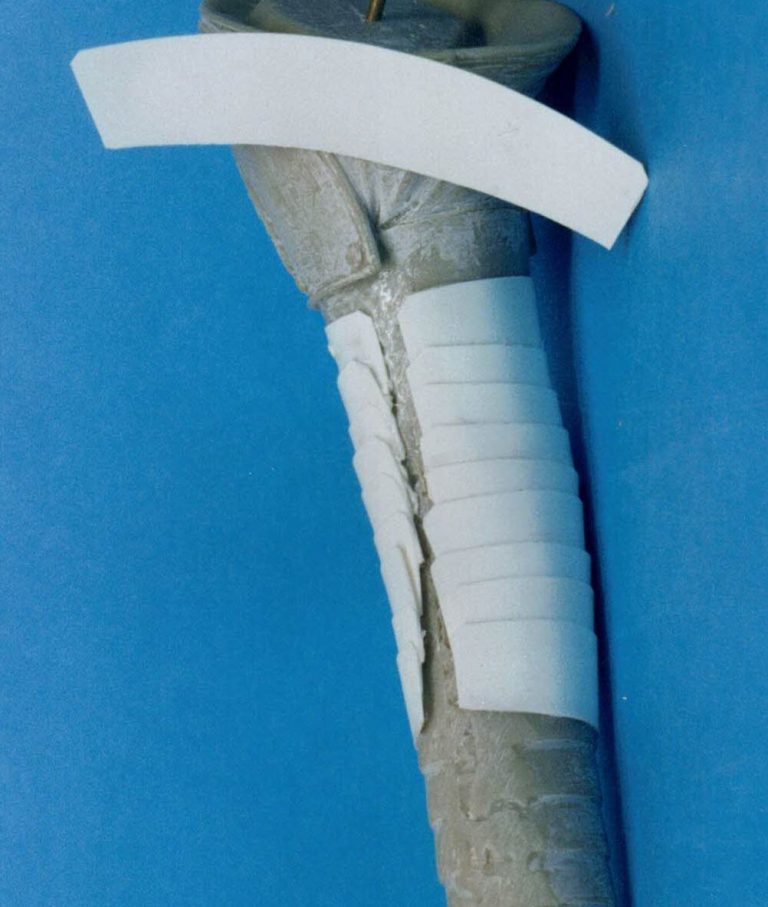
Making the change.
To begin with I used a large file to take off most of the detail on the arm, leaving the band of armour nearest to the shoulder plate untouched ( see photo #1 ).
Then I began to make new plate armour out of some thin plasticard that I’ve had lying around for ages - hence the lack of thickness being known. It was thin enough to bend around the arm easily, and once I’d figured out roughly what shape to cut it ( photo #2 ), I could begin using liquid glue to fasten them to the arm.
Yes, the liquid glue actually works, more because it melts the plasticard on top the resin, than because it actually reacts in any way with the cast material, but it does the job, and that’s all that matters. It does of course give one problem though. Because the plastic goes soft, it’s very easy to lose the shape of the plastic plates. This does tend to look like battle damage though, so all’s not lost.
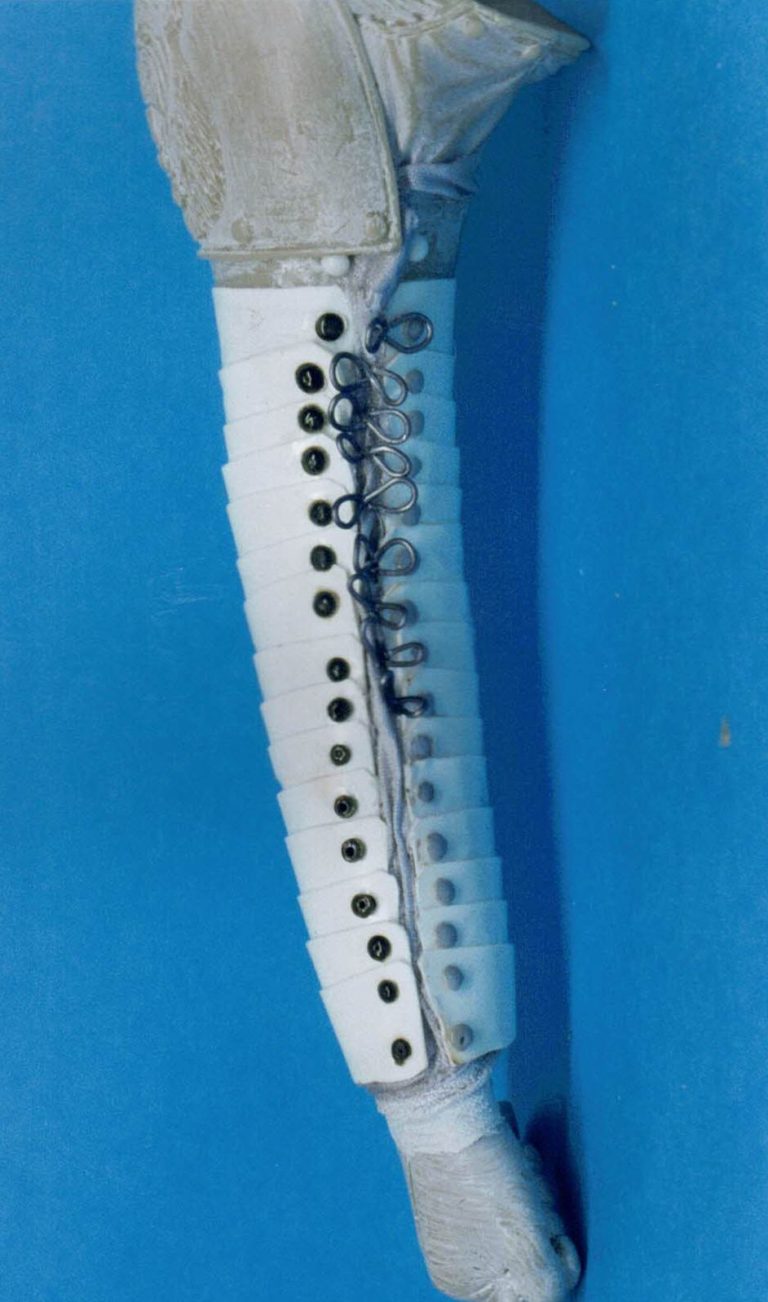
Photo #3 shows the armour fully replaced and I’ve added rivets from stretched sprue. This is fastened into holes drilled into the arm, and cut off leaving about 3mm of the sprue sticking out past the armour plate.
Heat from a cigarette lighter or similar is applied momentarily to the plastic and it melts back to form a domed head. Voila, a rivet.
Also added in this shot is some draughting linen in between the plates of armour.
This is so that it looks like a cloth is worn under the armour. Also I’ve begun to add little loops of lead wire for the lacings.
I’ve got several different grades of this ( thanks to Pete Morton ), and it’s supposedly available from fishing tackle shops.
In the finished shots, you can see I’ve completed the lacings and also added a length of the linen around the wrist and left it drooping down.
I realise that most fighting men would have tucked this away so that it wasn’t dangling like this, but in a fight things can easily become loosened, and that’s what I was trying to hint at.
I left this all to dry in between sessions, adding about five of the
plates at a time, and then doing the lacings etc all in one go. It really does allow one to appreciate more fully the skill that sculptors exhibit, and
whilst I think I’ve done a competent job of this, I don’t reckon to be able to match the professionals. Having said that, it was fun.
Now for some paint.
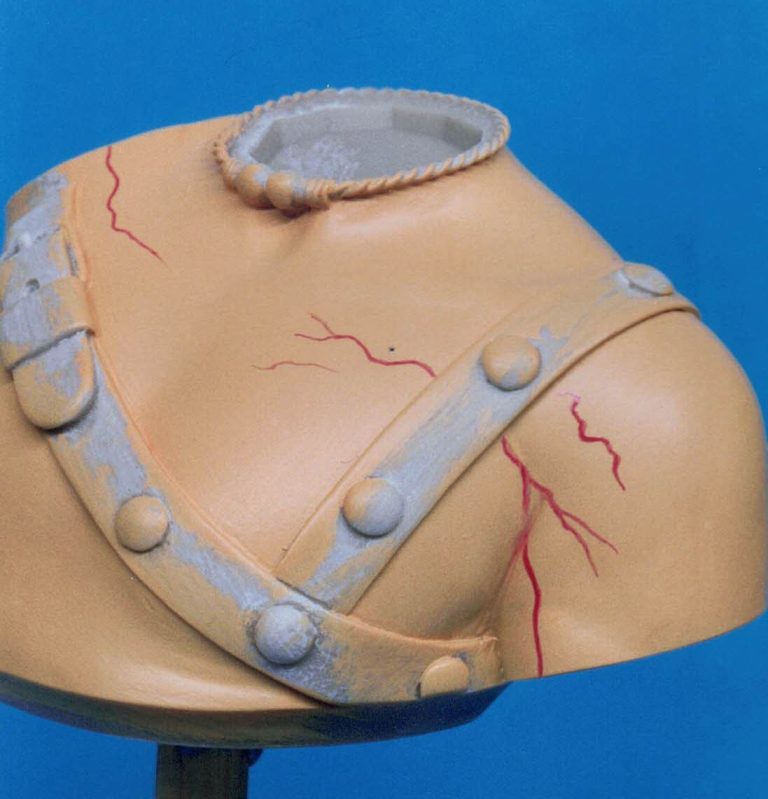
I’ve been thinking about veins and skin markings for some while now, and I’d seen a friend of mine paint veins on an undercoated model, covering it then with the finishing coats of paint, and having the veins look very realistic indeed.
I thought I’d take the plunge and try the same method, and in photo 5 you can see the veins painted on with a purple / red mix of acrylic over the top of my flesh undercoat ( Humbrol flesh, Games Workshop “Orc Brown” and “Skull White” in a 2:1:1 ratio respectively ).
I then used oil paints to cover this up in my usual way, and the results can be seen in the finished photos. I did highlight each of the veins with white to make them look expanded with the exertion of a fight.
Now on to the metal work.


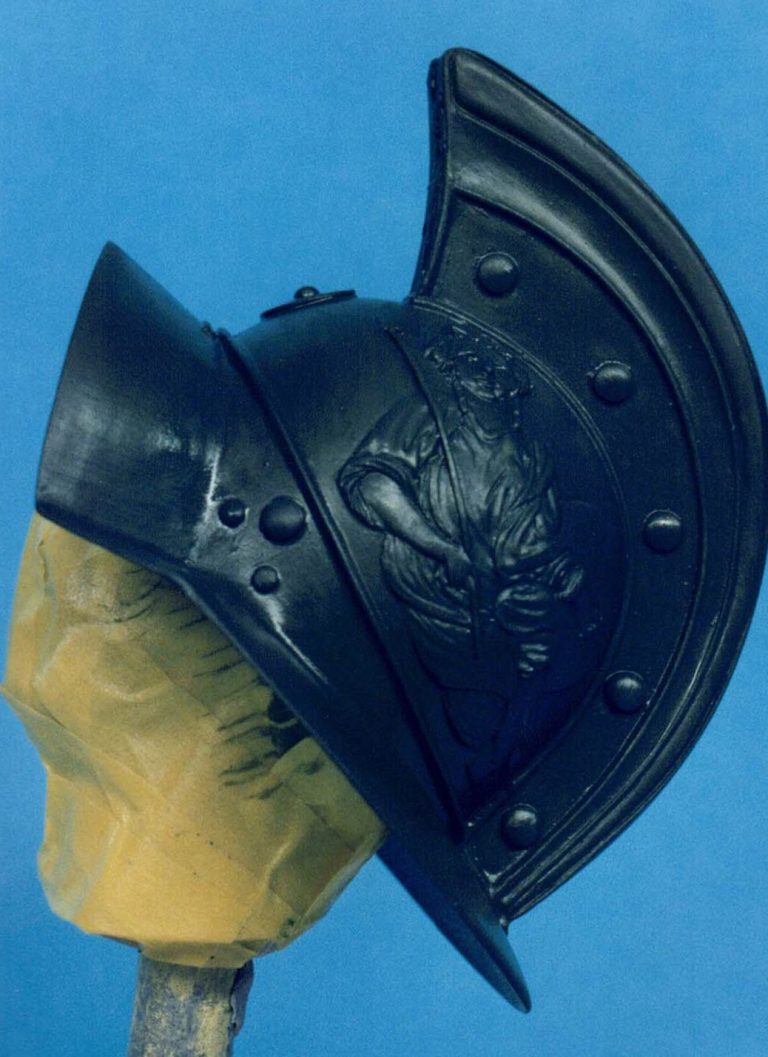
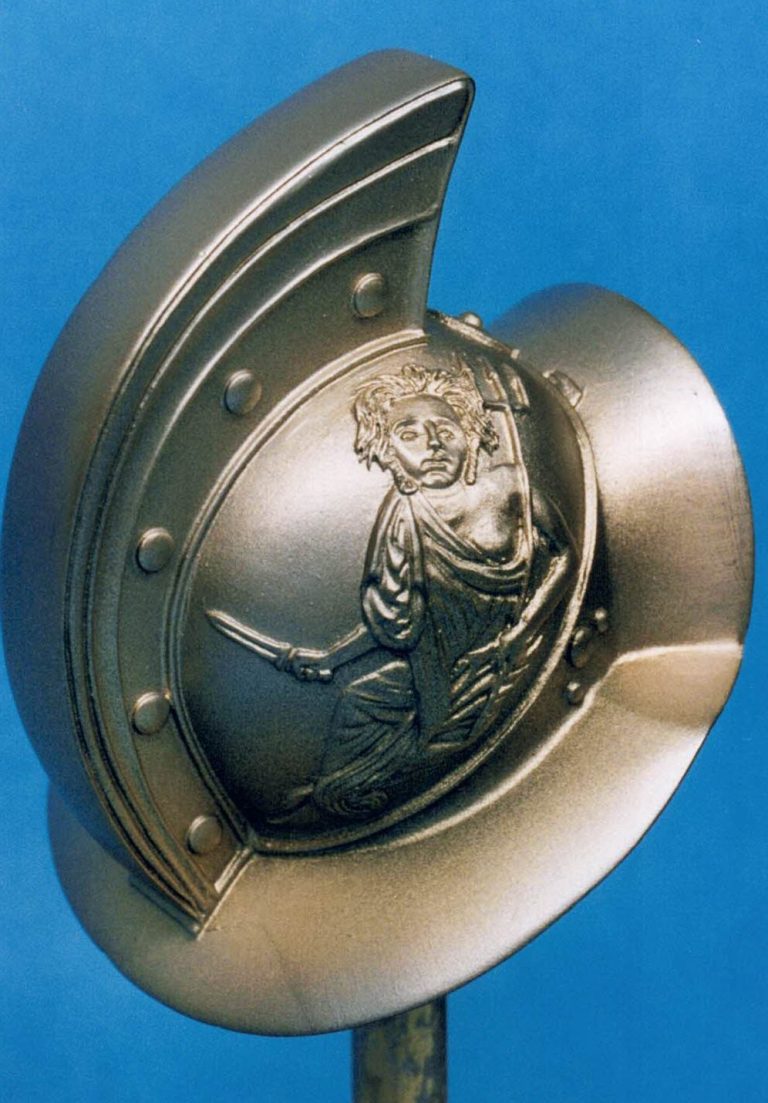
The helmet and arm were undercoated in a mix of Forest Green and Chaos Black ( both GW acrylics, see photo #6 ) and then airbrushed with Testors Gold.
Highlights were added with Testors Aluminium (photo #7 ).
The figure decorations on the helmet were detailed with GW chainmail mixed with black, adding more chainmail for the mid-tones and finally some touches of silver ink for highlights.
For the sword I would have liked to use foil to cover the blade and thus have a nice shiny silver, but as the resin is relatively thin, it would bend too much and cause creasing.
I therefore used Humbrol Metalcote paints to render the blade, although I’ve since found out that the Testors range of airbrush paints are buffable too, and as I have brighter silver colours of these, I’ll be using them in preference in the future - if I remember that is.
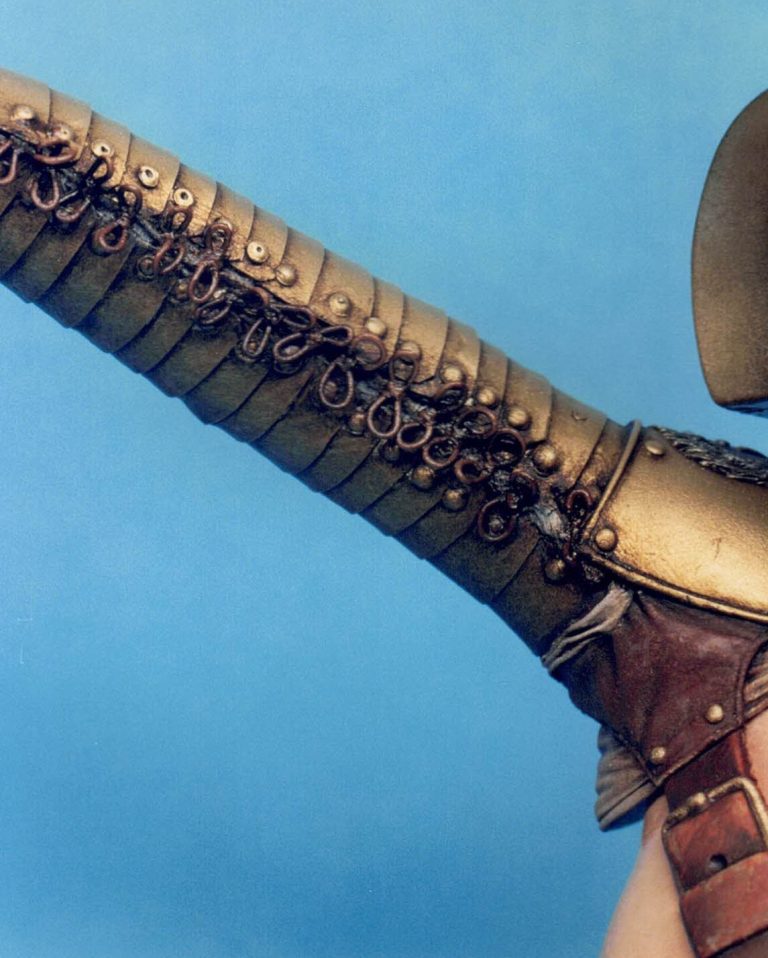
With the metallics all dealt with I moved on to the cloth in between the new armour plating, making this a pale linen colour and then adding some Burnt Umber to make it look dirty.
Finally the leather areas on the straps were painted, using Burnt Umber oils as a starting point over a brown acrylic undercoat. This was lightened with Burnt Sienna oils and highlights of Light Red and Yellow Ochre scuffing.
Calamity Adrian
Now for some glue. I’d pinned the parts so that they would slot together nicely, this being aided by the positive locators already on the mouldings. There was only one slight fit problem that surfaced here - although I’d not noticed it before painting when test fitting. The neck seemed to not sit properly into the torc hiding the joint at the base of the neck. This was sorted out with a little careful filing, and then the glue could be added.With Euro looming near - like three days away - and knowing I wanted to take this piece, I thought strength would be best and elected to use some epoxy glue.
I haven’t used this stuff for years, but a friend gave me some that they use at his work, claiming it was “good tackle”. I dutifully mixed it up, applying it as per instructions and held the parts together. For five minutes.
Then I gently put the model down and released it.
The head began to move, but being quick, I grabbed the pieces before they could part company and held it for another five minutes.
I then went through the motions again of gently putting the model down on the workbench and releasing it. Great, the pieces stayed where they were supposed to.
Just until I’d picked the arm up and started applying some more epoxy that I’d mixed up fresh in order to glue the arm with.
The head began a slow twist, then a lazy tilt forward, this in turn pulled the chest of the model over too, and the head and chest of the model hit the bench together. The force of this detached the head from the body, sending it off the edge of the bench to land with one of those ominous cracking sounds on the floor.


I’d seen several bits of resin fly off when the head hit ground zero.
It was tempting to scream, possibly stamp a bit, or even to launch the model towards an inoffensive section of wall. After reviewing the options I went and watched telly for the rest of the evening.
Patching up
Once calmed, I began the search for the bits. there were three bits of brim to attach to the main helmet, and these can be seen glued back, and the paint rubbed down ready for repainting in photo #8. I repainted this area,
fortunately the airbrush allowing a blending in to the original colours with relative ease.
The flesh areas were somewhat more of a problem. There was a small patch of the undercoat showing on the shoulder and another on the chest. Dirt I thought, that’ll do. So continuing with the idea that he’s been in a fight, I added some patches of dirt with crushed pastel chalks, using several colours of brown.
That covered the damage up nicely, and also left him looking dusty, but what about a few scratches too. These I added with some Alizarin Crimson, making short thin lines of colour and then small dribbles running down from
each of the lines. Less is more in this case, and I added just three cuts to the front of his chest.
This was then all sealed with a light overspray of Games Workshop Matt Varnish aerosol, which, as with most varnishes, dries slightly satin.
Back to the cunning plan
Finally I added sweat to the model, well he’s been exerting himself hasn’t he ?
This was easily done by stippling on judicious amounts of gloss varnish with an old brush, and then adding thin trickles of it with a finely pointed brush whilst the initial stippling was still wet. It worked a treat, but only shows up when the light catches the model as it’s turned.
The final thing to do was to mount him on a plinth - one that wouldn’t topple over ! and I selected one from the few I have “in stock”.
With the bust in place and all but glued together, I had to decide what to do with the helmet face plate.
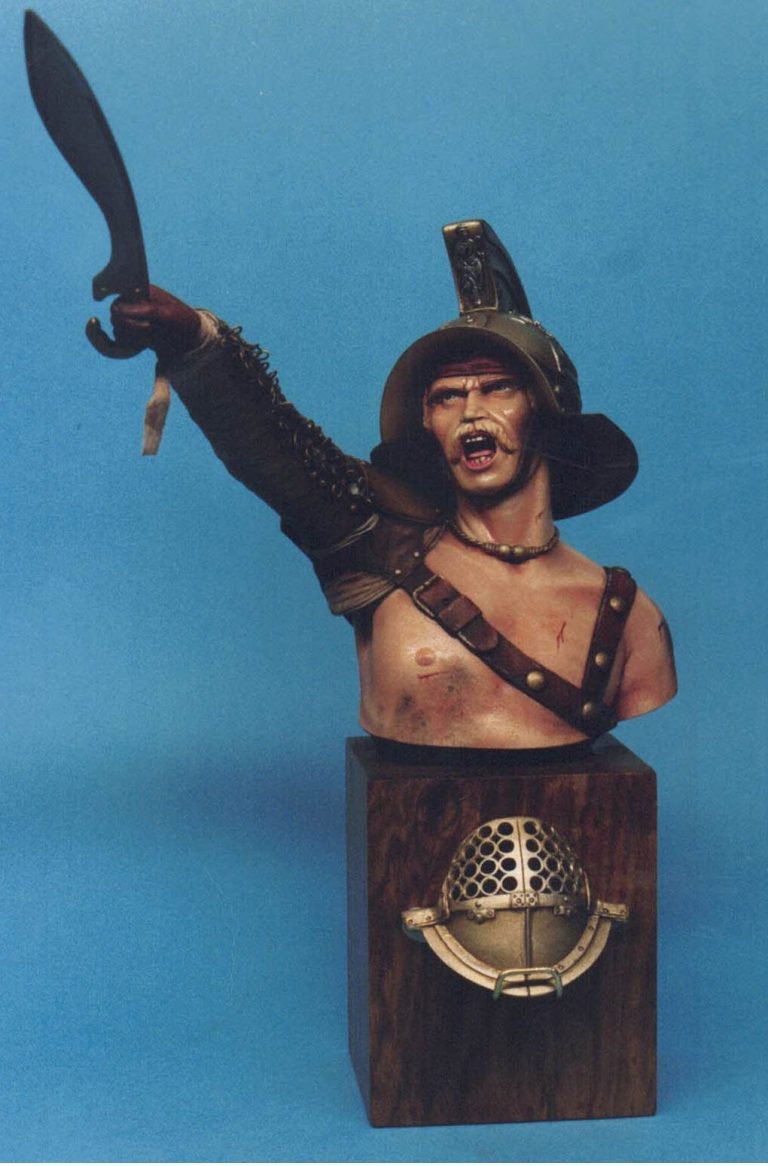
The features on the model are too well sculpted to cover up, and so I decided to mount the face plate on the front of the plinth on a small loop of brass wire.
I fastened it in place with some blu-tac so that the face plate can be removed and put in place on the model should I choose to at a later date.
A photo with it in place temporarily shows how much of the model it obscures, but if you’re not so confident in painting faces, then at least you have the choice of using this should you so desire.
Summing up
What can I say, this was a very enjoyable bust to paint, the features are pleasingly animated - something that some of the manufacturers are catching on to, rather than the shop window dummies of previous years.
The moulding is excellent, and how Verlinden manage to get the helmet and head out as one piece I cannot even imagine. But it’s a credit to them.Sculpting it typical Derek Holmes, and you can certainly tell it’s one of his. I like them, not just because I like his sculpting, but because his parts generally fit together well, and some of his recent pieces, this included have been quite large. Getting them to fit and allowing for shrinkage is a testament to his skill.
Price and availability. Well this I’m told should be out some time in March 2001, although it could possibly be earlier, and as for cost, well I’m not to sure, but I would guess - and it is a guess - that it would be around the twenty five to thirty pounds mark, but don’t hold me to that, look in Attenshun or call Historex Agents once it’s released. Again I’d like to thank both Derek Holmes and Francois Verlinden for supplying the sample, it’s yet another nice addition to a range of models that’s getting better and better.


Cetero oporteat sensibus his eu. Has ex vidisse perpetua, vis partem mollis mandamus at. Ea nam legere mentitum prodesset, no quo lucilius liberavisse, te oratio debitis omittantur eos. Sea ea iusto detracto, ut scripta sapientem suavitate cum, nam deleniti perpetua intellegam an. Ei per officiis detraxit probatus, vim at graecis tincidunt.
Lorem ipsum dolor sit amet, consectetur adipiscing elit. Nulla euismod condimentum felis vitae efficitur.
Lorem ipsum dolor sit amet, consectetur adipiscing elit. Nulla euismod condimentum felis vitae efficitur.
Cetero oporteat sensibus his eu. Has ex vidisse perpetua, vis partem mollis mandamus at. Ea nam legere mentitum prodesset, no quo lucilius liberavisse, te oratio debitis omittantur eos. Sea ea iusto detracto, ut scripta sapientem suavitate cum, nam deleniti perpetua intellegam an. Ei per officiis detraxit probatus, vim at graecis tincidunt.


Cetero oporteat sensibus his eu. Has ex vidisse perpetua, vis partem mollis mandamus at. Ea nam legere mentitum prodesset, no quo lucilius liberavisse, te oratio debitis omittantur eos. Sea ea iusto detracto, ut scripta sapientem suavitate cum, nam deleniti perpetua intellegam an. Ei per officiis detraxit probatus, vim at graecis tincidunt.
Lorem ipsum dolor sit amet, consectetur adipiscing elit. Nulla euismod condimentum felis vitae efficitur.

Lorem ipsum dolor sit amet, consectetur adipiscing elit. Nulla euismod condimentum felis vitae efficitur.
Cetero oporteat sensibus his eu. Has ex vidisse perpetua, vis partem mollis mandamus at. Ea nam legere mentitum prodesset, no quo lucilius liberavisse, te oratio debitis omittantur eos. Sea ea iusto detracto, ut scripta sapientem suavitate cum, nam deleniti perpetua intellegam an. Ei per officiis detraxit probatus, vim at graecis tincidunt.


Cetero oporteat sensibus his eu. Has ex vidisse perpetua, vis partem mollis mandamus at. Ea nam legere mentitum prodesset, no quo lucilius liberavisse, te oratio debitis omittantur eos. Sea ea iusto detracto, ut scripta sapientem suavitate cum, nam deleniti perpetua intellegam an. Ei per officiis detraxit probatus, vim at graecis tincidunt.
We need your consent to load the translations
We use a third-party service to translate the website content that may collect data about your activity. Please review the details in the privacy policy and accept the service to view the translations.