LRDG Soldier
65mm White Metal Figure from Young Miniatures
Article in Military Modelling magazine in 2007
History.
With Italy’s entry into World War II, and the threat of the European theatre of war likely to spread into the desert of northern Africa, the British commanders saw the need for a specialised group of men to operate in a looser and more mobile manner than the usual armed troops employed up to that date.
July 3rd 1940 saw the formation of the Long Range Patrols, later to be named the Long Range Desert Group.
Initially the force was made up from New Zealanders, after the refusal of troops from the Australian forces.


The emerging troop of men would be commanded by Ralph A Bagnold with his two Captains – Shaw and Clayton - these three officers would act under the auspices of General Wavell. The New Zealand men were mainly from a farming background, which was thought to be of advantage because of the likelihood that the men would be used to working with, and be capable of fixing, machinery.
The small force would soon have both British and Rhodesian men join it too.
The idea of a highly mobile and fluid group saw the use of unarmoured civilian vehicles like Chevrolet WB’s and Ford F30 4WD trucks. These would soon be replaced with more Chevy’s – this time the ¾ tonne command cars and 1.5 tonne trucks, but joined by the ever-present Willys jeep.
Whilst the issue of weaponry was mainly from stock British forces items – Thompson machine guns, Lewis guns and Bofors 37mm guns for on the trucks, the men soon began picking up captured equipment to turn to their own use.
Training was quite brutal ( from films I’ve seen on the History Channel ), having men jump out of the back of vehicles moving at thirty odd miles per hour, to long treks on foot in the desert. The focus was on building up the ability to survive in a harsh environment and behind the enemy’s lines.
The men brought into the troop were not necessarily models of soldiery, in fact quite a few were there because they were deemed to be mavericks or simply very difficult to control under the normal army discipline of the day.
Whilst there were rules and regulations to be observed, the lateral thinking and “beg, steal or borrow” attitude were highlighted as attractive attributes.
Certainly the desert environment was a harsh place to be posted to, the weather was always an extreme ( too hot or too cold ), with all the problems to body and equipment that this brought. Many of the local peoples were against the British forces, not to mention the Italian and German forces. Basically, the world and his dog wanted your head on a plate !
On top of all that, the initial group of 150 men was split into small forces of around 40 men to take on the work of infiltrating the enemy lines and cause havoc behind them.
Having been trained in communication and navigation, some of the embryonic force were sent out on their first mission under the command of Bagnold and with orders to survey the supply traffic using the Jalo to Kufra track.
At the same time, other portions of the LRDG were given the task of setting up hidden supply dumps along the Libyan border, so that the range of future incursions could be extended.

By September 1940, the group’s training was deemed sufficient to take on a combat role, and separate forces were sent out to the desert; the first real battle taking place against Italian forces who held a fuel dump. Other members of the LRDG bypassed the Italians, and linked up with French forces in Chad, and it is believed that this group were instrumental in getting the French to join with the Free French force, and together fight for the allies.
So impressed by the LRDG’s actions in it’s initial role, the War Office approved an increase in the force to double it’s number – the new intake coming from British, Indian and Rhodesian nationalities.
This was the beginning of an exceptional history of success, with additional men being brought in to take over when wounding or death thinned out the original force, or to raise numbers – as with the forming of an Indian / British squadron during 1941 – 1943, an artillery unit, and even an air link – even though this latter had to buy it’s own aircraft, because the RAF refused to supply any planes.
Probably the most useful contribution the LRDG made to the war effort in North Africa was the constant watch on the Tripolitanian coast road, where a two man unit would conceal themselves before dawn’s light brightened the sky, and throughout the day would identify and radio through all traffic that used the road.
After the African campaign ended, the LRDG went on to serve in Italy, Greece and Normandy.
The model.
This is “One of Those Figures,” you know, the ones that you see a picture of and think “ I gotta have one of them !”
Certainly I think that Young Miniatures will sell one or two of these, as the whole thing just looks right. The pose, the clothing - it just works.
The other thing is, production of the model is so complete, there’s even a nameplate in the box, ready and waiting for when you’ve finished him – what more do you need as an excuse to get on with it ?
Well, not much, I admit. But I’ll start with the presentation of the piece, which is worthy of note – a nice box, rather on the large side, but containing plenty of soft foam packing to keep the pieces safe. There’s a picture on the box of a well painted example to whet the appetite, and the pieces of white metal that make up the kit are separated into two layers in among all that foam.
The parts split is interesting, to say the least, but logical for all that, and there’s a choice of two heads to be used, a clean-shaven rather “good” looking character, and the rather more “rascally” and unshaven second head, which I’m pretty sure that most of these will be made with.
Photo #1 shows the box art........

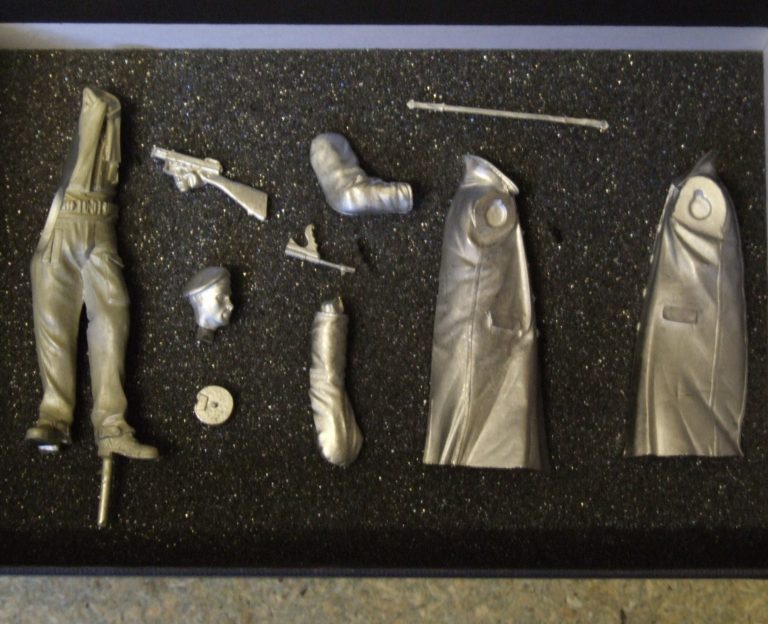
photo #2 shows a layout of the parts ( yes, impatience had won the day, I’d primed the main casting ! ). The second of these shots shows what I mean about the odd split of the parts – the coat comes as two separate pieces which join down the central seam at the back – some filler will be needed at the collar by the way, but only a small amount. This makes the main casting of the legs and torso look very strange, as the upper body tapers to almost a point at the shirt collar. It may look odd, but it certainly works, and the three components join quite well, to result in a very effective model with the maximum benefit for undercutting of the flowing coat.
The head and arms are separate as well, and the Tommy gun ( two further parts ) slides into place in the crook of the right arm. That would give a few problems when I got around to painting that area, but we’ll cross that bridge when we get to it !
The metal is very soft and easy to work, and because of this, it allowed me to make a few improvements to the model - which are caused by mould limitations. These were simple enough to do, and involved using a very sharp scalpel to cut under the pocket flaps on the coat, and also the ends of the straps on the trouser cuffs. Once I’d gotten the blade under the edge, I could then gently bend the metal a little so that more of a gap was visible.
It’s not a great deal of work, but it does add a little bit more detail to the model for anyone who gets close enough to see such things.
Photo #3 shows an evenings work – the shirt and trousers were completed, using a mix of Mars Black, Mars Yellow and some Titanium White. The first two make a very good Khaki colour, and by varying the amount of each of the colours, the darkness of the resulting mix can easily be altered. I used the white to add highlights, and to fade certain areas, with more additions of the black to deepen the shadows.
Two separate mixes were made for the trousers and the shirt, this being so that the clothing looked to be separate items.

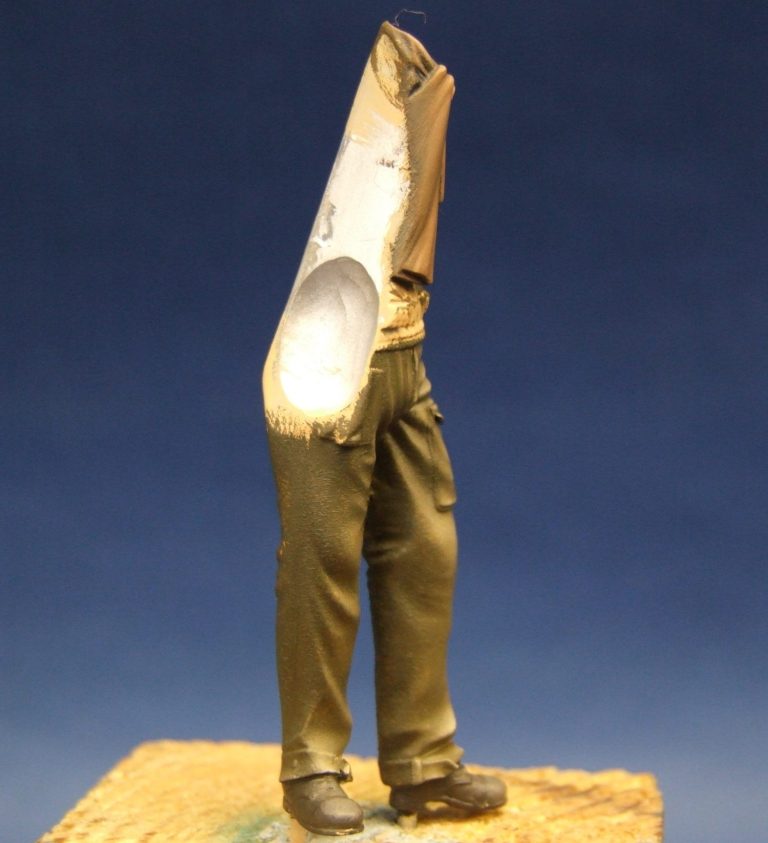
Just so that I got the shadows right on the trousers, I fastened the coat halves in place temporarily with some Blu-tac. This then showed me where the trousers would be in complete shadow, and also where light would effect highlights.
This might be more visible in photo #4, as there are no mid-tones or highlights on the back of the right leg. The front though does display such tonal change, because the front of the coat is open.
The scarf is painted with a variation of the Khaki mix ( believe it or not ) but with some Mars Brown added in to warm up the base colour. Again, Mars Black and Titanium White are employed to give the shadows and highlights.
Photo #5 shows a close-up of the head. I’ve just about completed the painting of this, although the eyes want evening up somewhat. I used a slightly dark mix of mid-tone flesh colour, made from Winsor and Newton Flesh tint, with Mars Brown, Mars Yellow and Titanium White added in to make a reasonable flesh colour – all oils by the way.
I used this over a good, solid undercoat of Humbrol Flesh acrylic ( three coats to build up the solid colour ), and then added more of the Mars Brown to build up the shadows. Highlights were added with more of the Titanium White, and then the face was allowed to dry fully.
Once this had happened, I added the deeper shadows with some Burnt Umber oils, and also stippled on some of this colour, mixed with Payne’s Grey to give the impression of unshaven stubble on his chin and jaw-line.
This shot also shows the woollen hat having been painted. I’ve used some of the mix from the trousers, tinting it with some more Mars Black, and using an old brush to put in multiple lines of lighter colour to show the ribbed, knitted texture, especially on the brow-band.


Photo #6 shows the inner faces of the coat. The sculptor has to be congratulated on how the model has been split up for casting, because although some of the parts look very odd when you get them out of the box, they fit together very well, but also allow the model to be painted in sections that can then be joined together, and make up a very detailed model with undercuts that would be impossible to produce in any other way.
But back to the photo. This shot, #6 shows how I’ve painted the quilted effect on the lining of the coat, using an Olive Green for the shadows, and lightening it with some Mars Yellow and some Titanium White so that I could build up the mid-tones and highlights. Some delicate painting here - because the detail is rather shallow - though there’s enough there to guide you, but not enough to let you simply drybrush the area and get a good effect. Sorry guys, you’re going to have to paint this section carefully, and to be honest that takes time. However, the good thing is that it’s worth it, although not a lot of this is visible once the coat is glued into place, it’s on show enough to make you feel that the effort was worthwhile.
Once the section had dried fully, I used some Mars Black to define the stitched detail between the quilted squares, which does add some depth to the area.
Photo #7 shows the coat in place ( temporarily ), so that you can see that there’s some space between it and the legs. So it’s worth taking a bit of time over that quilting !
I wanted to check here that the shadows were looking O.K. on the trousers, but needed the coat to be removable so that I could paint the belt sash and the ammunition.
Having painted those two areas though, the coat could be glued into position, and I did have to add a small amount of Magic Sculpt putty to fill in the slight gap that runs down the back. The joint seam of the garment does hide a lot of it though, and I just had to add a wipe of the filler.


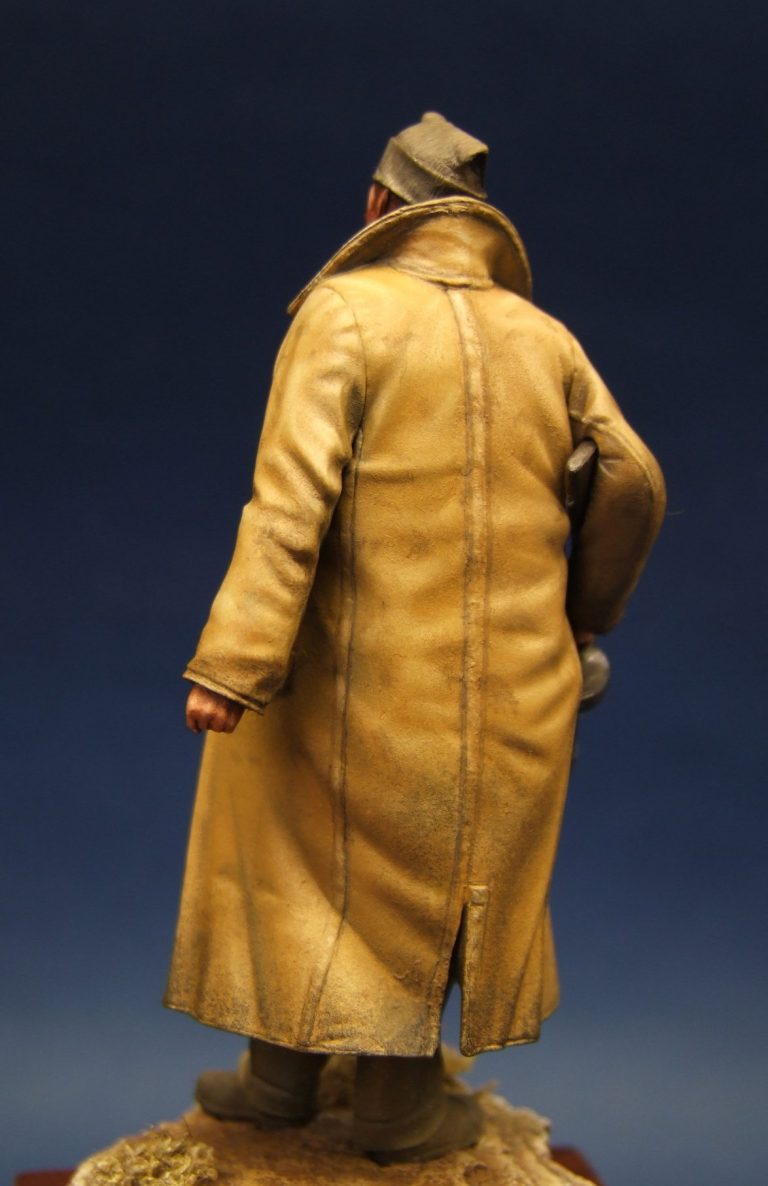
In Photo #8 you can see the back of the coat, with a nice clean paintjob. I used an initial undercoat of a sand acrylic ( GW Orc Brown ) using several thin coats to get an absolutely solid colour. Then I added a mix of Mars Yellow and Titanium White oils, with just the tiniest spot of Raw Umber added in. This was painted on and then stippled with a large soft brush to give a slight suede texture. To shade I added more of the Raw Umber, again stippling this into the surrounding paint so that the darker paint faded into the lighter mid-tone, and also retained the texture effect.
For highlights I added more Titanium White, using the method above to add small amounts of the lighter paint, and then blend it in to the surrounding colour.
It was quite a long-winded method, because whilst the white does effect a change in the colour, it’s gradual, and getting the lightest highlights took time and patience to build up.
I let the coat dry fully – which took a few days, then went back and added more of the applicable paints to the shadow and highlight areas.
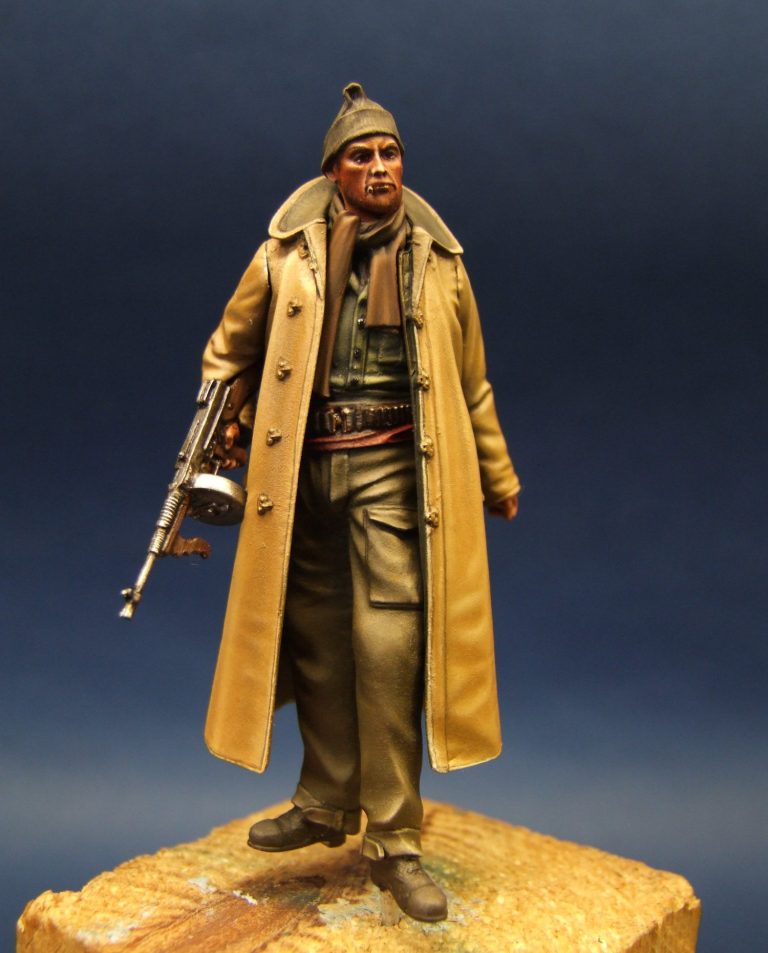
Photo’s #9 through to #11 show all-round views of the figure as it nears completion, the coat being finished with it’s main colours, the arms having been fastened in place with Blu-Tac whilst the coat was painted and got a chance to dry, only being fastened in place permanently when the “Tommy Gun” had been painted and it’s attendant hand fastened in place.

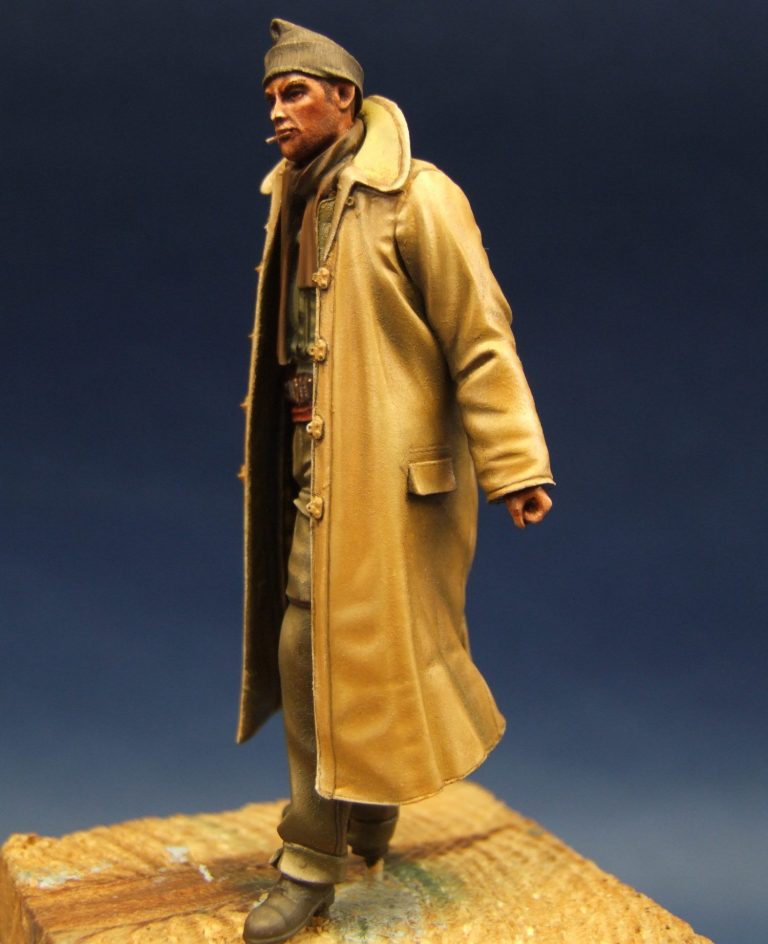
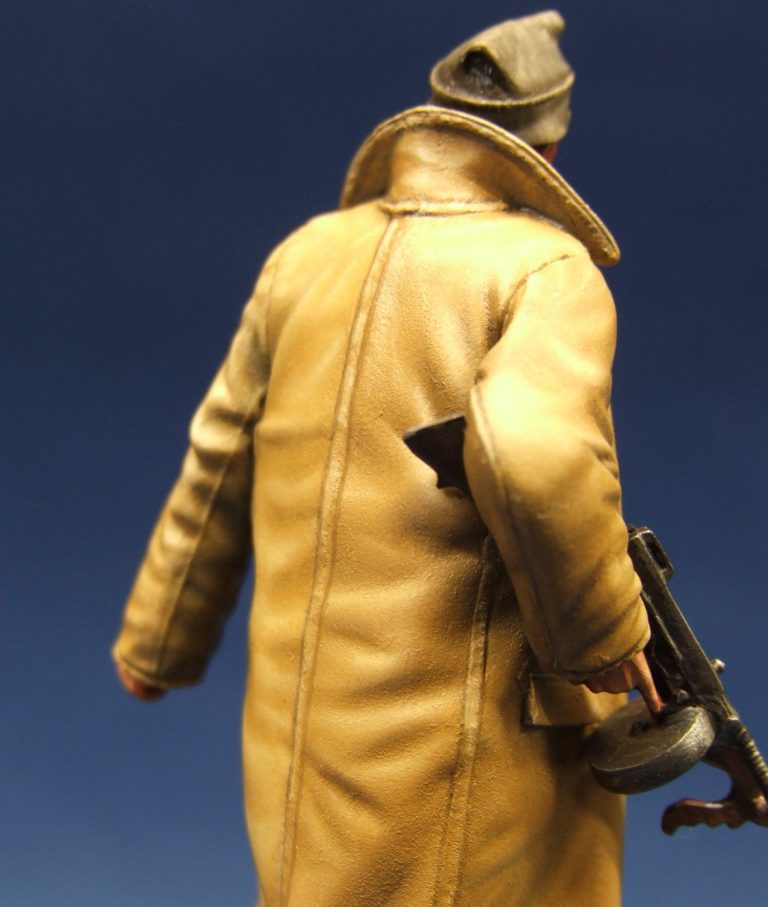
The close up in photos #12 and #13 show the seams on the coat. These are just begging to be treated to extra detail in that there is some puckering of the material sculpted in to the parts, and this can be enhanced even more with some careful shading and highlighting. Time consuming, but fun !

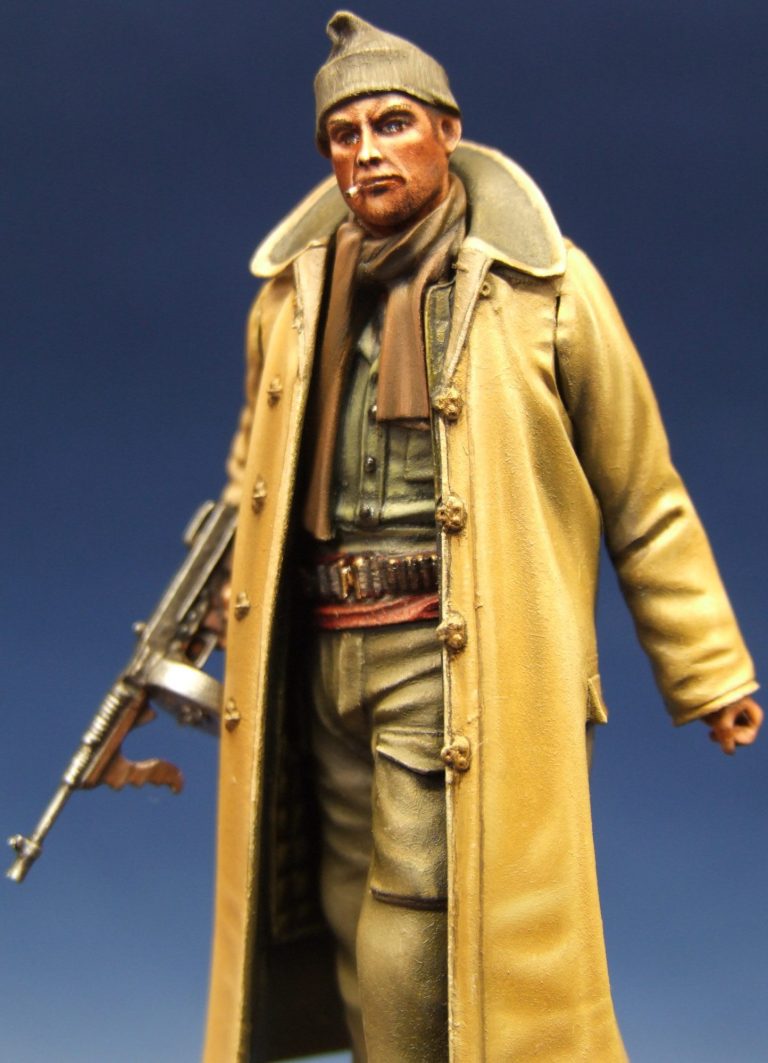
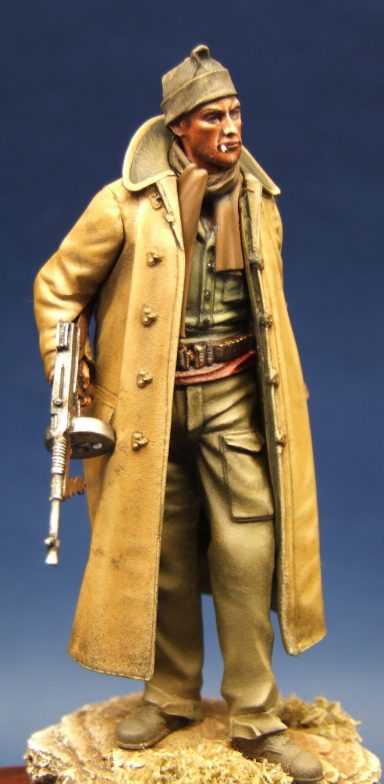
Photo #14 shows the front of the figure, but also the grain detail on the forward grip of the “Tommy Gun” can be seen. Again, this is time consuming to paint in, but the figure really does enthuse the painter enough for you to want to make the effort.
I’m not keen on the way in which the light catches the eyes in this shot, I don’t think that the sculptor has used beads or ball-bearings for the eyes on the original sculpt, but instead, he’s sculpted the eyes by making impressions in the sculpting medium. This shows up here, where the eye catches the light in this manner, as the concave shape of the eye, rather than it being a convex sphere, catches the light when a gloss varnish is added to indicate the wet surface of the eye.
It’s a small point, but it shows up on pictures like this, although in a display cabinet, I doubt that anyone would be able to notice.
The final shots of the model show him placed on a very small base, made from some Milliput, sculpted into shape with a small piece of stone. I added a small plant, just for a little interest, this being some deep sea fern that I pulled off a water pump brought in to work for cleaning ( well, I was helping out whoever was going to get sent the pump by removing a few bits of the fern-like stuff ).
Also in these shots you can see that I’ve added some “dirt” to the lower edges of the long coat. I initially tried various weathering powders, but these didn’t show up too well, so I opted to use a large-ish, soft brush with minimal amounts of paint on the bristles so that a spotted grubby look was given to the lower edges.
It took time to build up the dirt, and I used Mars Black, Burnt Umber and Mars Brown oils for this.
Having got this grubbiness looking O.K. ( I don’t usually find my weathering efforts particularly convincing, to be honest ), I then moved on to the areas that would also get dirty, those being the elbows of the coat, the lower middle of his back where he’d sit when wearing the coat, plus down the front where he’d be using dirty hands to fasten the coat on cold nights in the desert.
So, final touches, the off white acrylic used for the cigarette, with a dark grey tip for where it’s turning to ash, some of the weathering powders on the shoes and lower cuffs of the trousers, and just a bit of refinement to the stubble on his chin and cheeks.


All done.
I liked the look of this kit when it was released, and I can safely say that I wasn’t disappointed when I got a look inside the box at the parts.
The model is a joy to work on, because a lot of thought has been put into how the parts go together, and how it can be painted, with a view to the finished piece looking as detailed and natural as possible.
There’s a small etched brass plaque that can be added to the base ( the one I used coming from Dave Armstrong at Armstrong Bases ), and that’s all I can say really.
Well worth the money, good sculpting, good casting, unusual subject – what more could you want ?
Thanks to Colm White for trusting me to paint this for him, hopefully it’s giving him as much pleasure to look at, as it gave me to paint.
References:-
http://en.wikipedia.org/wiki/Long_Range_Desert_Group
plus programmes screened on The History Channel
We need your consent to load the translations
We use a third-party service to translate the website content that may collect data about your activity. Please review the details in the privacy policy and accept the service to view the translations.