Celtic Warrior
Pegaso 54mm White Metal kit
Article in Military Modelling magazine in 2003
I find the Celtic peoples to be quite intriguing. They populated most of northern Europe at one point or another, only falling back under the brunt of the Roman army's advances, and only then for a time, being quick to exploit Rome's weakness once it was apparent.
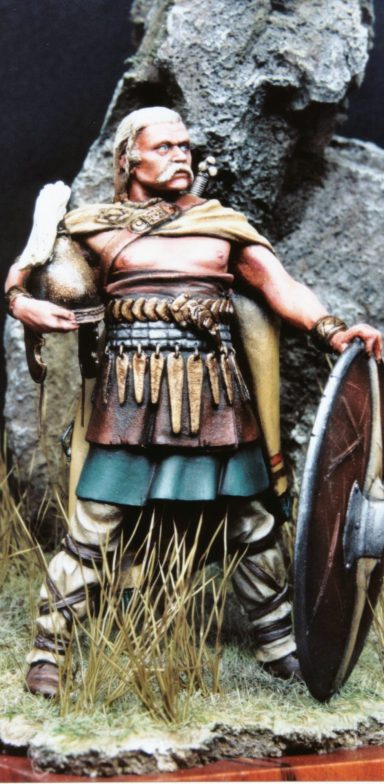
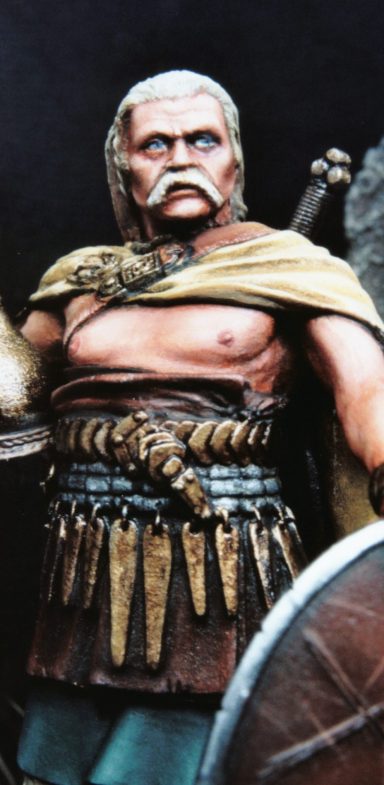
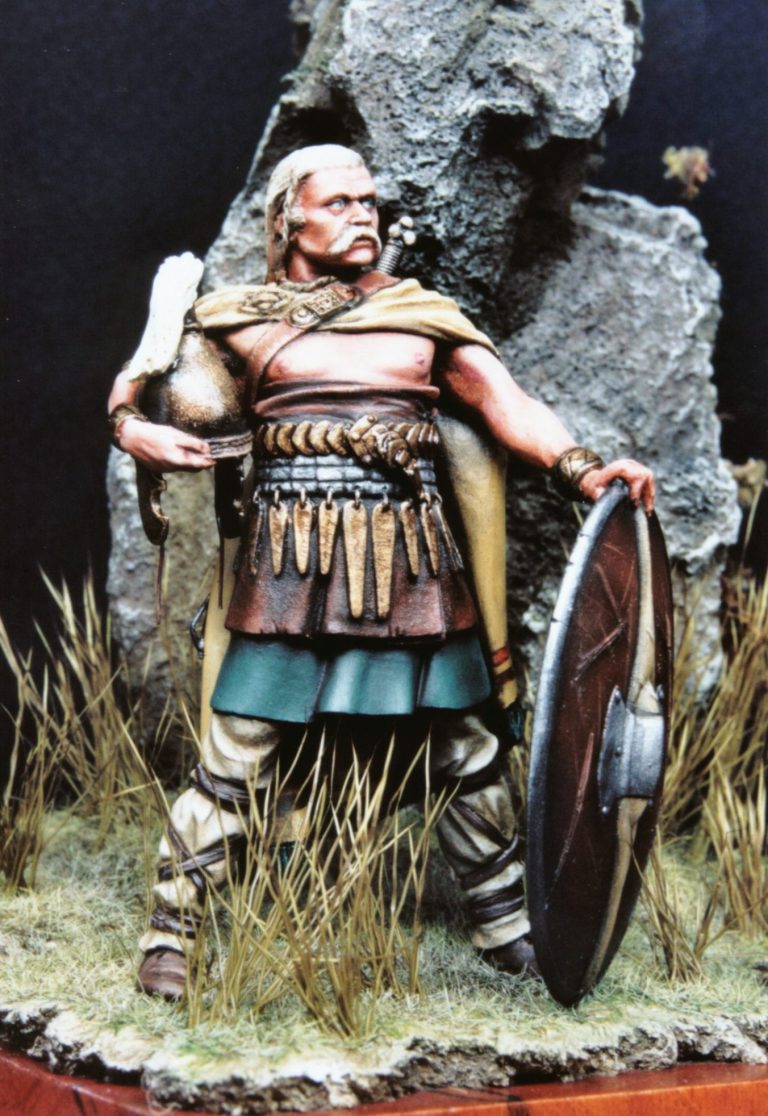
Even with Rome's might in the ascendant, the Celts managed to either get along under the Empire's rule, or to completely flaunt it by fighting guerrilla styled actions and retreating to higher and less accessible territories; the Spanish heartland and the highlands of Scotland being but two good examples of this.
Celts were a totally different culture to the Romans. They kept no written records that we know of, and our only real information in that form is gleaned from the Roman commentaries of the day. These of course could well have some bias to them. In fact, the view that historians have had of the Celts is of a barbarian culture, low in civilisation and in its day-to-day lifestyle comes from such writings.
We do have some artefacts, coins, jewellery and grave goods, but that's about all really. The facts are though, that the remains that have been unearthed are of good if not exquisite quality in the main, suggesting that maybe there was more to this culture that just a willingness to fight anything that moved. Maybe, there is more than just the "warrior culture" that has been postulated for all those years.
The waters have of course been well and truly muddied by the "romanticising" of Celts during the Victorian era, and so it's a somewhat uphill struggle to clear these views of the Celtic peoples away, and let in the newer more informed knowledge that has been brought to light in more recent years.
At best though there can only be theories, postulating on the hard archaeological evidence turned up at archaeological sites, and then piecing together the balanced truth from the Roman commentaries.
The main problem I find with research for such a long lived culture ( bear in mind that it is thought that the Celtic culture was existent as far back as 400 BC and the Scottish, Irish and Welsh were still fighting strongly, if on a backward foot as recently as 1600 AD. Some would say they still are !
The Scots in particular probably hadn't changed to any great extent in the period between 400 BC up until 1600 AD. They had been pushed back and hemmed in, treated badly by invader after invader - the Saxons, Vikings and Normans all had a go, not to mention the Romans. And this carried on right through to the Jacobite rebellions.


If the Scots can be used as a benchmark then, it is a clan-based society, with a modicum of farming and animal husbandry. The land that they inhabited though was never one to support a vast population, and this added to a poor economy meant that inter-clan raiding and thievery was rife.
Actual pitched battles are thought to have been relatively rare, single combat and ritualised fights were probably more common, simply because no clan could afford to lose too many of it's members. Having a distinct warrior caste though did allow for the renting out of the warriors as mercenaries, and this is documented as having happened, certainly Robert the Bruce is seen to have had Galloglas warriors from the Hebrides with him when he visited his brother in Dundalk in 1316 after Edward Bruce was crowned King of Ireland.
The Celts seem to me to have been ( still are ? ) a proud race. One that although undermining itself and doing their enemies work for them in a lot of cases, is a race that have a long surviving culture, with artistry in metals and a talent for battle ( where would Edward II have been without his Welsh archers ? ), that has seldom been outshone.
The range of 54mm figures that Pegaso have released seem to have caught this "look" very well indeed, and I've been smitten enough with the models to have hunted most of them down now for my collection.
The ever present problem of course is getting paint on them.......Well, at least I'm attempting a start with the model reviewed here.
The model
I bought this several months ago, one of the first of the “new” offerings I’d purchased from Pegaso that wasn’t a Gladiator.
It’s a nice little model, fairly relaxed in pose, and harking back to the “straight up and down” poses that seem just as popular now as the more complex “action” poses.
The model comes well packed in a small foam lined box, these boxes now being much more colourful that those of previous years.
The box top art includes a main frontal picture of a finished and painted model, and a smaller rear view of the same piece. This is not only good for seeing how the model will look when finished, but also sorts out any questions about construction.


Pegaso’s sculptors do seem to find interesting ways of joining the bits together, or perhaps that should be splitting them up for mounding, but I’ll return to this in a moment.
There are 9 parts in the kit, all cast in white metal, and these are broken down so that there is a main casting for the body, legs and head all as one piece.
Separated from this are :- the left hand supporting the top edge of the shield, the right arm and hand with the helmet, a cloak attaching to the rear, and a sword attaching to the cross-belt also on the rear.
Additionally there are two separate flaps for the helmet, a third piece for the plume, and finally a base plate with basic groundwork on it for the model to stand on.
All this little lot is perfectly cast, with minimal lines for where moulds have parted, so clean-up is minimal.
Back to that note that I made about the splitting of parts; the helmet flaps and plume are excellent little castings, and I’m fairly sure that many other companies would have had these as integral with the right arm / helmet casting. The cloak is interesting, in that the separate casting is only for the part of the cloak that falls below the cross-belt at the rear of the model; the upper portion where it wraps around the neck is sculpted on the main casting.
Again, how many companies would have taken the route of casting these parts as one single piece ?
Photo # 1 shows all the bits laid out prior to adding paint, and although this does give a good look at the parts, I felt that some clarification was needed for how the were split – sorry then if I bored you a little.
So, I guess you can figure that I like this model ?
Yup, it’s very nice.
But….
I still added a couple of bits to it.


These are simple additions really, and come in the form of two small lengths of lead wire for the ties that would fasten the helmet under the chin. These can be glued in place with spots of thick superglue, which once hardened will look like the studs to which the ties would be fastened.
The other change was to remove the handgrip from the shield as it is moulded as a solid piece, the moulding extending to the indent for where the hand would curl around the grip. It would be possible to paint this so that it looked heavily shadowed and hollow, but I thought that it might just be simpler to carve the handle off, scoop out the excess web of metal with a round grinding bur in my Minidrill, and then use a short piece of wire, glued in position, for the new grip.
Having made these additions, I could then drill a few holes into the model for pins to strengthen his join to the base. I found that the other parts would have strong enough joints and so didn’t bother pinning them. The holes going into the feet were drilled well back towards the heel, and extended up into the leg as far as the calf.
Brass pins were glued into these holes, and the ends of them left to extend beyond the feet by about 3cm. The model was then fastened to a temporary base so that he could be painted.
I did drill into the underside of the helmet, allowing me to add a loop of wire into this, which acted as a handle for me to use whilst painting this rather small component. I couldn’t for the life of me think of a way of drilling into the shield, well, not without doing some damage, and so opted to hold the part with my grubby little fingers and just try to avoid rubbing paint off it as best I could.
Holding models, especially once painted, just isn’t the done thing. It tends to get grease on things, rub paint off, and generally destroy the good painting that you’ve taken hours to do. Therefore, picking which parts of this to paint first would be critical to allow me to hold unpainted areas as much as possible.
I’ll come back to this later though.


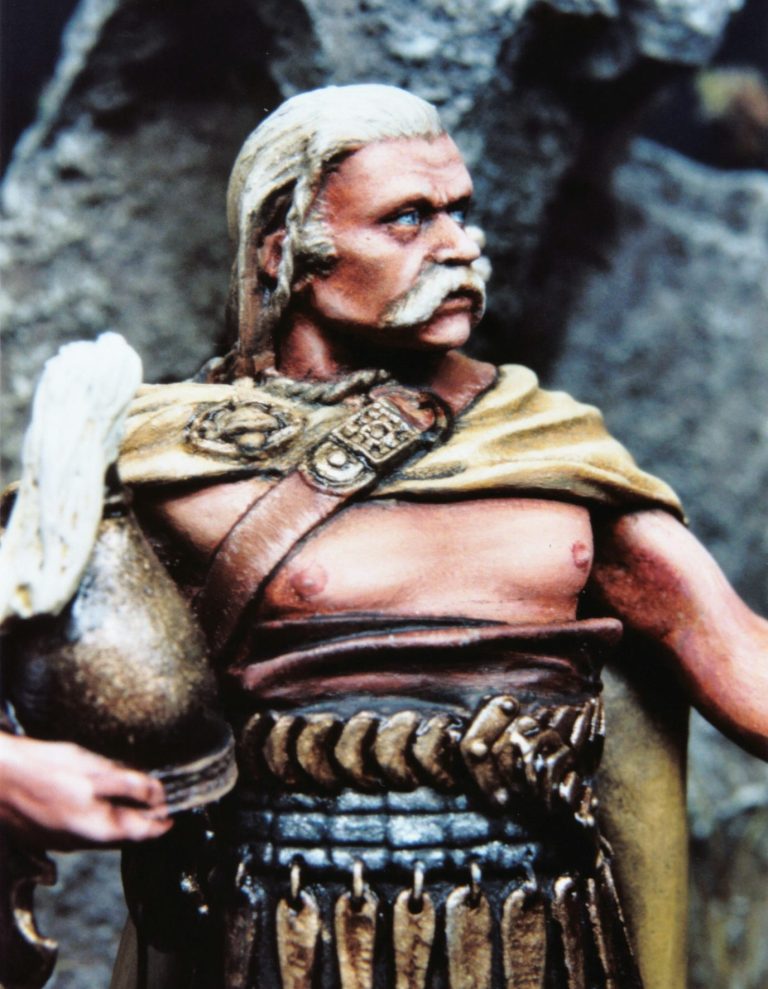
As usual I began with the flesh areas, these being undercoated with Humbrol Flesh acrylic, and over this was added a thin coat of an oil paint flesh tone. This mix was made up from Titanium White, Mars Yellow and Windsor and Newton Flesh Tint in a ratio of 1:1:3. I added Mars Brown to the areas that I felt required shadows. Highlights were added with more of the Titanium White, blending the colours together with a clean, dry brush.
I usually try to finish the face at this point, adding the eyes and the lips, and usually some portion of the hair. The eyes though gave me a right old problem. I wanted them to be blue, as I planned to paint a blonde chap.
The eyes though wouldn’t seem to go in right, and even after several attempts, I’m still not completely happy with them. The paints I used to get to this stage on the eyes were an undercoat of white acrylic ( adding a tiny bit of blue to just take off some of the brightness ) and then a iris of Payne’s Grey to mark out the outer edge of the iris.
A small amount of Titanium white was then mixed into the centre of this area, attempting to keep the dark ring of Payne’s Grey in tact. Once this was done, a pupil of black was added, and finally a tiny catchlight of Titanium White.
After all that farce ( and it took around five hours of painting to do the eyes, compared to around an hour for the rest of the face ), I moved on to the clothing.
I began with the trousers and bindings, adding the off white to the main part of the legs first. An undercoat of sand coloured acrylic was used, and over this I added an oil paint mix of Titanium White, Mars Yellow and a tiny bit of Raw Umber. For shadows I used more Raw Umber, and in places a very small amount of Mars Black, and for the highlights, some more of the Titanium White.
The kilt was next, and I initially considered doing this with acrylics, mainly because I’ve got a couple of green paints that I like working with, however, to get the more subtle shading, not to mention the richness of colour, I chose to use the oils again.

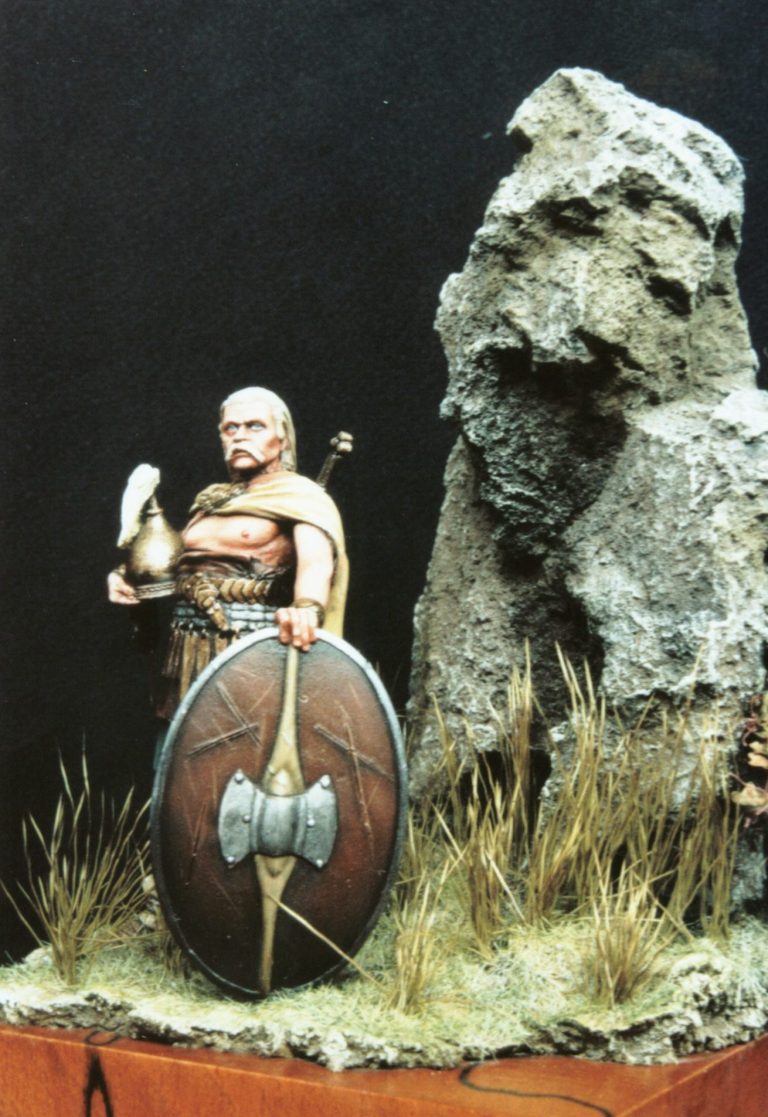
I still used an undercoat of acrylics though, and used a mix of Prussian Blue, Mars Yellow and Titanium White to get a mid tone oil, adding to this some more of the Prussian Blue for the shadows, and some Titanium White and the Mars Yellow for the highlights.
So far it’s all been cloth or skin, I thought however, that the metal plate belt and its decorations, would probably have been worn over some leather, so I opted for a warm brown colour for the apron-like article of clothing that he wears over the top of the kilt.
I began with a very dark brown made from Mars Black and Mars Brown oils, adding this over a sand acrylic undercoat. More Mars Brown was then added, using an old brush to stipple it into the darker colour. On top of this I added some Mars Yellow and also some Titanium White, hinting at cracking on the edges and the corners of folds. I allowed this to dry fully before committing to doing the metallic areas.
For the brass decorations, I used a mix of Testors Gold enamel, Olive Green oil, Mars Black oil and some Liquin as undercoat, adding some of the gold to build up highlights, and finally some very small touches of silver ink on some of the edges, to hint at damage and wear
The main area of the belt plates were painted with acrylics, beginning with a mix of Games Workshop Chaos Black and Chainmail, adding some silver ink to this to get a mid-tone, and some highlights from pure silver ink.
I'd settled on a rather simplistic colour scheme, realising that this might seem to be a bit of a "cop out", but working on the assumption that not every Celt is going to have looked like an explosion in a dye factory. Therefore I opted for a variety of earthen colours with just a few touches of something brighter.
The cloak was the biggest area of colour on the whole model, and I thought that by painting it a darker shade of natural wool, that this would lighten the whole of the model, that was in danger of becoming depressingly dark - the green on the skirt and the brown leather areas certainly being guilty of this.
I began with a lightened sand coloured acrylic undercoat, this being a 1:1 mix of GW Orc Brown and Skull White. I added about three coats of this, simply so that a solid colour was built up for the oils to sit on.


The main colour, shading and highlighting is done with good old oils. Beginning with a mid-tone mixed from Raw Umber, Mars Yellow and Titanium White. This was painted all over the cloak, stippling it with a dry brush afterwards to take off any excess paint, and also to provide an even texture to the whole garment.
Shadows were worked in with some more of the Raw Umber, and the highlights from the Titanium White. Again stippling these colours into the mid-tone with a clean, dry brush, to blend them in. This not only fades the colours into one another, but also retains that textured surface on the whole area. This was then allowed to dry, and final shadows were added from some thinned Mars Black for the deeper recesses and folds and for the shadow of the cloak between the legs.
The lines were not at all simple to do, having added the fringe in a dark green oil and added highlights from a lightened green, I marked out the lines with some Burnt Umber oils.
The beauty of this being that if you go wrong with the line, the paint can be easily removed with some clean White Spirit. Having added two sets of parallel lines for the brown and the red stripe to go between, and being happy that they generally followed the line of the bottom of the cloak, I filled the centre of each line, cutting it back to be a thin dark border, with either some Alizarin Crimson or Mars Brown ( to give the two lines their colour ).
This looked fine and dandy whilst looking at the figure straight on from the back, but the lines don’t seem to follow the same line as the bottom of the cloak when looked at from a slight angle. I have no idea why this should be, and only noticed it when the photo's came back from development. This is both maddening and frustrating, as it's going to be very hard to correct now that the figure is glued in place.......
Now that the cloak was finished, I could paint the hair in, going for that blonde look that I must admit is usually a struggle to get just right.


I began by undercoating with Skull White, adding oils over this, and beginning with a 1:1 Raw Umber and Mars Yellow mix.
By then adding highlights in the form of a !:! Mars Yellow / Titanium White and finally just the Titanium White, I built up the lighter areas. I used an old Prolene synthetic brush to do this, one of the gold handled ones that'd seen better days, and had had it's bristles severely shortened to almost a little mop. I do this to brushes that I use for stippling, keeping the bristles as short as possible.
Instead of dry brushing the colour on "across" the direction that the hair grows in, I used a combing method to add the paint, adding small amounts to the model with a single stroke, and the wiping the brush on a dry cloth before adding more paint. This repeated wiping of the brush removes any darker pigment that it has picked up, an also stops too much paint building up on the model. Using a small brush also helps to get into the finer detail, particularly on that coiled ponytail.
Once this had dried, I painted in the ribbon in a red colour, using Humbrol Crimson acrylic as an undercoat, and then adding some Woodland Green ( GW ) to the Crimson and putting this into the shadow areas. Small highlights were added with a very small amount of a flame orange colour that is from GW but doesn't have a name on the tub.
Now for the shield. This is a dominant part of the model, being at the front and also being quite large. I wanted it to look relatively new and cared for, but also to have some damage to it.
For the damage, I scored in some lines with a sharp scalpel blade prior to adding paint, trying to imagine how a person would be holding it and from what angles a weapon would be hitting it. Once this was done, I primed it with some Skull White, and then undercoated the back in Orc Brown. The wood effect is done in a similar manner to the hair, using a mix of Raw Umber and Mars Yellow as a starting point for the oils, and then adding more Mars Yellow and then Titanium White in long sweeping strokes. The brush used has slightly longer bristles, again though it's an old one that the point has long gone from, so that the splay on the bristles forms the lines of the grain. Once dry, darker lines can be added to denote the narrow gaps between the planks.


The front of the shield was then tackled, working on the main leather covered area first ( remember, I'm forced to hold this part between fingers at this point, and so work on areas that can be avoided by the fingertips ). I began with an undercoat of Swamp Brown ( GW ), and once dry added to this a thin coat of Mars Brown, stippling as per the cloak so that a slight texture was added.
Mars Black was used to darken the lower area, and then some very small amounts of Mars Yellow and Flesh Tint were used to build up highlights. The tops of the damage lines were also treated to highlighting, but it wasn't until the shield had dried that Mars Brown was used to put in the lines of shadow.
The wood spine on the front of the shield was painted in a similar manner to the back of the part, adding dark lines to separate this from the leather area.
Finally the metal areas were added, Games Workshop acrylics and Printers Ink being used to bring out this area of the model. I cheated here a little by adding the mid-tone and shadows to the metallic areas now, and then only added the highlights once the figure was complete and assembled on the groundwork.
The Sword is a lovely little piece of sculpting, the detail being very fine indeed, and I wanted to bring out the best of this. The leather areas of the scabbard and also the cross belt were painted to match in with the shield face, adding some scuffs and cracking to both areas by using Mars Yellow and Titanium white on an old brush with splayed bristles to touch in random damage to the edges.
The silver edges are touched in with the GW acrylics - just like the shield rim, and the bronze hilt and guard with the Testors Gold Enamel as on the waist belt decorations.
Whilst I had some of the brown oils handy, I painted in the shoes, going for a dark brown again, but mixing in a little Yellow Ochre and Titanium White to hint at a dustiness to the colour.
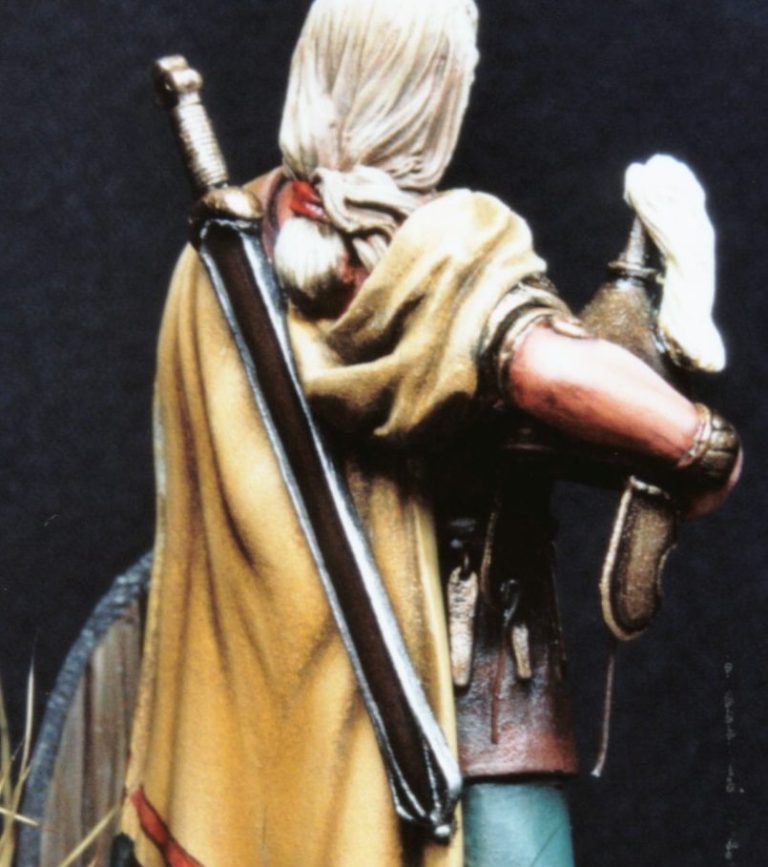

On the helmet I tried for a darkest bronze colour, using more Mars Black to shade and distress the lower areas over the Testors Gold. The brow band is a lightened mix of the brown colours used for the leather, and the plume is done with a much lighter form of the colours used for the hair.
The final touches were the helmet cheek guard ties in the leather colours; and the armbands, which as an indulgence, I painted a more shiny gold.
All this was allowed to dry whilst I made the groundwork.
I began with a nice little plinth from Armstrong Bases. To this I added a piece of coke ( weathered naturally ) that I'd found lying in the gutter down the street ( someone must still have a proper fire or boiler near us ). Drilling into each of these and adding brass pins so that a secure joint could be had. Around the coke I added some Milliput, tearing away the edges to leave a ragged texture, and stippling the top with an old ( cheap ) plastic hobby brush. Before the putty dried, the model was pushed into it so that a positive location was made for his final placement.
The Milliput was painted with Burnt Umber oils, the excess of these being wiped off the groundwork so that the texture is picked out. To further emphasize it, Titanium White was dry brushed over the edges to really make them stand out. This was left to dry, and then mainly covered over with white glue and Static Grass, the grass being painted with some Humbrol enamels once the white glue was fully dry.
Final additions were the longer grass in the form of dyed deer hair, and also the ivy on the coke, from a Hudson and Allen set ( that comprised of what looked like a plastic scouring pad and some miniature leaves ), this being glued in place with some superglue.


Once all this had dried fully, I added the main casting of the model to the groundwork, testing for fit first, and then adding superglue. Then the separate parts - the cloak, sword, right arm with helmet, and left hand and shield were glued in place.
The only other addition made was some replica coins of the period that I made by making simple moulds from Milliput, and impressing Magic Sculpt into.
I'd got these coins from a friend ( Gary Rayson - thanks mate ) who does a little bit of metal detecting now and then. By pressing each coin into Milliput after dusting both coin and putty with Talcum powder, a one sided impression can be made. Once the putty is part dry, the coin can be eased out of it, and then allowed to cure fully.
Again by adding more talc, some more putty ( I preferred Magic Sculpt here ) could be pressed into each of the moulds and then gently eased out to form replica coins. The other advantage being that the backs are flat too.
After a quick dash of paint to make them look like the real thing, they were glued in place on the front, back and sides of the base. I used two Roman coins for the back and sides, and an Icenii coin for the front.
Pegaso seem to be releasing rather a lot of models recently, particularly in their 54mm scale range; so much so that it’s rather hard, even for a relatively fast painter to keep up with their output.
With this wonderful choice on offer, you’d be forgiven for thinking that quality would have dropped – after all, these models seem to be being released at an average of around six a month. That doesn’t seem to be the case though, as after buying several of the new releases of both ancients and medieval subjects, I can only say that the quality, sculpting and fit of parts is well up to the high standard that you’d expect from this company.

Cetero oporteat sensibus his eu. Has ex vidisse perpetua, vis partem mollis mandamus at. Ea nam legere mentitum prodesset, no quo lucilius liberavisse, te oratio debitis omittantur eos. Sea ea iusto detracto, ut scripta sapientem suavitate cum, nam deleniti perpetua intellegam an. Ei per officiis detraxit probatus, vim at graecis tincidunt.
We need your consent to load the translations
We use a third-party service to translate the website content that may collect data about your activity. Please review the details in the privacy policy and accept the service to view the translations.