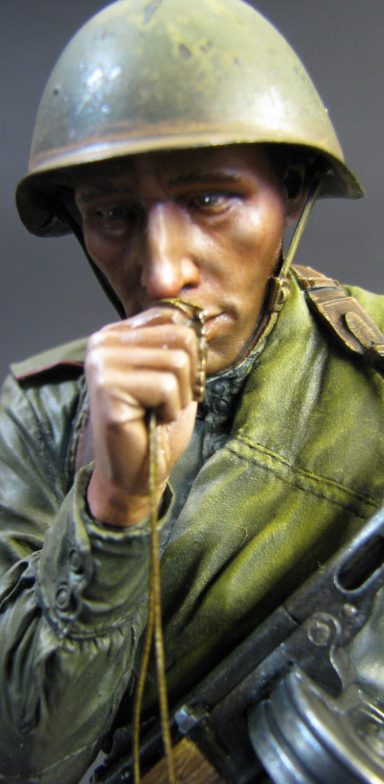

Desperate Hope
1/8th scale Resin bust from Life Miniatures
Article in Military Modelling magazine in 2014
The Russian front during World War II was beyond terrible, the weather conditions alone were possibly a greater enemy than either the Germans or the Russians faced when compared to each other, and were in fact one of the factors that helped the Russians turn the German military machine’s tide.
However, reading historical accounts from the battles fought to defend their country against the German invasion, the loss and suffering of the Russian people and especially their troops was phenomenal.
Watching films like “Enemy at the Gates” brings home the attrition and desperation in the face of the German advance, with the aggressors possessing a much greater advantage, not to mention their better trained troops that had seen plenty of fighting already to hone their skills.
In the face of this, the Russians had a great deal of pride, coupled with great numbers of potential troops, but with little experience and lack of weapons to arm their ranks fully.
As the German troops steamrollered through the Russian countryside with their mechanised Blitzkrieg tactics, the young Russian army reeled. With the enemy literally at the gates of their central and most important cities, there had to be some way of turning back the tide.

Defeat was not an option, it would be death or victory, and Stalin would brook no failure.
Within the ranks – being less than a number really, just more cattle to the slaughter – the young Russian soldiers must have felt terrified. To be sent into battle with little or no training, just a uniform and the order to advance into a maelstrom of projectiles coming your way at high speed is unimaginable – well to me at least.
Which brings me to a question about this kit……
In Stalin’s Russia, the great Communist state, I wondered what would be the views on Christianity ?
A little bit of investigation was required, because to be honest I had it in my mind that religion was outlawed within the Soviet states after the Communists killed Tsar Nicholas II and his family
The Orthodox Church supported the Tsar and his rule, and was quite open in it’s opposition to the new Soviet regime.
The Soviet “Councils” initially had intended religious freedom for all, especially as the Orthodox Church had frequently and openly supported the persecution of the Jew during the early part of the 20th century ( 1910 – 20’s ), and so there became friction, which I suppose we in the west have picked up on as religious repression.
As it was, it’s thought the Soviet regime killed at least 28 bishops and over 1200 priests, so in fact a lot of the pillars of the faith sought safety by fleeing into exile.
An edict was enacted that gave back church property to the people – thus making the Orthodox Church in Russia “of the people” although it di mean that there was a heavy-handed control from the Soviet powers.
The Soviet government put Tikhon – the patriarch of the Orthodox church under arrest and eventually deposed him in 1925, putting Sergius I in his place. Whilst this might seem to have been an allowance of free worship, Sergius made sure that he never contradicted the Soviet state doctrine or questioned the Communist regime. Many of the churchmen found this stance an anathema.


So, maybe not the total persecution of religion that I for one had believed to be in Russia during this period, And although this was my main question about the kit, I’m reasonably happy that this young chap wouldn’t have been taken out and summarily shot for possessing a cross.
So to matters pertaining to the model…….
To quote myself from the initial review I did regarding the actual title of the piece :-
“…….the full title of the piece is actually “On the edge of no-man’s land – WWII Young Red Army Infantryman, July 1943, Battle of Kursk”……..OK, take a breath, ‘cos that’s almost a life story of a title.
Glad that’s out of the way, now the pleasurable bit – the model.”
It is a bit of a mouthful, but it does set up the feeling of the piece.
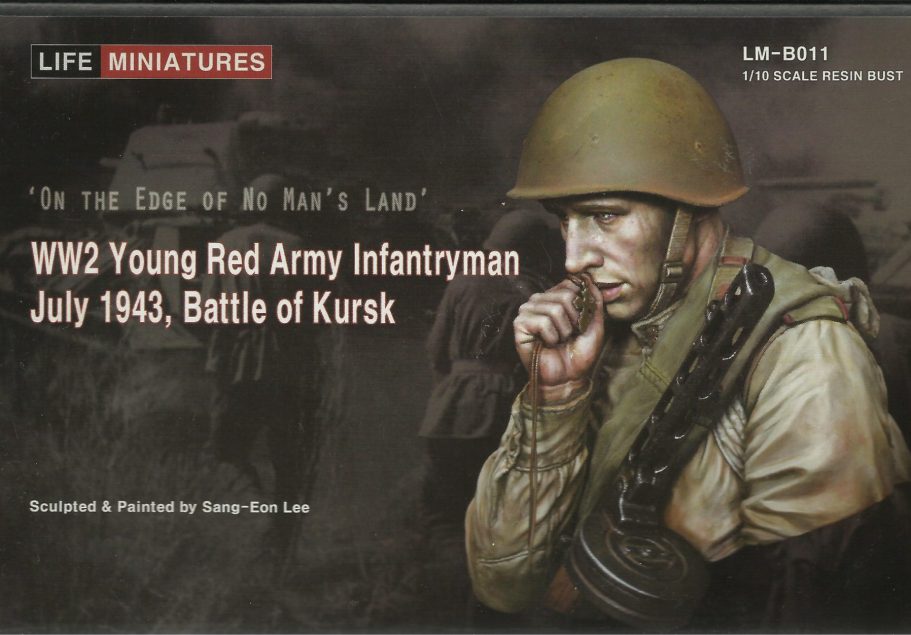
Prior to seeing this review sample, I’d only seen painted up kits from this company, and as I mentioned in the review, the sculpting, casting and fit of parts is very good.
Once you get to work on cleaning the components up, you do get to appreciate how clean they are, only a couple of mould lines in evidence that needed work, and even so, they were pretty restrained.
Photo #1 and #2 show the box art, and this gives a good frontal view of the piece in the main picture, with four smaller shots giving an all round view of the painted piece done for box art.


I just about managed to take a shot of the bare resin parts before slapping the paint around, and these are shown in photo #3
At this point I was pretty pleased with the components, there would be little or no problem fitting them together and the only area that would need some filler was the joint between the right arm and the jacket. The arm would need fastening in place and the gaps filling prior to painting – which is what I did.
The gun is possibly worthy of note, as it’s in several pieces that will need careful construction.
I chose to swap out the resin barrel that is supplied and used instead a thin piece of aluminium tube instead. There were two reasons for this, one is that fine resin castings tend to bend, and the precision necessary to drill a hole into the end of the resin rod wasn’t something I was going to mess about and risk doing once I’d constructed the rest of the gun shrouding around it.
It also struck me at this point that the face was a lot more expressionless than in previous offerings from life Miniatures. In fact I though that the face looked particularly uninspiring and a little bit blank somehow. Nothing intrinsically wrong with the face, but it didn’t seem to have ( even on the box art, now I was looking closely ) all that much character about it.
However, that would be a worry for later, for now I was just going enjoy doing some painting.

Photos #4 and #5. OK this jumps a long way ahead, and just proves how the below average article writer can get carried away with things…….um, well, I do sometimes.
What’s happened then ?
The long and short of it is that I used an airbrush to do some very simple weathering effects on the helmet. I like an airbrush in such cases as this because it gives a dead appearance to the finish. There’s a matted down lifeless feeling somehow that I can’t replicate exactly with a conventional brush.
The method is simple enough – use a base coat of metallic acrylic to completely cover the area – in this case the helmet. I used one of these new Dark Star metallic colours - the Steel mixed with a small amount of black just to darken it a little for the more vertical areas, then blocked the rest of the helmet in with the Steel colour on it’s own.
I allowed this to dry fully and then used a small section of sponge to dab on small amounts of Marmite – yes, love it or hate it (I’m in the latter group ), it has it’s uses.
Over the top of that I sprayed several shades of a greyish green, gradually lightening it as I went, so that the highlights on the helmet built up slowly.
After allowing the paint to dry for half an hour I gently washed the helmet with a toothbrush and some washing up liquid so that the marmite was removed and some layers of paint that had covered the foul smelling brown gunge…….After allowing the helmet to dry fully, the result is what you see in photos #4 and #5
Now I’ll be honest here and say that I have no idea why the lighter areas surround the sections of bare metal. It’s completely random and always a bit of a mystery as to how this method will turn out……OK I’m sad enough to look forward to seeing what the outcome of this is each time I try it out…….I probably need to get out more.
Whilst I was using those greenish colours on the helmet, I also painted up the jacket on the main body section. It’s years since I painted clothing with an airbrush, and it reminded me just how quick and effective this method can be. It always needs a little bit of refinement to put in a few of the details, but overall you get a more reliable overhead lighting technique in the time taken than with a conventional brush.


Photos #6, #7 and #8 show the jacket painted with exactly the same shades of colour as the helmet, but just how different they look without the colours being broken up with wear and tear and sections of metallic colour showing. The cloth looks almost soft because of the gradual shade transitions a good airbrush can give.

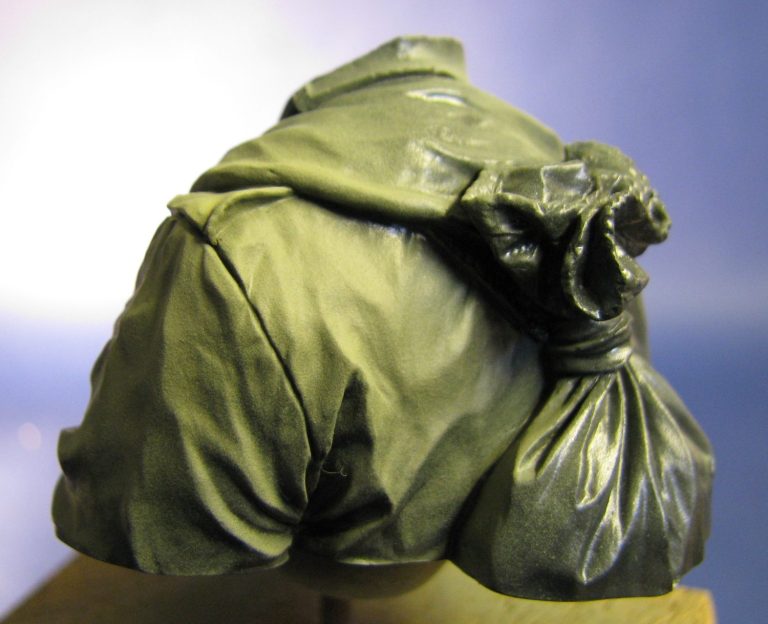

In photo #9 I’ve started building up the texture on the sack that he’s carrying on his back. I wanted this to have a rough, hempen texture to it, so used an old brush to stipple acrylic colours onto the surface of the model.
The idea here is to start of with a dark colour over all the sack, then gradually lighten the colour being applied to build up mid-tones and highlights. I was also trying to stick to the overhead lighting idea too, but whilst the colour have built up quite nicely by the time that this shot was taken, I’d not taken the colour far enough down the sides of the sack.
Obviously this would give me a few problems, as I’d already worked through about eight or ten different transitions in colour, and if I opted to strip the area off and begin again, there was always the chance I’d damage the green colours I’d used when airbrushing the jacket…….Problems, problems.
The most obvious thing to try is to match up the last six or so layers of colour, and work over the area that I’d missed and about half way up the section that I’d already completed.
It was worth the risk really, because if it all went wrong, then I’d be stripping paint off the area anyway.
This is where a little experience and a bloody mind come to the fore, simply because matching up colours is difficult the more colours you use – I’d mixed up four or five to get the sacking colours, so getting an exact match was going to be more than fun.
One good thing is that as I use quite a large white tile to mix colours on, I still had the colours I’d used to match up to, acrylic colours do alter a little as they dry, but that’s relatively easy to account for – they tend to dry lighter in a lot of cases – so off I went with the mixing.
It’s not exact, and the overall look is helped by the rough texture that I wanted to create hiding any discrepancies in colour anyway, the results of this further work being shown in photo #10.
To help blend the texture a little I added some oil washes to the deeper recesses and this tied all the colours together even more.


In photo #11 I’ve painted in the blanket that crosses his body over his left shoulder. All I can say here is that there’s a lot of green on this model – variations of it I grant you, but a lot of green. I used oils on this section, using a stippling action to blend the paints together when building up shadows and highlights from the mid-tones, and again working towards reinforcing the overhead lighting. Once dry some deeper shadows were added with more oil washes to selective areas.
The gun – this is the part I had fun with. To begin with, I thought “hey, this is cleverly presented.” And to be honest it is. I think a lot of modellers will discard the barrel as I have done and replace it with a short section of tube, but otherwise it’s pretty decent to put together.
The ammo box has a slight gap that’ll need filling and no matter what I did I couldn’t completely rid the gun of the joint line between the two halves of the barrel shroud. It’s noticeable at the end of the barrel, and I tried various fillers – Magic Sculpt, Mr Surfacer etc, etc. one was too coarse and needed more depth of gap to grab into, the other wasn’t quite thick enough to fill the same gap up, even with several applications. MEK does take off excess Mr Surfacer quite nicely, although that’s probably not what the good modeller should admit to having on his desk……
So, having admitted to far more than I should, photo #13shows a nice side view that hides completely any problems I’ve detailed above, because they’re on the top and bottom of the gun – see, clever disguise of the problems.
I’ve used the Dark Star Miniatures acrylics for the metal areas here, and having tested them out a little for the review, I can say I’m properly impressed with them here.


I mixed up the steel colour with some GW Chaos Black to star things off, then began washing over just the steel colour on it’s own, I added a little bit of Pewter to this, gradually building up the mid-tones and fading up to highlights with the Pewter colour on it’s own, then added just a little Bright Silver ( which is very bright ) to the Pewter, and finally some little touches of the Bright Silver on it’s own to make little “pings” of reflection appear to be shining off bright edges of wear.
I did add a final wash to selective areas with some Mars Black oil paint, but otherwise it’s the acrylics doing the work admirably.
In this shot you can see a spot of filler on the small amount of the wood stock visible where the gun is cut off. This was where I drilled through to put a wire from the gun into the bust to provide a secure joint between the gun and the body section. It’s overkill possibly, but just gives me peace of mind for when I’m transporting this about.
The white thing that’s sticking up half way down the barrel shroud is the cleverly fabricated strap that will join the rest of the strap that is moulded to the main casting.
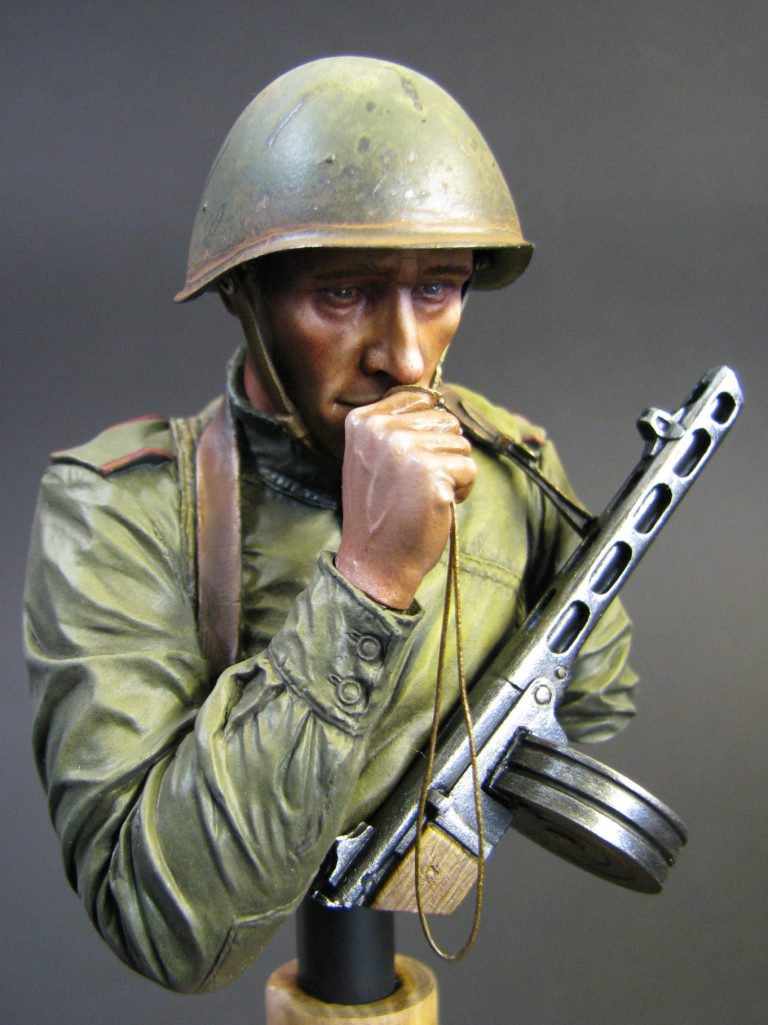
It’s shown once painted and fastened in place in photo #14, along with the finished head and hand.
I’ve not spoken about the flesh tones used on this, simply because it’s pretty much my usual method with Mars Brown and Titanium White. I did err on the dark side with the face, simply to reinforce the shadow being cast by the helmet. Final washes were added with a little Olive Green below the eyes, and some carmine around the eyes, nose and under the cheekbones. Once this had dried fully, I resorted to making the face dirty with some of the MIG powders. Lester Plaskitt gave me a good tip regarding these some time back, and that was to mix them with a little White Spirit and paint them on with a brush, feathering the edges out with more White Spirit. It worked well, and as the powder isn’t actually fixed in place, you can then “wash” areas off with a brush dampened in……more White Spirit.
I was impressed enough to add some dark earth colour to the face, and with that working so well, then added some rust colour to the rim of the helmet.


The smaller details were painted in – metallic areas like the belt buckles, cross and some very small chips and scratches on the gun were done with more of the Dark Star acrylics, and things like the cord for the cross with oil colours and a fine brush to add the lightest colour to this area to form the braided thread appearance.
And to be honest, that’s it. I put this on a very nice bit of turned wood expertly made for me by Nick Tebbs – he’s an absolute magician with a lathe, what must be very sharp chisels and other such implements far beyond what was covered in my “O” level woodwork class many, many moons ago.
With the rest of the shots you get an all-round view of the model. Personally, I’m quite pleased with the overall finish, I feel I’ve gotten a bit rusty this last eighteen months, so revisiting a few methods like the airbrushing and Marmite ideas, the use of green for a full uniform – heck most of the model really, and trying to gain differences in texture all serve to refresh the hand and eye.
As kit’s go, this is good, it fits together well, and apart from the filler on the arm and problems with the gun shroud – the latter is my shortcoming, not that of the kit I think – it’s a joy to work on.
I am a little disappointed about the facial expression, because to be honest I think that many of the other Life Miniature offerings have superior expressions when compared to this kit, but as with all models, there’s ways and means of getting around some of this problem – Careful painting and use of a variety of colours on the face and hands will allow for cold conditions and perhaps dirt and a few tracks where tears have run down his face, not to mention redness of the eyes and nose to perhaps hint at those tears having been shed.
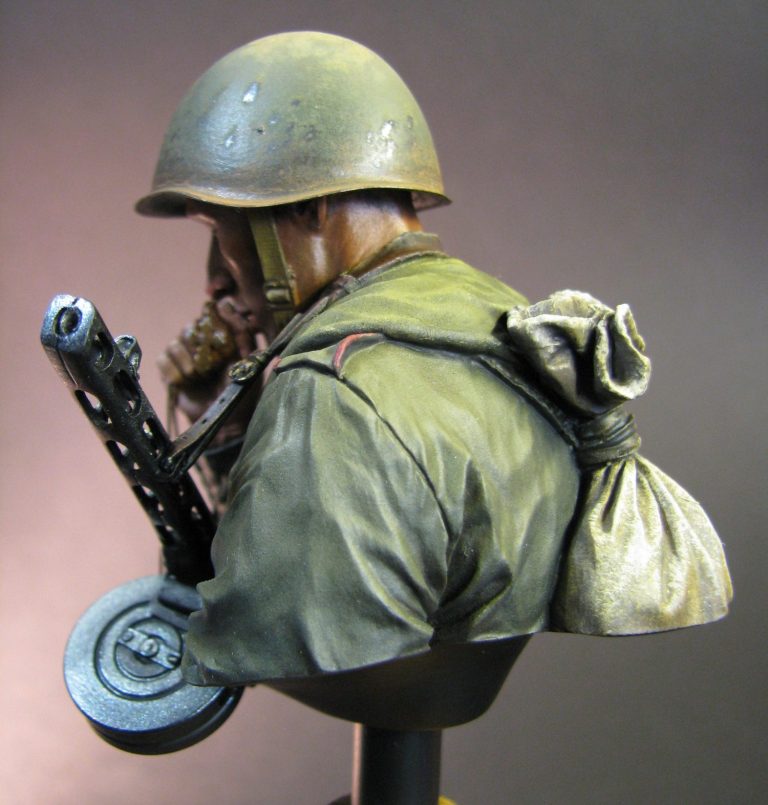

And really, that will be part of the enjoyment when you come to paint this model, to see if you can add to the melancholy suggested by the sculptor’s composition.
Russian WWII subjects are pretty rare in this scale anyway, and just turning now to look into the display cabinet, this piece does look dull and dishevelled – in stark contrast to Young Miniatures Hector and the Roman Signifer that flank him – but he does look good……Isn’t that the main thing of what we do, that the finished piece reminds us of a part of history; and in this case, the harrowing side of war.
We need your consent to load the translations
We use a third-party service to translate the website content that may collect data about your activity. Please review the details in the privacy policy and accept the service to view the translations.