Short Articles
I thought I'd add a section for very old pieces that might be of interest, but really don't need full article - possibly because I don't have progress shots.
Some or all of the old pieces will be from companies that no longer trade too, but you may be able to pick them up second-hand via eBay or the like, and I'll set up the page with these initially.
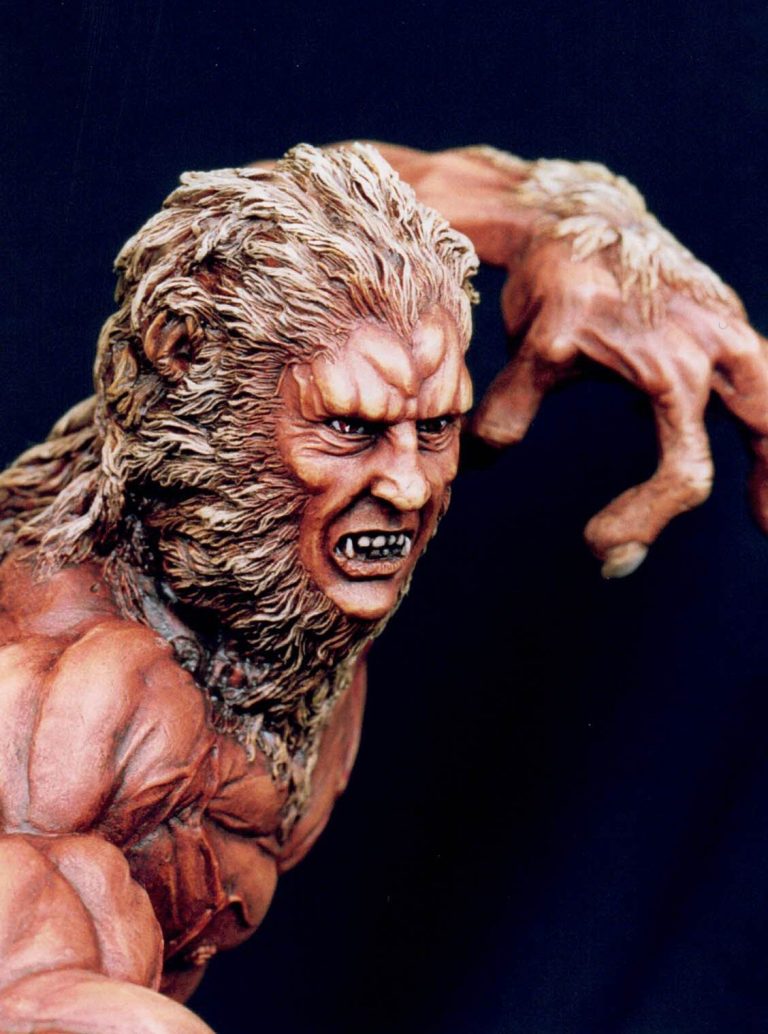
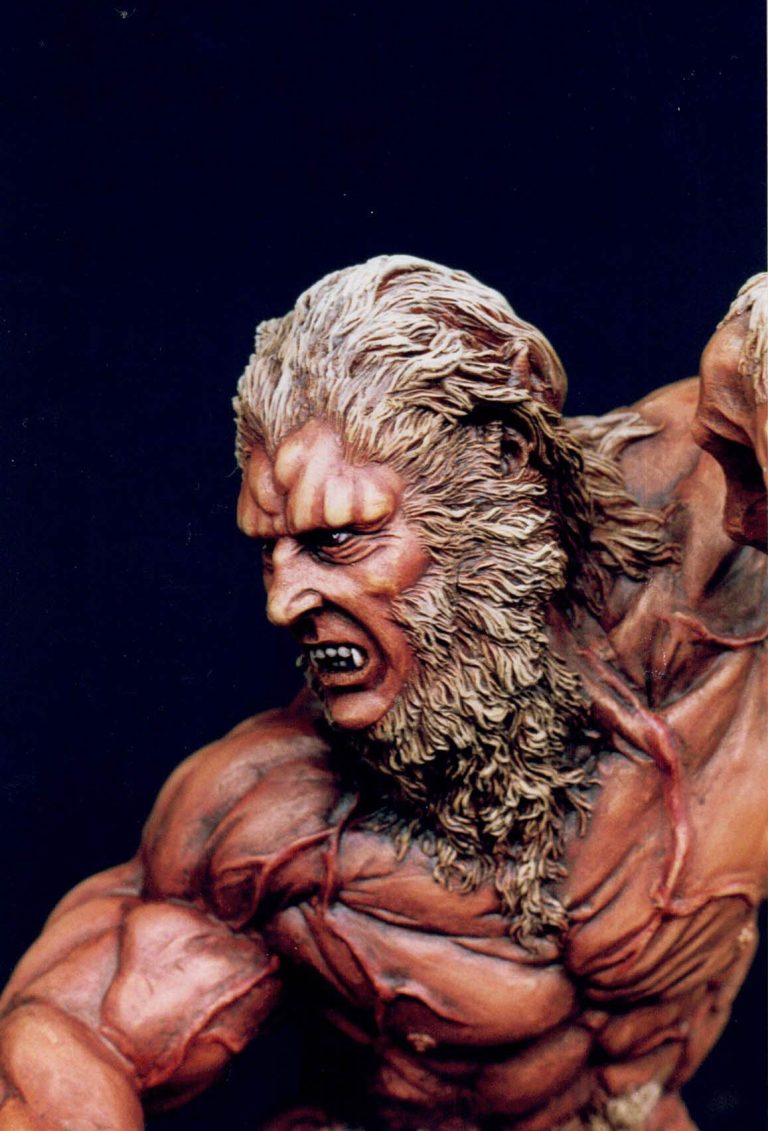
Werewolf
Cold Cast resin figure from Richard Bailey
Painted in 2001
This kit's a bit of a conundrum, mainly because I have no idea who's marketing it.
It's got a bit of a history though, because I know that it was sculpted by a lad from Birmingham by the name of Bailey. He was doing the master kit for I & E miniatures who were wanting to broaden their line of fantasy models.
But they dropped this one like a hot brick when some American chap told them that it was ( supposedly ) an amalgamation of two or three already existent model kits, cobbled together, and that it wasn't a "master figure" at all.
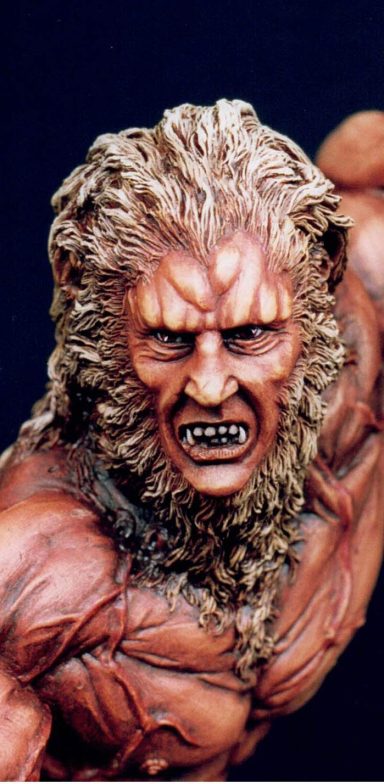

Now having seen AFM's article on werewolf models shortly after this came to light, and their line up of twenty to thirty kits being fairly complete, I was hard pressed to see where the "two or three" kits were, or how the parts could be amalgamated so that the pose and the scales worked.
Granted the model is stylised, and the head looks small compared to the girth of the thighs and biceps, but I think that it's just that, a stylised sculpt.
There are questions raised though. The face for example is very well sculpted, someone's concentrated a lot of effort into these features. Whilst the sculpting on the arms and particularly the legs is nowhere near as refined.
I don't know how many full figures Mr Bailey has sculpted, I do know that he's done several large military busts, two of which won gold and silver a couple of years back at the IPMS nationals.
So if he's used to doing faces, but not as adept at the lower body, then this could result in a tailing off of the quality and accuracy of the sculpting.
I ain't defending Mr Bailey, don't get me wrong, I just can't see where the copies have come from if it's this supposed "amalgamation" of kits.
Anyway, the model has been produced by someone, and very nice it is too. A little bare on clothing, and only three parts, the upper body, left arm and head being separate from the lower body and legs, and also the right arm being separated at around the elbow.
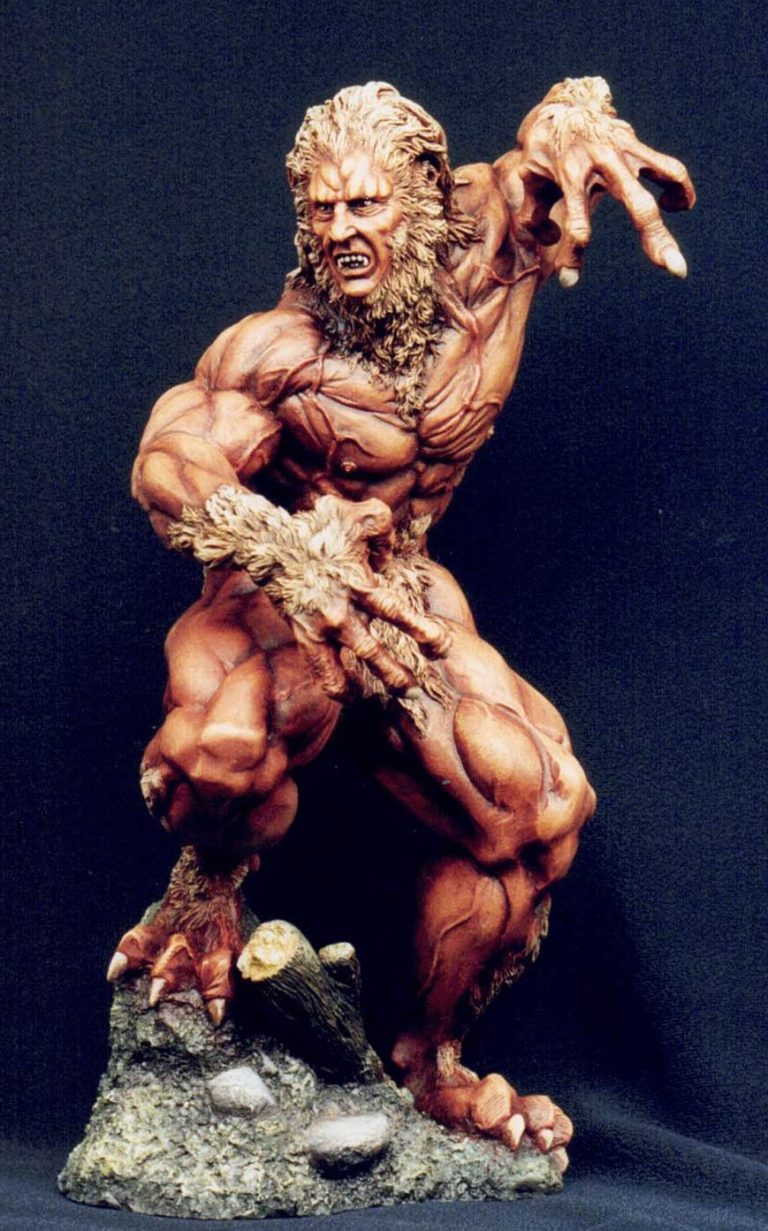
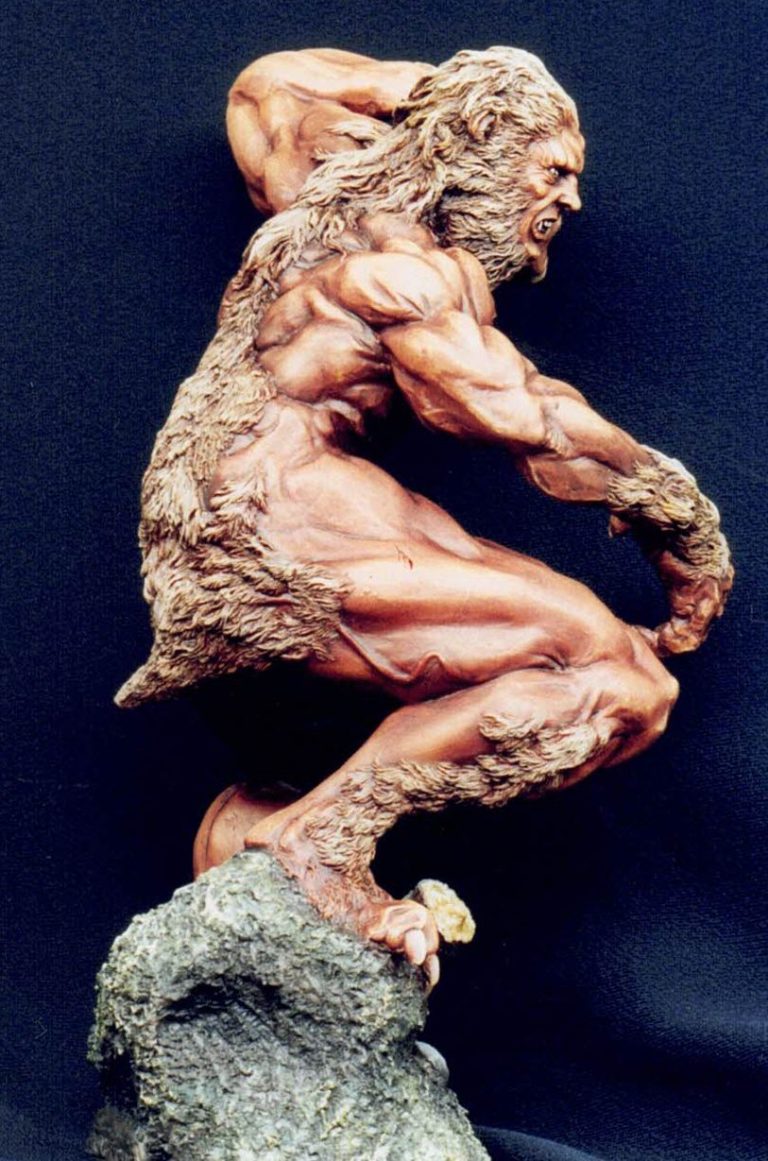
The part with the lower body has the feet moulded directly onto a groundwork base with a tree stump on and some grass. It's nicely rendered, but will limit the modeller to what can be done, unless of course you fancy hacking the base away from the feet, and all the lovely resin dust that that will cause.
I have misplaced ( thrown away ) the box in some previous house move, since I got this model about three years ago, and have moved each time the bin's been full - at least it seems that way.
So, the model. It's cast in cold cast porcelain, quite cleanly, but there are a few lines to file off here and there. I also found that the waist joint was a little woolly, and so added some more Milliput "fur" around this to hide the gaps.
The painting looks at first to be relatively simple, lots of flesh tone, and some fur. That's it. Then you're onto the groundwork. But it's more complicated that that isn't it ?
Yes. Y'see, the body is sculpted to be along the lines of Arnie Swarfega when he was into the bodybuilding, and the muscle definition, particularly on the chest and back, is superb.
The only thing I've seen that's in any way similar is the Jaguar model of "The Destroyer" by Sugeta, and painting all the detail of corded muscles will be time consuming, if it's to be done correctly.
So, with all filling and filing done, the model was washed in soapy water, and left to dry.
I then undercoated the whole thing in a mix of sand coloured and flesh toned acrylics, leaving this to dry fully before going on to the oils.
I decided to depart from my normal method of applying a mid-tone, then adding to that shadows and finally highlights, and instead opted to add the shadows first, building up the mid-tones and highlights on top of these.
So to begin with I added a thin coat of Burnt Sienna oil paint, straight from the tube with no thinner added. This was then dabbed and wiped off so that the paint stained the undercoat, but remained only in the areas of shadows between the muscle groups.
I then added some flesh tone onto this, stippling in the oil paint so that a mid-tone was established, wiping excess paint off the brush onto a dust free cloth so that the oil paint didn't build up too thickly on the surface of the model.
Finally, having built the colour up with the mid-tone as far as it would go, I added Titanium White in small amounts to the top of the muscles, to build up the highlights, again stippling this in so that the colour change from light to dark was gradual.
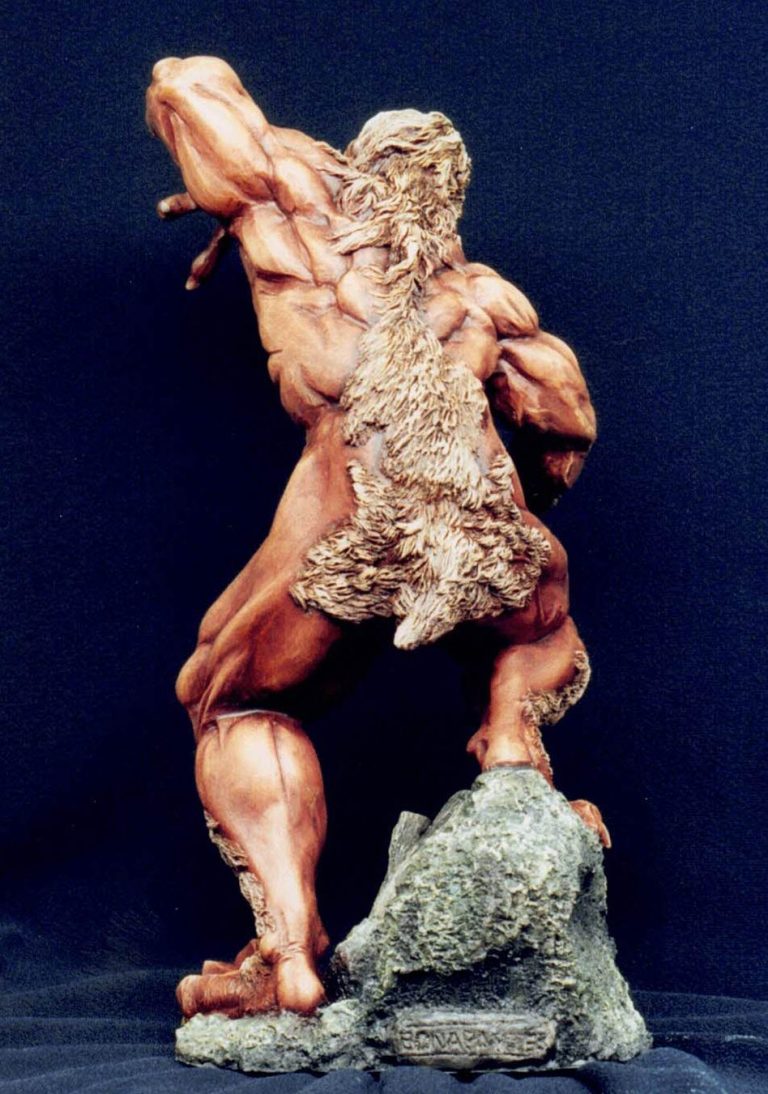
I then allowed the model to dry fully. The problem with nudes, and in this case a semi-nude that the clothing, or in this case fur, doesn't join up to provide true splits in the expanses of flesh ( Like a belt around the waist, which can be painted up to when doing the top half of the figure, you can let the model dry then, or go on to complete it by painting the legs ), is that once you start painting the skin, you can't stop for any length of time.
The stain provided with the Burnt Sienna, because it's so thin a layer of paint, will dry in a matter of hours, possibly less. So whilst having a cuppa is O.K. leaving the model overnight, even in a cool room, will result in a brown "tide mark" that, short of stripping off all the paint back to the bare resin, can't be effectively hidden.
So whilst the face and the feet can be painted in separate sessions, the rest of the skin needs to be done in one go if you're like me and prefer to use oils. Having said that, this is a model that would lend itself to acrylics, due to the amount of fine detail on the skin. But I like oils, so I had a long paint session on my hands.
The model's only eight or nine inches tall, but there's a fair amount of skin, and fast though I am, it took about five hours to paint with the odd cup of tea in between.
But it's worth it, the lack of finishing on the sculpting on the legs pales into insignificance when you get the overall effect of the model. The chest, as I've mentioned is superb in the raw resin, and even better with paint on.
Once the flesh is done though, it's a bit of an anti-climax to do the fur. Not much to be said here, browns and yellows, a little bit of grey too, and some black to add interest. Basically going off a real wolf's coat that I've got several pictures of in children’s "zoo" style books.
With the figure completed, it's a case of carefully blending in the groundwork as sculpted to the feet and I added a bit more groundwork and the ever popular ( with me at least ) tree stump.
The kit cost thirty pounds, I remember that much at least, and I reckon that it's not bad value at all. The sculpting is a little lacking in places, going from the excellent to the moderate on different areas of the body.
With a little tweaking here and there, or a moderately good paint job, the deficiencies will fade away, and the pose and ferocity of the model takes over.
I like werewolf and vampire models, particularly if they're well rendered or thoughtfully animated.
This kit fits in well in my view, and is a little gem just waiting to be brought to life.
Ghostly Apparitions
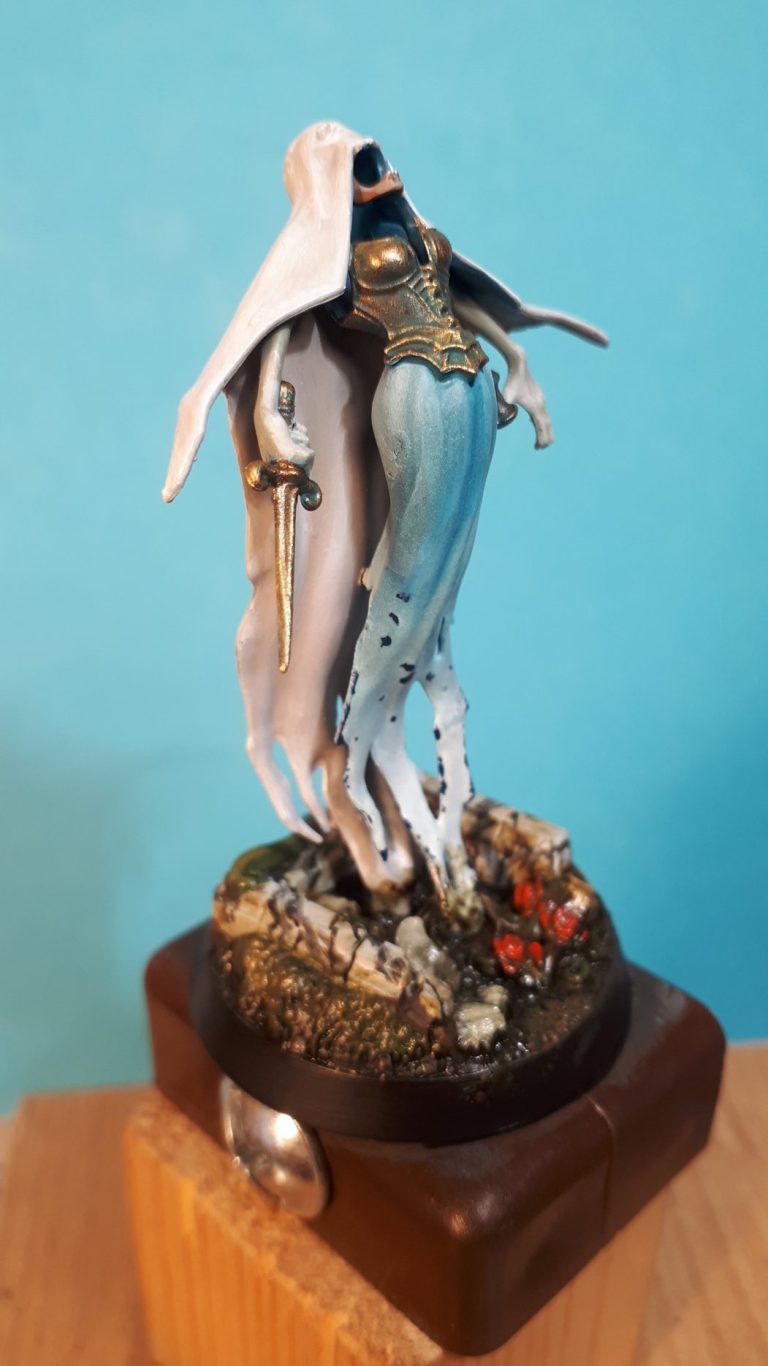
28mm plastic figures from Games Workshop.
I’d seen a few of these painted up and the concept of a semi-hollow figure seemed rather clever, and something I’d like a go at.
Someone commissioned me to paint all four of them, so that was even better.
Foolishly I didn’t ask for a deposit, as I’d got the set of four figures in already, and we’d agreed a price, so I set off assembling the first two in preparation for painting.
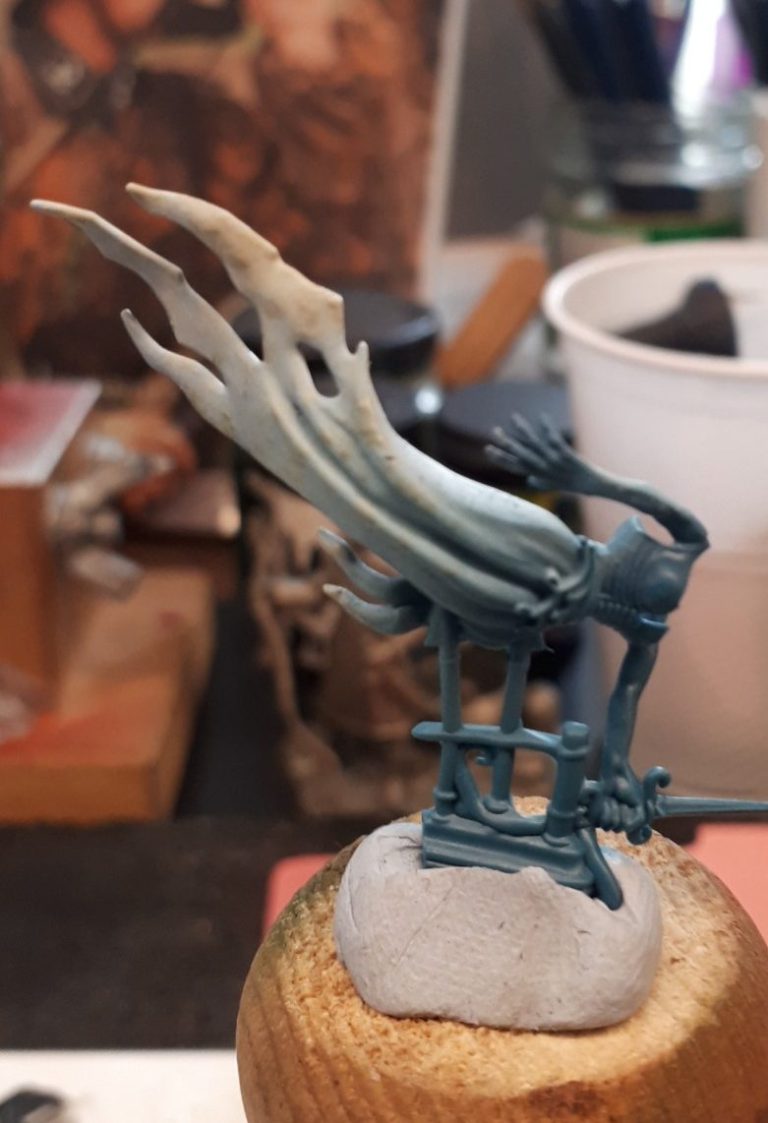
Photos #1, #2 and #3 show the figures cleaned up and fastened together, the second figure being kept in two subassemblies for ease of painting.
Sticking with photo #3 I decided to start off the painting by using the airbrush to fade in the pale cream / white areas at the bottom of the clothing.
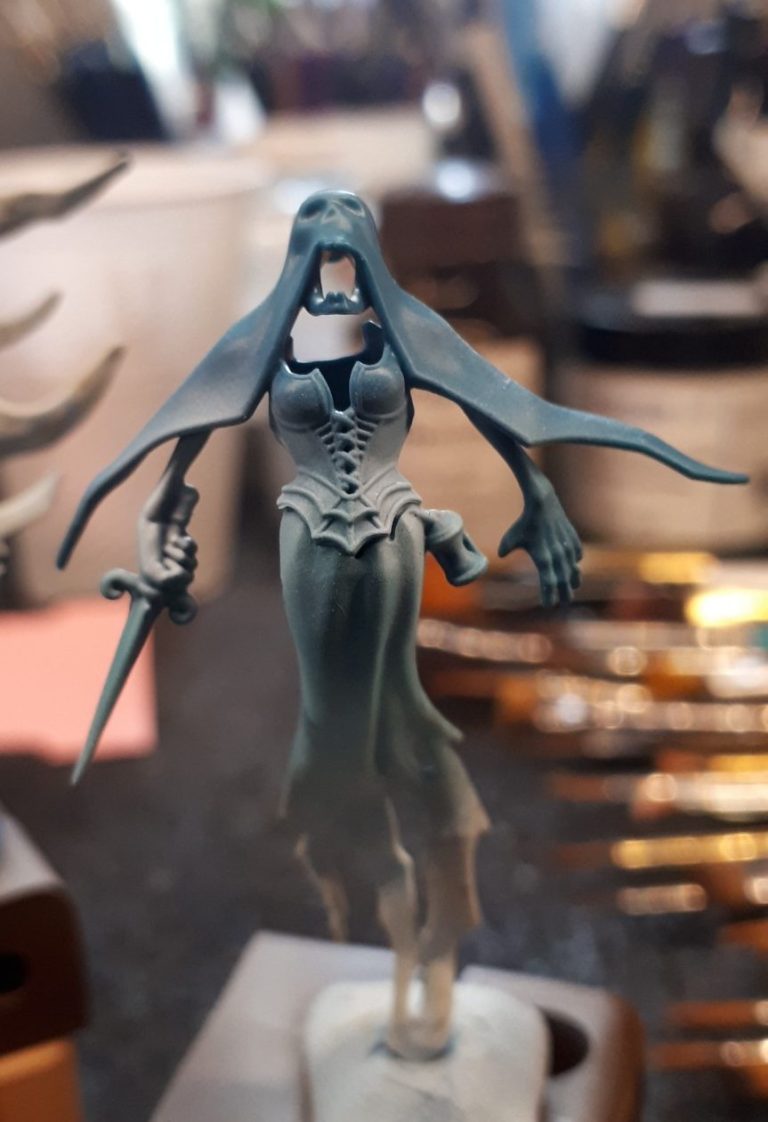


Perhaps photo #4 shows the effects a little better in that I’d sprayed on an initial coat of a dark blue acrylic. Allowing this to dry, I then gently sponged on some Marmite to act as a barrier to the lighter colours of paint that would be sprayed on next. Adding a pale blue to the airbrush cup, lightening this gradually by adding small amounts of white acrylic to the cup of the airbrush, and then spraying the new, lighter mix on, then repeating the process until I was using almost pure white.
The final coat of paint was allowed to dry for half an hour, then the model was washed with warm water and some detergent, using a soft brush to gently scrub the surface of the model and remove the paint that had covered the Marmite. The result is seen in this shot, the marmite removal leaving the dark ragged looking spots on the lower parts of the clothing.
I’ve also painted the skin of the arms with a very pale flesh coloured acrylic, adding some white to the mix to paint the highlights. This was done with multiple washes of paint to allow a smooth gradation of the lighter colour to build up.
The initial coats of metallic paint has been added as well, I used a bronze colour from the Darkstar range, adding some basic highlights of gold to pick out the details.

Photo #5 shows the second figure at around the same stage as the first figure shown in photo #4. The additions here are a wash of green to the metallic areas to hint at verdigris on the bronze armour, and some dark brown on the exposed jawbone with lighter cream colours added for the teeth.
I’ve painted the groundwork too, adding the dirt-covered gravestones and some old flowers scattered towards the foreground.
Photo #6 shows a three quarter view of the same figure, and here the features of the grave can be seen a little more clearly.
In photo #7 we return to the first figure, having glued the cloak in place and completed the railings and gravestone sections on the base, along with some flowers, the ghost is pretty much done.


Photo #8 shows the back of the same figure, the large gravestone has a lot of detail that can be brought out, and there’s plenty of other bits and pieces that can be painted on the groundwork too.
It was about this point – nearly finished the first two figures of the set of four – that the client changed his mind and no longer wanted the set painting. No reason was given, just a short email.
I don’t know about other commission painters, how they work or why they choose to paint, or decline to paint a commission, but I work on the basis that I’ve got to actually like the piece or pieces that I am to paint.
I learnt early on that accepting review samples or commissions of pieces that were not to my taste, do not end up with the best possible paintjob, and having to paint them drains positivity and time like nothing else. Painting something you don’t like is on a par with pulling teeth, and no matter what the financial gain, it’s simply better to tell a client the truth so they can get a decent paintjob done by someone who does like the subject matter.
But it doesn’t hurt to ask a painter if they’d paint something for you, especially if you like their style, or you just don’t feel up to painting a particular piece.
Most painters I know are very approachable, and are really pleased if you contact them. And of course it’s really nice to have a model in your display cabinet that someone else has painted. I’m lucky to have several from friends within the hobby, and they have a shelf all to themselves.
But returning to these two little ghosts, and me painting for other people….
In this case, I didn’t ask for a deposit, but that has now changed and I’d require a deposit before starting a piece, But whilst I have lost time on these, it did give me chance to paint something that I liked, and they are ( at the time of writing ) still available for sale, with the option of adding the other two figures from the set, should a client request it.
I do enjoy doing commissions, although it can be a wrench to let them go – if they’re something that I particularly like. I do occasionally sell the models that are already painted and in my display cabinets, depending on whether an offer is acceptable, as it makes space for newer projects, and there would always be a good reason given for me declining to sell something.
A lot of the models shown on this website are for sale – well isn’t everything if the price is right, or so they say – but some have found homes elsewhere and one or two have a special memory attached to them, but if you see something that you would like, then it’s just a case of dropping me a message.



Girl Power
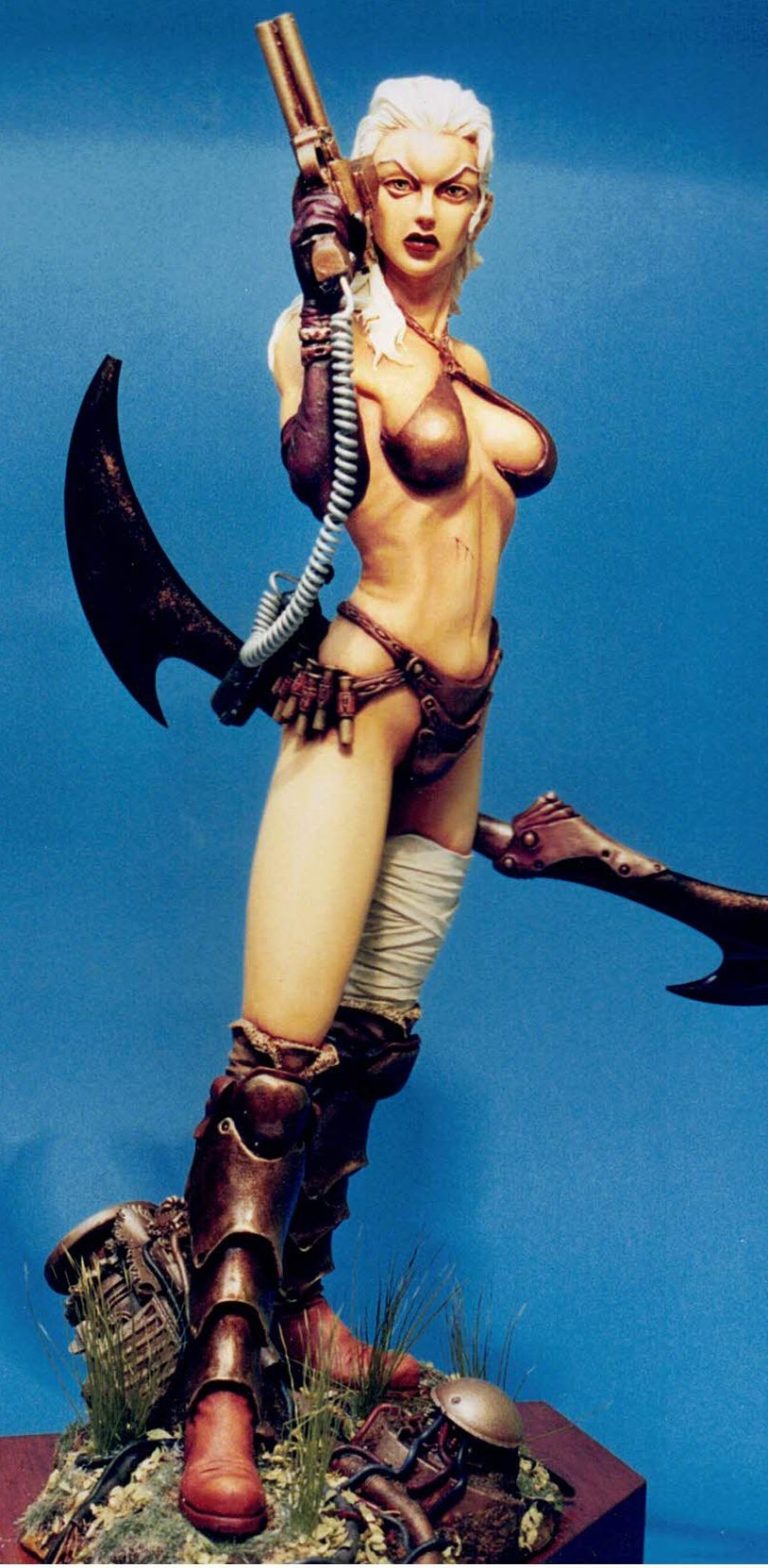
Kirin 1/8th scale kit
As I sort through old photos – yes, actual photos, none of that new-fangled digital stuff – I’ve been very happy to find pictures of models that are around 25 years old.
Whilst I’d like to believe that my painting skill has advanced, I still think that some of them are worth a short article.
This kit in particular might be of interest, although I’ve never seen another one offered for sale, let alone painted, is from Jaguar Miniatures.
It was, if memory serves me, an offshoot of the Kirin company – Kirin marketing military subjects and Jaguar in turn selling Fantasy and Sci-fi ones.
Kirin was an off-shoot itself, it’s parent company being Dragon – the well known producer of plastic aviation and AFV kits.
Sadly both Kirin and Jaguar are no longer in existence as far as I know, and I think Jaguar possibly only produced six or seven kits anyway.
My memory’s a bit hazy, but there was a female sorceress, a very muscle-bound Conan-like figure, a two-figure set called “Beauty and her guard”, a Ninja Girl and this one pictured here – Space Girl, oh and a Nosferatu bust looking very much like Max Schrek from the original 1920’s film.
Any others, have slipped from my memory, but I seem to remember there were one or two more.
Did they sell well ?


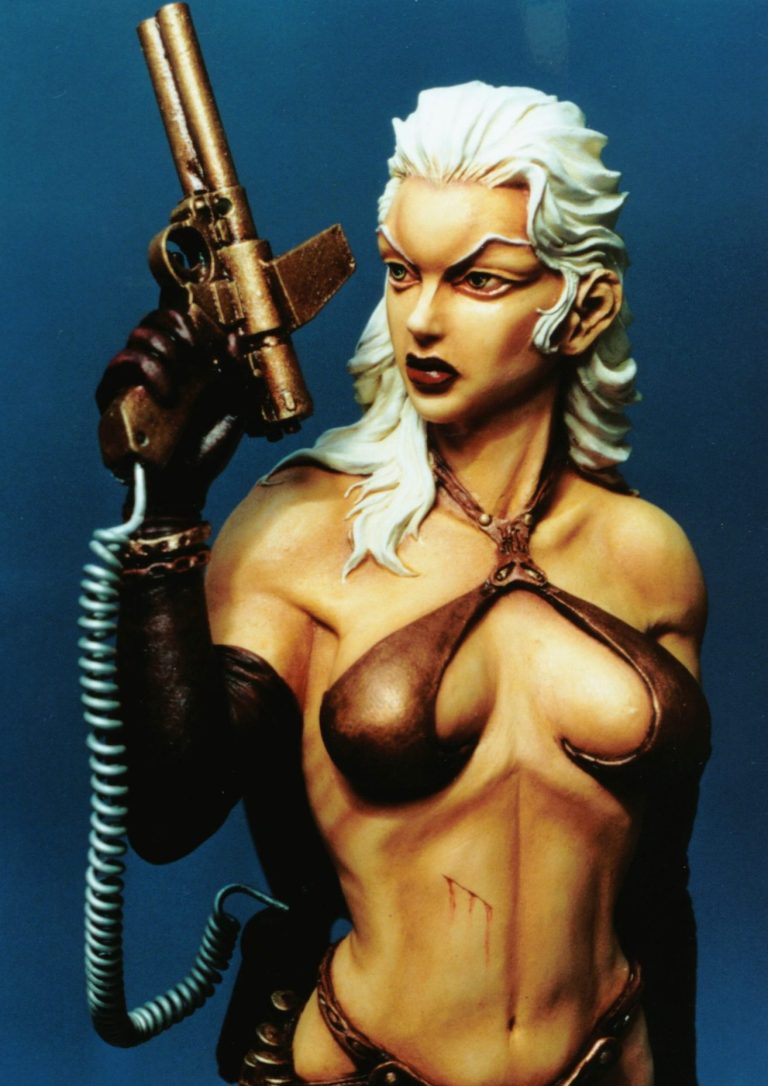
and also making a gas canister and coiled hose to change the pistol into one that is powered by compressed gas ( I was heavily into Paintball at this time and got the inspiration from that ).
Otherwise no changes have been made, the kit even comes with the engine embedded in the groundwork section supplied with the figure.
At the point in time that this piece was painted – around 1999 – I was still using a lot of the Games Workshop acrylics for metallic areas, and also as undercoats, the bronze metallic areas being undercoated with Chaos Black, a couple of payers of Shining Gold added to the mid-tone and highlight areas, and then a mix of Tamiya Clear Red and Yellow being added, thinned with water so that I could build up several layers of the clear lacquer.
I get the impression that they didn’t, or that they weren’t imported to Europe in very great numbers for them to make any real presence felt. It’s a great shame because the sculpting and production quality was very high for the time, and still stands up to modern offerings available in the third decade of the twenty-first century.
The sculpting is very good, and is backed up by fairly clean moulding of the parts. Yes, there’s a little bit of clean-up, but nothing to worry a competent modeller armed with a sharp craft knife and a small file.
I did add a couple of items to the double-barrelled pistol, using an old gramophone stylus cartridge ( How I’ve waited to use that descriptor and sound like I come from Sherlock Holmes’s era ) , gluing this upside down to the top of the pistol to act as a magazine,
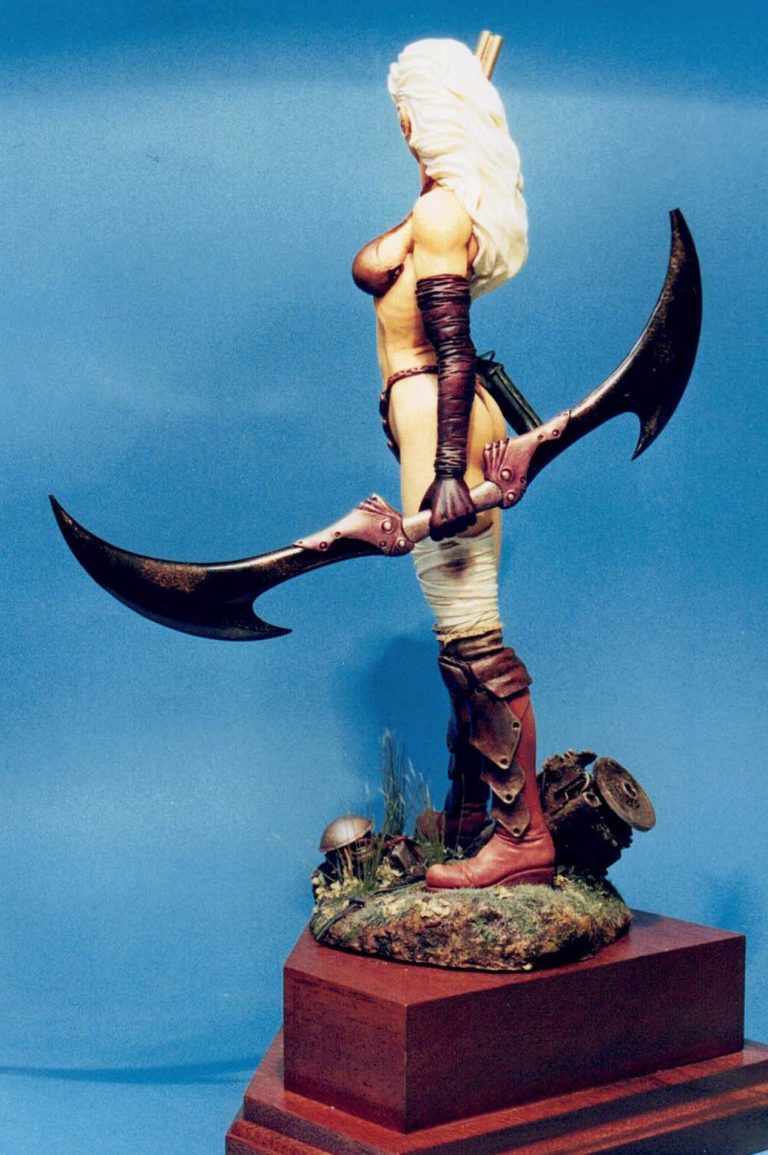
The bladed of the hand weapon were treated in a similar way with the same colours being used, but the Shining Gold was applied with a sponge rather than a brush, and a lot of the Chaos Black being left visible.
The bandages on the leg were painted with very pale sand coloured acrylics, adding more and more Skull White to bring up the mid-tones and highlights, and then a mix of Burnt Umber and Alizarin Crimson were stippled on to look like an old wound had been bleeding and some of the blood had seeped through.
The white hair was inspired by a picture from an artwork book by Jim Burns, and used Skull White with some very minor additions of a very pale sand colour for the deeper recesses of detail.
The base is pretty much how it comes with the kit, and after painting with appropriate colours, I just added some Static Grass around the raised details, and because even the longest Static Grass I had in stock ( about 6mm long fibres ) wasn’t really long enough, I stripped some dyed Deer Hair – used by fishermen who make their own lures for Fly Fishing – to make the longer tufts of grass. The advantage to Deer Hair is that the tips of each hair don’t take the dye very well, so the tips look like the seed heads on the grass flower stalks.
Final thoughts.
Twenty +-five years ago I painted this, and I’ve still only collected two more from the range, and haven’t put any paint on them anyway – Bad Adrian, Bad !
It is sad that Jaguar Miniature kits are no longer available, I think that there would have been some really cool models that would have been released if they’d continued production, although maybe my bank account is relieved that they didn’t
As for this one, very enjoyable to assemble and paint, at the time it won quite a few prizes for me at model shows, and it’s one of quite a few pieces I have that will not be sold.
It’s showing it’s age now as far as the painting is concerned, although the sculpting quality can’t be denied.
I’d certainly consider buying another one ( depending on the price of course ) if I saw one available, just to allow me to paint the newer one and compare if my painting has improved….. or not.
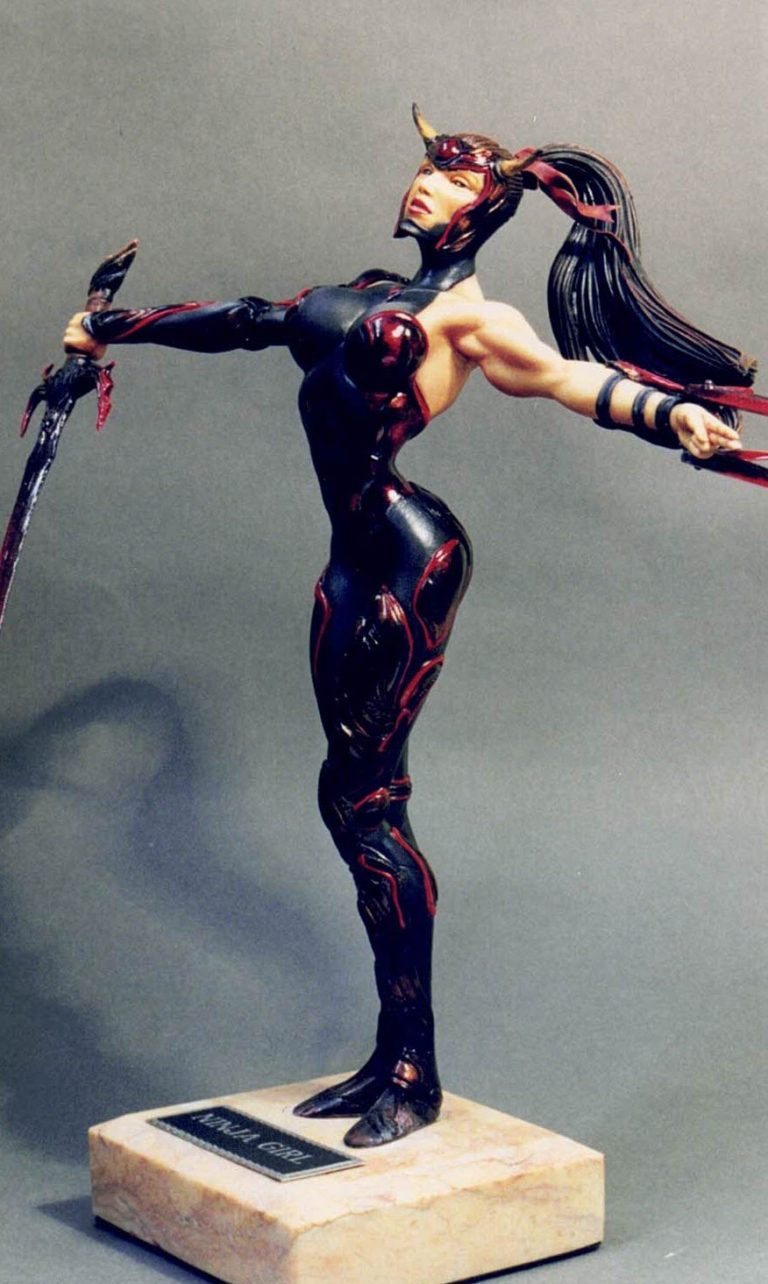
Ninja Girl
1/8th scale Resin kit from Jaguar Miniatures.
Painted in 2000
Bought around the time when “Garage kits” were becoming more commonly available in the UK, I managed to buy and get paint on this kit from Jaguar.
I’ve mentioned the background to the company in a previous article on the Space Girl from Jaguar, so won’t bother repeating myself here.
The sculpture on this piece is superb for the time, and would stand up against anything produced currently either by traditional sculpting methods or in 3D.
The proportions are typically exaggerated, but still allowing the anatomy to be relatively believable.
Untypical of the times was the feminine face, although the chest does revert to the idea of “stick two bulges on the thorax and it’s gotta be female”
Unusually for me the painting took a different path than usual, applying the colours to the clothing first – heavy on the black, although it’s really a very dark grey, with accents undercoated with white and then the addition of red to outline some of the raised detailing.
A coat of varnish finished things off and then the flesh areas could be done.
Why a change in the usual methodology ?
Simply put, it was so that the gloss varnish could be added without it getting on the flesh areas.
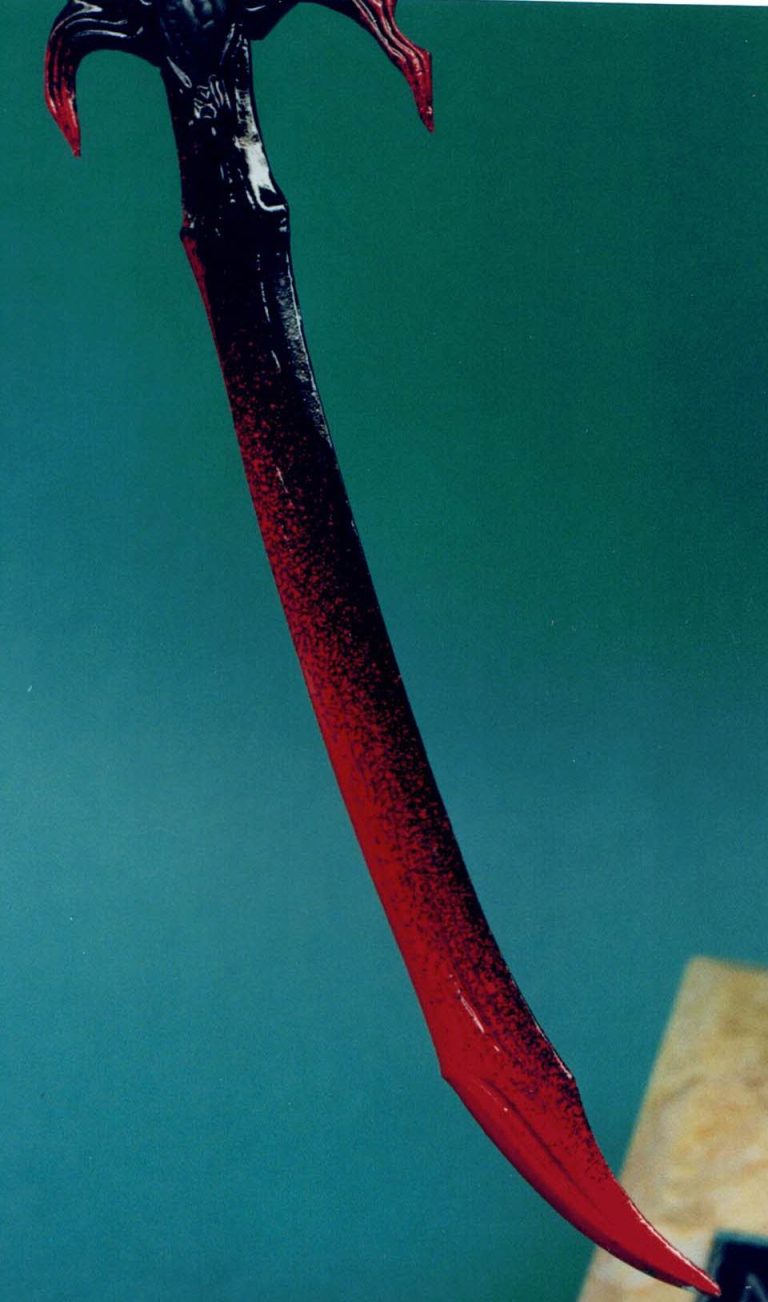
The weaponry received a couple of coats of Chaos Black acrylic and then a spray can with White Primer was used to get a speckled effect running from a solid white at the blades tips to the spotting on the third of the way along towards the hilt.
Tamiya Clear Red lacquer was applied in several thin layers ( watered down with an equal amount of, well, water actually ), allowing each coat to dry fully before adding the next one.
To this day, the hair rotates / swings around on the wire pin that is fastened into a hole in the back of the head. I’ve added glue so many times, but the weight of the resin seems to break any permanent hold the glue has at the least opportunity.
So I’ve given up on that one – the pin is long enough that it’s unlikely to work it’s way out of the hole any time soon, and I’m OK with that.
The only additions made to the model are the thin Pewter Foil ribbons added around the hair / head attachment point, and made to look like they’re flapping about in a wind coming from her right.
One last point is the use of an old marble trophy base for her to stand on.
The choice of colours of marble is quite varied, and it all seems a good idea to have something heavy to stabilise a model that has a small point of contact with the base, but a larger amount of resin spread out I the upper areas of the figure.
On a wood plinth, this model would be quite easy to knock over.
As it is, superglue does not secure Resin, or for that matter White Metal to marble. The bond is at best temporary and will come adrift with the least possible provocation – most likely when the model is in transit, or better still when a kindly judge is picking the model up to have a look at it.
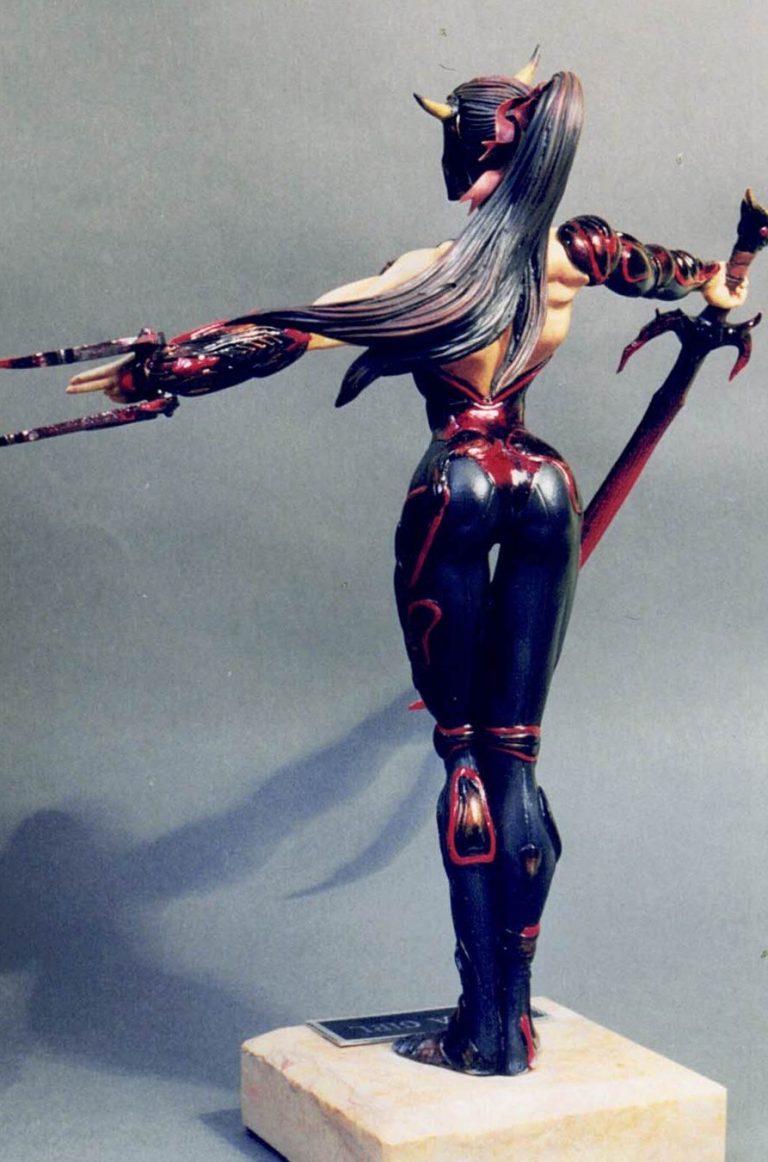
Knowing this fact, is why I put a couple of long pins up through the heels of the figure, drilling corresponding holes down into the marble, so while I know the glue isn’t going to hold the feet securely to the plinth, the wire pins will stop her becoming detached and falling to the floor unless she’s turned upside-down.
Final Thoughts.
OK, we know I like the Jaguar range of kits, limited though they were, and looking for them twenty-odd years after the company ceased producing them is akin to searching out hen’s teeth.
There is always hope that one that I don’t have will turn up, and maybe I’ll get lucky.
So please humour me when I state that “they’re awful kits, terrible, and please don’t buy them if you see one, just give me a shout and I’ll do my best to make sure you’re not burdened with them”…… Well, it’s worth a try, isn’t it ?
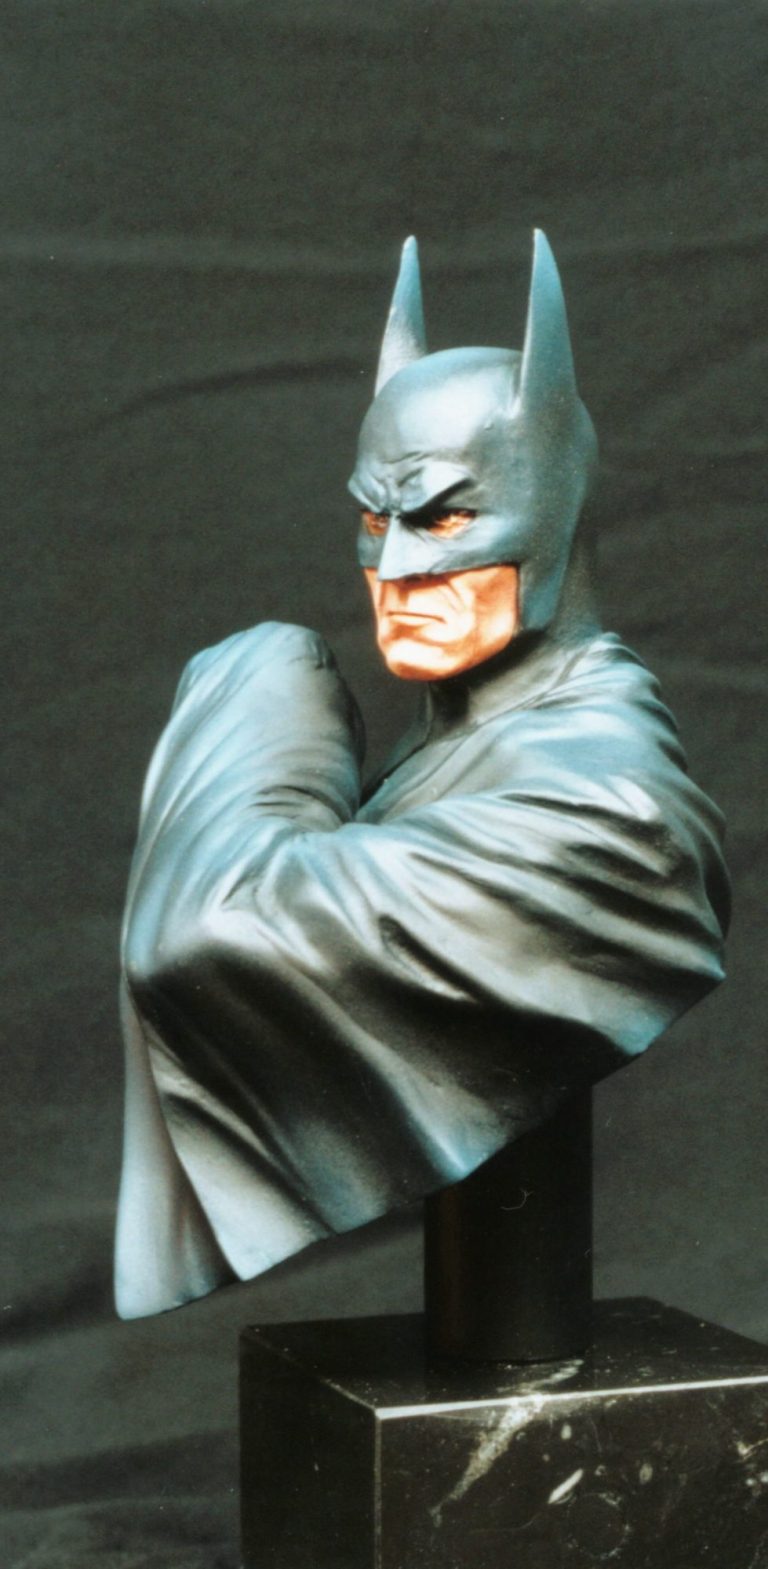

Batman
I joined the two parts together after painting the face, as I thought that it would be easier to get at without the arm in the way.
Once the face was done, I superglued the arm into position, filled the slight gap, and then masked off the skin areas already completed.
The airbrush then came into play, using this for the deep blue/black of the cloak, and once completed, then returned to the oils for the light blue chest area and then painted the black Batman motif with GW Chaos Black acrylics.
This is one of those kits that should have made a mint for the company that produced it, but probably didn’t. It is ( in my opinion at least ) a model that evokes the whole forbidding, dangerous hero that I equate to the Batman character.
Company – United Empire Miniatures
Available from – United Empire Miniatures
Scale – 1/8th
Painted – Dec 2000
A brilliant resin bust from United Empire Miniatures; it’s not a huge piece, being scaled along the size of a military bust – probably around 1/8th scale.
The kit comprises of two parts, the main casting with the head and body, and then separate from that is the raised arm.
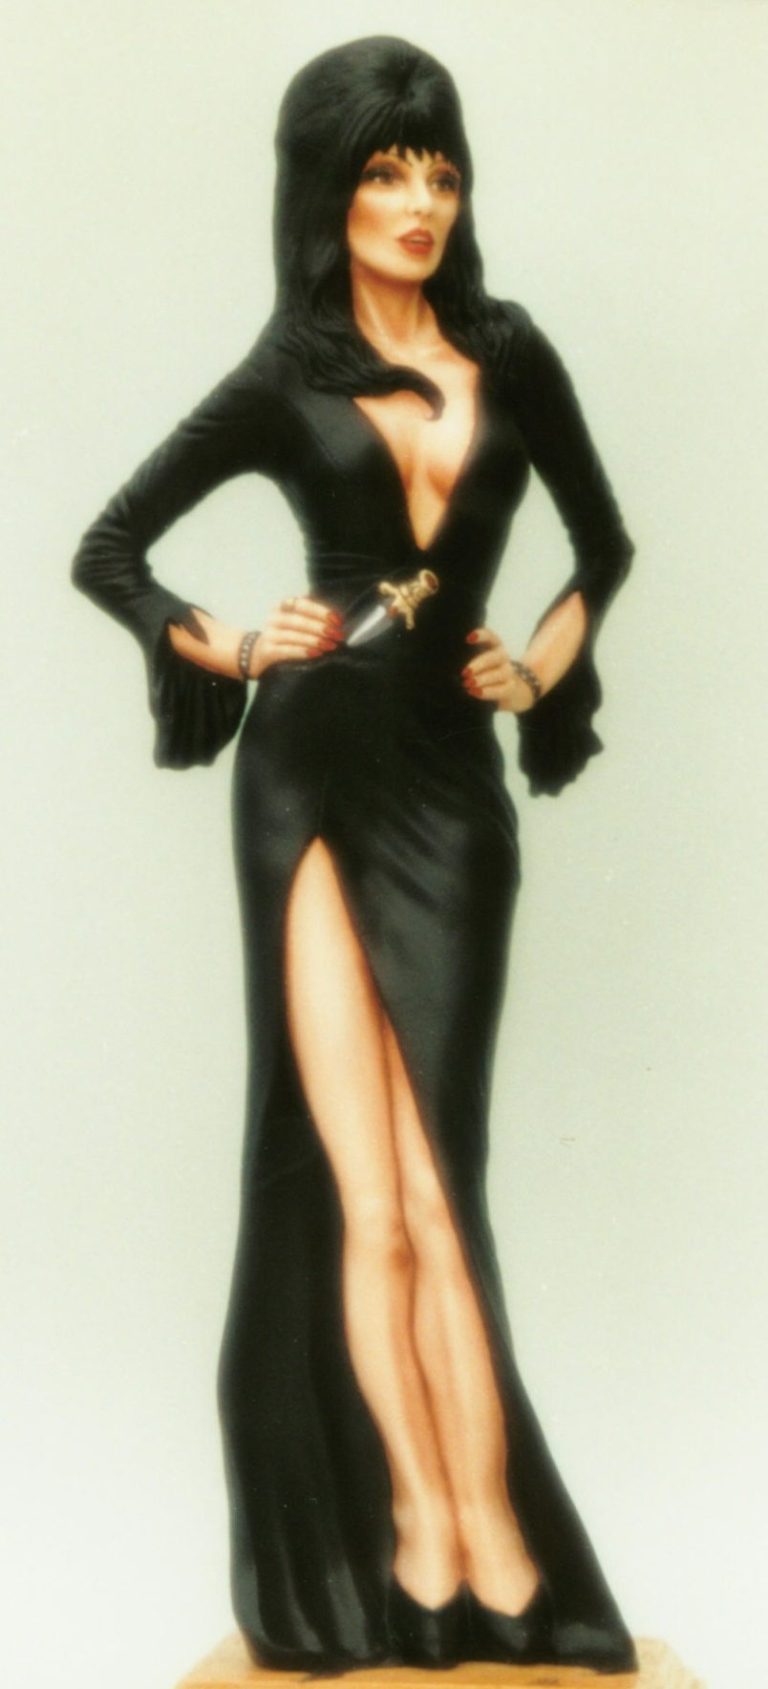

Elvira
I also used a couple of large screws to fasten her to the wood plinth, and then added more Milliput to the tips of the shoes to make them appear longer and more realistic. The putty was also employed to fill in the rounded areas of the dress hem and make it flare out a little, faring this into the wood base.
I painted the skin tones with oil paints, doing these first, and then for the black hair and the dress, just used GW Chaos Black acrylic.
Yes it was that simple, the casting is so large that natural light does all the shading that is necessary. Having initially tried to shade and highlight the black, and have it look too forced, this method of letting the casting do the work was more effective and much simpler.
The hardest part of the whole process was finding somewhere to take a picture of the model, and a large enough backing paper. The stone wall visible at the top of the second picture is testament to my failure in the quest of the backing paper at least.
Company – Screamin
Available from –
Scale – 450mm
Painted – April 1997
Another commission, the first I did for a guy called Steve Balmer.
This must be one of the most gratifying models I’ve ever produced for the work to effort ration.
It came into my possession semi-stripped of previous paint, along with several promotional photo’s of the character. The model comes in two parts ( or the one I got hold of did ) and the only disappointment was the lack of depth to the sculpting / casting.
It’s an original “Screamin” kit, and is done to their accepted ¼ scale, making her a very big girl ( well, she’s eighteen inches tall – 450mm ). I decided to fill the whole of the model with Plaster of Paris, just leaving about half an inch at the waist joint that could be filled with Milliput.
Grief
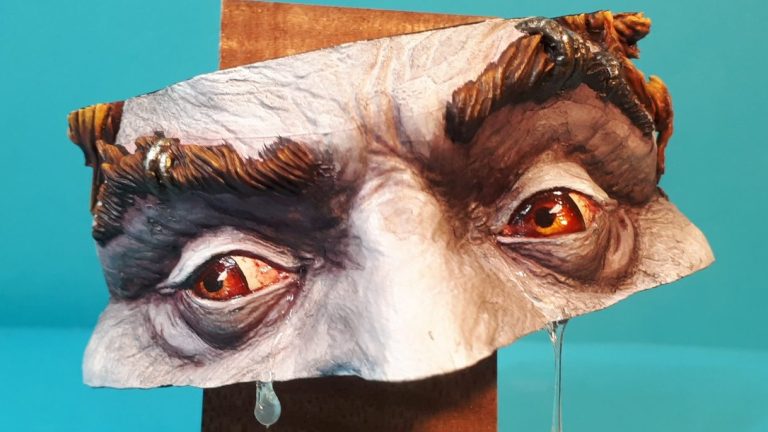
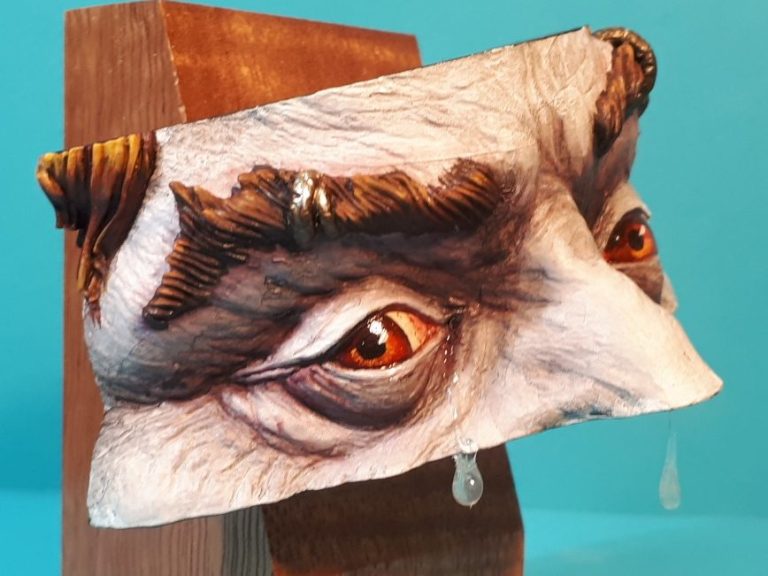
My first plan was to paint it in the style of The Joker from Batman, the manic look and wild eyebrows might work well with that theme, but as I began painting it, working on a pale flesh colour that I could later add The Joker’s make-up to, it hit me that the subject was unhappy; no actually, it was more than that, it was full of sorrow.
This was helped perhaps by my not having securely glued the pin into the back of the piece, causing it to tilt to one side.
And that was it, “Grief” became a reality housed in this expressive piece. Having painted it, leaving the pale flesh colouration, adding some ginger eyebrows and the rings through them, I just needed to add a tear dripping from the corner of the eyes.
A glue gun supplied them, with the end of the each teardrop falling clear of the lower edge of the model and the trimmed down face tilted to one side as in the shots here.
The White Rose Historical Miniature Society had a competition in 2022 inviting all members and a few regular supporters to have a go at painting a very strange piece. The whole point being to see who would be inventive, and in what way their imagination would take the very limited canvas. The finished pieces were to be displayed at the White Rose Christmas Bash in December 2022.
As you can see from the pictures, the canvas is limited to a pair of eyes and eyebrows, a small section of the forehead and the bridge of the nose.
It makes for an interesting project, the first thing being how to think of something different with it.
The Duck that Fet Forgot
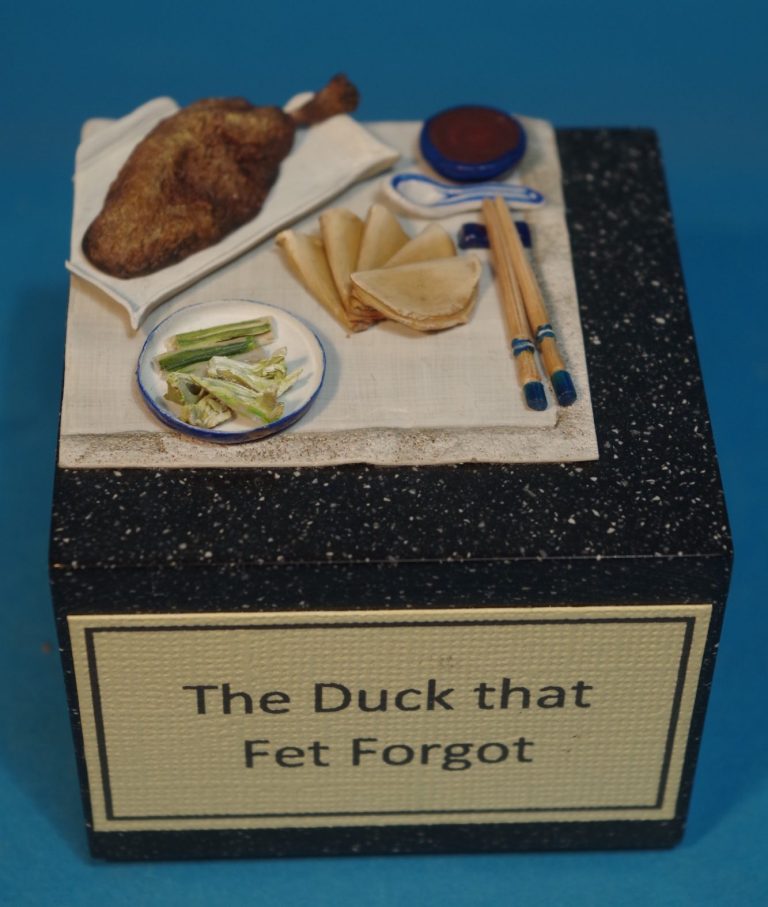
All of the items are scratch built, from the miniature chopsticks, pancakes, the shredded spring onion and sliced cucumber, and the little pot of duck sauce. I even managed to make a miniature rest for the chopsticks and a corner of a tablecloth.
Everything except the chopsticks is made from Magic Sculpt epoxy putty, the chopsticks being carved from a couple of cut down cocktail sticks.
Scale ?
It’s probably around1/6th, which makes it quite a lot larget than Fet’s ducks, but who’s going to complain about a bigger portion of Crispy Duck Pancakes ?
A couple of years ago a chap called Fet Milner did a series of 1/35th scale ducks on separate little plinths, that all fitted together on one large plinth in order to display them.
They were lovely little pieces of art, with foliage and one or two ducks on each little plinth, and each of those plinths holding different species of ducks.
I loved the idea, and knowing Fet well enough that I thought he could take a joke, pointed out that he’d missed a very important duck that was often seen in the UK.
Pictured here is that duck, and hence the title “the Duck that Fet Forgot”
We need your consent to load the translations
We use a third-party service to translate the website content that may collect data about your activity. Please review the details in the privacy policy and accept the service to view the translations.