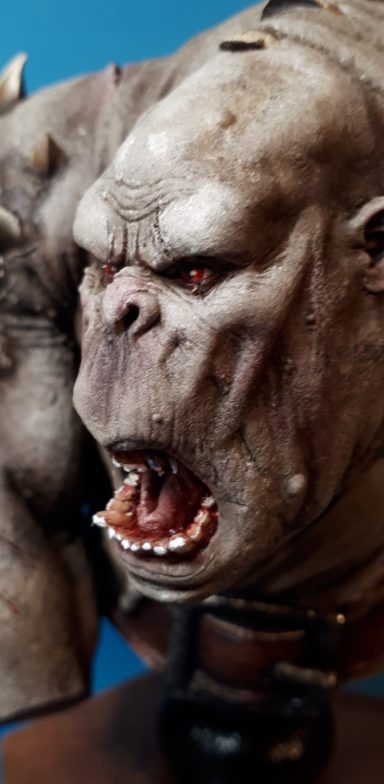

Bob, AKA Ork'aa Grim
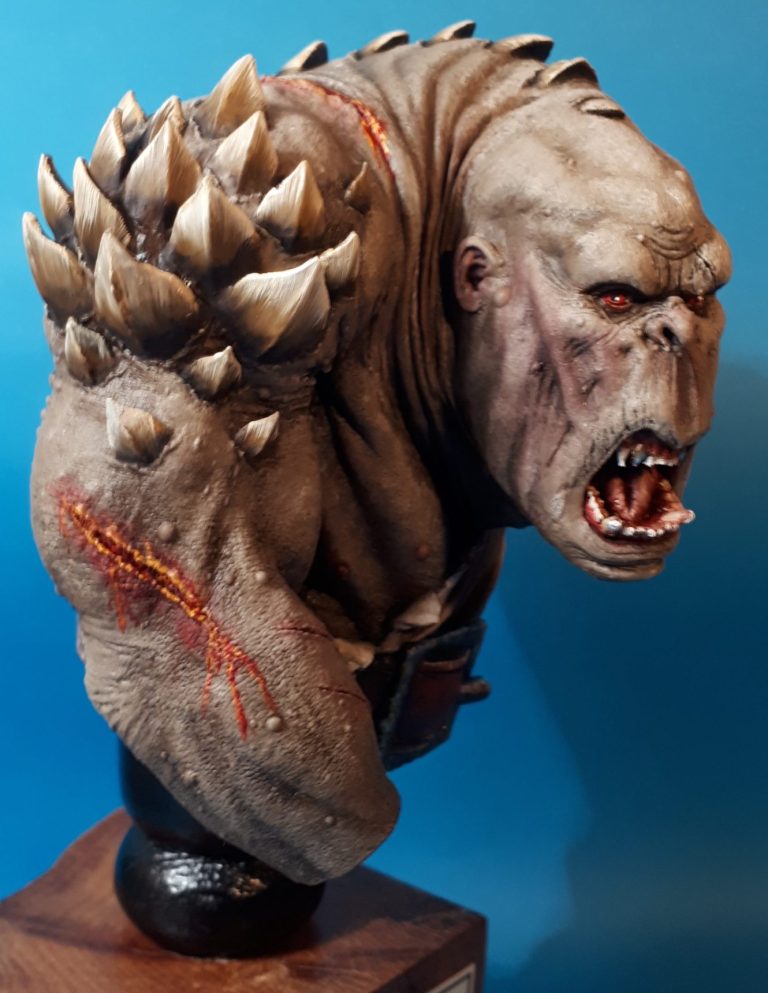
A CFPrints3D 1/6th scale bust
Painted in 2023
Oh eBay, thou tempter of the poor figure painter !
3D printing has increased over the past few years from giving us visible slicing that was almost impossible to deal with, to pieces of, well, how else can I put it, visible perfection like this.
OK, it’s a face that only a mother could love, and even then with the help of a lot of alcohol or some illegal drugs, but wow, is it a cool bust.
Since buying this I’ve seen different scales of full figures offered on eBay – 30mm, 54mm and 75mm – but I’ll stick with this I think.
The cost was £30 plus postage, and whilst there’s no box art, the images shown by the seller looked very good indeed.
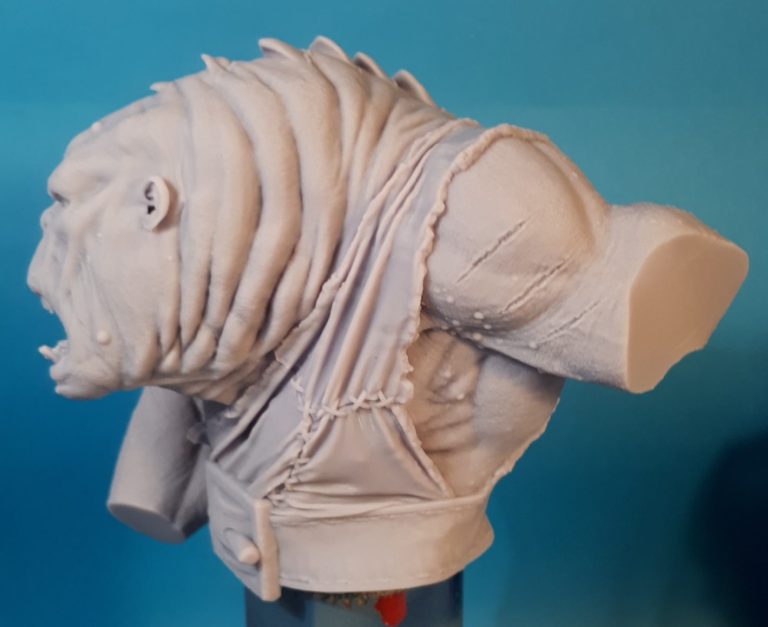
Photos # 1, #2 and #3 show the casting as it comes – a single component – with no real clean-up to speak of. I did refine a couple of the fangs, but this was really minor stuff and I doubt that the small scrapings with a sharp scalpel are all that noticeable.
Surface detail – it’s bleedin’ wonderful, although I’m glad it’s a print with no mould part lines to deal with, because replication any detail would have been difficult to say the least.


The bust is hollow, with a couple of drain holes underneath the flat area below the belt, and I took the precaution of part filling the inside of the bust with some casting resin. This was simply so that I could fasten wire pins into the model so it could be secured to a wood plinth when finished, and I didn’t want anything snapping when he goes to shows.
Photo #4 shows the start I made on the skin. I’d primed the model fist with a heavily thinned mix of Isopropyl Alcohol and sand coloured acrylic paint, then added three more coats of the sand colour mixed with some water to allow it to flow better.
Once fully dry, I painted on a layer of Vandyke Brown oils, thinning these with a little White Spirit and using a large brush to work the paint into all the detail.
Time for a cuppa and maybe a biscuit to give the paint time to settle and some of the White Spirit time to evaporate a little.
Put in a warm place, the White Spirit disappears quite quickly, enough to leave the oil paint wet, but not overly so, and to bring out the details it’s now simply a case of using an old T-shirt or piece of soft cloth to dab at the surface of the model to remove the dark paint and reveal the lighter acrylic colour underneath.
Left at that, it’s perfectly fine, the detail on the skin doing all the work for the painter.
However I chose to add more paint, taking some Buff Titanium oils and a large soft brush to gently blend in the lighter colour with the dark brown.
It’s a balance between very light drybrushing and stippling to add the lighter colour without having it fill in the very fine detail, but still create highlights, and “less is more” is definitely the rule here. After initially adding the Buff Titanium to the Vandyke Brown that was still wet, I dried the model for about forty-eight hours in the drying cabinet, then returned with more Buff Titanium and the soft brush to enhance the highlights even more.
This addition was made using a very light-handed drybrushing technique, picking paint up off the palette and wiping the brush a lot on a soft cloth before using the brush to pick out the raised areas of detail.
Again a two day session for the model in the drying cabinet, and I could then add pin washes of Vandyke Brown, heavily thinned with White Spirit, to the deeper wrinkles and other areas that would have dark shadows.
This all sounds like a lot of work – repeated layers of paint with time for the model to dry in between.
Yes, OK, that’s true, but the surface detail helps a lot with this, and to be honest, seeing the skin detail “pop” out is well worth the effort.
Photo #5 shows the upward pointing scales on the shoulder, there’s more of these running up his spine too, and I used the already present Vandyke Brown that was in the deeper recesses of detai to begin the process of painting the scales.
I added some Mars Yellow to the Vandyke Brown on the palette and then using a fairly wide, flat brush, painted on this mix working in strokes that began on the upper edge of each scale allowing the lighter paint to gradually peter out the nearer it got to the base of the scale.
I needed to wipe the brush on a soft cloth after each pass so that the dark brown colour didn’t contaminate the lighter paint, recharging the brush from the palette before moving on to the next scale.
With a mid-tone established on each of the scales, I could then lighten the mix that was left on the palette with some Titanium White, and begin the process again, but not allowing the brush to travel all the way down each scale, .
A final highlight colour was established using Titanium White on it’s own, dragging the brush from the upper edge of each scale, but only allowing the paint to touch the upper quarter of each scale ( at the most )

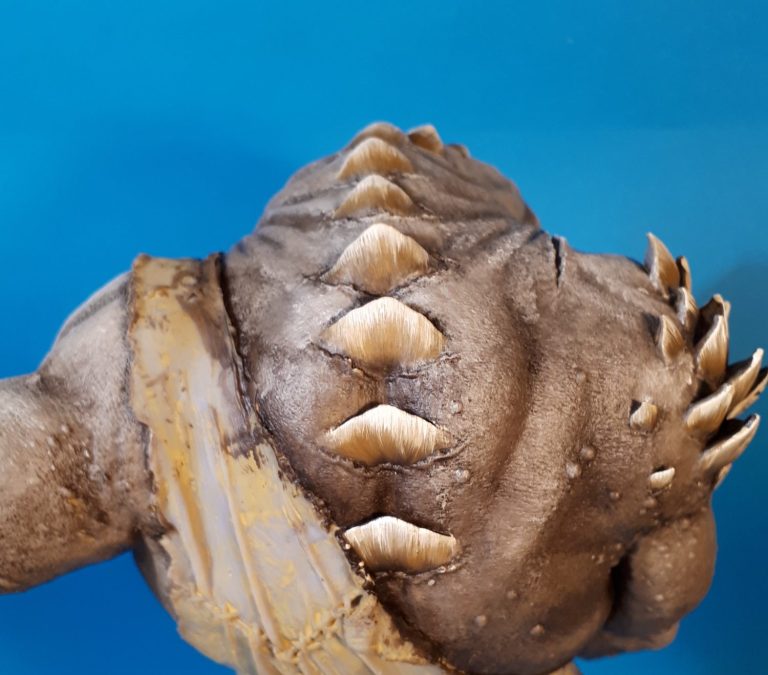
Photo #6 shows the scales that run up the spine having been painted as described above.
Now for the scant amount of clothing that covers the left side of the figure at the front.
I wanted to depict a patchwork of skins that had been used to make the garment, and whilst the colours do look rather similar to those used on the skin areas, there is quite a bit more Mars Yellow in the mix.
The contrast was built up by adding spots of lighter oil colours to the area that already had an overall coat of Vandyke Brown painted onto it, stippling the lighter colours into the surrounding areas, but not allowing them to fully blend in. I worked through a Vandyke Brown / Mars Yellow mix to begin with, followed by adding Buff Titanium into what was left on the palette, and then just Buff Titanium on it’s own, finishing up with Titanium White to highlight the edges of each scrap of skin.
This took a while to dry, even with the heat in the drying cabinet because the paint was rather thick.
Photo #7 - Once it had fully dried, I painted the belt with more Vandyke Brown, adding Mars Brown in random patches and again using a very rough stippling method to blend it in to the darker brown.
Further additions of Light Red and then some Mars Yellow were made, with scuffs and scratches added with fine lines of Buff Titanium, the cracks that I wanted to appear deeper had a fine line of Black added to them.
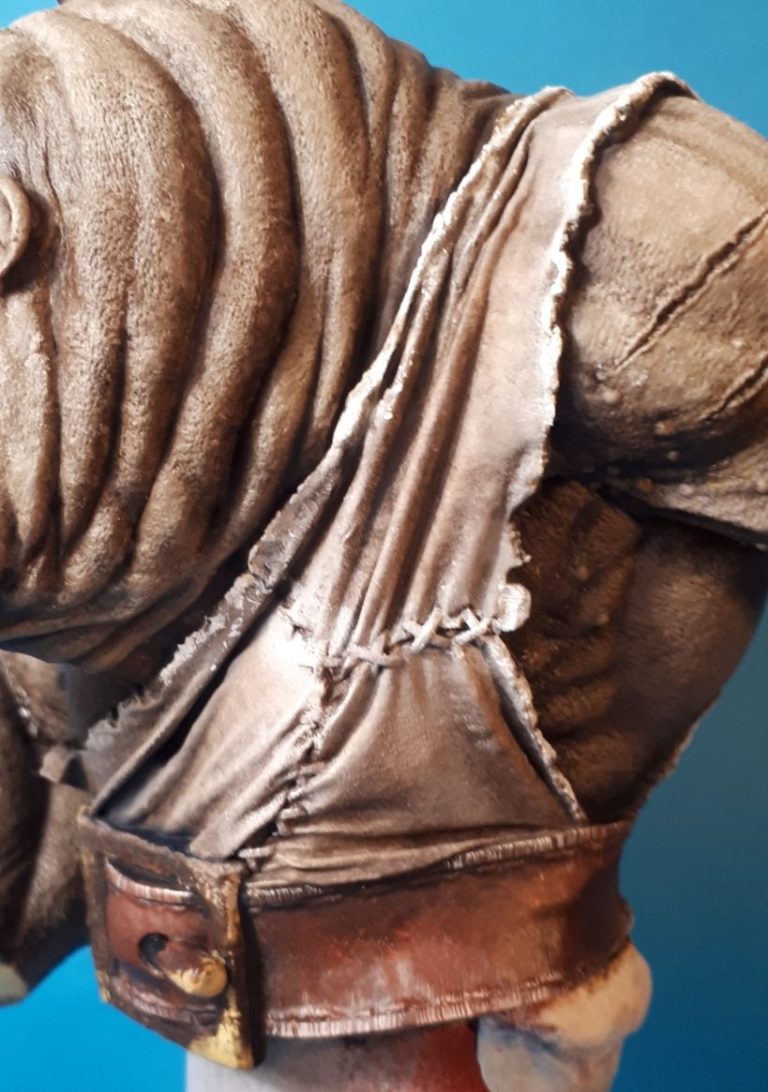
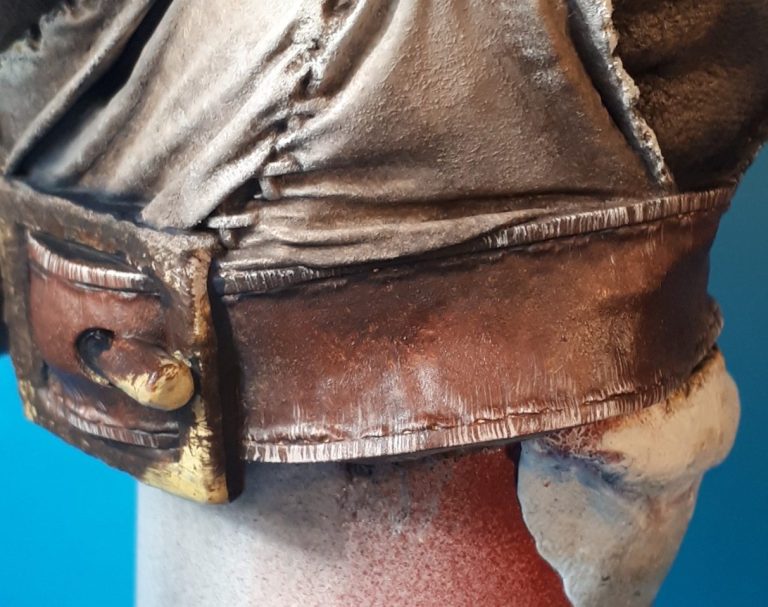
Photo #8 shows a close up of the belt and the fine lines on the edges can be seen better in this shot along with the texture that the thick paint on the skins has left.
Photo #9 - The skins on the back were painted in exactly the same way as those on the front, although they were made a little lighter at the top of the shoulder as more light would be getting to them.


Photo #10, showing that all of us are merely human, shows where I’ve caught one of the shoulder scales with some of the dark brown paint. I didn’t notice this until after it had fully dried, and ended up having to paint the scale again.
Photo #11 and I’ve painted in the eyes – beady and red of course, and painted in the mouth and teeth.
On figures like this, where the mouth needs to look a bit dirty and which certainly hasn’t seen a toothbrush like forever ! I find it easiest to paint on a pink acrylic as a base ( Good old GW Titillating Pink if you’re old enough to have it in your stash, or just a mix of a dark red and some white will do ).
Once fully dry, and usually after three or four coats to establish a solid colour, I add a thinned mix of Carmine oils and some White Spirit. The mix is approximately 50:50, and is painted over the whole area. More Carmine can be added to the deepest recesses, and a small amount of Titanium White or some Buff Titanium can be added to beef up the highlights.


The teeth at this point are basically the same colour as the tongue, but with the addition of a little mars Brown, some Mars Yellow and some Titanium White, can be brought back into the realms of something you wouldn’t want biting you.
Yes, the Carmine is still wet on the teeth, and you’ll get a small amount of contamination from that into the brown, yellow and white, but this seems to work well, because it makes the teeth look grubby without adding darker browns to the mix.
In that last shot, and also in this one – photo #12 – I’ve undercoated the belt buckle with a black acrylic. This will establish a decent base for the metallic colours to go over…..
Which appear as if by magic in photo #13. I’ve used Bronze and Copper from the Darkstar range of acrylics as a base over the black, then adding some Antique Gold and finally some small additions of silver. Some extreme highlights are painted on with a Molotow chrome pen. These last additions are kept to a minimum as I wanted the buckle to look used and old, so the chrome is really only there where the buckle would get scraped or knocked against rocks etc.


Photo #14, scars… There’s a lot of variety of wounds that can be rendered on our miniatures, from old and fully healed scars to fresh open cuts and abrasions. I n this case I wanted cuts that had been made recently, but instead of healing, had become infected, a nice bit of Oozing puss leaking from them…… Nice.
To do this I used Carmine oils with just enough White Spirit mixed in to allow them to flow into the recessed detail of the individual cuts.
A large soft brush was used to scrub gently around the cuts, taking some of the Carmine paint onto the edges of them and making them look red and angry. This has to be pretty subtle and is easily overdone.
More of the liquid Carmine was added into the cuts, and then a fine brush was used to pull small dribbles of the paint down like it was leaking over the edges.
Now for the gross bit – Chrome Yellow and Mars Yellow oils were mixed 50:50 and a fine brush, charged with some of the mix was used to drag a little bit more of the Carmine out of the recessed wound and down away from the edge of the cut.
It looks gooey, which is exactly how I wanted it.
Some cuts were made to be more infected than others, but those on the left arm look to be about the worst – definitely needs a plaster and some antibacterial cream.
Finishing touches were the stitching fastening the skins together, and painting on the black acrylic for the cut-off sections of the arms.
Final thoughts.
3D printing is bringing such a variety of subjects, mainly to us fantasy and sci-fi modellers, although occasionally there are bad prints that need to be avoided.
In this case the printing is absolutely superb, no slice lines at all, and although I did partially fill the piece with resin, this was only a precaution because of the model needing to travel to show where he’ll be on display. As a static display piece to be put into the display case and left there, the filling is completely unnecessary.
CFPRINTS3D is a seller on eBay, and this offering from them is an exemplary piece of quality printing that makes me feel I can safely recommend buying from them.

Cetero oporteat sensibus his eu. Has ex vidisse perpetua, vis partem mollis mandamus at. Ea nam legere mentitum prodesset, no quo lucilius liberavisse, te oratio debitis omittantur eos. Sea ea iusto detracto, ut scripta sapientem suavitate cum, nam deleniti perpetua intellegam an. Ei per officiis detraxit probatus, vim at graecis tincidunt.
Cetero oporteat sensibus his eu. Has ex vidisse perpetua, vis partem mollis mandamus at. Ea nam legere mentitum prodesset, no quo lucilius liberavisse, te oratio debitis omittantur eos. Sea ea iusto detracto, ut scripta sapientem suavitate cum, nam deleniti perpetua intellegam an. Ei per officiis detraxit probatus, vim at graecis tincidunt.

We need your consent to load the translations
We use a third-party service to translate the website content that may collect data about your activity. Please review the details in the privacy policy and accept the service to view the translations.