The Joker
Knight Models 75mm white metal figure kit
Painted in 2015
Not one of the newest releases from Knight Models, but it is one of their best ones to my mind; but then again I do like the Batman films, and both renditions of the Joker character. I didn’t think Jack Nicholson’s performance could be equalled, but I’m quite happy to have been wrong. Heath Ledger manages to out weird Nicholson, playing a wholly darker character.
This figure is based on Heath Ledgers portrayal, and the likeness is absolutely stunning. Quite often you’ll get a kit that is meant to look like someone in particular, and the box art will show a good likeness, but in a lot of cases it takes very skilful painting to bring the models to life. In this case I think the sculpting is such that even a moderately practiced painter could get a recognisable Heath Ledger in miniature to emerge.


So, the kit – well, it’s nicely packaged like all of Knight Models’ offerings, the components coming in a sturdy metal tin with plenty of colourful artwork on the outside, plus a glossy card insert within the box showing a well painted example of a finished kit – see photo #1

Encased in some thick foam padding are all the parts in white metal ( photo #2 ) – not many really and the undercuts are cleverly made to make the recesses seem a lot deeper. I chose to cut under the lapels and pocket flaps of the coat very carefully to make them seem a little more detailed, easing the edge of each flap away from the surface of the model a little bit. If done carefully with a sharp scalpel a small alteration like this can really add a little extra detail to a model. In photo #2 I’ve made a start to the kit, priming the main body section and drilling pins into it and the head to locate them onto holders to make them easier to paint.
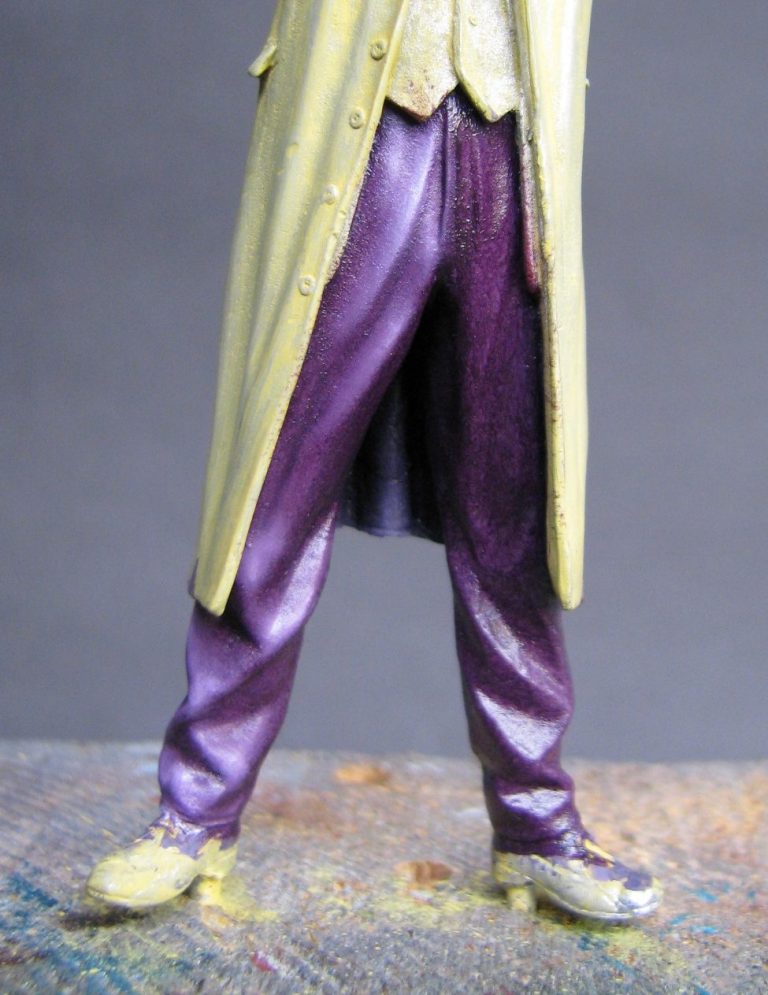
Photo #3 starts us off on the main body section. I decided to paint from the inside outwards, beginning with those shockingly purple trousers. I used games Workshop Imperial Purple for an undercoat, and after building up a solid colour with that – probably three or four thin coats – I then added oils over the top to start the highlighting and shading process.
I used a mixture of Alazarin Madder Purple for the base colour in oils, adding some Prussian Blue to give it a bit more body and also darken it, and then building from that through mid-tones and on to highlights by adding small amounts of Titanium White. This can be seen in Photo #3 where both of the figure’s legs have been coated with the oils shadow colour, but the figure’s right leg has had the process of mid-tone and highlight build-up painted on. Once both legs were painted to match in this manner I allowed the paint to dry for a few days in a drying cabinet.
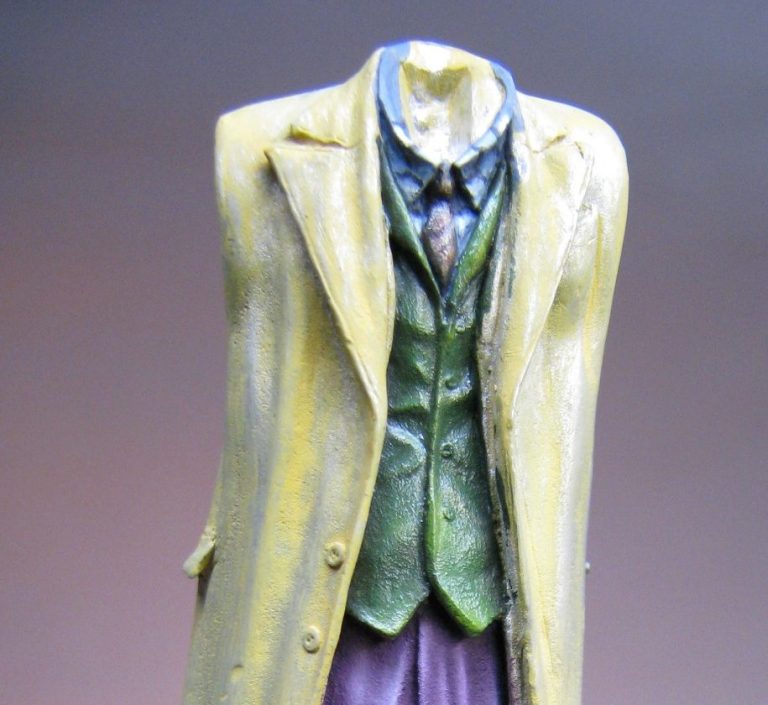
As you can see in photo #4 the paint on the trousers has now dried thoroughly and the glossiness has all but gone, in fact they appear quite nicely matt. Also in this shot I’ve begun work on the green waistcoat. Again the area was undercoated with games Workshop acrylics – this time Goblin Green, and then oils added over the top to allow shading. mid-tones and highlights to be built up. The oils used are Prussian Green, with a little Mars Black added to strengthen it, then using just Prussian Green with a spot of Titanium White and some Chrome Yellow added to make the mid-tones, and final highlights being built up gradually with more Titanium White / Chrome Yellow mix.
Pinstripes – not as difficult as tartan, but it takes a steady hand to put them in. I think it helps to use oils as lines can be thinned, shifted slightly or just plain removed if they’re not right.

As you can see in photo #4 the paint on the trousers has now dried thoroughly and the glossiness has all but gone, in fact they appear quite nicely matt. Also in this shot I’ve begun work on the green waistcoat. Again the area was undercoated with games Workshop acrylics – this time Goblin Green, and then oils added over the top to allow shading. mid-tones and highlights to be built up. The oils used are Prussian Green, with a little Mars Black added to strengthen it, then using just Prussian Green with a spot of Titanium White and some Chrome Yellow added to make the mid-tones, and final highlights being built up gradually with more Titanium White / Chrome Yellow mix.
Pinstripes – not as difficult as tartan, but it takes a steady hand to put them in. I think it helps to use oils as lines can be thinned, shifted slightly or just plain removed if they’re not right. In photo #4 I’ve done the pin-striping on the trousers. It’s not magic, it’s not a trick, it’s simply taking your time, using a good brush with a sharp point and allowing the brush some latitude to follow the contours of the sculpted creases. Patience and allowing yourself plenty of time in which to do each leg of the trousers – don’t start it if you think you’re going to get disturbed, and try and do one leg of the trousers – get the spacing even and remember how trousers are made. No, they’re not a complete tube of material, but in fact two pieces of cloth sewn together on the inside leg and on the outer leg seam. So any unevenness can be soaked up on the inside leg seam – don’t be tempted to have lines running into the crease on the outside leg unless you’ve researched the item of clothing and that’s what it did !
Again in this shot you can see that after drying the oil colours on the green waistcoat area have matted down nicely too.

Talking of research, I hadn’t realised that the lining of the Joker’s coat is red. Yes it is ( people have told me it isn’t; but unfortunately there’s a couple of good reference shots that show in fact it is…..proving them wrong ). Happily I noticed this early on, and although I’d got the trousers painted, it was easy enough to get to the lining areas that are visible and paint in a nice red colour.
In photo #5 you can see that I’d painted the undercoat for the jacket, but hadn’t yet discovered the lining needed to be red.

Photo #6 shows the red lining completed and the arms still in their raw metal being added and a wipe of filler closing any small gaps.
Oh, the shirt and tie.
Yes, now then, the shirt and tie. These are very small areas in this scale, and yet they’re the areas that hold the most complex patterns. I searched the internet for several close-up shots of the Heath Ledger in Joker costume, and from this began tearing out what little hair I have. It’s a really complex pattern on both areas, but with a very sharp brush, a lot of patience and a few well placed profanities, I managed to paint in a passable replica of the patterning on both tie and shirt – again, photo #6 shows this.

In photos #7 and #8 the undercoat has been added to the arms and gloves and also the red lining painted onto the lining of the jacket.

The shoes have been neatened up too, adding Vermin Brown acrylics to them as the undercoat for what will come later.

I began painting on the oil colours for the jacket in photo #9. The area I’ve worked on is the front right hand side of the jacket, leaving the sleeve and the lappet until later. The reason for this is to build up the sections of the jacket as a tailor would. The main point being that you get the seams in the right places, plus you can break off after doing one section and leave the model to dry, returning later to carry on. It’s useful to note that oil paints can be stored in the fridge to keep them from drying. Well, it slows the drying process down to almost nil, and allows you to mix up a batch of paint that will cover the area you’re going to be working on, and not have to keep trying to colour match a new mix if the paint runs out or dries up.
You can see that whilst the colour of the oils remains very similar to the acrylic undercoat, there is a lot more depth to the shadows and highlights. Once the glossiness of the wet paints matt’s down, the jacket should be a similar, but not the same, colour as the trousers.
Also in photo #9 you can see where I’ve used paint to emphasize areas of the jacket – not just highlights and shadows. The jacket pocket for example is more paint than the sculpture giving that three dimensional effect.

Photo 10
Photo #10 shows the rear of the figure with the difference between the front left side of the jacket having got the oils on and the back of the jacket yet to be painted.
You can see that there will be a very fine seam line for how the jacket is constructed in real life running down from under the arm.
Photo 11
Photo #11 shows a top view of the figure, again seam lines will run laterally across the tops of the shoulders.
And that about completed the painting of the jacket. The back is done in a similar manner, painting up to the seams at the side and across the shoulders. There will be a central seam running down the middle of the back of most tailored jackets, but not all – best to check reference photos if you’re doing a particular subject.
And so on to the face.


Photo 12
This was the bit I had reservations about prior to painting. As mentioned, getting a likeness to a real person can be difficult. My worries were unfounded though, because even with undercoat on, the face looked a heck of a lot like Heath Legder.
So, photo #12 shows the face with it’s mid-dark oil coat. The paint is applied over the whole area then gently stippled off with a clean, dry brush. This is to remove a lot of the thicker paint, take away the brush marks and leave an even surface for the shadows and highlights to be built up on.
Now you might question the use of painting the face a clash colour when it’s going to have white make-up over the top of it. The truth is that if you paint the face as normal, then add the make-up effects, anything left showing will appear natural.

Watching the film ( several times – no chore it’s one of my favourites ) you’ll notice that the Joker’s make-up deteriorates throughout the film. At the beginning the face-paint is quite neat and tidy, but once you get to the scene where Batman’s beating the living daylights out of him in the interview room, the white and red make-up has got smeared and somewhat degraded.

Choosing how neat the face paint looks then can suggest at what point in the film your rendition of the character is taken from.

Jumping on to photos #13 #14 and #15 we have a finished face…….Um sorry about that, I was doing so well with the paint it sort of just happened.
To run through the process though, the face was painted normally with flesh colours, adding highlights and shadows just like any other figure. That was allowed to dry thoroughly – about a week in the drying cabinet, simply because I’d be mistreating it for the next process.

That being the addition of the white make-up. I sues and old brush and some Titanium White oils to stipple the paint onto the face. I didn’t allow much paint to be on the brush, wiping it prior to stippling the face.
This then was almost like a woman would apply powder make-up to her face, and I built up the effect slowly, allowing some of the flesh colours to still be slightly visible ( see, method in my madness, plus there’s no white make-up on his neck in the film – that remains flesh coloured ).
Once satisfied with that I again allowed the face to dry, adding the dark patches to the eyes and the red to the “smile” at a later time. To complete the head I added the hair – again this needs the painter to look carefully at film stills to see that the hair is not straight green, but a dirty ( and greasy looking ) blonde colour with green streaks added to the bottom half ( approximately ) of the hair strands. Painting this in miniature to get the desired effect was about the hardest part of rendering the head.
Photo #16 ( above ) gives the reader an idea of how small the model is. Just in case you’re one of the unwise folk who hasn’t yet got one of these kits.

Then in photo #17 I’ve glued everything together. Still need to paint the shoes, gloves, knife and add the playing card, but otherwise he’s pretty much done.

And photo #18 where the collar is of the jacket is still shiny and wet.

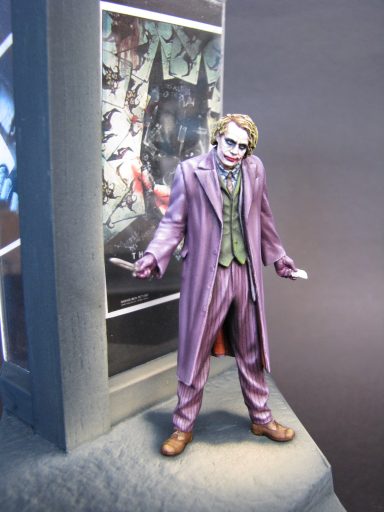
In photo #19 the figure is complete and I’m beginning construction of the base. It was a difficult choice of where to put the figure, I wanted something generic that showed the figure off, rather than putting him in a scene and the surrounding props create visual noise that detracted from the model.
I thought that having him standing on a street corner would allow me two good options. It would allow the viewer to see all round him rather than blocking the back of the model, and also give me chance to put some graffiti or something on the part walls that were behind him.

With that in mind I used some plastic card to build up the sides of the wood plinth and some balsa wood block as the corner of the building, then thought that maybe using large poster pictures in the windows from the film to save having to populate what would be seen through them inside the building – a good cheat !
Printing off the posters and fastening them to the back of some clear plastic sheet solved that little problem, and then it just came down to painting the base.

I decided to have a relatively narrow footpath ( sidewalk if we’re being American ), and this would allow me to put some rubbish in the gutter and generally play about a little with small details – all this can be seen with the figure temporarily in place in photos #20 and #21.

I removed the figure to a safe place – mainly because the airbrush was being brought out – and then began painting the groundwork. OK so in reality I masked off the windows so that they didn’t get any paint on them, but then I started with the airbrush.
I used a few different shades of grey, making this up from various Tamiya colours and thinning it down with Isopropyl Alcohol. I started off with the darkest shades, moving through mid-tones and then to highlights. I also blocked in a “shadow” where the figure would be standing – suggesting that he was standing under a street lamp of some sorts.
Again I popped the figure back into place shown in photo #22,
Along with photo 22, here are photos #23 and #24, showing the groundwork up to this stage.


Again the figure was removed and final touches added to the groundwork – some oil paint washes to mark in the details and some very small printed playing cards – one of which was added to his left hand as though he’s holding it.
I printed these off because I wanted all of them to be various designs of joker cards, and to be honest, painting the very fine details necessary would be pretty much impossible.
The details don’t really show that well even with a high quality printer doing the work for me. One final touch is to add a curled up poster of the previous Joker – played by Jack Nicholson.
I wanted this on because even though Heath Ledger did a fantastic job of playing the part, I still think that JN did a damn fine job too - sort of the young actor taking over from the old.


Final words.
Well I think Knight models have done a superb job of this kit – the production values are very good and the presentation even better.
I enjoyed painting it, and the piece now resides in Scotland with one of my nephews – Keil Hopwood - an avid Batman fan.


We need your consent to load the translations
We use a third-party service to translate the website content that may collect data about your activity. Please review the details in the privacy policy and accept the service to view the translations.