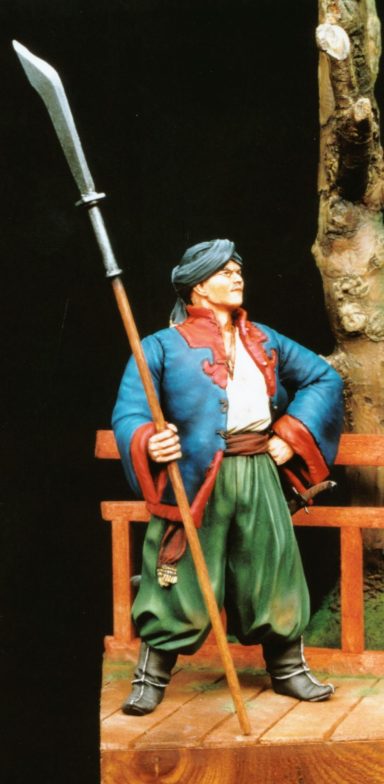

Chinese Boxer Conversion
Using a 120mm VLS Cossack Attaman kit.
Article in Military Modelling magazine in 2002
The Plot
The desire to make this conversion was brought about in the main by two people, neither of whom I actually know. First of all was Bob Marrion with his serialised articles concerning the Boxer Rebellion, not to mention the excellent drawings included with it.
Also Kostas Kariotelis, a Greek modeller who entered a Chinese Office, at Euro Militaire 2000 in class 4 for 54mm scratch built and converted models. It was a very understated model, painted with subdued shadows and highlights, but modelled to a very high standard.
What really drew me to it though was the illusion that the quilted coat was soft. I felt as though I could reach out and poke it and my finger would sink into the material. The wrinkles on the guy's neck were good too. It was worth a Gold when you had the chance to look at it really close-up and that's why Mike Thomas and I gave it the award.
I was enthused though, but not to build something at that scale.
Oh, no, too small for me. I wanted something a bit bigger.
I hunted round for a few months, looking through various catalogues for something to use as a base model, but without success. I eventually put the idea on the back burner, something would turn up, given time.
And so it did.
VLS released the model of a Cossack Attaman Chieftain 1648 ( LL050 ) and our kindly Editor sent me the sample.
Ooooh. Out came the milliput !
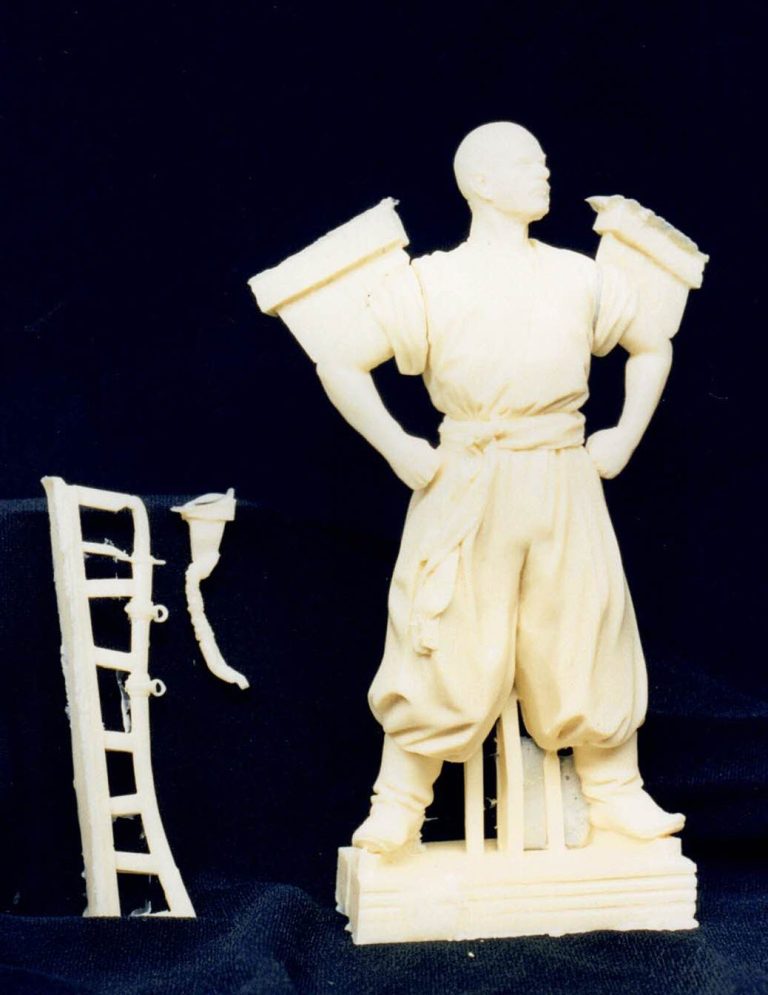
The model
As it comes, the model is a 120mm resin moulding, with arms, sword and hair separated from the main body casting, see photo #1.
Parts are O.K. but some cleaning up is necessary. I had a couple of air bubbles under the bottom edge of the voluminous trousers, and a few mould lines to sort out too.
As the resin is fairly soft, these didn't cause any real problems, although the mould gates on the arms might be cause for concern if building the model as he comes.
The fit of parts is good though, and though there are no locators to tie the parts together, the butt joints are well mated and all that should be needed is a bit of wire to strengthen the joints once glued.
The basic model is a gift to converters. He could be painted in various ways to appear as a pirate, a barbarian or a number of other subjects.
Give him a different sword, and the options expand even further.
Adding a coat
I decided to add a quilted coat. This was simple enough to do.
Beginning by removing the shirt sleeves, and opting to just saw away that section of the arm and replace it with milliput.
I drilled each of the arms and inserted some brass wire, fitting these wires into holes drilled into the shoulders, and adjusting the length of the wires to the correct size.
Deciding that the body of the coat could be made before starting on the arms I left the arms separate for the time being. I had in mind that the pose would be basically unaltered. Having the left fist still contacting the hip, but the right hand moved forward to hold a spear.
This meant that either there would be some serious amount of folding in the material where the left hand compressed it into the body, or I could have the coat open, and show off the belt.
The latter option won, not least because with the coat fastened, the figure seemed to be looking rather too chubby to me.
It also allowed the interest of having the coat pushed back to reveal the sash, and also have the right side of the coat billowing and showing the thickness of the quilting - if I could pull that off, that is.
With this in mind I added the back of the coat, envisaging a seam line down from each armpit, and cutting the Milliput to this line - photo #2
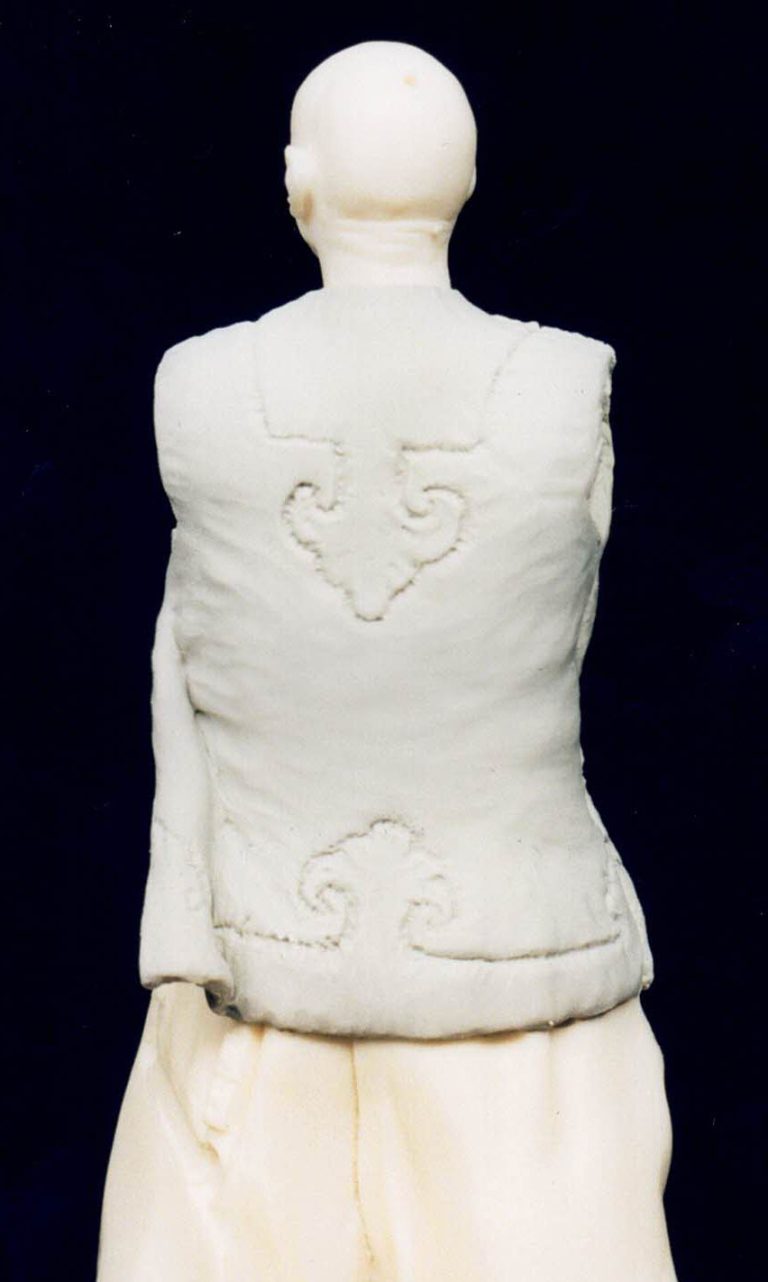
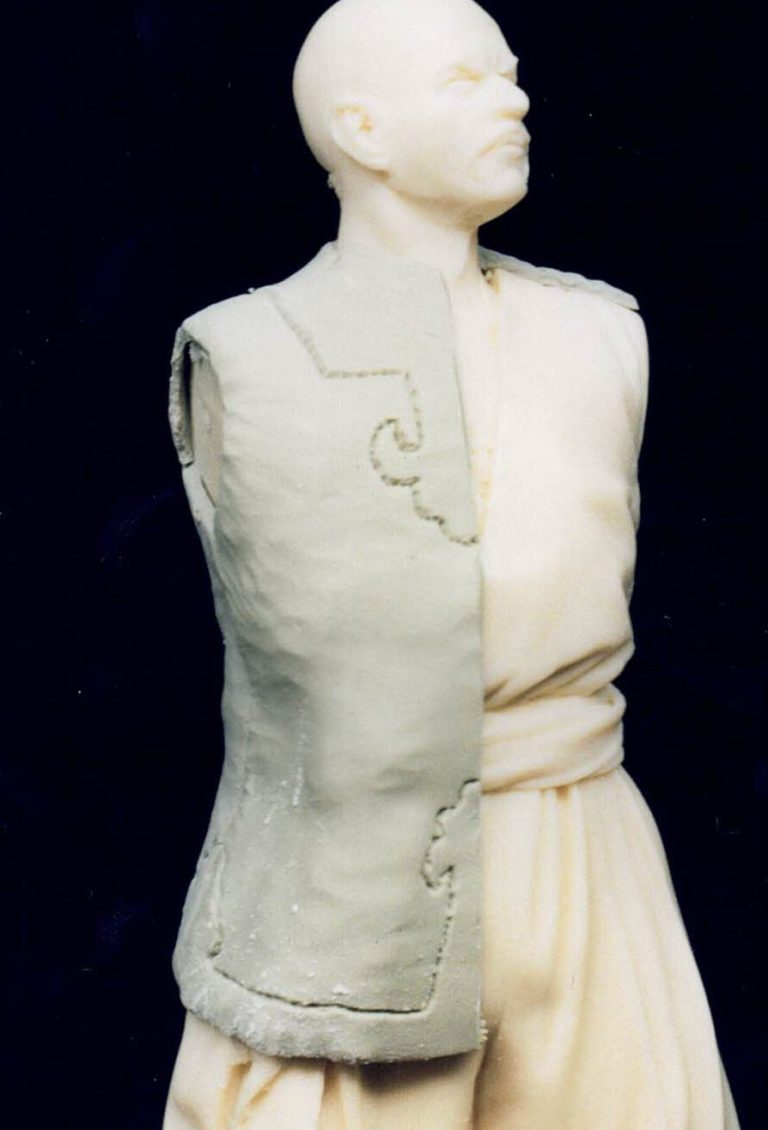
After mixing up some Milliput, I rolled it out to a uniform 2mm thickness, coating it with French chalk on both sides so that it didn't stick to either the tile that I used for a flat surface, or the paintbrush handle that I used for a rolling pin.
Then after wiping one side of the sheet of milliput with a damp cloth, to remove the chalk. I transferred the sheet onto the model, easing it into place so that it conformed to the basic folds of the resin. Again see photo #2.
Ah, problems. At the back of the figure the milliput had to bridge quite a gap between the shirt and the pants caused by the belt.
The beltline needed filling in with some Milliput so that the "coat" hung across this area instead of into it, and also some of the wrinkles in the shirt around the shoulders needed smoothing out.
A blob of Milliput added to the waistline, and a large file applied to the offending resin at the shoulders and I could try again.
The Milliput was trimmed to a rough shape, and the excess material removed - see photos #2 & 3
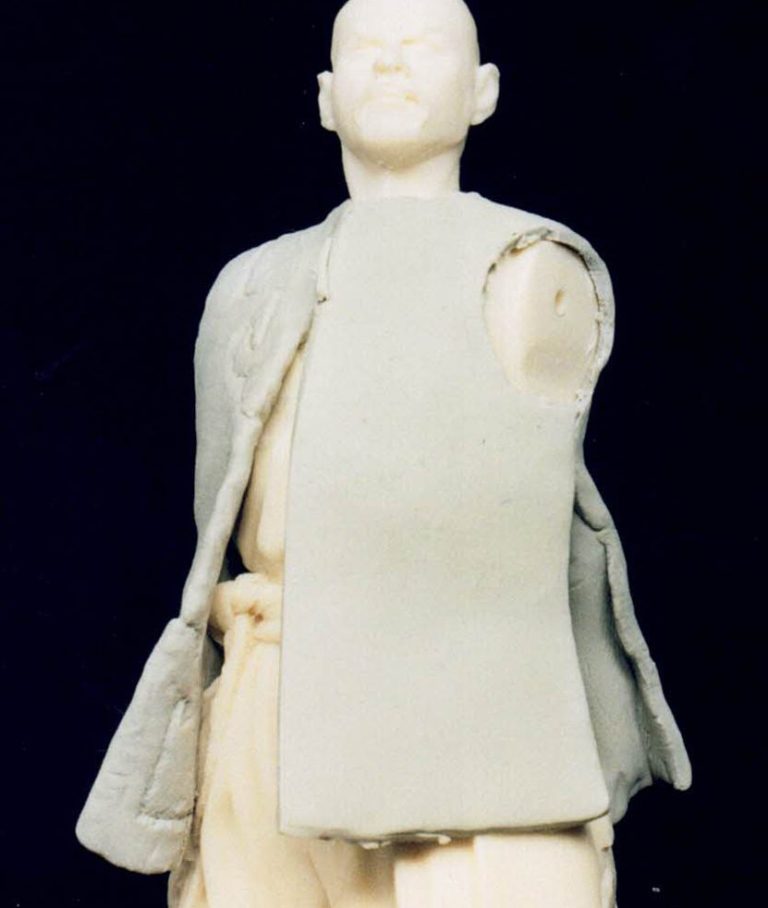
Then the details of the folds and design sculpted in using a knife blade and also a soft silicone sculpting tool. See photos #4 & 5.
By adding the coat in sections I could allow the Milliput to cure before adding the next bit, and avoid damaging any sculpted detail.
Getting the double sided pattern on the right side of the coat front was fun, and basically had to be done to the outside first and then gently on the inner face without damaging the work done on the outer face.
Again this was allowed to cure before adding the sleeves.
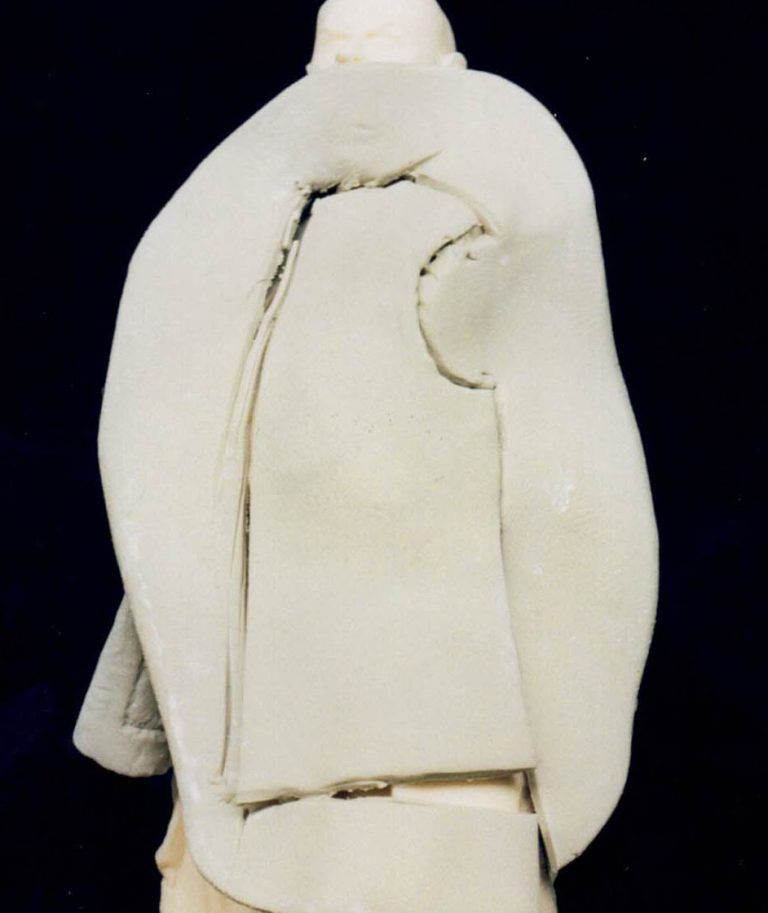
Oh what fun
Yes. The sleeves. I'd had this brilliant idea that if I rolled out some Milliput very thinly and added the inner face of the cuffs at the wrists, then my life would be made really easy when it came to making the sleeves.
Once that had cured, I could add the main bulk of the sleeve, leaving the separate ( and once painted, differently coloured ) outer cuffs to be added last.
This would allow me to add the cuffs over the inner lining of the sleeves and have the illusion of the sleeves being hollow.
Great idea, and it worked right up until I got down to adding the sleeves.
The problem being that whilst the inner cuffs I'd added seemed to be large enough when on the bare arm, they were way too small once the sleeve was filled out. I suppose I could have left them where they were to imitate the cuffs of a long sleeved shirt or tunic, but no, I decided they had to go.
I trimmed off the edges of the main sleeve once the Milliput had fully cured, and then added some fresh milliput that had been rolled out thinly. I got this to stay in place by adding superglue to the end of the main sleeve and fastening the fresh and still soft milliput to that.
Sculpting of this bit was a little bit awkward with the sleeve ends being hollow, but with a little persuasion and a lot of patience the end result wasn't too bad. Photo #6

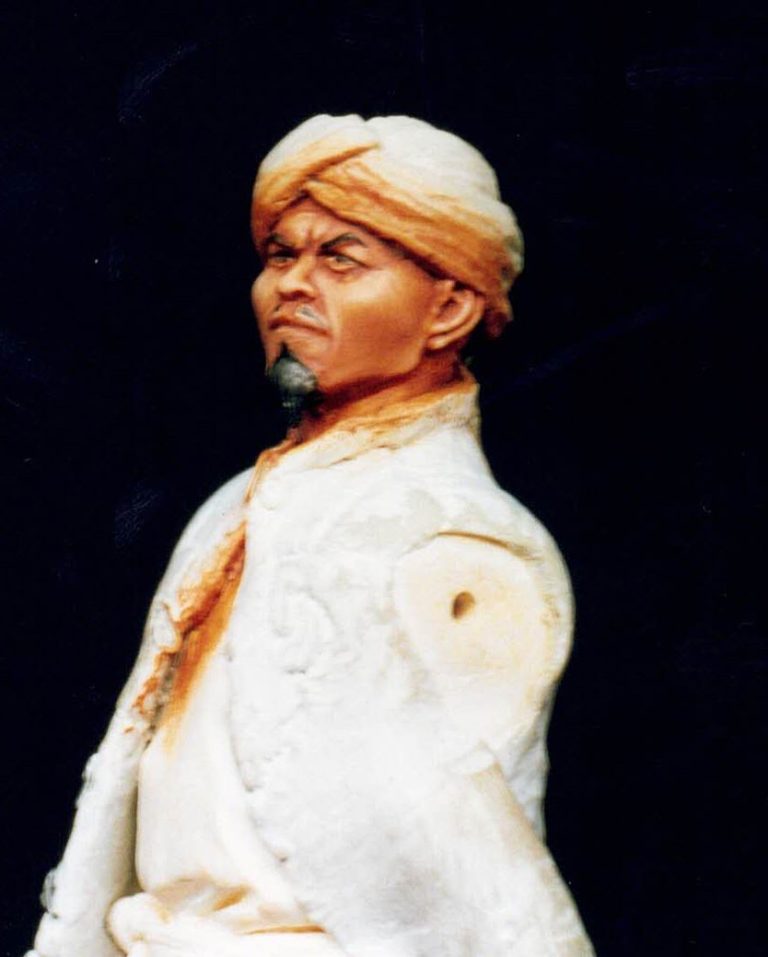
Whilst sculpting in the main sleeve, I found that I had to keep adding more milliput on to build up the volume of the area. This meant allowing the milliput to dry in part, then add fresh.
This in turn created problems with the folds that I was attempting to sculpt in to make the material look soft.
In the end I had to scrap the idea of sculpting the Milliput whilst wet, opting to add the folds and creases with a file and a sharp scalpel once the Milliput was hard. These harsh and sharply defined details were then rounded off using, of all things, a soft buffing pad from a manicurist ( Don't ask ! I only use them for modelling - honest ). These are a square section, soft foam block with an abrasive fastened onto the outer faces, they conform to compound curves fairly well, but obviously at this scale, tend to hit the raised areas more than the depressions and creases, hence rounding the detailing off and softening it.
With the sleeves and cuffs added. I finished off the jacket by adding the collar, again using soft Milliput that had been rolled out into a thin sheet. As with the sleeves, this had to be glued in place, then sculpted carefully into shape.
Up to this point I had kept the arms separate, offering up the sleeves to the shoulders whenever more Milliput was added in that area so that the parts would mesh together.
I did a final test fitting, and having compared the model to several photo's In Bob Marrion’s articles, thought that the shoulders on my model seemed to be too big ( A case of the Dallas / Dynasty shoulder pad syndrome ).
Out came the scalpel and file and I set to work correcting this mistake, aiming for a more round shouldered look to the figure.
This was hard to do, and I'm still not too sure I've done enough on this aspect of the model. I carved quite a lot of material off the tops of the shoulders, adding more putty under the arms to compensate, but I still don't think that it gives quite the right "round shouldered" impression of the pictures and drawings in Mr Marrion’s article.
It is hampered by the left hand braced on the hip, raising that shoulder, but also by the model initially being quite square shouldered and "well built".
Altering the shoulders too much would have altered the whole anatomy, so I felt that unless I was willing to start doing major surgery to the model, then I'd have to tread carefully. Less would be more - hopefully.
With the coat finished, I also added a small goatee beard, aiming for a sparsely decorated chin.
I also had a go at making a hat, but my attempts with plastic card are never the best, and this one in particular seemed doomed. I couldn't get a curve on the upward facing brim, no matter how I changed the basic cone I made as a starting point. I decided that a bare head was preferable to any of the half dozen attempts I made, and filled in the hole where the hair located.
To finish of the sculpting ( or so I thought, mad fool that I am ), I added the fingers to the right hand, sculpting them around the shaft of a thin wooden dowel. I then constructed a simple blade for this spear from Milliput and plastic card. Photo #7

Painting problems - Nah, never happens to me !
As is my habit, I began with the face, undercoating with a mix of Humbrol Flesh, GW Skull White and GW Orc Brown acrylics. The initial coat, given to the whole figure, showed up some flaws that I'd missed, both on the casting and on my sculpting, so they were sorted out and then a second thin coat of the same colour was added to the model.
I mixed up a batch of flesh colour from the usual colours I use, adding a bit more Yellow ochre than usual, to give that slightly sallow hue that is common in Oriental complexions.
I shaded this with a mix of Yellow ochre and Burnt Sienna oils ( No good shading a yellow biased base colour with a red biased shadow colour ), and then added in the deeper shadows with a Burnt Umber and Yellow Ochre mix.
Taking my life in my hands, I added the eyebrows, moustache and beard with black, and spotted in the eyes with Burnt umber.
Very good.
But it didn't look oriental any more.
The cheeks, that's it !
I showed said disaster to Quality Control ( my partner, Frances ) and she seemed to agree.
The paint was stripped off, and the cheeks added to with some Magic Sculpt epoxy putty. This I find is somehow stickier and a bit more oily than Milliput, and is good for very fine detail such as I needed here.
Once the putty was dry, I painted the face again.
Better, but not right.
It was the nose now - too prominent. Off with the paint and the face was given a light sanding to flatten it off a bit.
The paints came out again, and with the same method, the face was brought to life.
But....I'd not got the eyes right.
Hmmm. Off with the paint, and have a go at re sculpting the figure's right eye.
Ahhh. Oops, the merest slip of a scalpel and look what falls off. The bottom lid of the eye disappeared to become one with the carpet.
Great.
A little bit more Magic sculpt, which turned into a bit more than was initially required, because no way could I get the lid right on its own. The whole eye , upper and lower lids were removed and re-sculpted.
Back on with the paint, and now he looked distinctly Russian - well maybe a little Chinese, but not enough. I took some photos anyway and the result is #8.
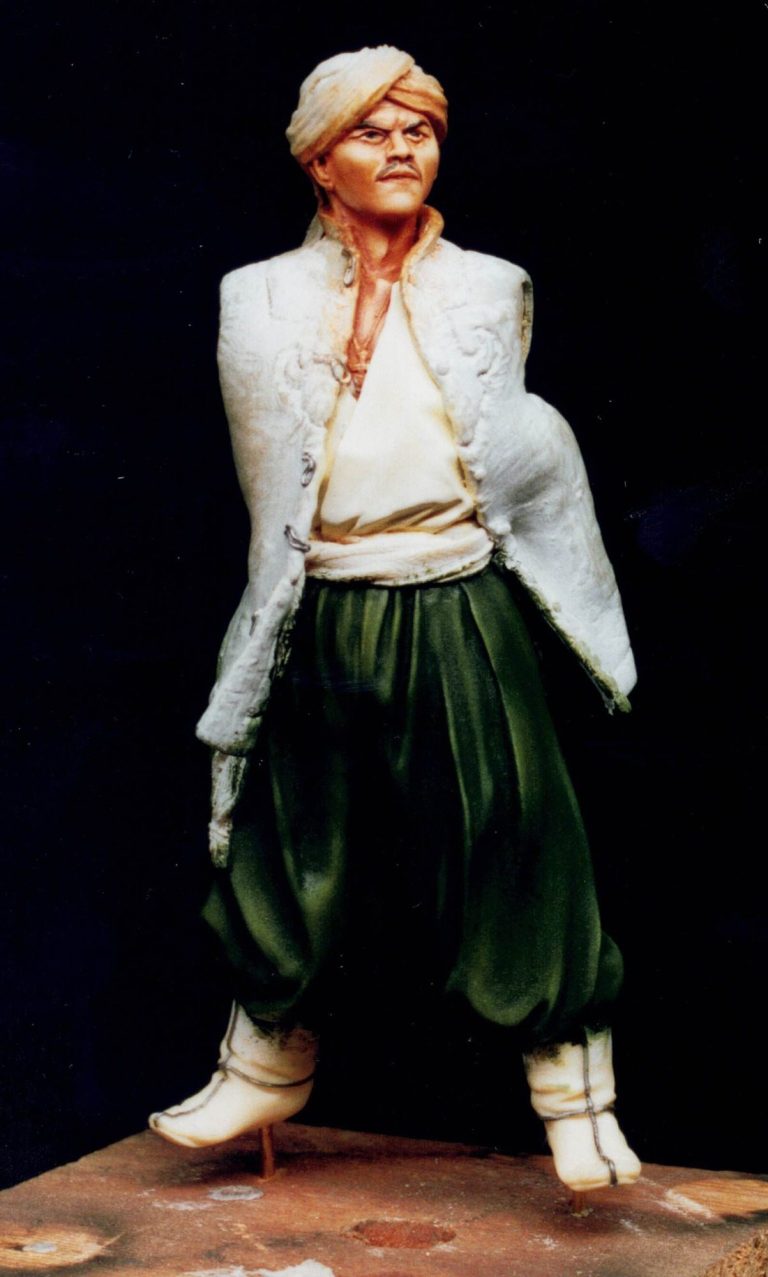
So the paint came off yet again.
Oh and that silly little beard went too ! Never did like it.
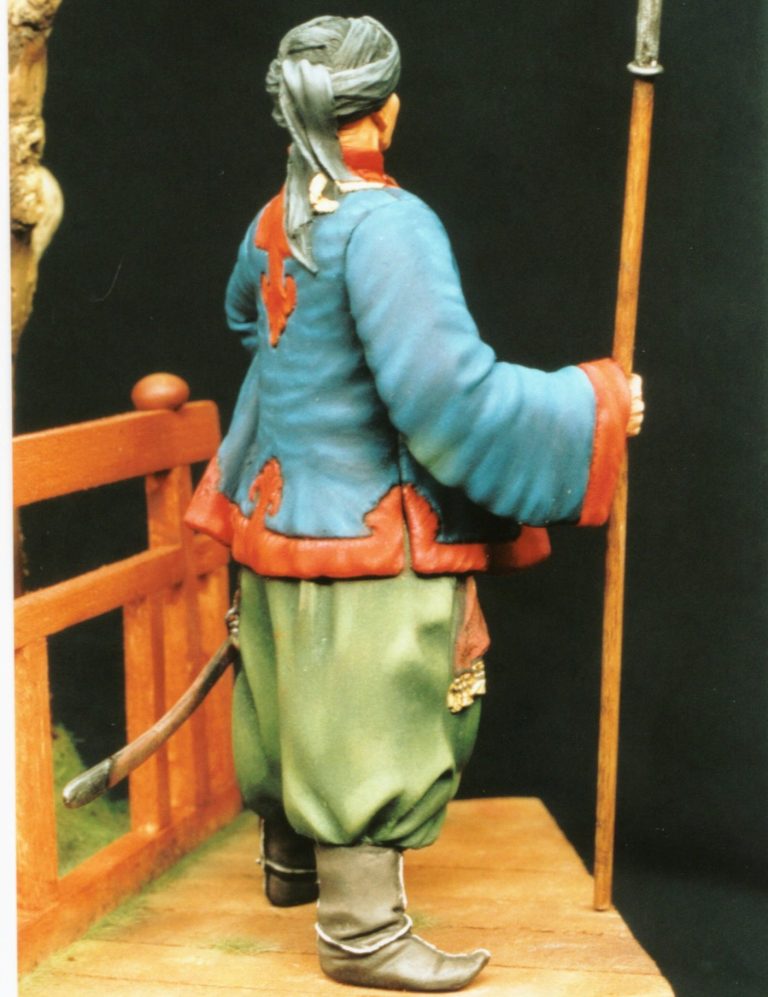
And I decided to add a turban from the excess Magic Sculpt that I'd mixed up before - it was still soft enough to sculpt fortunately, because the bare head didn't look right either.
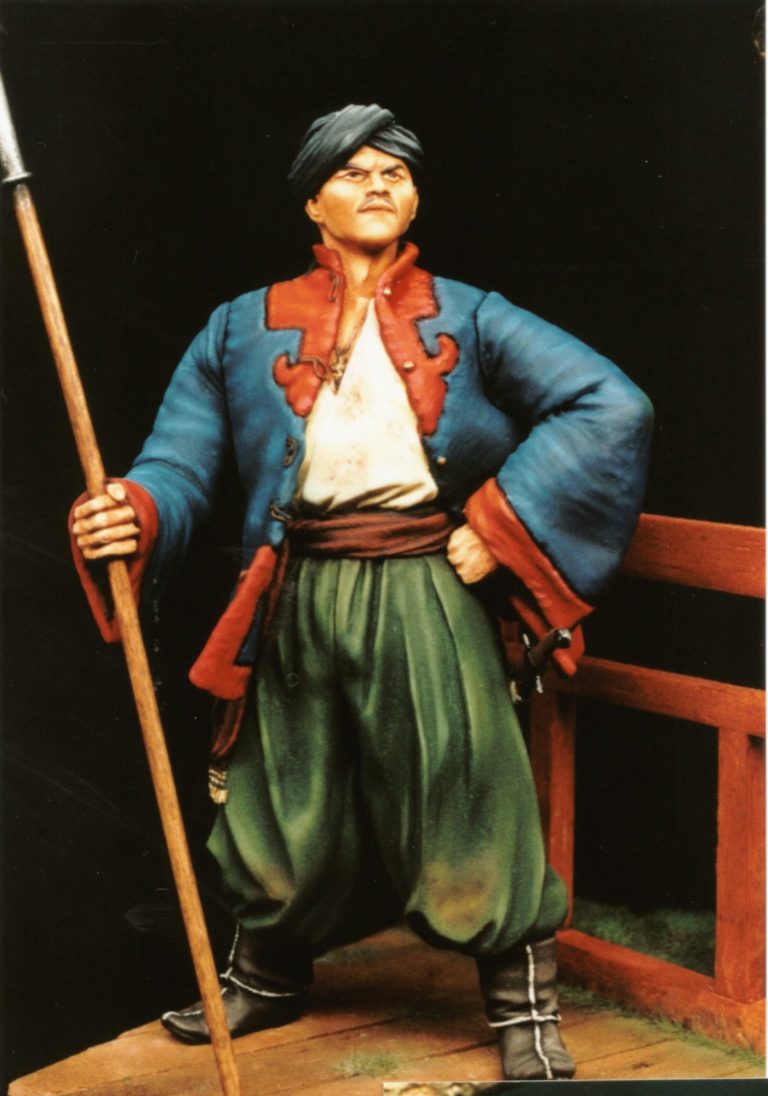
Finally, and I do mean finally, I added the paint and it looked about right, a happy circumstance, because I was getting just a touch bad tempered - probably due to over-exposure to paint stripper.
In wild celebration of the minor success of the face looking decent, I painted the hands with the same colours, and then left this to dry completely.
Is the trouble over ?
Well it would seem so, I started on the clothing, painting the shirt with a pale buff colour, highlighting this with white, using thinned acrylics for this, and once dry, adding shadows with thinned Burnt Umber oils.
The pants were painted with an undercoat of an Olive Green that I mixed up from GW Goblin Green, Chaos Black and Skull White ( lovely names ), see photo #9.
This was coated with a green mixed from Prussian Blue, Yellow Ochre, Ivory Black and Titanium White oils. I highlighted this with a mix of Chrome Yellow and Yellow Ochre ( the Ochre isn't strong enough on its own ). Then finally added a few touches of Titanium White to the highlights to hint at some fading of the material.
I took a picture of the model at this point ( minus the shadows on the shirt ) and the results so far can be seen in photo # 10.
Things were looking better now, and I continued by painting the jacket. For this I used an undercoat of Midnight Blue acrylic (GW) adding a coat of Prussian Blue over this. Basic shadows were added with Ivory Black, although there was little difference between the two dark colours.
Titanium White was employed as a means to highlight the blue, adding this sparingly, and softening the highlights with plenty of stippling into the surrounding blue. This was an attempt to make the material look soft with shallow depressions and hollows where it conforms to the figure.
The blue was allowed to dry fully, then I blocked in the red with Humbrol Crimson acrylics.
I painted over this with a mix of Alizarin Crimson and Orange, highlighting with more Orange and a little Titanium White, and adding some shadows with a little Prussian Green. Not too much of this last colour because it's a bit harsh in the way it darkens the red.
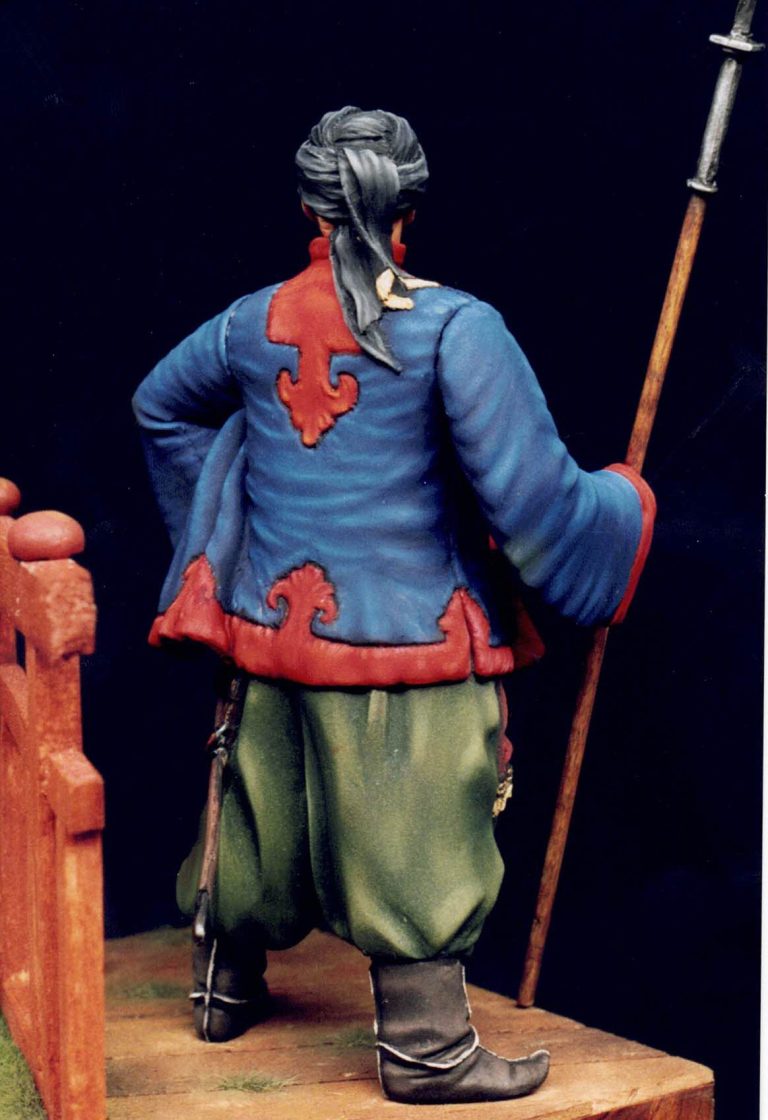
I attempted here to get the shadows and highlights to follow through the different areas of colour on the jacket, rather than having the red and the blue areas look like they were being lit from different light sources.
Finally the spear shaft was painted, using Burnt Umber to stain the wood, wiping the excess off with a soft rag.
The sword, scabbard and polearm metalwork were painted, as too were the leather of the scabbard and its hangers, and then it was time for the glue.
Fortunately the arms fastened into place seamlessly - and so they should, I'd played about with this positioning long enough ! - and final touches such as the leather thong around the neck, with its pendant, were painted in.
A quick check around for any touching up that was necessary, and I could move on to the base.
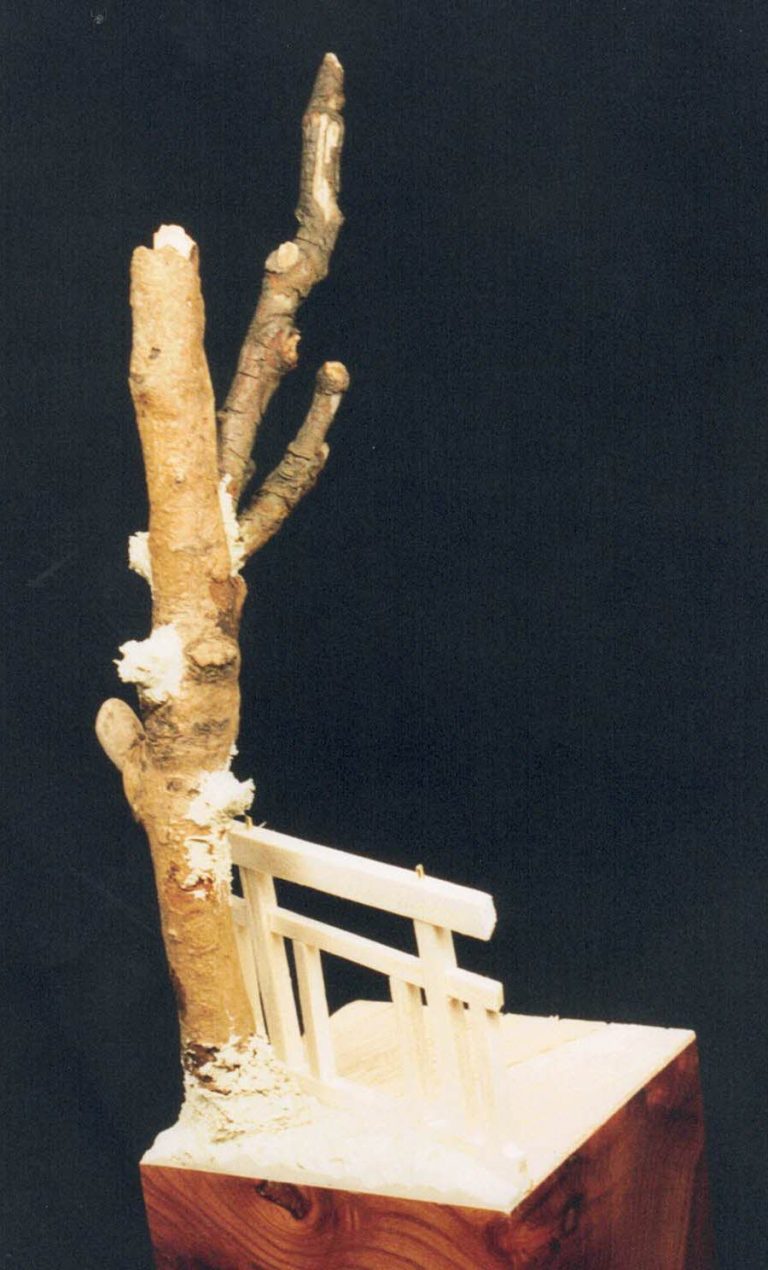
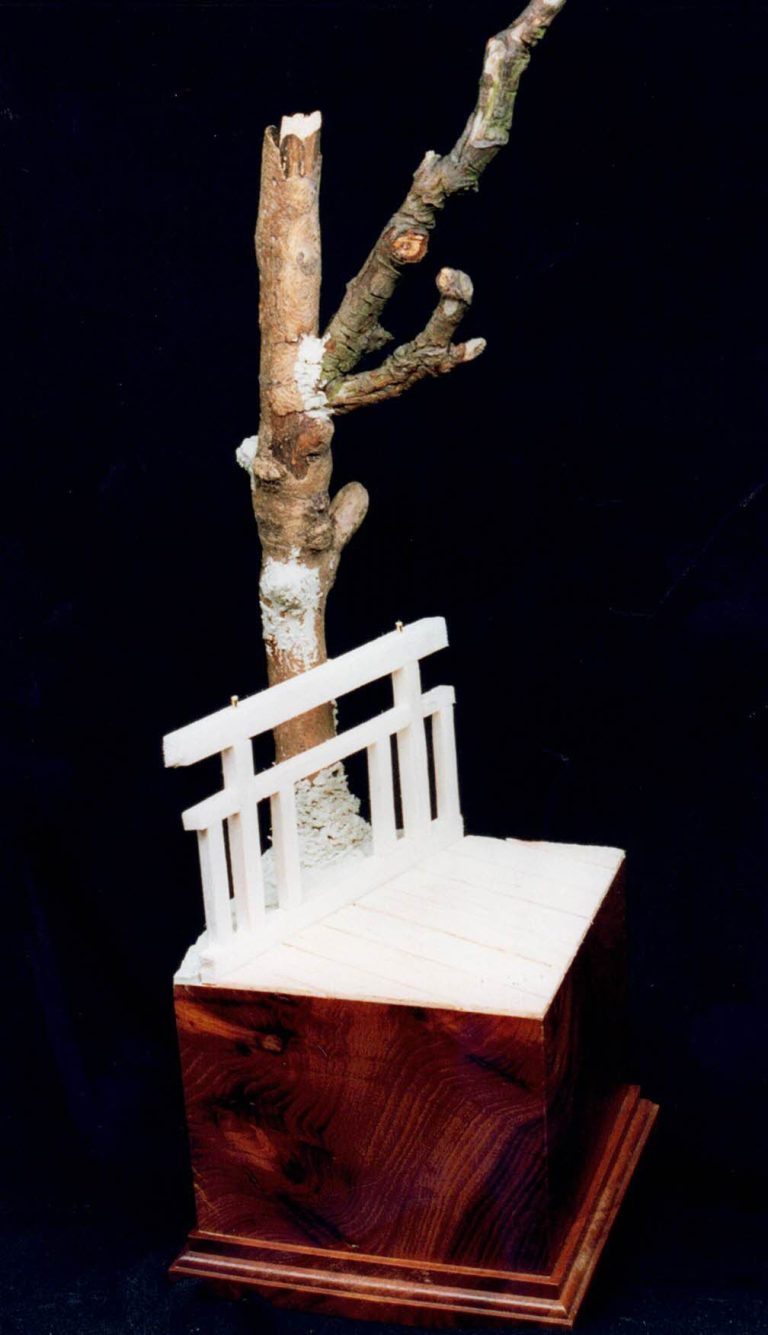
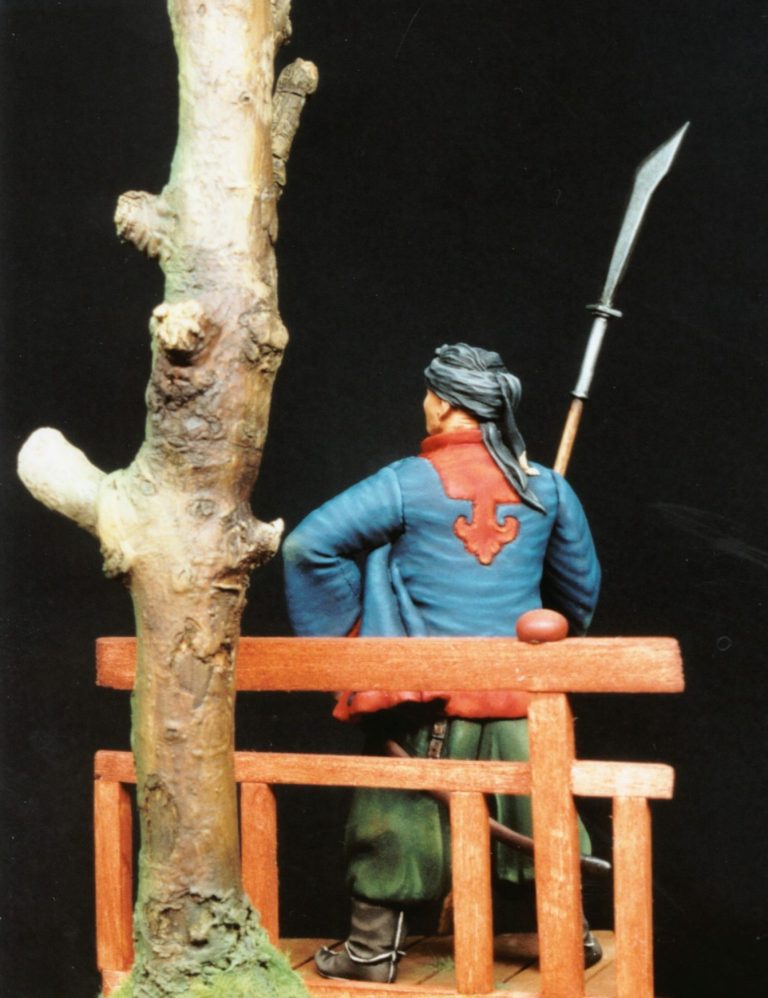
I decided on a section of walkway, similar to the scenic base on Mr Kariotelis's Euro entry, but opted to add a tree trunk as I had a little more space to play with.
I made the boards and the railing out of balsa wood, staining the rail with Burnt Sienna oils, and the boards of the walkway with burnt Umber followed by various mixes of Yellow Ochre and Titanium White to hint at the dust and wear of the wood.
Static grass was added over a textured base of Milliput on the other side of the railing, through an airbrush. The tree was added to the Milliput whilst it was still wet, and a couple of broken branches added, again with Milliput.
The excess putty was used to blend a grafted on branch to the main trunk. After which the whole tree was painted with various browns and yellows, and a moss green added up one side with leftovers of the grass colours via the airbrush.
Photo #11 shows the base in it's raw state before the addition of static grass and paint.
As final touch to the figure, before he was added to the base, I decided to dirty him up a bit. I added staining to his shirt, and also to the knees of his pants, dust in the form of pastel chalks was added to the bottom of his pants and to his boots, although this doesn't seem to show up too well in the final photos. I also added some fading to his elbows, again to make the clothing look a little worn.
I made a nameplate, adding this to the front of the base, and sat back to admire my work.
What began as a simple conversion - "I'll just add a coat to that" - turned into something of a marathon for me.
I enjoyed it, well, most of the time, and certainly like the finished product.
The base figure is very good, but whether I've improved it at all is questionable I suppose - I don't really rate my sculpting skills.
Thanks to VLS though for sending in the original figure, I hope that they aren't too put out at me altering it, as it's certainly a good model all on its own.
Main references taken from the drawings in Bob Marrion's six articles in Military Modelling Magazine.


We need your consent to load the translations
We use a third-party service to translate the website content that may collect data about your activity. Please review the details in the privacy policy and accept the service to view the translations.