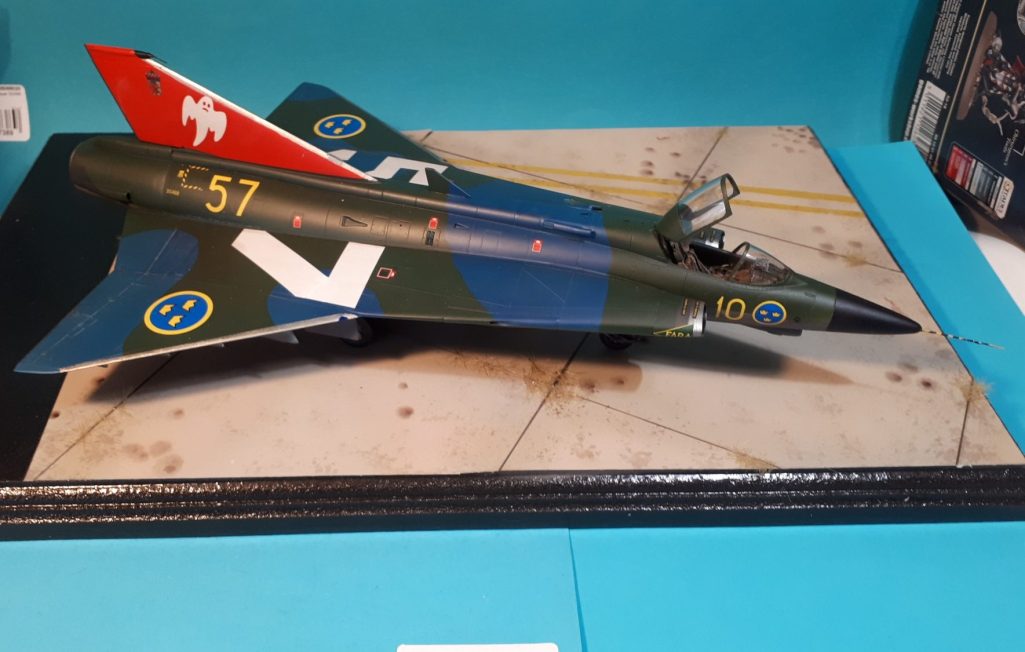
Saab Draken
1/48th scale plastic kit from Hasegawa
Model made March 2022
So whilst I am generally known for painting figures, since I stopped submitting articles to Military Modelling, I have had a chance to look at my kit stash ( you never have too many unmade kits, just not enough shelf space to pile them on ), and realize that I have a lot of AFV’s, cars and aircraft in amongst all the figures.

So I guess it was time to branch out and actually make a few.
After the “test” of the Hawker Typhoon, I decided to make this Saab Draken. There’s certain aircraft I love – the SR-71, Messerschmitt 262’s, and both propeller driven or Jet Corsairs to name but a few.
The Draken however is a bit special, as it’s the only aircraft to get a weapons lock on the SR-71 Blackbird, and pilots had been trying to do that for years. Getting a lock on a plane that can outrun ground to air missiles is somewhat of an achievement, and it’s no the only thing that a pilot has managed to make a Draken do before anyone else – think of the striking snake manoeuvre that the Russian pilots seem to pull on a regular basis at air shows..... Yup, a Draken was the first to do that one too.

Designed and built at a time when swept wing jets were de rigueur, the designers for the Draken cleared out a lot of preconceived ideas and seemed to hit on a whole bunch of design concepts that solved problems or shortcomings of the established swept wing jet design.
The singular shape of the Draken owes a lot to the need for larger internal fuel tanks, that by expanding the overall wing contour, allowed for extra fuel storage, and thus an extended deployment time for the aircraft.
OK, I can see your eyes beginning to glaze, I’ll just get on with the kit shall I ?

So the kit, much bigger than the Airfix 1/72nd version I made forty odd years ago, but then it would be, because this is 1/48th scale. However, there are many similarities in the split of parts, and thus construction.
Hasegawa have produced a nice kit, the moulding is good with very little flash, so clean up is pretty easy, and the components go together well
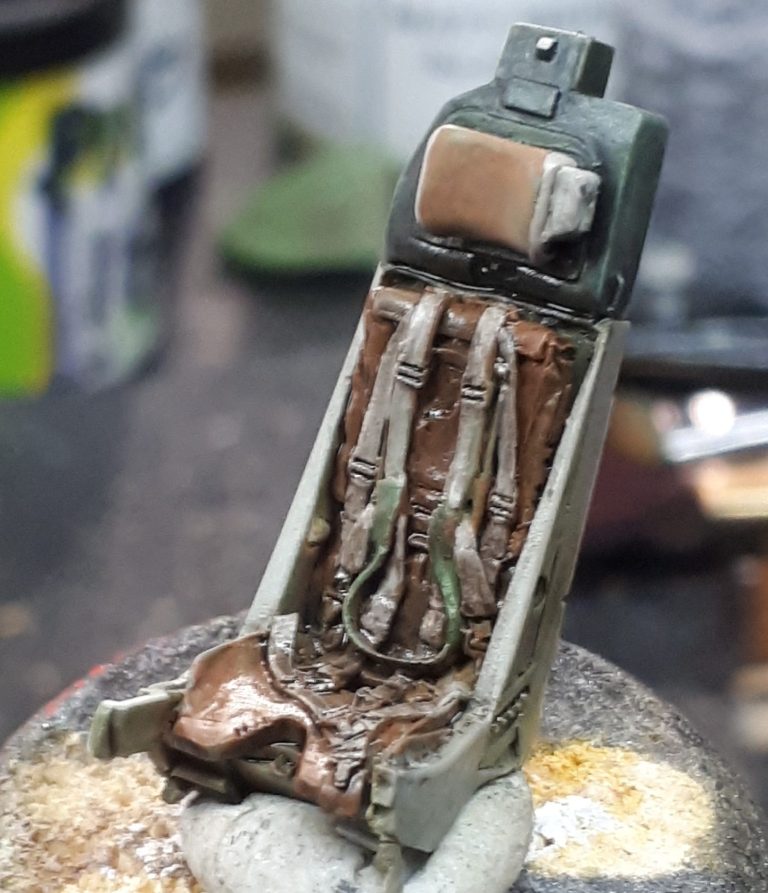
I did spring for a resin replacement seat, a new Exhaust nozzle set and some brass pitot tubes, I’m fairly sure that the replacement seat adds something to the kit, and the pitot tubes too, but the exhaust nozzles I’m firmly on the fence about.
Painting hard edged camouflage is something I’ve not done much of, especially with an airbrush, and to help in this I’d got hold of some AK masking putty.

There’s a few different companies producing similar putties, and the simple reason for using the AK brand was that it was available from my local hobby shop MJR Hobbies.
In the past I’ve used Blu-tac for the same job, but have heard that Blu-tac can leave an oil stain or residue on the surface of the model. Well, we’re having none of that, especially if I can spend money on something to do the very same job....... OK, so I’d not experienced the oil residue problem from Blu-tac, but as I wanted to improve my vehicle painting, I thought spending £7 or £8 on something purpose made for the job of masking might not be such a waste of money.
As it is, the AK putty is easy to use, much more pliant that the Blu-tac, and forms to detail a lot better. The first of the “work in progress” photos shows the initial coating of a semi gloss blue over a matt green ( with light reflection from the blue making it seem like only the fuselage and starboard wing have been painted blue ).

Decals....
These are BIG in the case of the wing numbers, and Hasegawa decals are very thin. Again my newbieness ( is that a word ? – it is now ! ), coming to the fore, I managed to break both of these big decals, having to get the two or three pieces of decal to butt up to each other to hide my heavy-handedness.
I used micro sol and micro set to help the decals settle into place, again something relatively new to me, and surprising in both how easy it is to use and how it improves the final look of the decals.
With the masking removed gently from the glazed areas I got an idea at how the aircraft would look once finished. Even I was impressed that I hadn’t made a total mess of it.

My apologies for repeating a photo, but this is the resin aftermarket seat from Quickboost and I think it's that good a bit of kit to add to the model, I thought it worth putting here again. It’s a single piece casting that just needs a bit of careful painting. As you can see, it adds to the overall look of the cockpit and is worth the additional money.

The Pitot tubes, whilst very fine, paint up well, although I did have three goes at getting that spiral of yellow reasonably even, and are easy to straighten ( yes I bent the nose tube once, stabbing it into my hand in the process ), lucky not to break it, and lucky not to have it “ping” off into space to land and be eaten by the carpet monster.

Painted and in position on an MDF base from Oakwood Studios, the concrete runway is a very simple homemade affair – a piece of white card, some Burnt Umber oil paints thinned down and painted over the card, with heavier oil stains added from unthinned oil paint of the same colour and also some Mars Black. Once dry, the break lines between the concrete slabs were marked in with a black biro.
Some double sided tape added to the back enables it to be fastened to the MDF and to help with safe transport, I drilled holes into the bottom of the aircraft’s wheels and fastened short lengths of wire into them, drilling corresponding holes into the plinth and adding some superglue to secure the aircraft to its base.

Now whilst I don’t usually say if a model I’ve made has won in competition, except in rare cases where the prize was of significance to me, but I will wax lyrical about this Draken. I took it as a “box filler” to help wedge a very large set of dragon wings in place when going to the World Expo 2022 in Veldhoven, Netherlands ( excellent show run by the team that run SMC each year ).
I put the Draken in the competition with a mind that “it’ll help fill the tables” not thinking I’d get any return on it – I’m not an aircraft modeller after all. So I was truly blown away to get a Highly Commended for it. Totally unexpected, and to be honest made a great weekend even better.
So having enjoyed the build and paint of this kit, learned a couple of things about it’s history and the way in which I tackled the painting, plus the abundance of aftermarket sets available to the aircraft modeller, I feel that it’s been a very worthwhile project, likely to spur me on to making one or three more aircraft subjects....... possibly ( maybe, perhaps ) even a helicopter....... we’ll have to see.
We need your consent to load the translations
We use a third-party service to translate the website content that may collect data about your activity. Please review the details in the privacy policy and accept the service to view the translations.