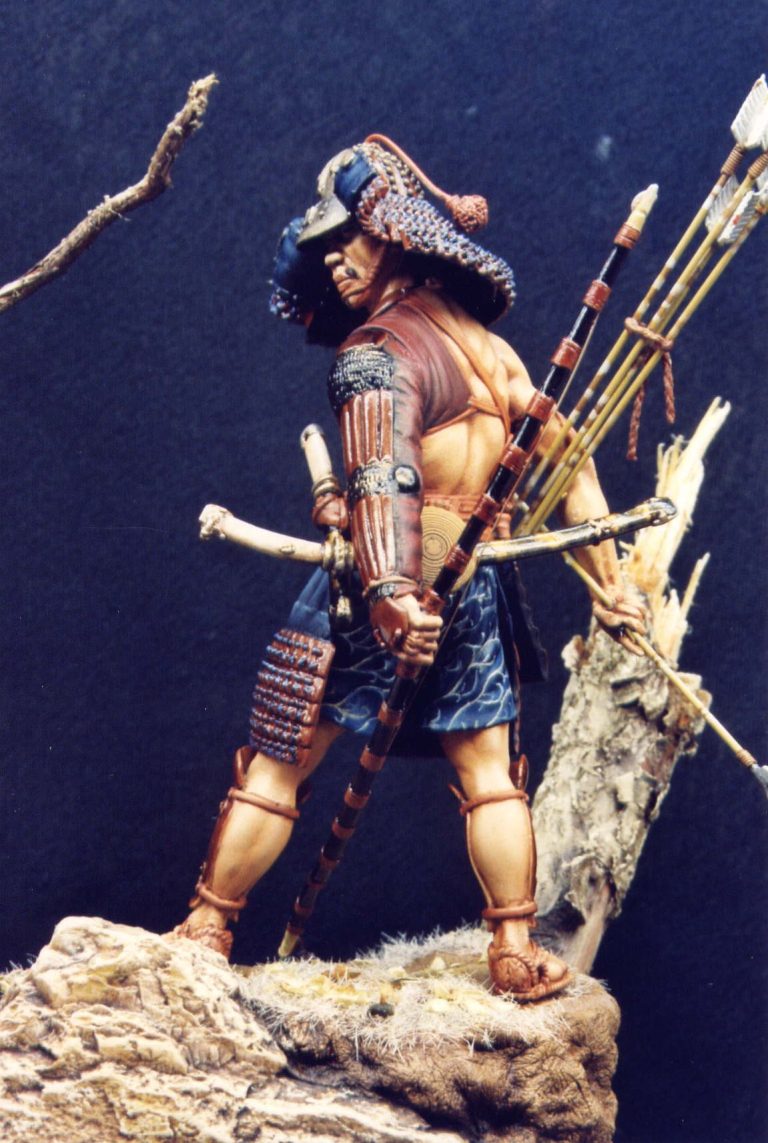
Half Armoured Samurai.
White Models 110mm White Metal kit.
Painted in 2007
History
Although I did touch quite heavily on the Samurai Bow and arrows, both how they were made, and also how they were used, in the article I did covering the Andrea Mounted Samurai last year, I’ll just add a few items here that you might find of interest.
Most of the time, when shooting a bow, a Samurai would wear a glove on the hand that draws the string.
This might be either just a glove to cover the thumb and two of the fingers, or sometimes a full glove would be used. If the full glove was being worn, then quite often the thumb, index finger and middle finger would be of a differently coloured / patterned material.

.
.
Whilst the arrows were usually a disposable, easily broken asset, there was a lot of care and art went into their production. As I mentioned previously, they could sometimes be cut from bamboo so that the nodes ( the dark bands on the stave ) would match when stacked in a quiver, but also different feathers were used - Eagle, Crane, Pheasant and Hawk being common. Also the very best arrows might have a gold lacquer ( or other decoration ) in the small area of the shaft between the fletchings.
Arrowheads were generally made with a tang that slotted into the bamboo cane, and reinforced with some rattan fibre bindings. Unlike the Europeans though, the arrow was probably picked up close to the head, rather than near the nock, and the arrow placed onto the left hand on the thumb side of the bow, sliding the right hand back down the arrow shaft to nock it and then draw.
I’m not 100 percent certain of course, but I can’t find any references to arrows being placed head first in the ground in front of the archer for ease of picking, so I suppose that rate of fire, just like the draw strength of the Samurai bow would be less than that of a comparable European weapon of a similar period.
The model is shown with a very broad headed arrow. This, it is thought was to maximise damage to anything “fleshy” that it hit, and although used offensively for war, would tend to be more effective against unarmoured subjects – say for instance when hunting.
The small tabs on the bowstring at the tips are to mark which end of the bow cord is top / bottom, and also a second tab was sometimes used at the upper end so that the cord could be gripped in the archer’s teeth and his hands left free to bend the bow whilst stringing it.
The model.
I’d actually started this kit over three years ago, in a rare moment of self-indulgence ( well, I didn’t have much on the bench at that time ) and there was soon an avalanche of review items and commissions that displaced it. So back in its little box it went.
Having completed the Andrea Mounted Samurai Archer recently, I took it upon myself to have a second look at this, and see if I couldn’t actually get him finished.
I’d managed to get the larger body parts joined together, and added paint to all the flesh areas, and the basic blue colour on the shorts, but that had been the sum of my efforts.
But before I go there, I should really tell you a bit more about the kit.
This is a relatively complex kit, and I suggest that you’d be better if you’d done a few white metal kits prior to attempting this one.
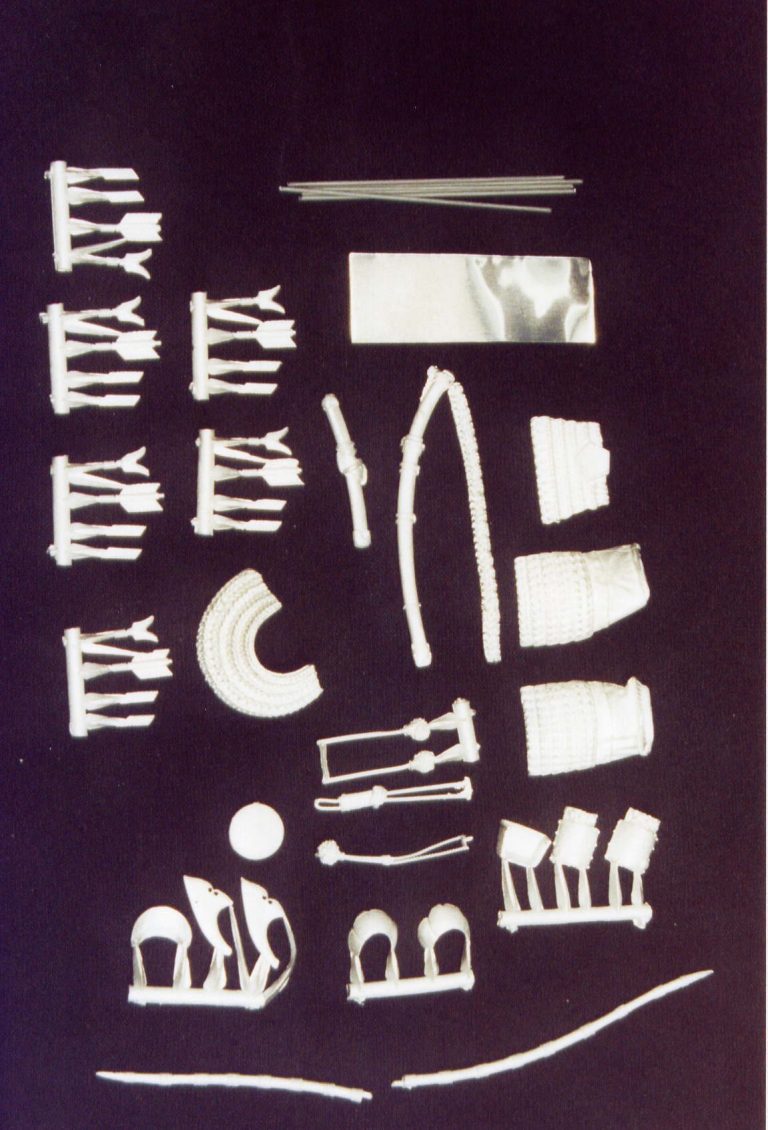
That’s not to say that there’s any problems, just lots of bits, and there’s certainly an easy way of doing it, and of course there must be half a dozen hard ways of doing it too. Photo #1, which is a rather old photograph, and I apologise for its poor quality, shows the parts all laid out.
The split of parts is logical, with breaks at natural points, so painting in subassemblies is easy. The metal is nice to work with, being quite soft, and there is an instruction sheet to help show how to produce some of the smaller and fiddly subassemblies from the several parts provided.

One of the subassemblies can be seen in photo #2. This shows how I’ve pinned through one of the legs at an angle and up into the upper body. This hole will be filled in and also covered by an armour plate as the painting and assembly of the kit continues.
It’s worth having several dry runs with the parts, using Blu-tac helped with this, making sure that parts stayed together temporarily to test what would get in the way when painting.

I decided that the main body could be joined together, and that the arms would be left separate. This does create a problem with the cloth covering on the left shoulder, but any slight differences in colour can be disguised with a seam line painted on to break up the separate pieces of cloth.
Thinking ahead....
I also decided to keep all the small details off the figure whilst the paint was applied, adding these as though dressing the figure with them after all the painting had been finished.
To begin the painting,
I added a thinned coat of acrylic white ( Skull White from Games Workshop, thinned with Isopropyl Alcohol ). The thinner used here allows the paint to get a better grip on the white metal, and prevents the “beading” effect that is sometimes seen if water is used
I then added three more thin coats of the same colour,
diluting the paint for these with boiled water. Boiling the water gets rid of some of the impurities, especially things like Chlorine.

Adding a couple of drops of washing up liquid
to a jar of water and using this as a reservoir to thin the paint will allow the paint to flow just a little bit better too.
Over these initial coats I then began adding the undercoats,
firstly to the skin areas, these being a mix of Humbrol Flesh acrylic, Skull White and Orc Brown ( both these latter being from Games Workshop).
Once this was dry, I could begin on the oils.
I mixed up a basic flesh tone, which was keyed to match the acrylic colours previously applied.
This was made by mixing Winsor and Newton Flesh tint ( which is very pink in appearance ), some Mars Yellow, and a little Titanium White. The ratio was approximately 4:1:1 of these colours respectively.
I also mixed up a small amount of a shadow colour, using equal amounts of Mars Brown and Mars Yellow.

.
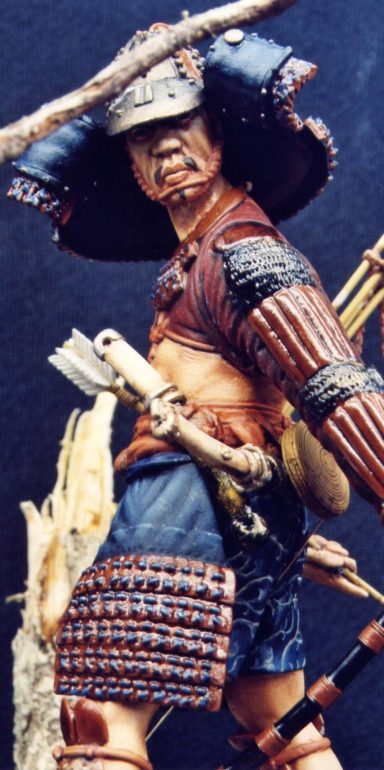
I applied the light flesh coloured paint to the model,
stippling this to even up the coverage, and mostly remove the paint.
Then I added some of the darker shadow colour to the recessed details, and for highlights some of the Titanium White was used.
By adding the paint to the model with a good quality sable brush, the colour was placed accurately on the part of the model where it was required. By then using an older cut down brush to stipple the area lightly, the colours could then be mixed together on the model.
So that there isn’t too much build-up of paint on the model, or the brush for that matter, it’s best to use an old piece of cloth, or a piece of kitchen roll to wipe excess paint from the bristles of the brush.
I use this method whenever I paint with oils, and simply adjust the size of brushes ( either bigger or smaller ) dependant upon the area being painted.
For the shorts, I used GW Moody Blue as an undercoat, and over this added Prussian Blue oils. To build up mid-tones and highlights, I simply added small amounts of Titanium White onto the model in the areas that I wanted, and then blended this into the blue; the more of the white that I added, the lighter the blue became.
To contrast the blue, and brighten the model up, I decided to do the other details in orange, or sandy yellow shades.
So the belts and cords were done in various shades of orange, using GW acrylics for this. I used a lot of their Flame Orange, and used some of the dark reddish brown ( which I don’t know the name of, because it’s rubbed off the label on the jar I have ). Highlights came from a mix of the Flame Orange and Skull White.
In Frazer’s photos of Samurai’s – some of which were used for the Andrea article- and also in the Mitsuo Kure book on Samurai costume, there are several chaps who have a rusty colouration to their armour. I’d not attempted this effect before, and decided to see if I could mimic it in miniature on this model.
Painting the armour
I kept the pieces of armour separate from the main assembly here ( although there are some pieces moulded directly onto the main casting – these were painted now along with the separate parts ), this allowed me to paint the backs of the separate pieces black, and also to work on the armour, then switch back to the figure whilst the armour was drying.
For the basic colour I used Vermin Fur ( GW ) and added some highlights with a 1:1 mix of this colour and Orc Brown. Over the top of that, once dry, I added several thin coats of Tamiya Clear lacquers, mixing a spot of blue to the orange clear colour to give a dark rust colour.
Once the rust colour had dried fully, I added some blue acrylic ( Moody Blue plus some Chaos Black ) to the cords holding the lamellar plates together. I gave these three coats to build up some density to the colour, and then added more of the blue and a little bit of Skull White to the mix to make a mid-tone. This was applied to the cords, allowing some of the darker colour to show around the edges and at the bottom of each cord.
Finally, some more white was added to the blue mix, and this light colour was applied to the tops of each cord to form the highlights.


As each colour was added in several coats,
allowing the depth of colour to build up, there are probably ten or twelve coats on each of those tiny bits of detail. It’s tedious work, and one of the reasons that I don’t do a lot of Samurai subjects, but worth it for the effect.
Whilst this dried off fully, I painted in the pattern on the shorts. I mixed up a very pale sand colour ( Mars Yellow and Titanium White oils ), and used this to sketch in the basic pattern of diagonal lines with periodic curled decorations. By adding gradually to the complexity of the design, working gradually around the model, a simple initial sketch of diagonal lines is built up into something much more complex.
A pity that this isn’t seen too much on the finished figure, as for once I actually managed to keep the decoration on this area fairly even as it passes around the figure.
The cloth areas at the top of the armoured areas were painted to match the blue of the shorts, but I felt that as this is only a fairly lowly foot soldier, then he wouldn’t be likely yet to have had the money to get decoration added to all his kit.
The armour was glued in place, having previously painted the rear faces of it with some Chaos Black acrylic.
I also checked that I’d painted all the straps and belts at this point, adding the sandals in too, and using the orange paint on the sash that is moulded around the two swords.
This turned out to be rather pointless, as I needed a small amount of filler, and had to re-make the colour to paint over these areas when joining the swords to the model.
The scabbards were painted whilst separate from the model, adding a couple of coats of the Chaos Black acrylic, and then floating on thinned Testors Gold enamel. I did stipple some more of the paint in a couple of places on each scabbard, to intensify the gold colour, and then once dry, this was then coated with several thin layers of the orange / blue mix of Tamiya clear colours.
The hilts of each sword were kept relatively simple. I painted each one with an off-white colour, and then added some pure white to pick out the highlights. Finally gold was employed to add the metal fittings, adding some Olive Green oil paint to this to form the shadows.
The arrows came next.
These are a clever idea in theory, but a right beggar to do in practice. In the kit there are several pieces of thin wire, several arrowheads, and several fletchings to form the flights. The Fletching is supplied as one pair cast flat to form the opposing sides, and then two more separate fletchings to make the flights into a credible rendition of the four-flighted arrow. I’ve not explained that very well have I ?
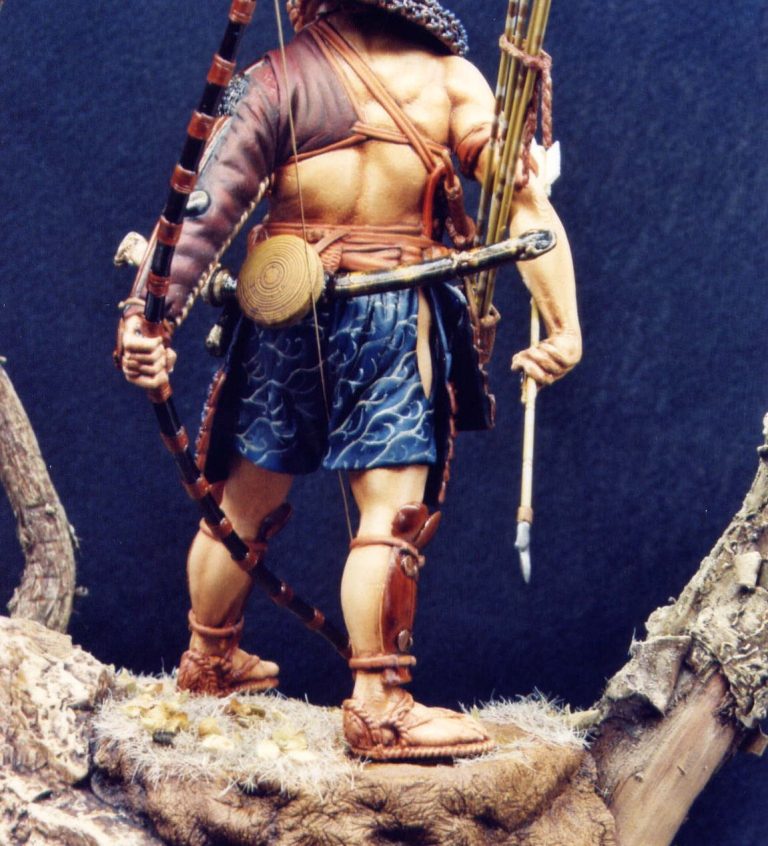
.
Basically each arrow is formed from six parts,
and you’ve got several to build ( I’ve seen most models sporting three arrows in the quiver, and a fourth one being held by the figure. I went for an extra one – because either I like torturing myself, or am an idiot with too much time on his hands ).
I did cheat ......
by only making the arrow being held by the figure with its head, the ones in the quiver ended up being just the ends of the wire slotted into the box-like cup that holds them upright.
I painted the arrows separately,
then slotted them in place and added the wire fastener around their mid-point.

This in itself is quite testing,
simply because the arrows components fall apart for the fun of it, and holding them in one place, getting the wire around them, not damaging the paint, and staying moderately sane is……Well, I’ve got a cloth now to wipe up the drool.
Samurai bows
It’s quite well documented about the form that a Samurai bow generally takes. That is, a larger upper section compared to the shorter lower section, in order to increase the draw strength and because of the diminutive height of Japanese people

Careful with that bow...
It’s something I now look at with all the examples of this model that I see, because he’s actually holding his bow in such a way, that if he wanted to fire is quickly – and if he’s either expecting an enemy or some food ( those darned mountain whale again – aka deer – to compensate for the vegetarian beliefs of the average samurai ), then it’s upside down.
Go on then, you have a go....
Yes, try holding a bow ( if you’ve got one to hand, but a stick will do ), like the model is doing, and to fire it you’ll be twisting your wrist through 180 degrees as you bring the bow to bear. Hence the longer section of the bow is pointing towards the ground.
This makes for fun, as with the positioning of the model, the top end of the bow stave is now more than grounded, it’s about six scale inches below ground.
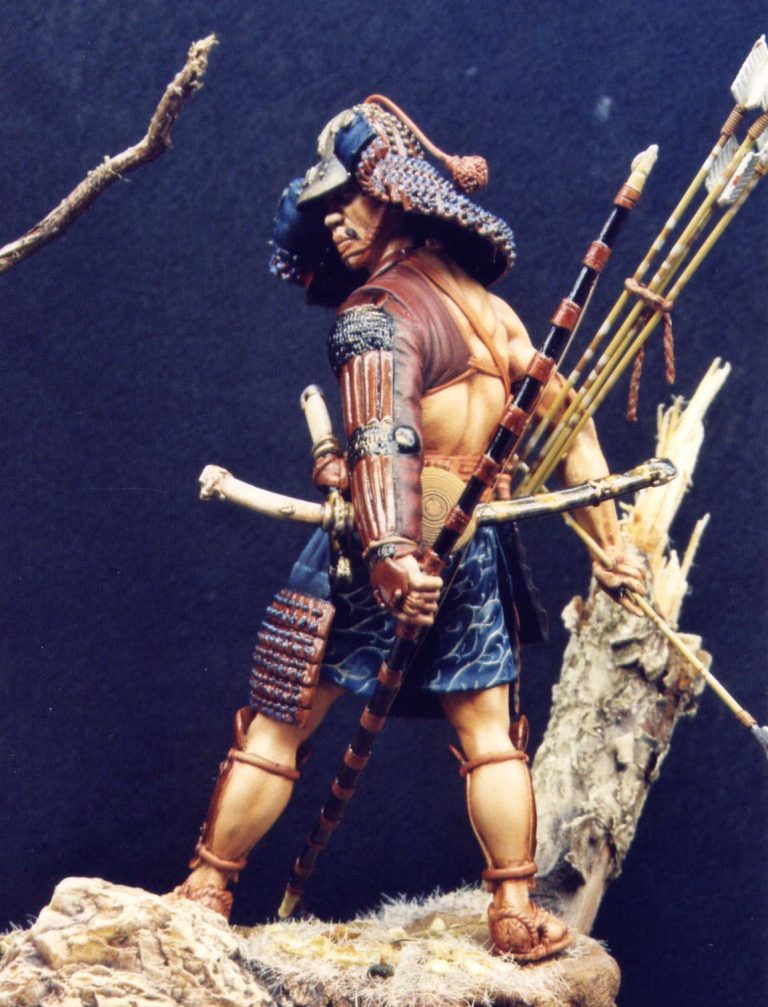
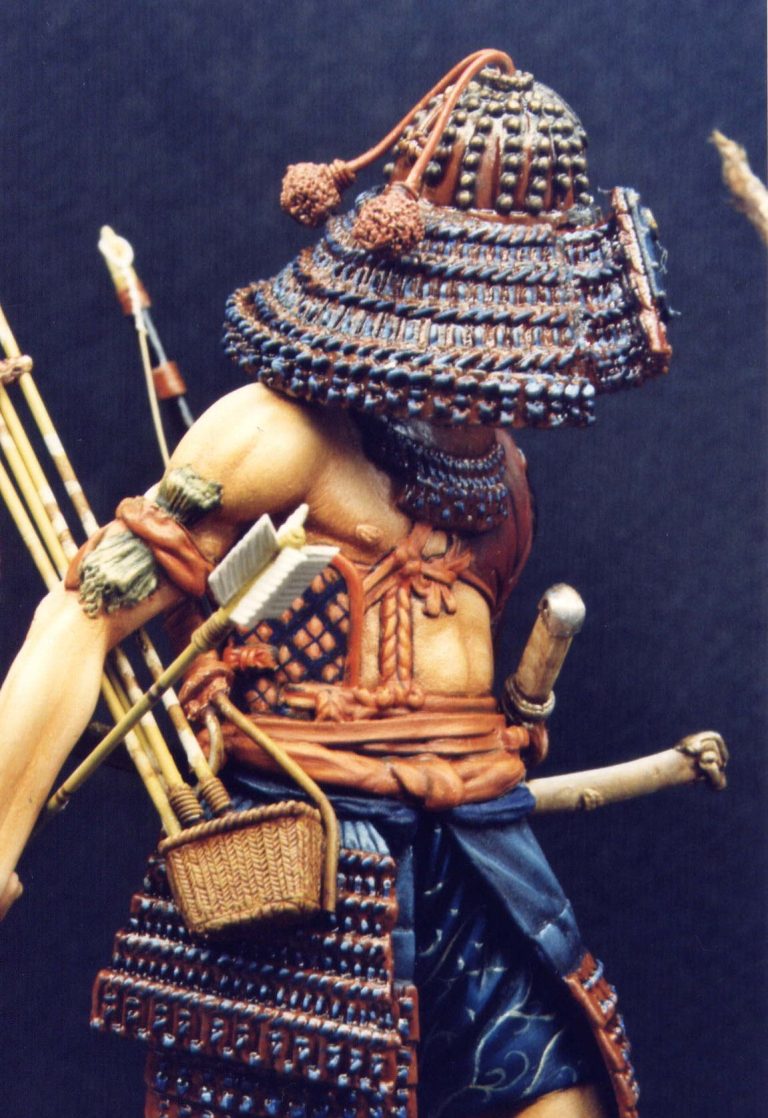
That’s why I decided to make the groundwork set-up that he’s on, as a flat base wouldn’t do.
Once the model was fully assembled, I began on the base. I used a small octagonal plinth, and added to this some moderately large lumps of rock to help build up the height. I used Milliput as both the glue for this, and also as the “soil” surface, texturing it with a toothbrush on the edges, and an old plastic bristled hobby brush for the horizontal surface groundwork.
I couldn’t find any cane that could be pressed into use for the bamboo steps, simply because the leaf nodes that give bamboo it’s characteristic form and colour were too far apart on the cane that I had in my shed to look realistic and in scale with the model.
Making the groundwork
I made use of some small twigs from the garden, from a cherry tree for those who must know, and painted it to look like bamboo.
The formation of the base can be seen in the photo below,
Items used....
there’s two broken twigs being pressed into service as trees,
Milliput
and the basic texture of the Milliput that was used for the bulk of the groundwork was made with an old toothbrush, stippling the bristles into the putty whilst it was still soft.

Cocktail sticks....
The small pieces of cane used to hold the steps in place are cocktail sticks, having been cut off square, and then drilled out to give each one a hollow end.
Ooops !
I’d forgotten to do this with the larger twigs, as can be seen in this photo, and so I did it prior to painting.

Painting the groundwork
The photo to the left shows the base having been painted with earth colours - GW Orc brown acrylic with Burnt Umber oils over the top, the latter being wiped off to reveal the texture of the Milliput. Also the Bamboo was painted with Burnt Umber, Mars Yellow and Titanium White oils, leaving the paint streaky so that the texture of the bamboo is hinted at. Mars Black was used to paint in the leaf nodes.
After this photo was taken, static grass was added sparsely to the upper surfaces of the groundwork, holding this in place with some wood glue. Once the glue was dry, the static grass was painted with Humbrol enamels.
The trees
The trees were painted with oils too,
mainly to increase the depth of shadow and highlight. I used a wash of Burnt Umber to begin with, and then added Olive Green, Mars Brown and Titanium White to them, drybrushing these colours on, and trying to work the different colours into separate areas of the tree trunks.
The model was superglued into position, having made holes for the wires in the Milliput and imprints for his sandals whilst the putty was still soft.

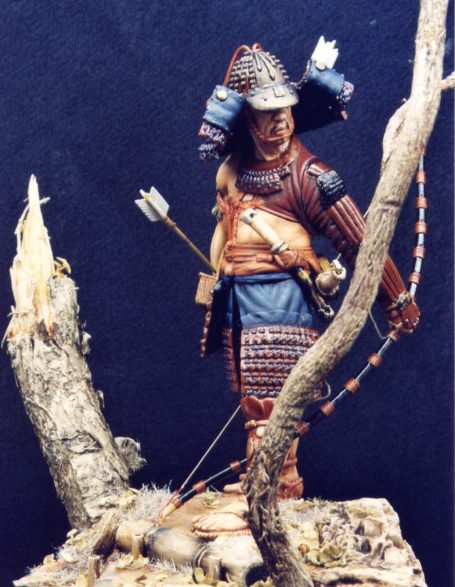
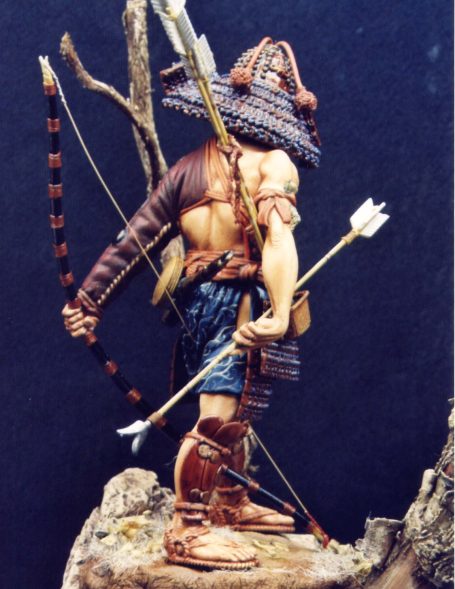
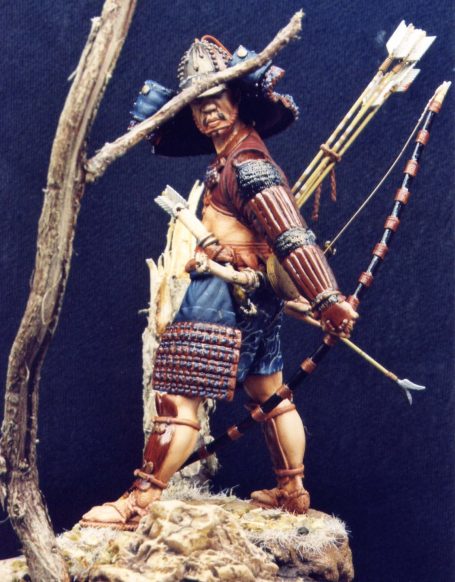

.
Final words
Well, as usual, I’d say that I enjoyed making this kit. It definitely isn’t one for beginners, as it can be quite fiddly to put together, and you definitely need to be thinking about what goes where, and why.
On the other hand, there is an instruction sheet, where the sculptor has given line sketches for how to put things together. There’s also a couple of additional photos included, which when added to the box top shot, should give a fairly good indication of where things go.
It is only a relatively small figure; but it’s one that when finished, will draw the eye.
I’ve kept the paintjob fairly simple and restrained, as mentioned; my chap’s relatively poor and has had to scavenge the battlefield for some of his kit. But obviously the open areas of clothing and armour will allow a vast canvas for the artistically minded to vent their skill upon.
I’m not sure how easily available this kit is, and I’d suggest that the first stop should probably be either Historex Agents ( over here in Europe ), and possibly The Red Lancer ( for those over in the States ).
White Models kits have never been cheap, so expect to pay in the region of £50 - £55 for this piece, but with a neat paint job, he’ll look ever so good in a collection.
References:-Photos of Samurai re-enactors taken by Frazer Grey.
Arms and armour of the Samurai warrior – I. Bottomley & A. P. Hopson
Samurai – Mitsuo Kure
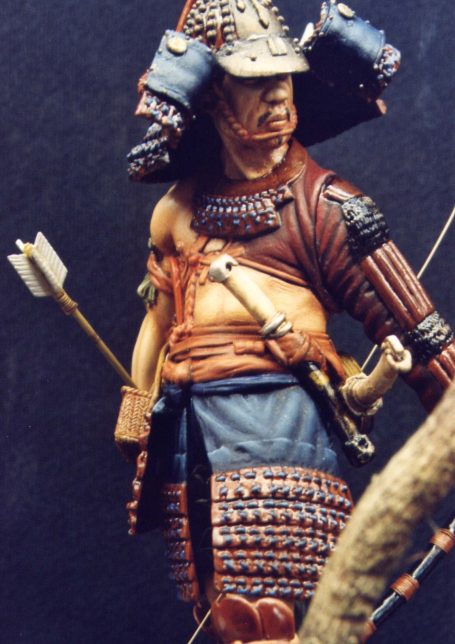
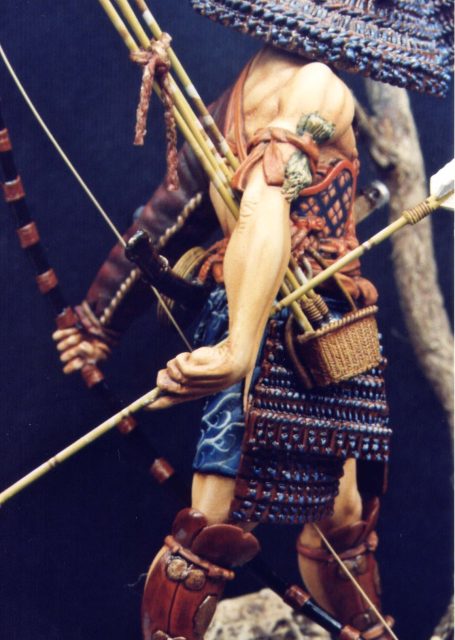
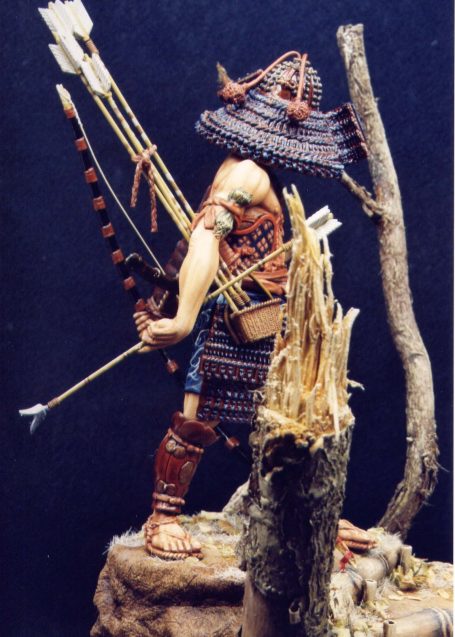
We need your consent to load the translations
We use a third-party service to translate the website content that may collect data about your activity. Please review the details in the privacy policy and accept the service to view the translations.