Napoleon Bonaparte
A 1/10th scale resin bust from Alexandros Miniatures
Painted in 2010
I think I can probably get away without doing much history about Napoleon – suffice to say he was a very clever man, a great tactician who built an empire and then lost it.

For all that his legacy leaves us with a period that we modellers have tagged with his name, and a military cornucopia overflowing with colourful uniforms, interesting characters and massed battles that even though they are well documented, can still cause experts to argue two centuries later – what could be a better memorial than that ?


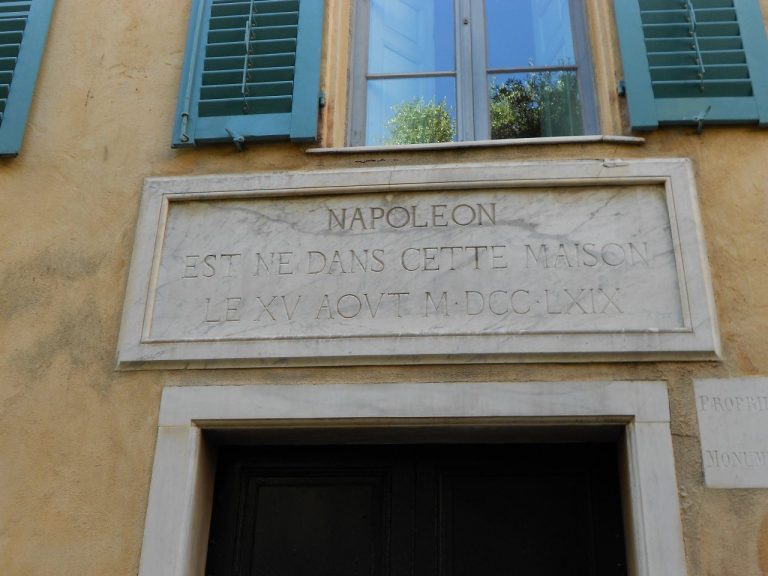
Among the pictures here are some that you might not normally see in an article, or reference piece either. They were kindly supplied by Malcolm Cuming from his trip to Corsica and show the church where Napoleon was baptised and also his home.

The sumptuous décor and furnishings of the latter might be of interest for anyone wishing to produce a vignette or diorama perhaps ?
My thanks to Malcolm for letting me have these pictures and his permission to reproduce them here.

The Model
Yes, let’s move along to the model.
There’s a lot of offerings featuring Bonaparte; some good, some bad, some just plain ugly. This I think is one of the best busts to be released, and to be honest, it almost paints itself for you.
Photo #1 shows the box art, and photo #2 the components ( OK I added the pins for holding them to the wood blocks I use as handles during painting ).

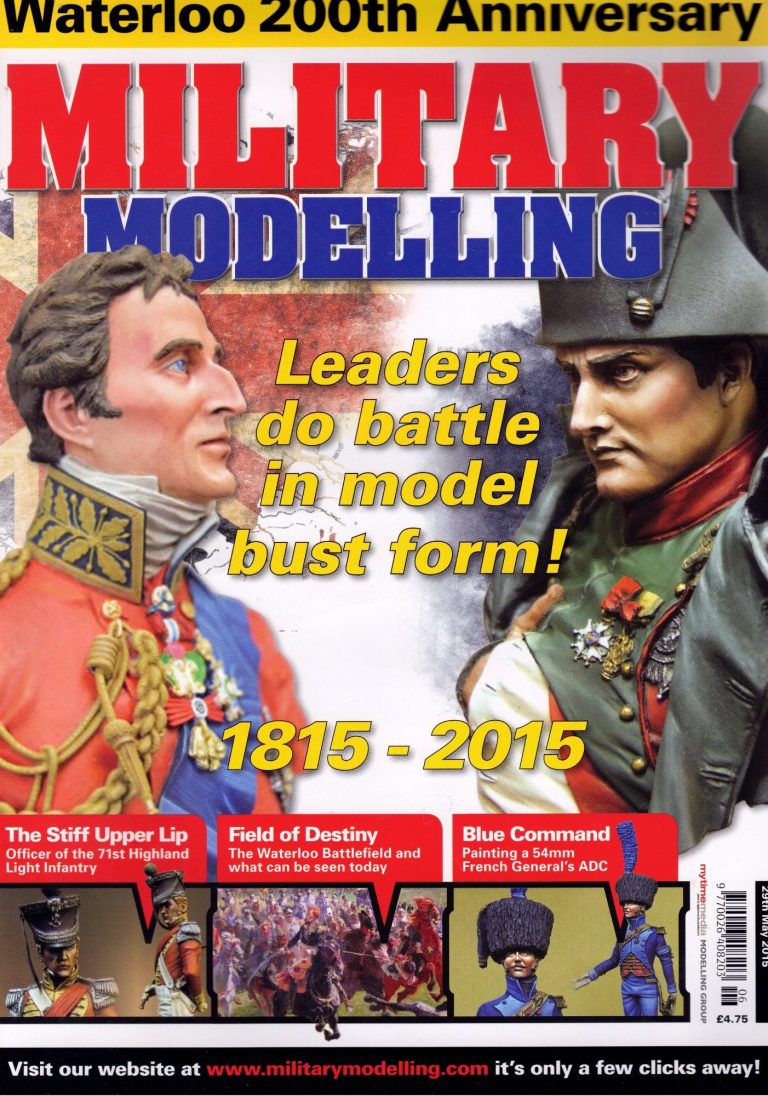
Ah, yes, to the right here is the front cover of Military Modelling Magazine with this bust featured on it...... Well, got to get these things in somewhere......
Moving on.....
The box art shows several views of a nicely painted example, although not enough that it allows you to paint in the finer details without having to look a few things up. Also there are several options for colours that could be used for the waistcoat – I chose to copy the box art, but I’ve seen other colours used and to be honest, the model looks every bit as good. It’s down to personal taste.
The components are all sculpted to a very high standard, with casting backing that up and allowing for only minimal clean-up, the filling of a few small air bubbles and no need for putty to hide any joints.
I’d heard some time ago that Napoleon never actually sat for a portrait to be painted, and that all paintings of him were taken from quick sketches and the memory and ability of the individual artists. With that in mind I thought I’d look around for some accounts of his looks that were taken from first hand descriptions, the general consensus leading me to have a mental image of a pale skinned chap, with blue / grey eyes. Interesting that there are differing reports of such a predominant feature as the colour of his eyes though……
But that notwithstanding, I had a few pointers for how I wanted to render the face.
Photo #3 shows the beginning phases of the flesh tones. I did want to err on a pale complexion, and used a lighter start point than I would normally mix up – but as usual I still just used Mars Brown and Titanium White, coating the face and hand with a mix of the tow colours and then building up mid-tones and highlights with additions of the white.
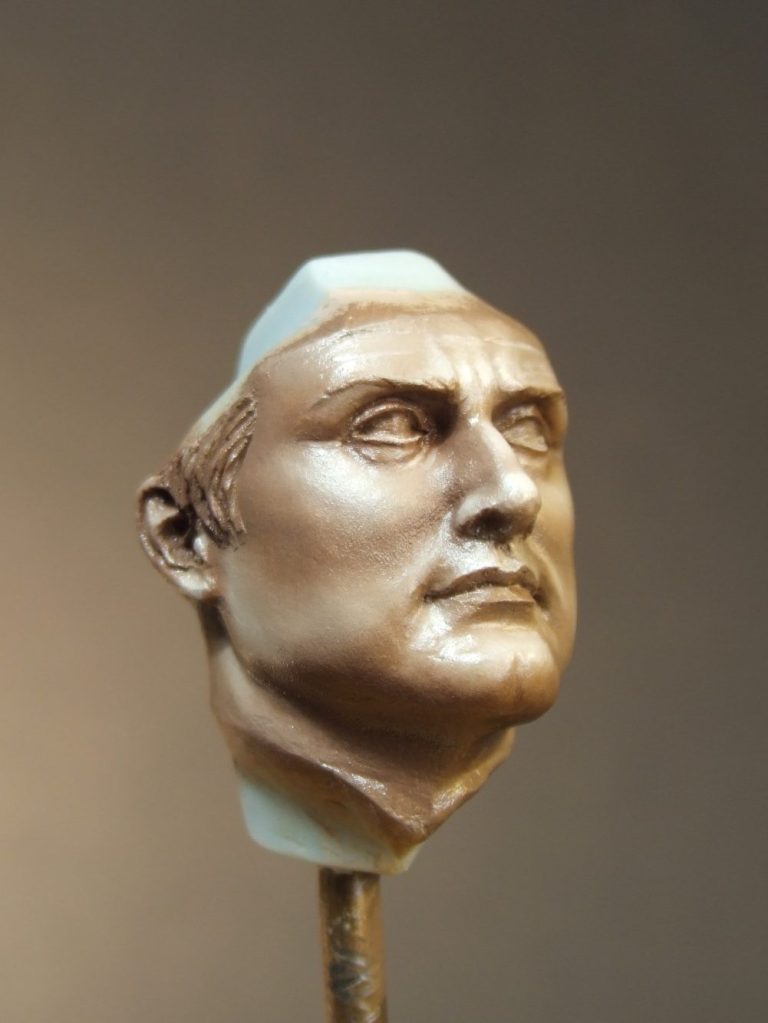
This is the stage I’m at in this shot, admittedly it looks a little bland and I would beef up the shadows with deeper colours a little later on, but the basics are there and were allowed to dry fully before attempting anything else.

Photo #4 shows the hand having received the same treatment, although it looks even more washed out with the pale resin surrounding it that’s been primed with a pale flesh acrylic undercoat.
In photo #5 I’ve added a few areas of deeper shadow to the hand using Mars Brown with just a little Mars Black mixed into it, and also begun the process of painting in the clothing.
The white section of the shirt has been painted using acrylics – I find them much more effective for pale colours – and I began with a mix of Vermin Fur, Kommando Khaki and Skull White – yes, you guessed that they’d all be Games Workshop colours. This was quite a dark cream / brown colour and took a lot of layers of lighter paint to gradually build up the mid-tones and highlights, adding water and more of the Khaki colour to initially lighten the mix and then bringing in the white to build up to the lightest highlights. When I say there’s a lot of layers of paint, there’s possibly eighty or so applications on the uppermost sections for where the paint is almost pure white. But there is hardly any build-up of paint as the layers are so thin due to there being a lot of water mixed in to thin the colours being used. It takes time and patience, but the colour transitions are smooth and invisible.
Finally in this shot is the addition of the Red undercoat. I’ve used the Mechrite red foundation colour from Games workshop and added in some Tamiya Flat Base to make it really matt. This will soak up any excess oils in the red colours that I’m going to use, helping give a matt finish to the area ……… Hopefully.

In Photo #6 I’ve added the red oils, using a mix of Carmine and a little Mars Black to block in the shadow areas, and then the Carmine on it’s own to fill in the mid-tones. I used Crimson to get the highlights and then put it in the drying cabinet for a couple of days.
What you might notice in this shot is the lack of a definite shadow between the white and red areas on the lower chest.
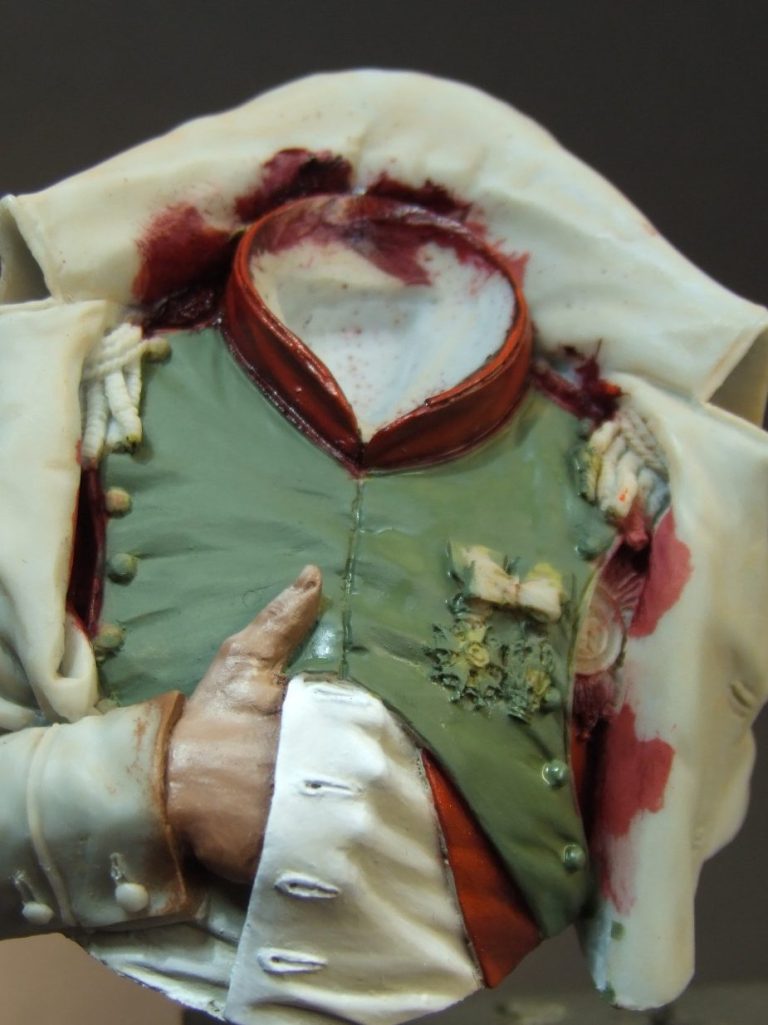
I deliberately did this because the deepest shadows would be added after the main areas of red were fully dry. As with the previous shot, this also shows me having added the undercoat for the green area, which would be treated to some oils once the red section had dried.

Whilst that was happening I returned to paint the eyes in. For these I first painted the eyeball with a lightened shade of the original flesh colour, but mixed in with that was just a touch of a dark blue. This gives an oyster colour that is light enough to look white, but isn’t stark as a pure white would be.
Once dry I could add the iris, beginning with some Payne’s Grey to mark out the edge of the iris, and then add within that a mix of the grey and some Mars Yellow and a touch of Titanium White. The darker outer rim gives the eyes a border that allows for a relatively pale eye colour. Without this darker colour the pale iris would be lost on the light coloured eyeball and the effect would be poor at best.
The pupil is added with some Mars Black and then the delicate operation of adding the catchlight is attempted. It takes a steady hand and a bit of patience to do, but adding the reflection to the eye on the border between the pupil and the iris gives the eye the effect of looking wet, without the trouble of adding a gloss varnish and hoping that that will catch a reflection on it’s own.
Here I’ve had a few tries ( better to do when the rest of the eye has dried ) and unfortunately it’s not gone well. In fact the catchlight in his right eye looks good from this angle – it’s actually too large – and the one on his left eye is almost nonexistent and needs re-doing when everything’s fully dry. See, us so called “experts” have bad days too !
Anyway, that was photo #7.
Moving swiftly along, we come to photo #8 and return to the main casting. Here I’ve painted the green area of the uniform with some Chromite Green and a little touch of Mars Black, then added more of the green to build up mid-tones and topped them off with some Buff Titanium to get the highlights.
I didn’t want to go too far with the highlights, because the Buff colour would tend to make the clothing look worn – OK in the average working Knight, but Napoleon was not only the chap in charge, but French as well, and that has got to mean that he’s well turned out.
Also in this shot I’ve begun painting in the braided epaulettes and the medals. I’ve worked with Printer’s inks on the epaulettes, and begun with a dark green oil working through Bronze, then Antique Gold and on to Bright Gold with some final highlights of Silver. The medals I’ve painted with Steve Crisp’s Darkstar Miniatures. These look brighter and will give a little extra punch to the relatively small areas that will remain metallic on the medals once all the other colours are popped in.

Photo #9 shows a closer shot of the medals after more paint’s been added. The left hand one has had the white enamel added to the outer triangle sections and the inner roundel has had a blue circle added to it just inside the outer edge.

LoThe right hand medal has had a pin wash added to deepen some of the shadows and the ribbons have been painted to match in with the references I had to hand.


Admittedly the separate sections are looking OK at this point, but they come to life a bit more when test fitted together as in photo #11 and #12. Here I’ve added the head temporarily to the main casting to test fit ( again ) and just for the heck of seeing how it’s looking – ‘s lookin’ OK !
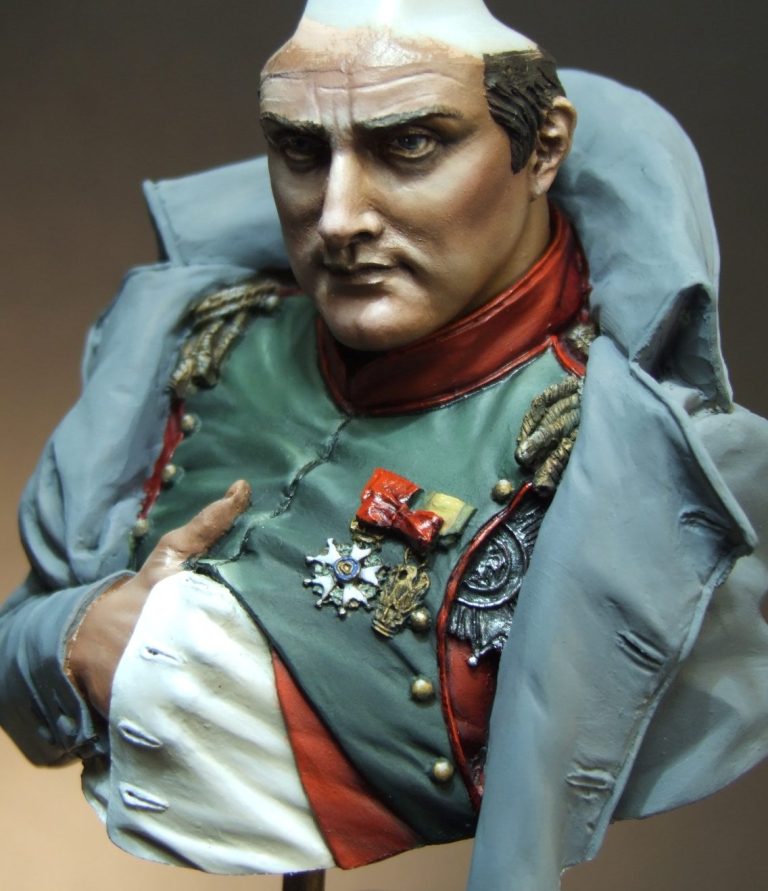
Moving to photo #10, this shows the medals from a little further away, but both shots are suffering from the ribbons looking glossy still as the pictures were taken before the paint had dried. Also in this latter shot the great-coat has been undercoated with a mid-grey acrylic.

This is helped of course by me having tidied up a couple of the edges on the clothing, adding a definite shadow to the edge of the green sections and also the red piping around the waistcoat edge. It’s strange how such small additions can make a big difference.
Off with his head – OK just the model that is, and so I continued with the painting by separating the head from the body.
The greatcoat was rendered with a green biased grey – mixed from Titanium White, a little Mars Black and some Chromite Green. I’ve looked at quite a few paintings of napoleon in this clothing and the overall impression is of the painter’s using green within the grey to get a particular appearance to the material. If it’s good enough for them, well it’s certainly good enough for me, hence the Chromite Green being added to the mix.
I used more of the black to introduce the shadow sections, and highlighted with a pale mix of the green and white. The deepest shadows were added after the coat was fully dry, using mars Black thinned with some White spirit to blend in washes of dark colour to the relevant sections.
The hat was painted in very similar colours, substituting Prussian Blue for the Chromite Green and stippling the area to give it the effect and miniature texture of felt.
And so to the final shots. There’s a few small details such as buttons and the ribbon and rosette on the hat been added, but nothing important going on in these last shots.

After many years of saying “I don’t do Napoleonic subjects” I feel that I’ve found them enjoyable, having done four or five now.
The history is more recent and because of that just a bit more interesting due to the presence of relics and reference material.

Visiting the site of the final battle – Waterloo – was a bonus too, and one that brings home the massive loss of life, the bravery of the men who took part ( on both sides ) as they were injured or killed and that whilst Napoleon lost, his determination, charisma and flair cannot be denied.

I not only enjoyed painting this model, but found that the sculpture was easy to bring to life, it’s one of the easiest pieces I’ve painted for a while – in fact it almost paints itself.
Safe to say then that I can recommend this one, and it’s a little break from all the WWI subjects doing the rounds at the moment


We need your consent to load the translations
We use a third-party service to translate the website content that may collect data about your activity. Please review the details in the privacy policy and accept the service to view the translations.