Crow Chief
1/9th scale bust from Harton Miniatures
Article in Military Modelling Magazine 2003
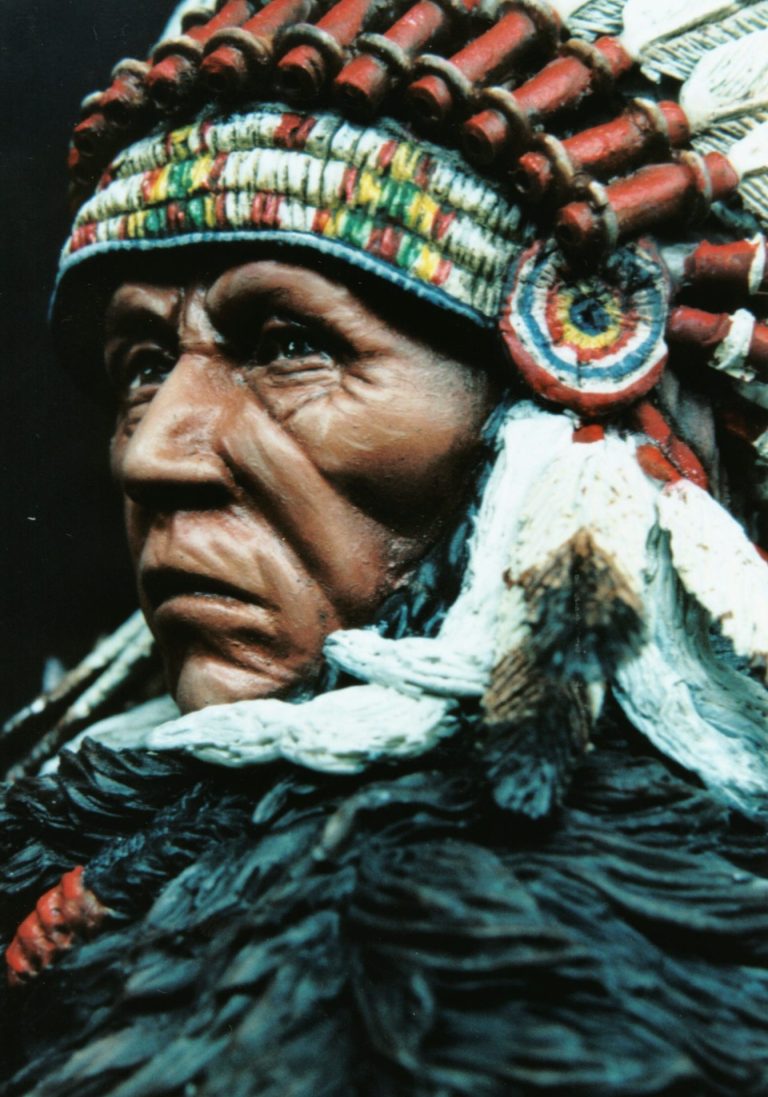
It seems ages since I've done one of Carl Reid's models.
This one is a very good representation of the front cover of the Howard Terpning book, showing his paintings of the early "Wild West". Carl seems to like taking his subjects from such sources, as a couple of other pieces from his range are from the James Bama book.
I must admit to preferring Bama's art to Terpning, the latter to me seems a little rushed and blurred. However, when translated into three dimensions, it's a bit of a different story. This is a very nice model, and one that I've left too long to put paint on, having accumulated several of Carl's models over the past few years.
This one in particular is one that I've kept looking at, nestling on the shelf, amongst the "grey horde" of unpainted models, all of which deserve a lick of paint.
Although I like Carl's sculpting, I invariably find myself adding something to the kits he manufactures. Not that there's anything wrong with them, you understand; it's simply that I find them a joy to work on. So before I go any further, I thought that I'd best take a photo of the model as I bought it, just to show you what it's like. See photo #1.
Initially I wanted to just add a different texture to the cloak / blanket wrapped around the figure. But as I worked on the kit this developed into something a little bit more involved.
Adding the texture itself brought on its own problems of details being buried that would need remaking. Then as I'd spent so much time doing that, I decided that a few other bits needed tweaking, just to bring them into line with the other parts that I'd added to.......It's a bit of a slippery slope really !
As I mentioned, I first decided to add a texture to the cloak / blanket, and settled on a very high relief Bearskin effect.
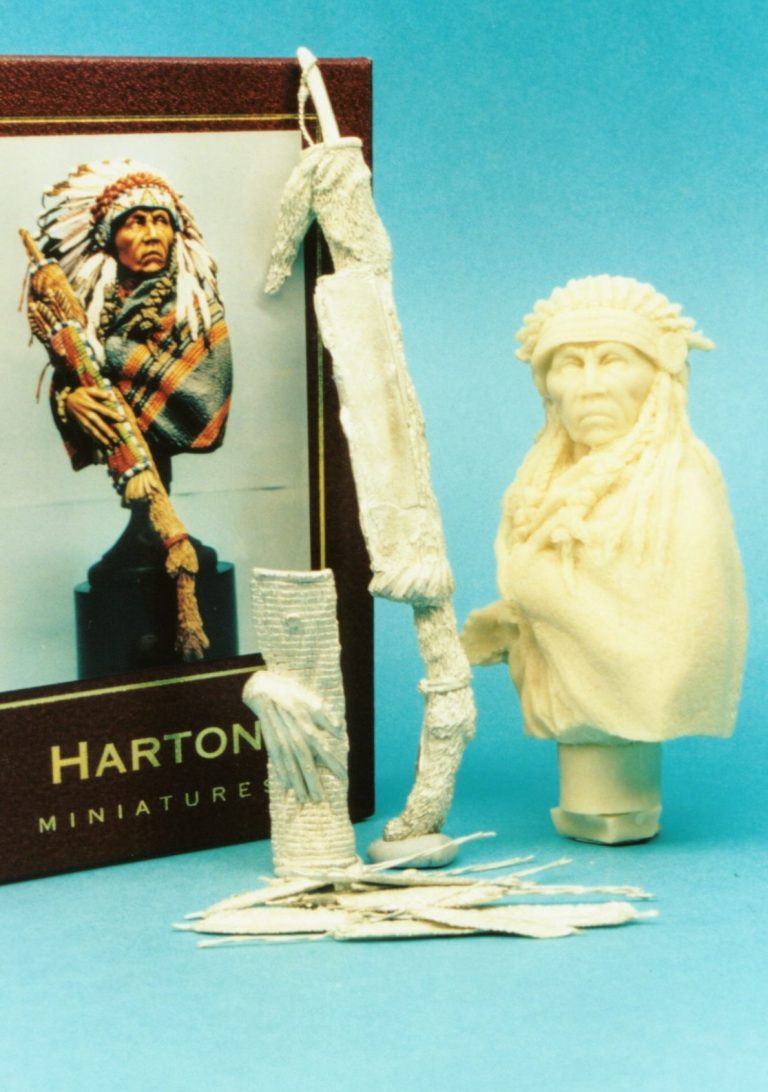
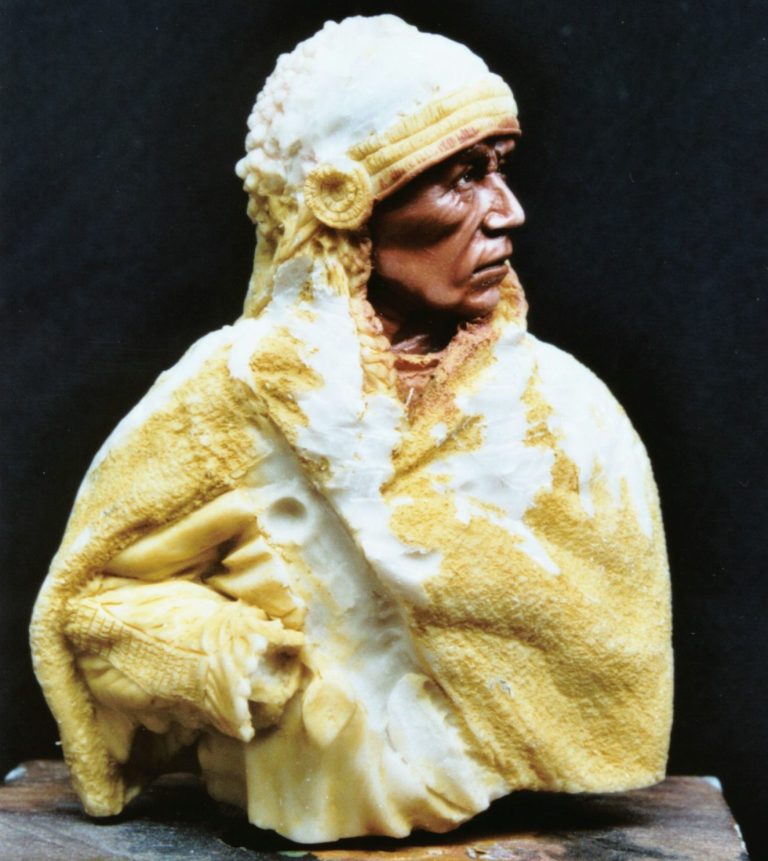
I'd seen this done before, although on a smaller area of a model, and though it might be fun to do on a larger portion of a kit.
The first thing to do was to decide on what amount of detail would need to be replaced - the longer of the "tails" coming down off that bonnet for a start, as some of these would be buried in the thick covering of putty that was to be added.
I decided to remove some of the details, simply to make the sculpting of the fur easier, rather than having to work around these details - photo #2 and #3 show this as having been done to the model – quite a mess, eh ?
The cutting you can see in the photo has been done with a "Stanley" knife, the thicker blade being a bit more robust for taking of the detail, and less likely to snap under such duress.
Also note that I've painted the face. Don't ask why I did this at this stage, probably impatience or something, but I spent the rest of the time trying to avoid damaging the paintjob that I'd done here, simply because I'd done ( what I thought was ) a nice job.
Another thing that I decided to alter / improve, was the cloth wrappings for the headdress feathers. I had to re-drill a couple of the holes in these that would later accept the white metal feathers, and ended up cracking the resin, as it's quite thin and brittle here.

I finally - after the third breakage - decided that replacing them with some short lengths of tube, with details from lead wire, would be easier than pussyfooting about with a fine drill-bit and a pin-vice.
Once all this clearing of unwanted detail had been done, I could start fixing things up. One piece of advice I would give at this point is that before embarking on a frenzied spree of removing the details that you think you’d like to change, have a go at making examples of the replacements first.
This then lets you see how long or hard a job it will be, if your replacements actually improve the model’s look ( and the chap or chap-ess you’ve got to please here is only yourself ), and then to work out if the time / work / effort is actually worth it. Doing this previous to hacking away the already sculpted detail means that at least you don’t HAVE to replace it if your efforts don’t look as pleasing as the original area. It’s only a thought.
Anyway, back to changing the model.


A logical beginning must be decided on for this, and it’s best to begin to work from the inside to the outside. By this I mean that the inner skin of the bearskin should be done first, like the areas that show up as turn-backs, followed by the fur areas, then the “tails” on the bonnet, the cloth that the feather holders fasten to and then the actual feather holders on the bonnet.
As there are turn-backs where the skin side of the cloak would be seen, and these areas of the original model are cast with a texture to represent wool, I had to sand these down, and then add a thin skim of Magic Sculpt putty to smooth out the surface.
Looking at the model, he gives me the impression that he's cold. And to further this, I thought that maybe he was standing in quite a strong wind, the cold air buffeting him from one side.
With this in mind, when I came to add the putty for the fur of the bearskin, I tried to sculpt it so that it looked as though there was a strong wind ruffling the fur in one direction.
This was the next job; to begin adding the "fur". I did this over the course of several days, pressing on small cones of Magic Sculpt and then adding the detail with a home made sculpting tool.
I couldn't make too much of the putty up at once, as after an hour it became too stiff to work with in this manner, and so any unused putty would have to be thrown away. This process was a lot more boring and dull that I'd envisioned, and about half way through I was fairly convinced that this might have been a bad idea.
In photo #4 you can see that I've added some Magic Sculpt to the model in the form of small downward pointing cones. Adding it in this way will help to separate the small points of fur that I wanted to sculpt, and by having decided a direction that the wind was blowing them, it was easiest to lay them in that direction to help form the shape required.
The hardest part was, once I'd decided which direction the wind was blowing from, to make the "parting" on the shoulder and side facing into the wind.

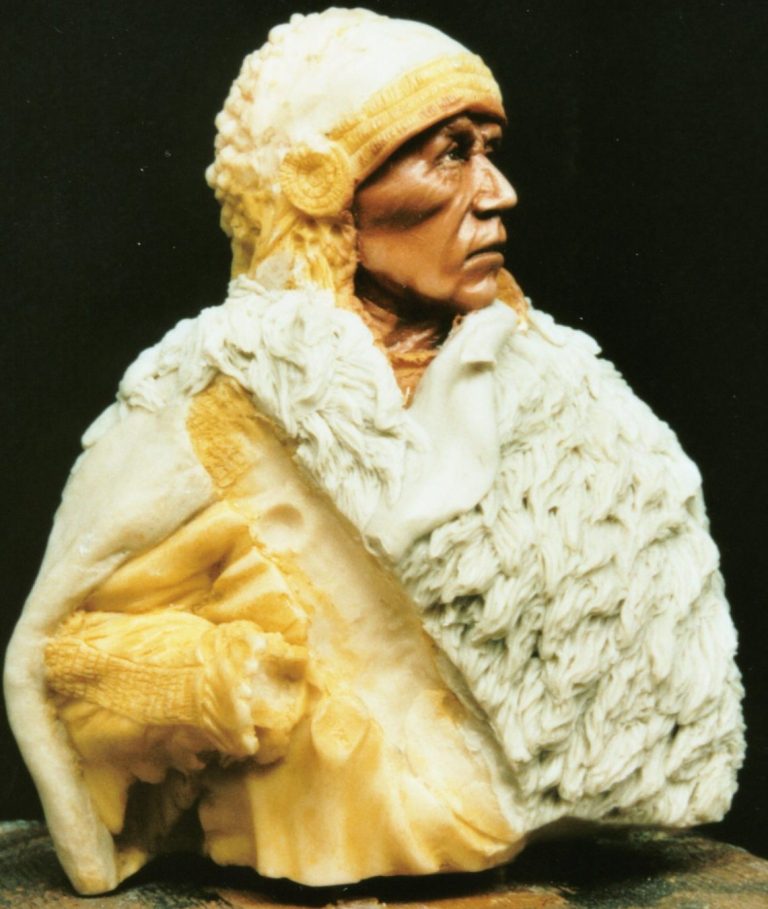
Our cat, whilst being of a demure and rather understanding nature, was I'm sure, rather perplexed by me spending half an hour or so huffing and puffing at her to see how her fur reacted to a strong draught. Eventually she gave up trying to sleep and stalked out of the house in what appeared to be a sulk - can't think why !
However, perseverance won the day, and eventually, with stiff fingers I might add, I ended up with the fur finished. See photo #5.
I had to check repeatedly that the bow-case would fit into position, leaving enough space for this to clip onto the front of the model. The fur looked a little "gapped" here, and I realised that to have this look right, I'd have to paint the back of the bow-case off the model, glue it into position, and then add the final bits of fur, before finally painting the rest of the kit.

Photo #6 shows the bow case placed in position to check for fit, and then photo #7 with it in place and more fur sculpted around it.
I'd decided to change the felt or cloth holders for the feathers on the headdress, as I broke a couple when drilling them out during the cleaning process. I must say that they had been drilled with small holes anyway, it's just that I ( for some reason that escapes me ) wanted to make them bigger.
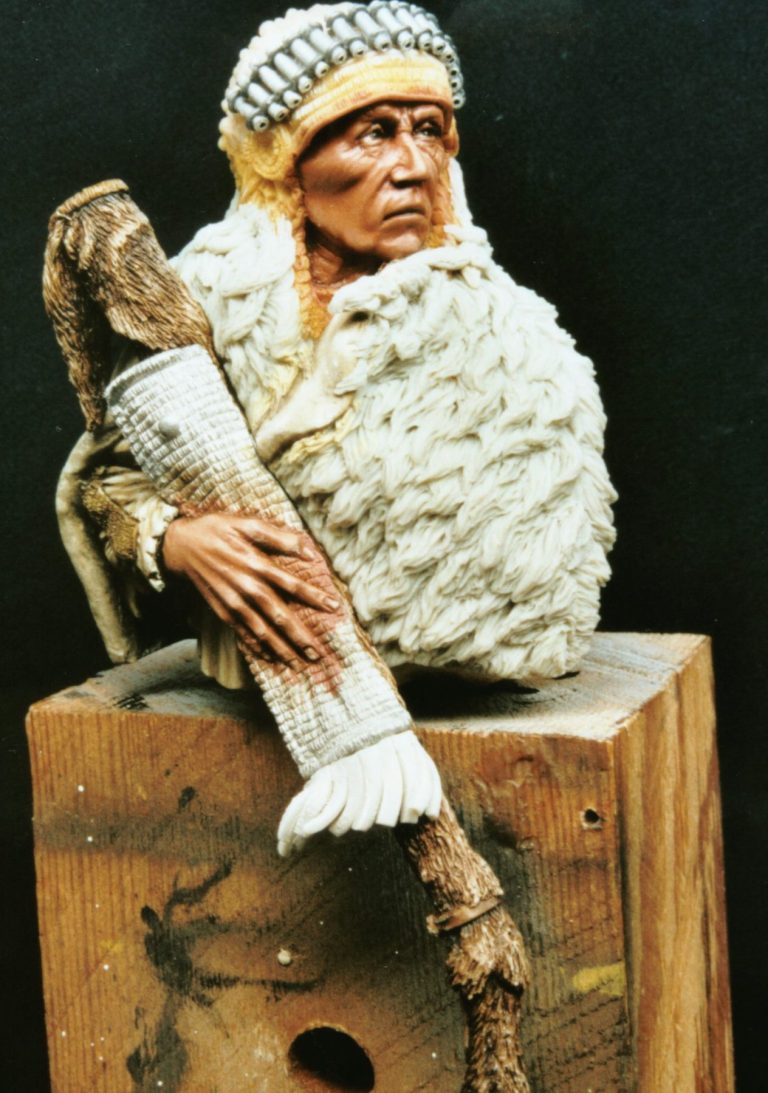

Before the bow case was put into position, I made new holders from short lengths of aluminium tube and lead wire. The latter wrapped around the former for decoration - see photo #8.
Now for the tails of the bonnet. These were again Magic Sculpt additions, long sausage shapes being pressed onto the model wherever desired, and then an old toothbrush used to stipple in a basic texture. This was worked on a little more with a scalpel blade, just to add a little bit more depth to the details.
These tails can be seen in photos #7, #8 and #9, the last of these three shots showing the back of the model and all that fur that was sculpted in.


The model, as previously mentioned is quite well detailed, considering it's several years old, but one area that I'd always been unhappy with was the top of the bow-case, where - for moulding / casting reasons, the top of the open bow-case is flattened off with very little in the way of a concavity to hide what in real life would have been an open hole.
Before the bow case was fastened in place, I cut off the metal bow and string, drilled out the top of the bow case, and then made a replacement bow from a cocktail stick, the string being some very fine twisted wire.
The drilled out bow case is shown from a top view in photo #10. It's amazing how this one change can really make a difference to the model, even if the rest is done as stock.
The other addition to the bow case was a new set of frills around it, two thirds of the way down its length. Again, there's no real problem with the ones that are on the kit, I just had some spare putty, and they looked a bit more animated that the originals. This can be seen in the previous four shots, and do look better compared to the originals on photo #1.

The last of the alterations was the arrows themselves. Each of these - probably again for the simple expedient of getting them out of a mould - are produced with only two fletchings per shaft. I was pretty sure that it should be a minimum of three, and quite possibly four.
However, settling on three, I used some thin wire for the shafts, and made the feathers out of some plasticard, gluing them in place with some thin superglue. Some more very fine wire was wound around each shaft, just below the fletchings to match in with the original items.
The wire used for the arrow shafts is some copper wire from some heavy amperage cooker flex ( available from most DIY stores ) and the fine wire wound around it below the fletchings is just some very fine lead wire used in the making of fly-fishing lures ( available from any tackle shop that deals in supplies for course fishing ).
Photo #11 shows one of the original arrows next to a new one, and you can make up your own mind as to whether it’s an improvement or not. Photo #12 shows two of the new arrows, one with the over-large fletchings as I’d made them, and then the second one with the fletchings trimmed down simply using a pair of scissors. These then conformed more not only to the original picture from Terpning, but also to the reference pictures I have showing actual arrows and bows made and used by Native Americans.

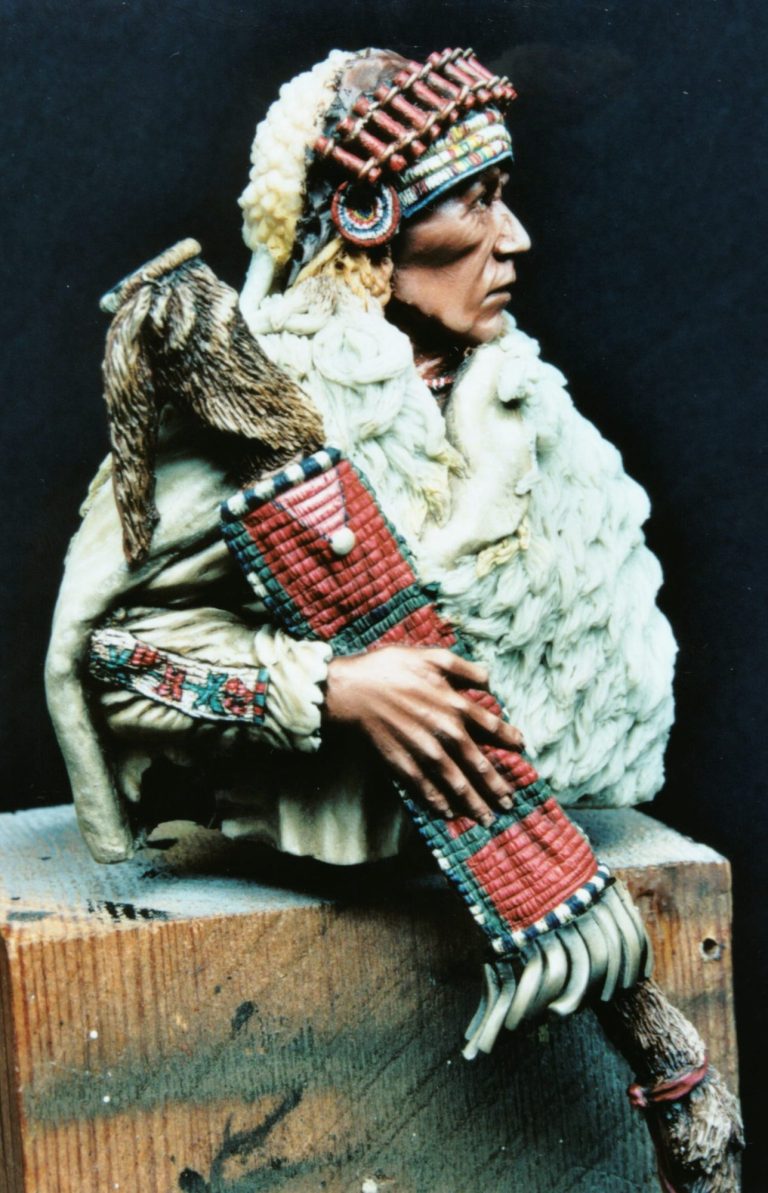
The final “construction” shot, photo #13, shows the fully painted bow case, right arm, and the beadwork and feather holders on the headdress. I tried to follow Terpnings patterns on the headdress as far as I could, but for the discs at the side of his head and also the decoration on the arm, I used examples shown in one of James Bama’s book, where he has painted a very old Crow Chief.
After this stage, I painted all the feathers off the model, wedging these into small holes drilled into a block of wood. I began with a primer coat of white, over which I added several thin coats of a cream colour. Highlights of white were then added to the main quill of the feather, and also to the outer edges, all this work being done with acrylics.
Oil paints were then used for the darker areas, beginning with a dark brown mixed from Mars Brown and Mars Black. This was thinned down with White Spirit, and then painted on to the upper third / half of each feather. The same colour was then speckled on to the feather using the old technique of using a toothbrush to flick the paint over the areas being treated.

For this I simply use thinned paint, dipping the bristles of an old toothbrush into it, and then use and old paintbrush handle to stroke across the top of the toothbrush bristles. This causes the bristles to spring back into their upright position, sending a random but fine, spray of paint off the toothbrush and onto the parts it’s aimed at.
Mars Black oil paint was then used to add darker spots to the tips of the feathers in a more conventional way. These were then allowed to dry fully before adding them to the model, fastening them into position with thin superglue.
Once the glue had hardened fully, I then set about bending the feathers into position, again allowing for the feel of a wind blowing in one particular direction across the model. This is further enhanced by bending the “tails” of thread attached to the feather tips, as these would tend to be caught by the wind even more.
The final thing to do was to add the model onto a wooden plinth, and I had bought one from Armstrong bases a while ago that had one of its corners removed – a slightly different design from the normal. This made it ideal for this model in that the lower end of the bow case would not foul on anything, allowing the model to be placed more centrally on the plinth.
I used a piece of brass tube to join the model to the plinth, polishing the brass with some fine emery cloth and then some T-Cut automotive polish. To protect the brass, and stop it from tarnishing, I added a couple of coats of Tamiya “smoke” colour acrylic.
In the finished shots of the model, the difference from the box art is quite marked, the bearskin darkening the overall effect.
I’m quite pleased with the changes that I’ve made, the constant idea being the travel of wind across the model from one direction, hopefully making him look quite cold.


The constant checking of different parts, plus the addition of newly sculpted bits made this a bit difficult, but hopefully it’s an idea that I’ve been able to make work.
As I mentioned at the beginning of the article, this is a good model straight from the box. I’d alter that statement a little, as just say that the one improvement that I would definitely consider doing is the alterations to the bow and it’s case, and also the arrows. Everything else was just for the sake of messing around with putty.
Carl Reid makes some excellent models in his range sold under the Harton Miniatures banner, and the Native Americans are some of the most stunning busts that you’re likely to see.
There is a down side to the high level of detail in any kit of this subject matter, that being the separate feathers and their attachment. This is true for any Native American kit, be it Harton, Poste Militaire or anyone else.
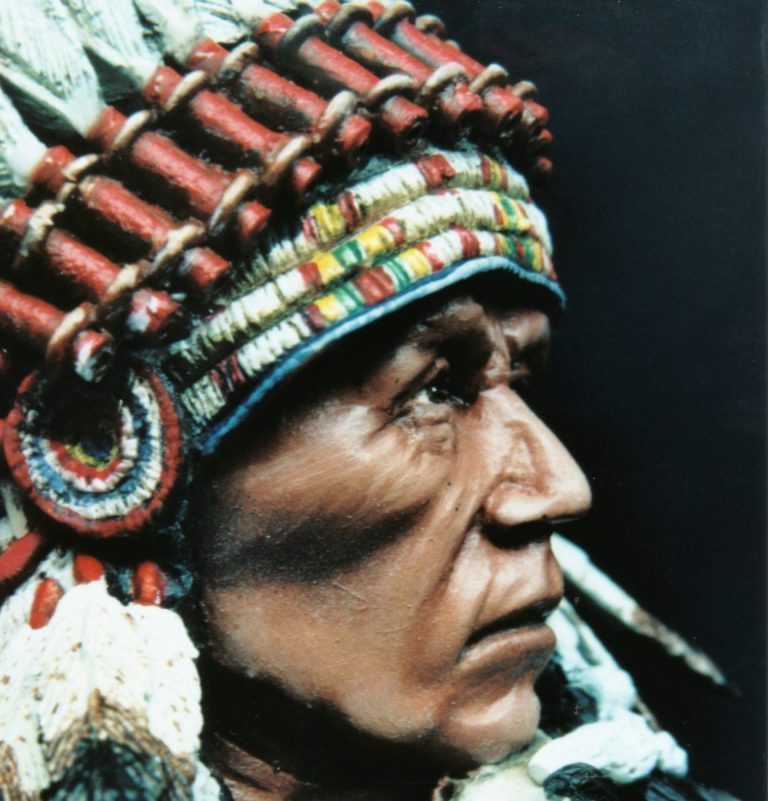
The amount of parts can be daunting to a beginner; but taking your time, and separating the feathers into groups of the same sized castings can simplify the task of painting and attaching these parts.
One fact that I do like about Harton Miniatures though is that detailed instructions and helpful tips are included along with the colour guide and reference notes. This takes into account that not everybody who buys one of these models will be an “expert” modelmaker, and is a definite plus to an already highly recommended purchase.
References used :-
The art of Howard Terpning – Elmer Kelton ISBN 0-553-08113-8
The art of James Bama – Elmer Kelton ISBN 0-86713-015-6
The Native Americans – Colin F Taylor and William Sturtevant ISBN 1-85501-765-2


We need your consent to load the translations
We use a third-party service to translate the website content that may collect data about your activity. Please review the details in the privacy policy and accept the service to view the translations.