Fox Warrior
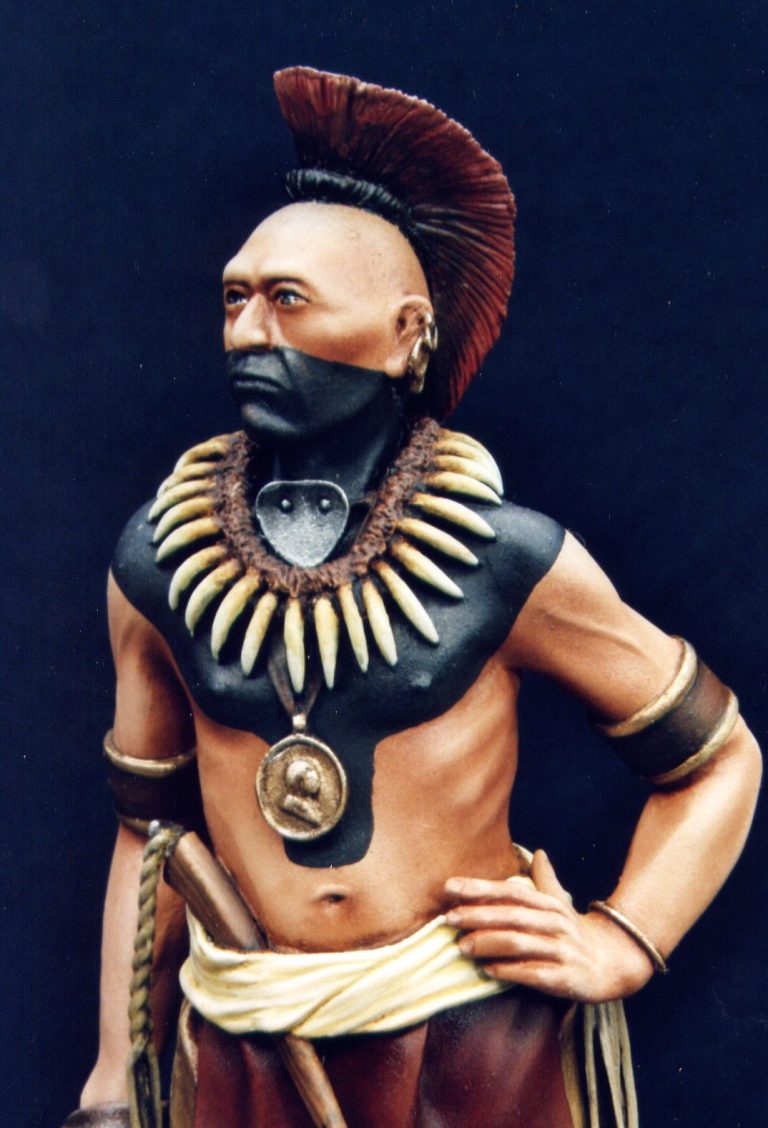
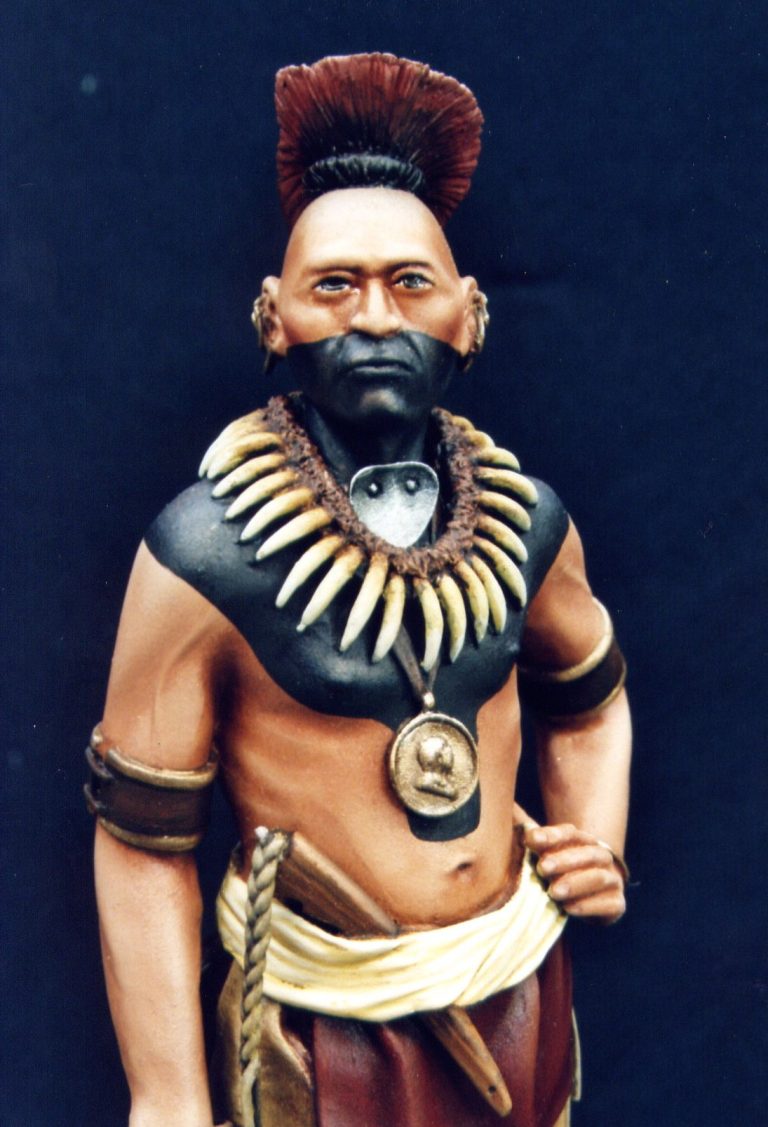
120mm Native American figure, resin csting from PiLiPiLi
Article in Military Modelling magazine in 2007
The Fox Tribe was located in the “Northeast” of America. It’s a massive area that takes in Lake Superior in its northwestern corner, with the rivers Ohio and Cumberland to the south and its eastern flank having the shores of the Atlantic Ocean.
It was a part of the Algonquian group of tribes ( including the Miami, Shawnee and Illinois ), and speaking the same language as the Sauk. All these tribes depended primarily on horticulture, although the changing seasons did allow for a variety of game and fish to be hunted.

Both the Fox and the Sauk were enemies of the Dakota and Chippewa but formed alliances with the Iowa, Winnebago and Potawatomi tribes.
There were close links between most of the tribes in this area to resist the encroachment of the settlers from Europe that flooded into the interior after the coastal areas had been initially subdued. In particular, The two tribes fought against the French up until 1737.
This resistance to European domination became more widespread towards the middle of the eighteenth century, although the tribal population had been halved compared to the estimated numbers of natives alive in the seventeenth century.

The main cause of death was the lack of resistance to disease that was so commonplace to the daily lives of the European settlers. Smallpox, fevers - even the common cold - were unheard of within the tribes, and as the native peoples had no resistance to such illnesses, they succumbed in frighteningly large numbers.
Although the number of men the tribes could call upon was diminished, the resistance was still there, although unfortunately it was doomed from the beginning, not least because of the advanced weaponry and martial training of the European forces.
The U.S. army defeated the combined tribes in the Black Hawk war in 1832. This saw the survivors of the Sauk and Fox moved from Iowa to reservations in Kansas in 1837 and 1842. Even with this move, many Fox were determined to return to their ancestral lands; and did so, using monies to buy tracts of farmland, which was eventually recognised as a reservation - the Mesquakie Settlement, which is near Tama.
Some of the Fox tribe remained in Kansas though, and together with the most of the Sauk, moved to a new “Indian Territory” – now Oklahoma – in 1869.
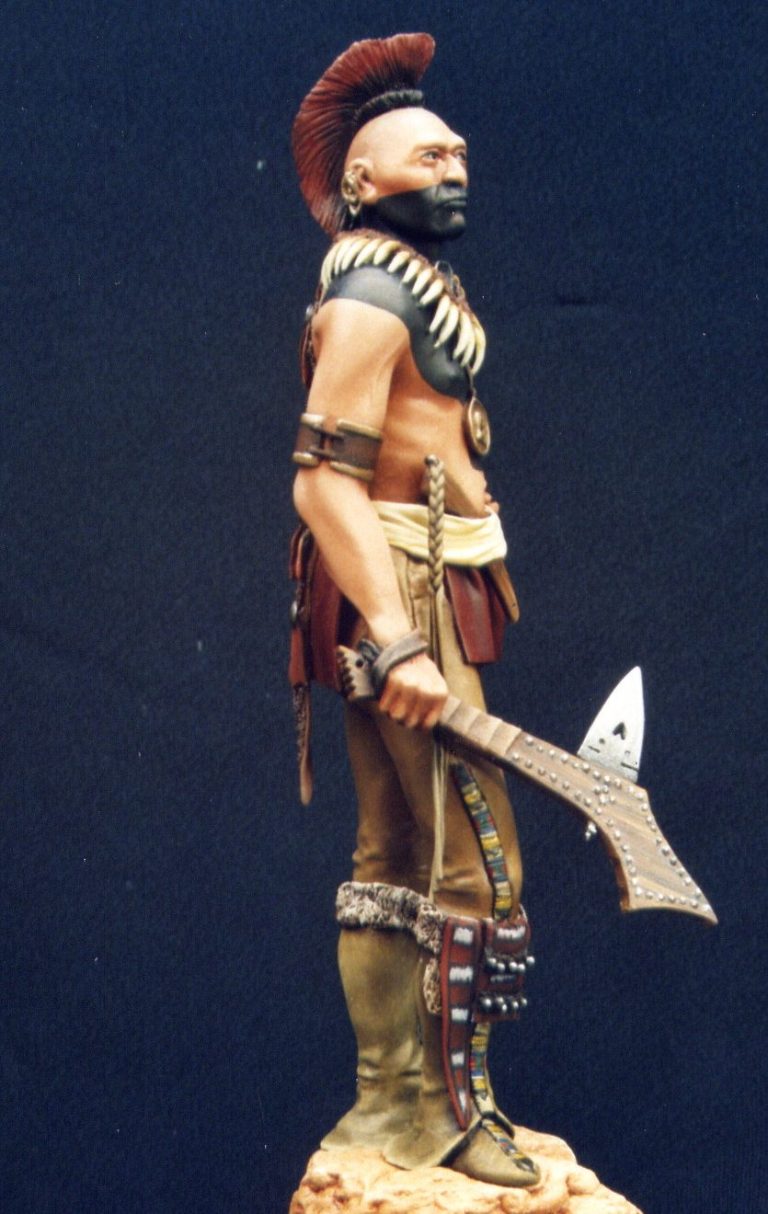
This model depicts a Fox Warrior from somewhere around 1840, showing him with typical clothing and weaponry from the period. Lee Van Quang of PiLiPiLi tells me that he has based the sculpting upon a painting by Catlin.
The kit.
This is one of Lee Van Quang’s first full figure kits from quite a few years ago, and I admit to having had it languishing on my “to do” pile for absolutely ages.
I must be a bit daft too, as it’s a lovely model, you can tell that just from looking at the bare resin parts.
Quang has a particular style to his sculpting now, but as this model is one of his earlier pieces, his flow and use of volume to depict areas is understated when compared to newer models that he’s released.
This is meant as no insult to him, rather that it seems quite different to the new release of the Crow Woman on her horse that I had just finished up prior to beginning this piece.


Rather than a typical PiLiPiLi kit, this can be likened to Verlinden or Amati at their very best.
The box that the model comes in however is the early precursor to what PiLiPiLi are marketing now, being a sturdy card box with a half wrap cover. The picture on the box shows a painted model, with small detail “thumbnails” of the figure to complement the main shot.
There’s also a short historical note on the external paperwork, all this being repeated with a lot more detail but in black and white on a slip of paper inside the box.
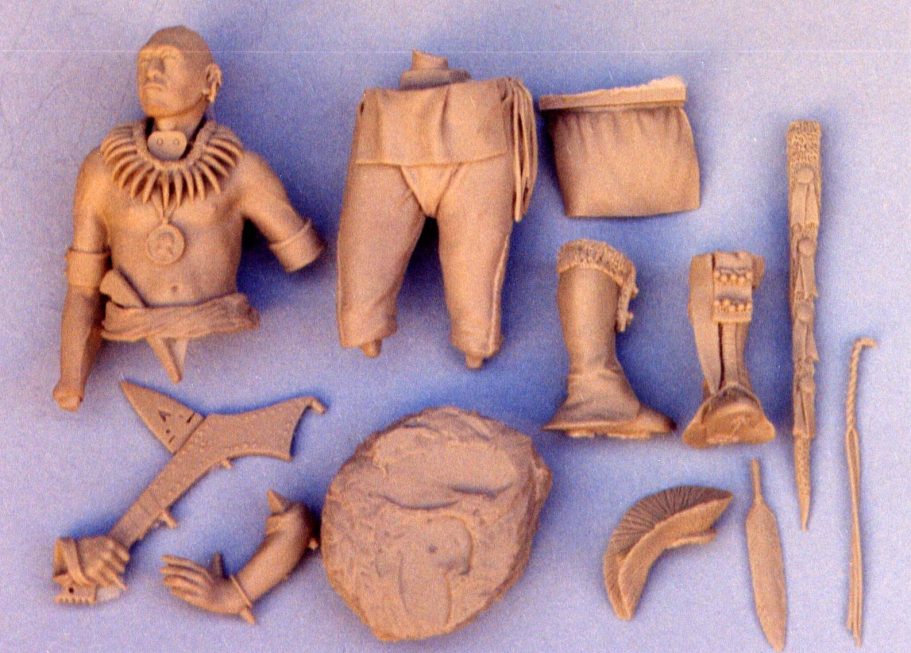
The resin parts are typical PiLiPiLi though, being the soft material that is easy to work with, in Quang’s usual light grey colour. There are only a few mould blocks to remove too, and there is very little in the way of cleaning necessary.

The parts can be seen in photo #1. When tested for fit there seemed to be no need for filler whatsoever. Usually, making such a comment at this point would herald a section towards the end of the article that I’d needed several buckets of Milliput to sort things out.
Sorry folks, this isn’t going to happen. I didn’t need filler at all.
Having tested the fit of the parts, I decided that almost all the model could be painted before any glue was added. The only exception I made to this was to join the torso / head component onto the upper legs.

There’s a fair amount of flesh to do on this model, and I decided that after priming, that would be where I began. For primer, I used Tamiya Flat White, thinned with Isopropyl Alcohol, and put this through the airbrush.
Onto this I used an undercoat of Humbrol Flesh colour mixed with an almost equal amount of Orc Brown from Games Workshop.
Now the oils.
The first thing to do was to make a mid-tone mix. I used Winsor and Newton Flesh tint as a starting point, adding to this some Mars Yellow ( although Yellow Ochre will do equally as well ). This knocks out a lot of the pink from the Flesh tint, although it does make the colour darken. I usually add 4 parts of the flesh tint to 1 part of the yellow, but if you use the Yellow Ochre, then you might need slightly more of this.
To lighten it I add 1 part of Titanium White. Again this latter can be adjusted so that a darker, or lighter mid-tone is arrived at.
These measurements are only rough guides, and playing about with the ratios slightly will give quite different skin tones, although all approximately realistic. Adding Mars Brown to the above mix can make darker skin tones; although only tiny amounts are needed of this last colour to give quite a suntanned glow to the paint.
Once I was happy with the mid-tone, I painted it on to all the skin areas with a flat brush. Once all the flesh areas were covered, I then used a clean dry brush to stipple lightly over all the flesh so that some of the paint was removed, but that which was left was evened out to a very fine coating, and also all the brush marks were removed.
The shadows can now be added, and for this I used the Mars Brown. A fine brush was used to paint on lines and spots of the darker colour, and then a small flat brush with short soft bristles was used to stipple the new paint so that it blended in to the mid-tone.
This was done to all flesh coloured areas, working on the assumption that the light source would be directly above the subject, and so all shadows would form under any surface detail.


For example on the face, the shadows would form within the eye socket, at the edge of and under the nose, under the cheekbones and lip, and also under the chin.
It’s important to look carefully at all areas here, as it’s easy to miss something when doing such a large amount of painting all at one time.
Not only that, there’s the highlights to do yet, and it’s easy to begin noting that ”Such and such and area will need highlight” when you’re still supposed to be concentrating on the shadows.
This addition of paint will give an idea of most of the shadow areas, but as some of the shadows will need to be darker – returning to the face as an example, the eye sockets, particularly above and in the corner of the eye will appear darker, as they are a lot deeper than say the area under the cheekbone. These areas can be returned to after the paint is dry, and some Burnt Umber, thinned with some White Spirit, can be added to further enhance the effect.
Whilst the mid-tone and shadow are still wet however, the highlights can be added. I usually use Titanium White for these, blending the white into the mid-tone where light would hit the flesh almost directly.
Titanium White is a very dense pigment, and surprisingly small amounts are needed to alter the colour of the mod-tone. The best advice I can give here is to add small spots of the white onto the model, blend then in with a dry, clean brush, and then decide if more is needed.
I try to stay away from having true white areas left on the flesh. Working from a slightly darker mid-tone will allow more latitude for the highlights to still remain “fleshy” in appearance, rather than having to use almost pure white.
It’s very rare that I add more highlights to a model after this initial session has dried, but it can be done if required. I do however add the deeper shadows afterwards; it’s very easy to make oil colours appear muddy or dirty, and this usually happens because too many colours have been mixed together.


In the past, I’ve found that adding Burnt Umber to the flesh colours when they’re still wet is an easy way of making a muddy mess, hence I use this method instead.
The burnt Umber can be added either as a thin “spot wash” similar to the way in which armour modellers add paint to enhance rivet detail, or by adding the paint almost neat, and then stippling it so that it seems to blend into the surrounding paint.
The spot wash is basically a case of adding thinner to the surface of a model with a damp, not drenched brush ( dip it in the thinner, then wipe it on a piece of cloth or kitchen roll ). Then to this, small amounts of the paint can be added ( Again thinned to the consistency of an ink to make them flow a little ).
A very fine brush can be used here to tease out the paint from its initial placing, so that it further blends into the dry paint underneath.
Experimenting with the density of the pigment in the thinner will allow different depths of shadows to be formed, and the point of adding a dampening of clean thinner to the whole area is so that “tide marks” don’t form as the thinner and paint dry off.
This enhancing of shadows can be used on all the different areas of the model as it’s painted, and will help make detail stand out.
With the flesh area completed, I moved onto the next largest area of single colour, the leather trousers and moccasins.
For these I used a base mix of Titanium White, Mars Yellow and some Raw Umber. The paint was applied in basically the same way as on the flesh areas, and then shadows were added with more Raw Umber, with highlights from a very pale mix of the Mars Yellow and Titanium White.
Again the deepest shadows were enhanced after the initial paints had dried fully.
Just a note here, the mid-tone used was darkened for its addition to the lower legs and moccasins. It doesn’t make too much difference to the overall colours, but does separate the items of clothing slightly.
The loincloth was painted using a mix of Carmine and Mars Brown, beginning this very dark as the shadow colour, and building up the mid-tones and highlights by adding progressively lighter mixes of paint. I used Crimson and a little Mars Yellow to make the lighter additions, again stippling these to blend them into the previous colour on the model.


So far, the colours used are either reds or browns, and the rest of the model was painted with these colours to stick to a muted colour scheme.
Burnt Umber and mars Brown were used on the leather armbands, the pendant decoration running down his back and the otter fur decoration on the legs. The Carmine and Burnt Umber were used on the hair roach, and the two browns with the Mars Yellow to depict the wood on the quirt and the gun stock axe.
Native Americans had to rely on trade of conquest with the Europeans for almost all metal objects. So usually metal areas are minimal. I used acrylics to depict the gold medallion, the edging to the armbands, the throat protector and the axe blade.
I also employed acrylics for the bear claw necklace, adding oil paint in the form of Burnt Umber only for the deepest shadows.
The only real departure from this red / brown theme was the used of a very pale off white / yellow for the waistband, for which I used Orc Brown and Skull White acrylics; and then the war paint, which was Mars Black with highlights of the mid-tone flesh.
Once fully painted and dry, the model was fastened together using superglue, and added to a wood base.
The outcome.
I liked this model when I bought it off Quang several years ago, and can’t really think of a good reason for me having taken this long to get some paint on it; although I guess that idiocy on my part cannot be ruled out.
Hopefully though, Quang won’t hold that against me.
On the bright side, maybe I’ve done a better paint job now than I would have back then ?
All things considered, I like the model. It fits together well, is well sculpted, and although a relaxed pose, it still draws the eye.


One thing worthy of note is the conversion potential of this model. Because the lower legs are separate, they can be substituted for different items very easily, as too can the weapon being held in the right hand. The fact that the hair roach is an individual part too enables it to be left off, and some other decoration, or a different hairstyle to be sculpted onto the bare head.
Not just an excellent offering from PiLiPiLi, but a versatile one too.
This model is possibly only available second hand, as PiLiPiLi ceased trading a while ago. However, it is worth picking up if you see it for sale, it really is a great model that goes together so well. It’s complete description code is FA-02 Walking Bear
We need your consent to load the translations
We use a third-party service to translate the website content that may collect data about your activity. Please review the details in the privacy policy and accept the service to view the translations.