Second Century Dacian Warrior
1/7th scale resin kit from Stormtroopers
Article published in Military Modelling Magazine in 2015
The second century AD was still a time when the might of Rome was flexing its muscles and expanding its borders. True there were a few reverses in fortune with the uncontrollable Picts in the north of Britain, and the Celtic tribes in Spain, but Eastern Europe suffered most because the Germanic tribes and their cousins to the east seemed a lot easier to subdue.
As it was, the Roman Legions annexed most of what is now Germany and continued east. Their setting up of military camps, engineering skills for crossing rivers and travelling substantial distances supported by supply trains and their formidable strength of arms carried all before them...... up until they reached the Danube.

Here the land had become increasingly mountainous and the Danube itself was a very wide river that even the Roman engineers found a difficult proposition to bridge.
The Dacians came into the frame at about this point, thought to be related to Thracians, they had also connections to the Scythians and possibly Celts during the fourth century BC. A mix of cultures, but all of them warlike.
Dacia spanned a large area, in modern terms it covered portions of Rumania, Moldova, with parts of Southern Poland, Ukraine, Eastern Serbia, Slovakia, Hungary and northern Bulgaria.

To the Romans, the peoples of this area were known as the Getae and as Dacus in ancient writings – both interchangeable terms – but levelling out to us as the Dacians. A lot was written about them by the Greek writers of the times like Horace, Lucian and Vergil to name but a few, and on into Roman times where even Hadrian wrote about them. The Romans did seem to partition the terms to indicate that they viewed the Getae as occupying lands that were more to the east, whereas “Dacian” was ascribed to tribes that were occupying lands closer to Rome’s invasion forces entering the region from the west.
The Dacians religion seems to have been centred on wolves, either the terminology for their warriors once they had passed through initiation ceremonies, the taking on of the lifestyle of the pack, or possibly the belief that certain individuals could transform into the shape of a wolf all mix in to some rather muddy water regarding their belief system.
Images and statuary of wolves do seem to feature heavily in anything to do with Dacians of those times, with small pottery depictions of wolves and banners carved on Roman victory columns remaining today.
As with all ancient history, the picture is never clear, the Dacians are thought to have had no written form of their language, which in itself is argued to be either a version of Thracian, or quite possibly a distinctly separate language ( well, it’ll likely be one or the other. But as both languages have died out except in the names of places or plants, we’re unlikely to know ). So the information we have is gleaned from two sources – Roman and Greek carvings and writings or archaeological finds. And whilst the written records are enlightening, it has to be said that from the Roman point of view, it’s a view of a people that were seen as an enemy or as being subjugated.


However, the Roman carvings do seem to have had a lot of care taken about them with the artist that produced the Trajan Column going to great lengths to depict not only warriors, but different levels of the Dacian populace including women and children.
What we’re interested in here though is the warriors, and again a feature of the Roman carvings is that the Dacians did suffer defeat and both the enemy warriors and the spoils of war are depicted accurately.
The appearance of scale armour, oval and round shields, the peculiar curved swords and the different shaped helmets are all given to us via these historical Roman records. Worth focusing on is the curved sword that seems to be a peculiarity of the Dacians at that time. Whether this was developed or became more common because of the Roman invasions isn’t quite clear.
Its design and use though are documented as although at first glance the sword would appear to be a curved blade similar in make up to say a Cutlass or Tulwar, it has one serious difference. The sharpened edge is on the inside of the curve rather on the outside of it, so it was more like a heavy duty Sickle or perhaps a scythe with a hilted handle. The blade was relatively heavy too, and the curved point was apparently quite devastating if used overhand to pierce the Roman Helmets. Up until this point, the Roman Legions had only encountered exuberant Celts dashing at them without formation, without tactical thought and with lots of space between each warrior so he could swing his sword. In comparison we know that the tight formations that the Romans used with shields locked together and the short Gladuis used to thrust between the shields created a meat grinder effect that allowed the Legions to roll over attackers efficiently and very effectively.


The advent of an enemy striking over the top of the shield wall, striking at the top of helmets that were not meant to stand piercing attacks was a shock. It allowed the Dacians some advantages, and slowed the Roman advances.
The Romans regarded the Dacians were a troublesome lot although it was due to a lot of raiding and skirmishing prior to the rise of Burebista who came to power in the middle of the 1st Century BC. Rome saw him as a threat although with Burebista’s death in 44BC Dacia became split and the threat dissipated. A century later though a new king of the Dacians rose – Decebalus ( ruled 87AD – 106AD ) and this new threat caused Emperor Trajan ( ruled 97AD – 117AD ) to gather forces for invasion. Trajan’s forces spanned the river Danube with a boat bridge, entering Dacia and conquering it. Decebalus was forced to sign a treaty which neither side really viewed as binding in the long term.
Decebalus gathered forces and had a Greek engineer build a stone bridge to cross the Danube, but Trajan recognised the threat and had his forces cross the Danube a second time and on this occasion the defeat was decisive. The Dacian capital was captured and whilst Decebalus escaped to the mountains, the Roman pursuit was harsh and fast, the Dacian king being cornered and choosing to commit suicide rather than be captured and paraded through Rome as a slave before being put to death.
The Romans hailed Trajan’s success as a great victory and the celebrations were the longest and most expensive then known with the records stating that eleven thousand animals were slaughtered during the festival and the same number of gladiators fought in games held during the hundred and twenty three day celebrations. Part of the cost was likely offset by the masses of gold from the Dacian mines that were taken in the conquest along with animals captured along the return and warriors enslaved after the battle with them then being forced to fight within the gladiatorial contest.


The Model.
Ok, an admission. Pegaso did a little 54mm figure of a Dacian several years ago, it was a beautiful sculpt and before I got hold of one a chap called Steve Walker got one painted up. It was a beauty and kind of made it redundant me painting one – I didn’t think I’d be able to do one that looked that good.
Years later, I wish I’d put one of those on the Grey Army shelf, but then up pops this larger scale bust from Stormtroopers, looking very similar and very nice too. My hand was in my pocket before I even had a conscious thought.
So, sculpture by Carl Reid – not much I can say about that, Carl does a very good job of whatever he’s sculpting, parts fit where they’re supposed to and volumes and anatomy are what you’re expect from a chap who’s been sculpting for over twenty years that I’m aware of. He’ll probably be able to tell you exactly how long before that he was pushing putty about, but then he’d seem old and ancient and we wouldn’t want that. Suffice to say, it was a nice sculpt.
Casting, very good too, everything I’d expect from Stuart Hale, and along with a sturdy box with art by Ernesto Reyes, it all looks good.
There’s the usual casting blocks to remove along with a couple of restrained mould part lines, but nothing to catch you out and nothing to cause any problems.
Parts split is logical, and I chose to keep most things separate until after the painting process. The only exception is where the shield strap that passes across the body in a diagonal line extends to fasten to the shield’s inner face. This is a separate piece of resin and can only be fastened in place once the shield is attached to the back of the bust. I fastened the left arm in place too, and had a little fun getting the strap into position. So attach the shield first, then the strap, THEN the arm once the strap is painted........ See, I’m being your stunt double for this one already !
So, photo #1 shows that nicely painted box art by Ernesto Reyes,


and photo #2 lets you know that yet again I’m out of the trap and on my way before taking shots of the raw resin parts. In this shot I’ve painted all the metallic areas with printers inks and oils. I began with a primer of black acrylic mixed with Isopropyl Alcohol, adding two further layers of black acrylic to make for a solid coating. Over this I added a shadow colour mixed from bronze Printers Ink and Mars Black oils, then painted each of the scales with a mid tone colour using just the Bronze Ink. A couple of highlights were added from Old Gold and then Silver Printers Ink.
The beauty of the Printers ink is that whilst the carrier does evaporate off the inks don’t actually dry unless heated up. So the colours can be blended on the figure in a similar way to using oils.
The model was put in a drying cabinet overnight and then the metallic areas sealed with a couple of layers of Tamiya Smoke ( X19 ). This stops the metallic flakes spreading and getting onto areas that you don’t want them. I also undercoated areas that weren’t going to be metallic so that again any errant paint couldn’t migrate.
In photo #2 I’ve also painted the face, it’s one that’s full of character and has plenty of wrinkles to play about with. I also did the arms and hands that were bare flesh as well whilst I had the paints out – the usual mix of Titanium White and Mars Brown.

There’s a fair difference in photo #3 where I’ve gone back to the metallic areas with the addition of some Classic Gold from Darkstar Miniatures. It’s an acrylic paint with a very finely ground pigment in the metallic colours and whilst it’s slightly transparent, it gives s superb shine. I used it on the helmet and scale armour, then recoated with more of the Tamiya Smoke acrylic.

Whilst that was all drying I started on the back of the shield. Photo #4 shows the undercoated shield. As you can see there are what appear to be some uneven marks on the shield, these are where the arm will contact it and also where the cross strap piece will fasten on. There’s no need to mess about smoothing them out as they will not be visible on the finished piece.

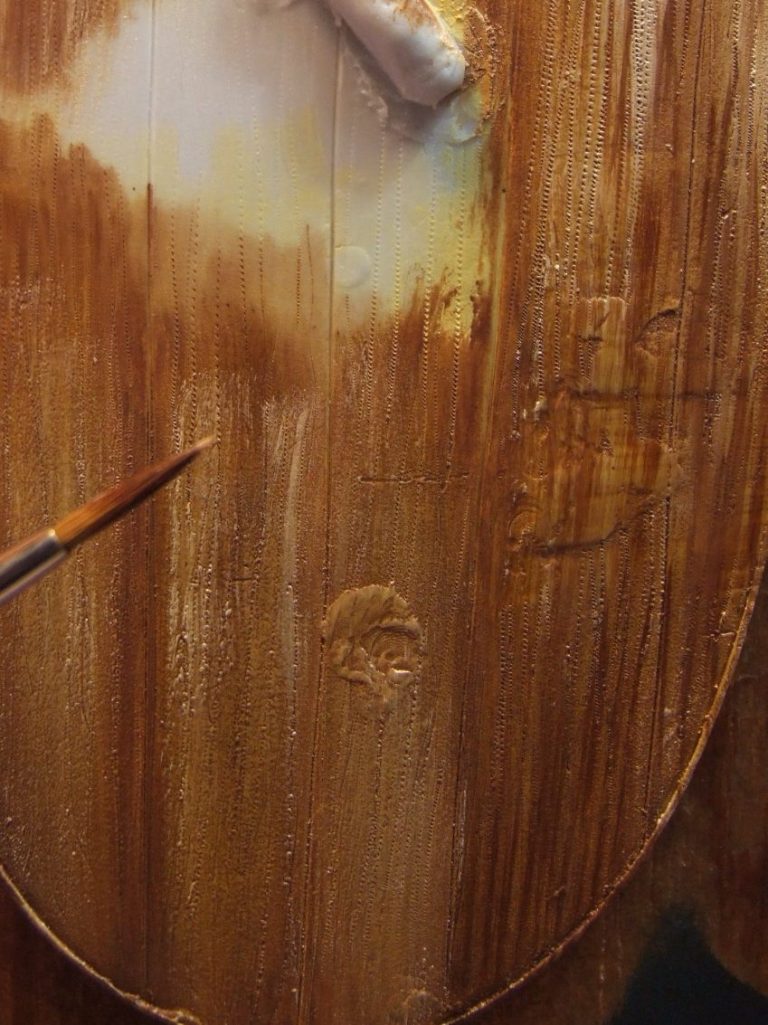
Photo #5 shows the first addition of the oil paint – Mars Brown applied with a ¼ inch wide brush. The paint is put on without any thinner being added and is spread out a lot so that the brush marks remain to begin to look like grain detail.
In photo #6 I’ve begun to add more paint, again with the large brush and without cleaning it in white spirit. Simply wiping most of the oil paint off is sufficient. The lighter colour being added here is Mars yellow, and the upper half has had just that colour added, with the lower half beginning the addition of a mix of Mars yellow and Titanium White. One thing to remember is that after each pass of the brush it must be wiped clean on a soft cloth. The reason for this is that as the brush passes over the surface of the model and it’s putting new colour on, it’s also taking some of the darker colour OFF the surface. If you don’t wipe that darker colour off, then it’ll just add to what you do on the next brush stroke and you’ll end up with muddy looking colours all mixed together. So, get in the habit of wiping the brush after each pass.


The next shot – photo #7 – shows more of the pale yellow, more of a cream colour really, being added and the brush I was now using to apply it. It’s a 1/16th inch flat brush, and again the paint is added without thinner and quite lightly so that lines are left in the colour.

Next for some fine detail. The brush being used in photo #8 is a Winsor and Newton series 7, Size 1 and I’m now adding small amounts of a mix of Mars Brown and Mars Black.

Next for some fine detail. The brush being used in photo #8 is a Winsor and Newton series 7, Size 1 and I’m now adding small amounts of a mix of Mars Brown and Mars Black. has been treated to this method.
This all needed to dry before I could mark in the individual planks.

So back to the main casting and the painting of the cloak – photo #10. I didn’t want anything too bright or glaring, and opted to use some reddish browns for this section of the model. I began with mars Brown and added some light red to build up mid tones, then thinking that this might be a woollen garment moved to a cream colour to add highlights mixed from Mars Yellow and Titanium White – you’d almost think I was using the left over paint from doing the back of the shield......

Another angle in photo #11 shows more of the cloak and also the beard.
With all the wrinkles on that face I was thinking that this guy was aging prematurely – hard life and looking like he was ancient even though he was possibly only late twenties or maybe mid thirties, old for a warrior in those times I would guess.

So I thought I’d paint the beard as though it was beginning to grey, using more of the Mars Brown, but this time with a bit of Mars Black mixed in, and then adding a little of the light Red ( which is more of a rust colour ) and adding the grey areas from some of the left over cream mix that I’d made for the cloak.
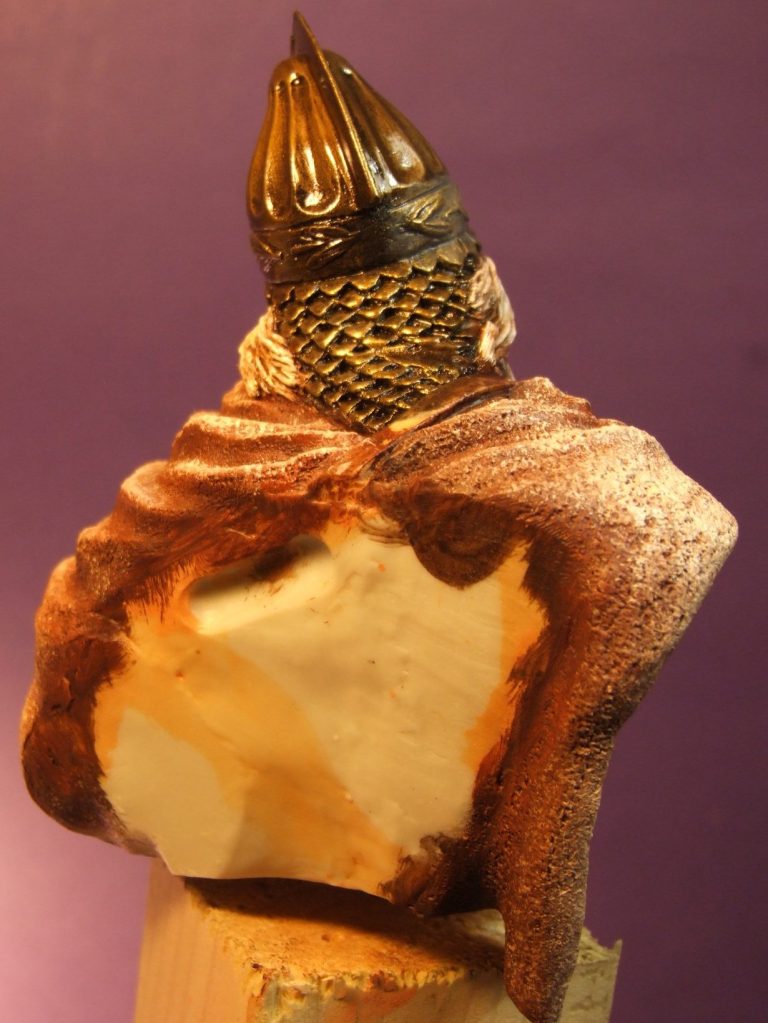
Photo #12 shows how easy the back of the model is to paint – nothing difficult about that big open space where the shield will fasten on...... So moving swiftly along......
And we’re back to the shield.
Having accessed a few books and also the Internet regarding Dacians, I got the impression that they, like the Celts, loved their decoration. There are notes from texts written about them when Rome was battling them that they were pale of complexion, blue eyed and tattooed, and Trajan’s column depicts designs on some of their shields.
I didn’t want to go daft with an intricate design that was over the top, but did want to add something to brighten up the shield........ Yes, even though it’s on his back.
Photo #13 shows the main cover of the shield – likely a piece of leather has been painted in and allowed to dry off. I’ve also painted in the metal fittings of the diamond shape and rivets although I’ve not yet added the metal edging.


Once all that was dry I could begin marking out the pattern. I took this from a design I found on the internet – OK not the most reliable source I admit, but it did echo the shape of a lot of the different designs I’d seen so far. The lower half of the shield design has been marked out with a very dark brown mix, just visible along the edges of the Mars Yellow that I’ve used to fill to leave only the dark outline visible. I used oil paints for this as mistakes can be rectified with a damp brush soaked in White spirit, and patterns can be trimmed again with the same brush – just clean it each time it’s used.
In the upper half of the shield I’ve started adding lighter colours – a cream then a pure white using a small brush and stippling the paint on in small dots.
To help, I’ve also added a close up shot of just the design at this stage – see photo #14.
It’s not perfectly neat at this stage, as I say, adjustments will be made to tie in the shape of the design and where the colours are laid out, but it gives you an idea of what’s going on.
Photo #15 shows the finished design, and all that needs doing now is the edge of the shield painting with metallic inks.
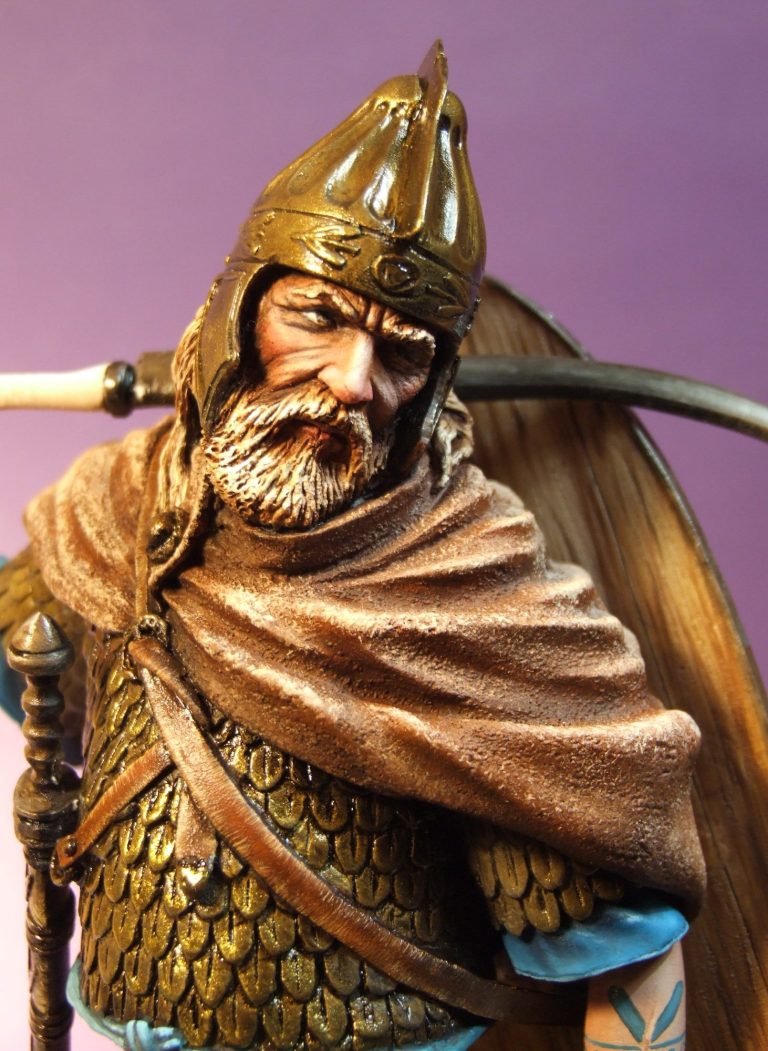
The final shots show the model finished. It had been looking a bit dull so far, so I opted to paint the sleeves and belt with a nice bright turquoise colour – I did actually grey this out a bit by adding black and white to it, but it still looks very !!!
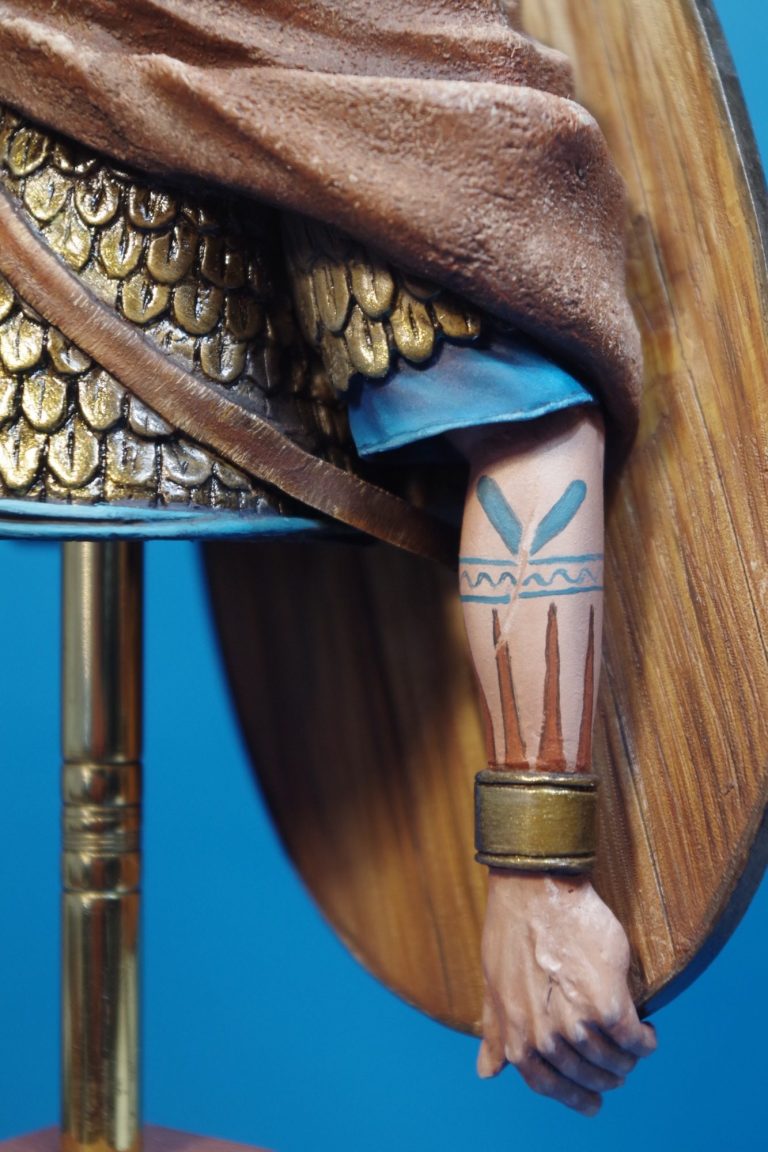
I looked to pottery produced at that period and particularly to any figures depicted on it for ideas about tattoos. The spikes on the left arm are found on a pottery jug from the period, the squiggly line with its borders again are on a few pottery examples and the “V” shape is on the arms of a warrior – again a depiction on pottery unearthed from around two millennia ago. The “V” shapes on the figure on the pottery are on both arms and there’s about four or five running up each arm, I chose just to do the one.


One admission I have to make is replacing the sword hilt. I was a little bit out with the fit of the arm somehow when I’d attached the wrist ( What is it with test fitting something – it’s perfect when it’s in the raw resin, but just add paint and nowt fits anymore !). Anyway, a slight bit of bending, gentle like, and there was a miniscule “crack” sort of “crack” noise and I’d managed to snap the hilt. I could have just glued it, but to be honest a blind man galloping past on horseback at midnight would’ve spotted the joint, so I decided to cut it back to the metal ring in the centre of the hilt, drill a couple of holes and insert a wire of the correct length and add some putty to fill out the shape.
You’ll probably have to add a small amount of putty to the joint in the cross belt where it joins onto the body, but that is the only time I actually needed to add filler ( excepting being a heavy handed fool regarding the sword ).
A brass tube a nice angle sided plinth from Oakwood Studios ( Please stop asking Richard for these – he says they’re terribly difficult to make...... My answer being that they look so good )
And that was it really. OK the short sword or long dagger – browns and metallic inks again folks, I just kept using those same colours – must’ve laid too much out on the tile I use for a palette.
Things to watch for with this one – well, the short sword, shield and the left hand hang a fair way down below the cut off point of the body of the bust, so either a plinth with a narrow top or a longer than usual post to mount the piece on should be considered.
Also, as mentioned in the text, add the shield to the back of the model, then that extra bit of cross strap, then after that’s fastened, filled and painted, then add the left arm.


And watch the blade-like decoration on the helmet. I dropped the main casting prior to painting and it snapped off. It glued back fine and it’s my own fault, but it is rather delicate as it’s a thin piece of resin, so try not to drop him – perhaps that should be just a note to me then.
The pommel stone doesn’t protrude very far from the hand, it would be a moments trouble to add a small piece of putty to make this stand out from the little finger on the right hand – something I’m going to do right after typing this.
Summing up.
I am so glad I got this model. As mentioned early on, I really liked the Pegaso figure, and this is every bit as good, just bigger and easier for my eyes to see that have aged fifteen years since I saw the Pegaso piece. I enjoyed painting this, even though I made a couple of problems for myself, it’s actually very easy to put together, Carl has hidden all the joints so there’s no need for putty apart from that cross belt where I can’t see how it could have been done any differently, and as is so common with Carl’s pieces, it exudes a “Look at me” presence that catches people’s eyes.
Maybe it’s because it’s a little bit bigger than most of the busts on offer at the moment, maybe the pose has that bit more attitude, or perhaps it’s the composition with that left arm hanging down...... Maybe it’s all of these, but whatever, I do rather like it.

We need your consent to load the translations
We use a third-party service to translate the website content that may collect data about your activity. Please review the details in the privacy policy and accept the service to view the translations.