WWI British Soldier
George Percy Hopwood
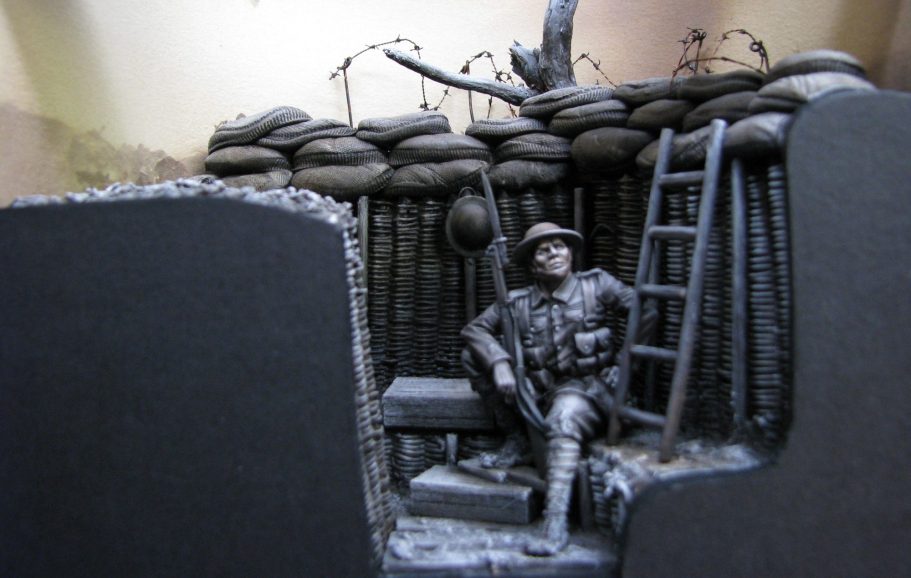
A 54mm JMD figure in a scratch built box diorama setting.
Article in Military Modelling Magazine in 2004

Billington, near Whalley Lancashire; the year 1914. A village with a small number of houses, not many people, but one of whom would eventually be my Grandfather.
The war on the continent had begun that year, and many young men would join up - to defend King and Country. Some would make a career in the army, but many would just join up to “service” regiments – to serve in the armed forces for the duration of the war ( which, as we all know, would be over by Christmas……)

George Percy Hopwood born in 1893 ( pictured here in his uniform ) joined the King’s Own Royal Lancashire Regiment, and after receiving some training was sent to France in September 1915 as part of the 8th Service Regiment. What happened between then and the end of June 1916 I don’t know, but the 8th Regiment were moved into the 3rd Division, possibly taking up positions to the extended British and Commonwealth line that allowed French soldiers to pull out and reinforce their own forces already at Verdun. If so, then Percy ( as he was known to family and friends would have been present at Ypres and may well have taken part with the 3rd Division when it was tasked with taking the St Eloi craters.
Both sides at this point were using mining techniques to dig under each other’s trenches and particularly anywhere that would have concentrations of munitions and men.
Ground conditions were so poor that front line troops had to be relieved after just a short period of combat, but at 2am on the 3rd of April the King’s Own 8th Rgt successfully took Crater 5. This position was held for almost twenty-four hours until relief was supplied by Canadian Corps.

In May 1916, he might well have been one of the troops that took over a further 20 miles of poorly dug and maintained trenches that extended the British lines – the French vacating to again support their forces in Verdun.
Mining and detonation of explosives continued underground, whilst above ground the forces of both sides fought a bitter struggle to take and hold the cratered land.
Plans were afoot to bring this to an end – from the British point of view - and on July 1st, what we know as the Somme offensive began.
Artillery Batteries bombarded the area forward of British lines, along with several large underground explosions which, together, should have destroyed German opposition and chopped up the miles of barbed wire that criss-crossed no man’s land between opposing forces.

And here’s where my Grandfather comes back into the story.
He, along with the other men crouched down in the British and Commonwealth trenches, stormed forward at 7:30am on that July morning.
The Germans hadn’t been cleared from the opposing trenches; their dug-outs were too deep for the artillery to penetrate and do much damage, and once the artillery stopped, it was like a siren of silence signalling that the Tommy’s would be on their way.
I say the British and Commonwealth forces stormed forward – they actually walked. I suspect that the walking became headlong running once the German’s got their machine guns in place, loaded and began to unleash a storm of lead in their direction.

It might not have been on that first push, it might not even have been that first day, but at some point, somewhere in the mud and madness, George Percy Hopwood was hit. He went down wounded and lay in agony as the battle raged on around him.
Because any troops advancing would hope to take the ground they advanced over, gaining the trenches ahead of them and forcing their enemy back, they would carry all their kit with them – it’s estimated that the average trooper was carrying approximately thirty pounds ( fifteen kilos ) of kit, plus ammunition and his gun. If you left anything behind, then you’d not get it back, you might not even return to that trench or at least that section of trench in the near future.
And that’s what went a small way to save my Grandfather. He, like his fellow troops had just been paid, and the bullet entered his leg after ricocheting off the coins in his purse.

He was still down, he was badly injured and bleeding, but he wasn’t dead…..yet.
Around him, there was what can only be termed as carnage – British and Commonwealth soldiers were cut down like wheat being harvested, and few gains were made regarding forces positioning that first day, or in the weeks that followed.
After several hours, fighting would cease; and whilst the guns were quiet, the voices of the injured and dying must have been terrible to hear. Many brave men died, but one soldier, and I don’t have a name for him, went back out into no man’s land to find my Grandfather. Whether he was looking for Percy in particular, or just for anyone hurt from his group or company I cannot say, but he did drag Percy back to the British trenches and from there, Percy was evacuated.
Eighteen months in Oxford Hospital, followed by further convalescence in Calderstones Hospital ( which was a lot nearer home ), and George Percy Hopwood returned to his family – injured but alive.

The coins here are the ones that saved him, alongside the purse that they were in when he was shot.
Percy went on to father a daughter – May, and a son – Frank ( my father ), in 1924 and 1927 respectively; and whilst he couldn’t serve his country as a soldier during the Second World War because of the injury he’d sustained, he did run a small machine shop in Billington that supplied parts for munitions as part of the “war effort”.
George Percy Hopwood died in 1971 at the age of 78.
World War One records are patchy, the Kings Own had approximately forty thousand troops pass through their ranks during the conflict; and the building in London holding a lot of war records for that period was damaged, along with a lot of the records it held, during a German bombing raid on the capital in 1940. So the above history is patched together from memories of relatives – Sheila Hopwood ( my mother ) and May Fowler ( my aunt ), not to mention a little detective work from myself.
I would like to point out that the King’s Own ( Royal Lancashire Regiment ) has an excellent museum in the centre of Lancaster, and also a lot of the information I gained was from an excellent website by Chris Baker - http://www.1914-1918.net/index.html
We often are told to remember the men who gave their lives during the conflicts that Britain and her Commonwealth have taken part in, and I believe that’s true – we should remember them.
But also there were a lot of men injured who returned home – just as in any conflict - and they too should be remembered for their bravery. They might not have given their life, but they were standing right next to the men who did.

The model.
This began life as the excellent JMD 54mm British WWI trooper, and hasn’t been changed at all apart from me not using the small, stepped base that comes with the model. The idea for the scene came from a “group paint” on The Basement forum – simply put, a broad theme that links projects being undertaken by different forum members, and in this case the theme being colour.
I wanted to try painting everything in sepia, to try and replicate an old photograph. I didn’t want a huge project, but because of the idea, I did need to build a section of trench, which would come along with it’s own problems – but more of those later.
The figure itself is a lovely little sculpture of a soldier taking a break, and to me he almost screamed “I’m posing for a photo”.
So he was a bit of a no-brainer to use for this idea, not to mention that he was already on the shelf, as I’d bought him almost as soon as he was released.
JMD kits are not only well sculpted, they’re well produced too – the clean-up on this was minimal, parts fitted well and whilst I left the head and his rifle separate from the body, everything else was glued together – see photos #1 and #2.
Then, he sat around the workbench for ages, whilst I fiddled about making the trench.


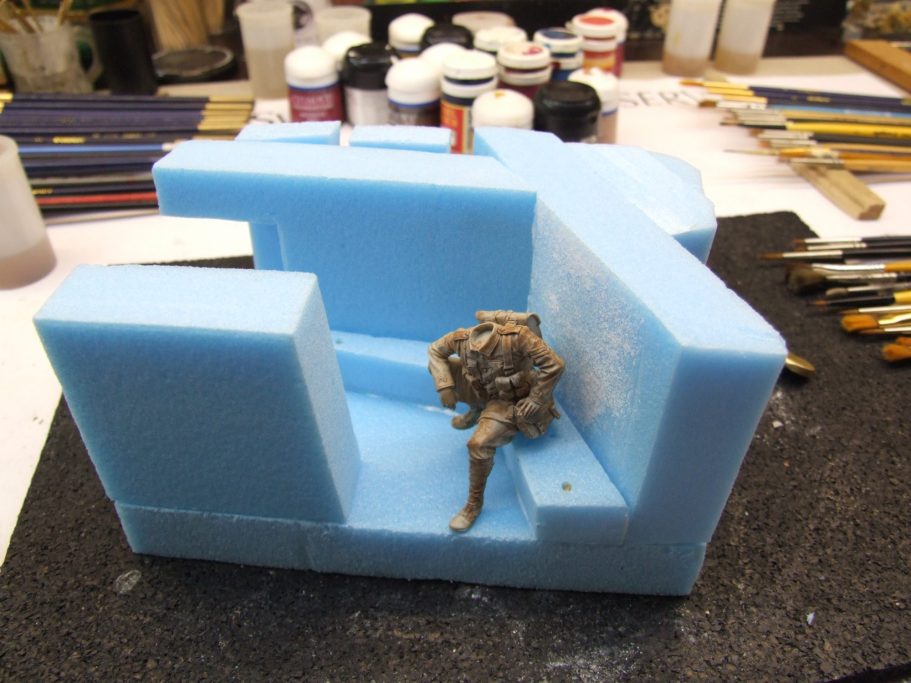
The beginnings of this you can see in photo #3, where I’m using blue foam – it’s off-cuts of the loft insulation foam sheeting that can be glued together with wood glue ( I use cocktail sticks pushed into it as well to help strengthen things ) and is easy to cut and sand to shape.
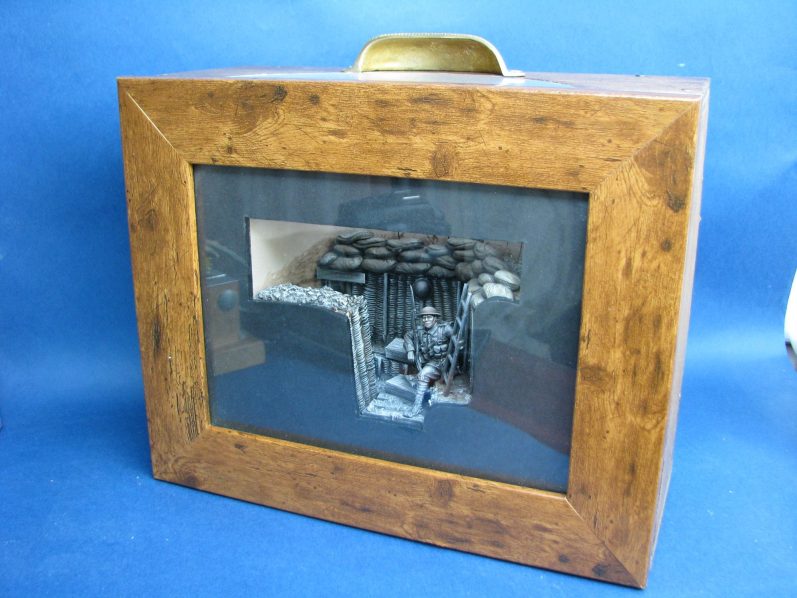
I wanted this to fit behind a photo frame eventually, so that the illusion of a sepia photo was enhanced, so it’s kind of a one-man box diorama.

Photo #4 shows the blue foam blocks with the front trench wall removed. This wall would allow for the illusion of the trench dog legging off to one side, and so enhance the feeling that there was more trench “off-picture”.
Research showed that various means were used to hold the earth walls of trenches at bay, and in one photo from the war I noticed some woven fencing had been used on large portions of trenches.
Some stupidity made me think that this was a good idea, so after various searches on the Internet, I found that there would be no other way to produce this barring building it myself.

Photo #5 shows the result of this genius about a third of the way through – I drilled a lot of holes in a block of wood and positioned some uprights made from stiff aluminium wire in them, then got some very nice thin wire and proceeded to split it from the bunch it came in and weave the single strands between the uprights.
To say this is long, tedious work is an understatement; it was cold in my model room – a loft, and winter months – so, it being a Saturday evening, I ventured downstairs and did this whilst watching some televisual entertainment.
I now know why I prefer to watch paint dry.
After three evenings of weaving – it became more awkward as the wire got to the top, I eventually had my little wattle wall. Having a premonition that simply taking this off the wood base might spell disaster, I fixed everything on one side - what would be the back - with a generous slathering ( is that even a word – although spell-check seems to say it is ). Once the glue dried, I removed the wire wall and made a mould in RTV rubber, then cast off four or five replicas to cut up and use on the base.

Whilst that was curing ( the rubber, then the resin castings ), I busied myself with the base, fastening blocks of the foam in place and testing positioning of the figure – taking note that the walls would come in somewhat with the surface detail I’d add later.
You can see in photo #6 that I’ve angled the “lead in” walkway that the viewer will look down. It’s not too noticeable in the finished model, but the forced perspective gives an illusion of greater depth to the piece. The cut-out on the left, behind the front wall is meant to be an entry to a fox-hole. It’s not easily visible on the finished model, but again adds to the feeling that there is more trench leading off to one side if the observer does catch the detail by angling their view through the front of the frame.

Photo #7 shows a bit of gardening being done at the top of the trench – well I’ve planted a tree, so I’m doing my bit – and the walls and duck-boards of the trench itself being fixed in place.
The duckboards are made from balsa cut to size and show again the angle of forced perspective in the entrance to the trench.

In photo #8 there’s an angled view – basically what I thought what might be visible once the frame was in place, and the narrowness of the lateral trench can clearly be seen. Again this is simply to fool the eye as that section of trench will appear to the observer to be a similar width to the entry trench, but it’s narrower width will cut down on space needed for the box and the diorama itself.

Things are moving along in photo #9. I’ve added a lot of Magic Sculpt sandbags, texturing these with an old T-shirt, and also bedded in the extra boarding on the firing steps, muddied the floor between the duckboards too, and added a magic Sculpt curtain and a board lintel to the fox-hole.

The same treatment has been added to the front wall, and in photo #10 the figure and the wall are temporarily in place to check space and positioning.

Photo #11 sees the addition of a lot of paint – I did this with an airbrush and a lot of Tamiya Brown XF10, simply because there was a massive area to cover and I wanted to put oils over the top of the acrylics.

Those oils – a mix of Burnt Umber and Mars Black have been added in copious amounts – in photo #12, and then the surface textures revealed by wiping the excess paint away with an old T-shirt. I softened the effect by using a soft brush to blur the harshness of oil paint to revealed acrylic undercoat, then gave it a few final dabs with the T-shirt to refine the highlights a little.

Boxes – yes, some boxes appeared. These were simply made from the off-cuts of balsa I’d used for the duckboards, and then glued in place for the necessary step the figure needed for his raised right foot. I also took some simple moulds off his steel helmet to cast some resin copies – only one of which was eventually used, which is hung behind the model on the back wall in photo #13. I added a short length of electrician’s tape to make the chinstrap that it hangs by…..well, there’s nothing worse than things hanging in free air.

Photo #14 shows a general view at the same stage as #13, but with the front wall still missing. Some of the details here are in place “just in case” so that if someone tries to peer around the side of the front wall, then they don’t see blue foam or other construction material.

Alright, here’s an admission. I have absolutely no idea why I chose to put a white plasticard front on the model. It took time and effort to line it up and trim the card to final shape, and although it does neaten things up, it’s going to have to be covered up by some black card at some point soon. A complete waste of time, effort and some plasticard. But I thought I’d share that with you, so you realize that we writers are as daft as the next bloke, and it justifies photo #15, which I’d not have known what to do with otherwise.

Photo #16 shows the rather ugly back of the model. All this is going to be hidden inside a box ( which I’d neither made, nor given proper thought to at this point.
Before the box, I turned my mind to a background. I’d need something to go above the upper ground level of the trench, and to give an illusion of distance ( to a blind man on a horse galloping past at midnight ), I used a very simple and quick method to get me some land.

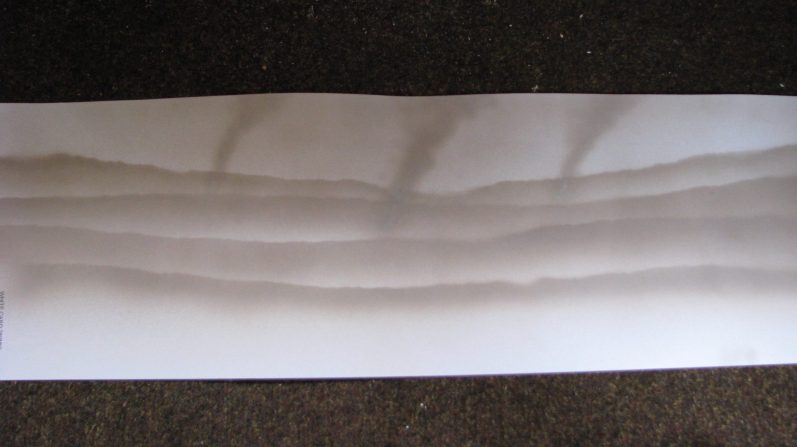
O.K. this is the second attempt, the first being on card that was too yellow to match up with the other colours used so far. So, what you see here is some white card with several passed of some Burnt Umber oils through an airbrush.
To get the random contours of the land, I tore wide strips off the initial background and placed them across the white card ( one at a time ) and sprayed the brown colour underneath the ragged edge. That gave a primitive mask to the area under the card, and a brown stripe across the white card. Use a different torn piece and move it down the card a bit, and repeat the spraying, and you get a second horizon line. Repeat this a couple more times and you’ve probably got too many levels of terrain, but I could line up the backing card so that I had something that looked O.K. afterwards.

I then added some plumes of smoke for where incendiaries had gone off or where aircraft had crashed ( a little bit of Hollywood stepping in there ) and I could put the airbrush away for another eighteen months or so.
With a traditional brush I added in some little biplanes, the explosions where someone was shooting at them ( add some white spirit to the card and then a little brown paint in the centre of it, dab it a bit to spread it out and you get a little aerial explosion effect ), then a ruined building to one side and loads of barbed wire coils and the poles that were used to hold the wire up, and you then have the results in photo #18 with the trimmed down version that would fit the back of the scene.

The rest of the pictures show the finished model, it’s setting and the box that was built to house it. The box is some 10mm marine plywood, cut to size and glued together with a few small nails to help hold it whilst the glue dried. A quick coat or two of stain and varnish and a brass handle for the top finished the outside, and a pair of magnetic catches for the inside so fasten the frame to the box. I still added some Blu-tac to the joint just to be on the safe side, as I don’t feel that the magnets are strong enough, but I’d like to be able to remove the glass for when it’s on display at shows.

And that’s it. A tribute to the brave men of World War One – on both sides of the conflict, but mainly to one of my grandfathers.
Researching family members is very difficult once they’ve passed on, and particularly so from this period of military history if you only have limited information yourself. I guess if I was to say anything with this article, it’s that I wish I’d known my grandparents, and that if I had, then I’d have thought to ask about their experiences and record what they said.

As it is, I’m left with some grainy photos, some badly damaged coins and patchy memories from two ladies who have whole and interesting lives of their own to recall and pass on to their children and grandchildren.
As I said earlier in the article, we’re encouraged to remember those who lay down their lives in defence of our freedom, but do we sometimes pass over the sacrifice others gave who survived the conflict, but with physical or mental wounds that they then carry with them for life ?
We need your consent to load the translations
We use a third-party service to translate the website content that may collect data about your activity. Please review the details in the privacy policy and accept the service to view the translations.