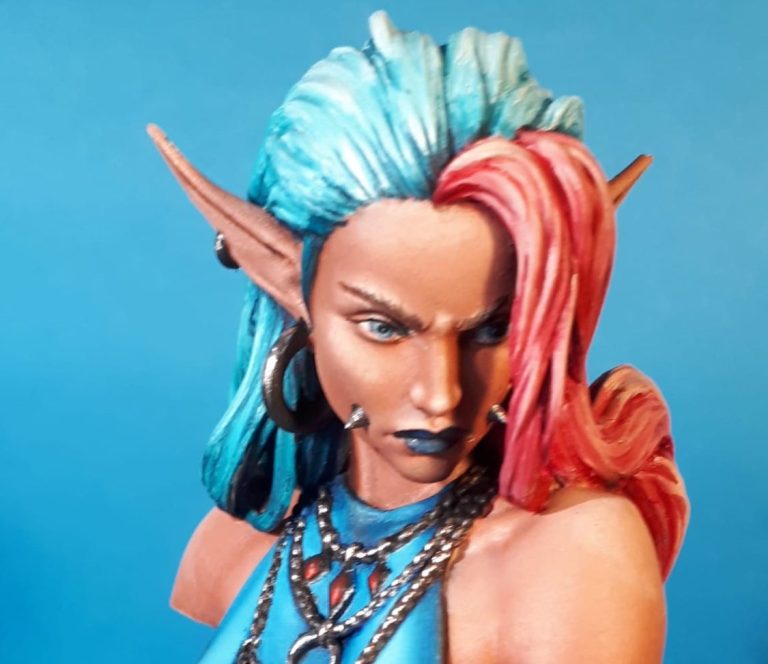
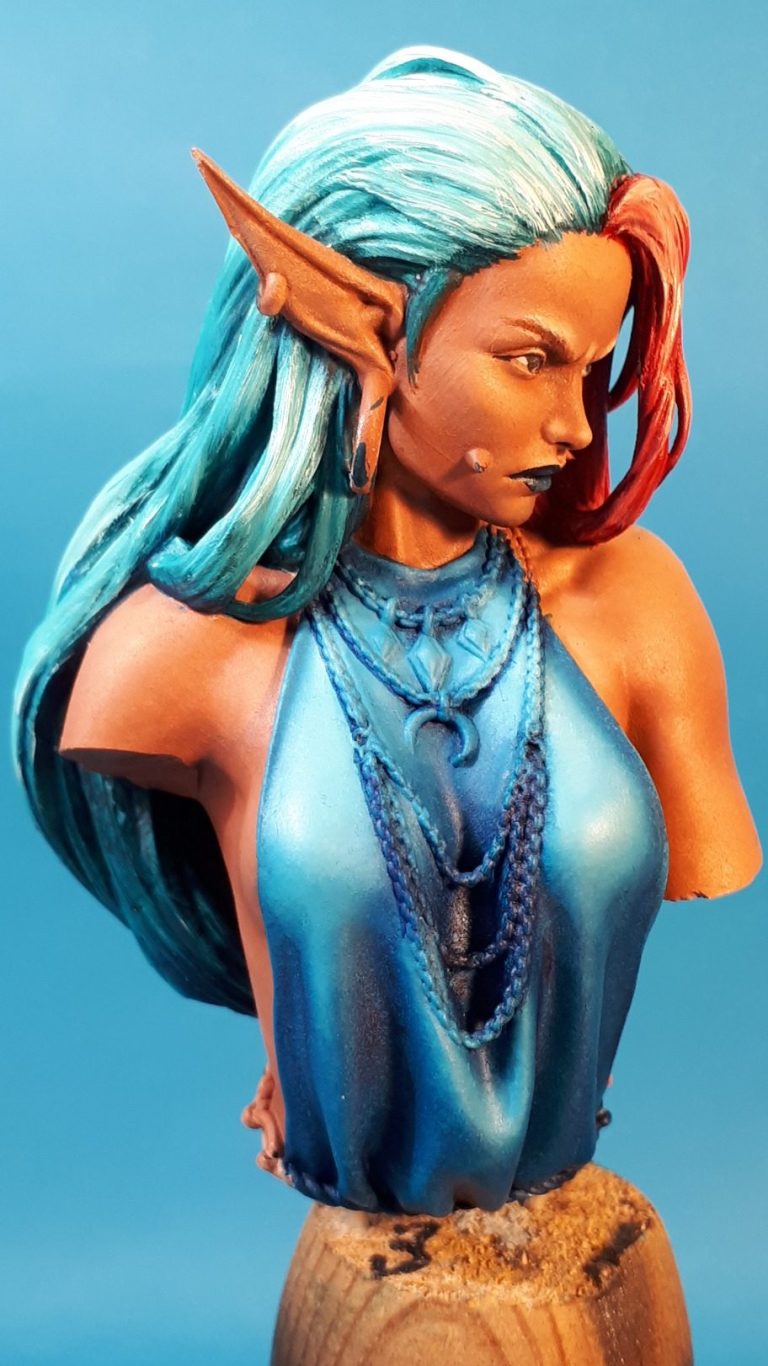
Elf Witch
1/8th scale 3D Resin print
Painted Autumn 2022

This is a gorgeous bust that has been altered a bit simply through my laziness.
I go to a painting day with a few friends held at Lostock Community Hall on the last Sunday of each month. A chance to sit, paint and talk with other model makers and painters, and catch up with what they have all been doing in the previous month.
Mike Dodds runs the group and has, for a few years now, waded in the mysteries of 3d printing, appearing each meeting with some truly beautiful pieces.
Like any hobby or interest, there is the occasional disaster, and this bust started life as just one such, the print becoming detached from the printing plate. This caused some horizontal “slashes” to occur on the arms and hands of what should be a half figure. There was a lot of deformation of the underside of the forearms too, and the skull she’s supposed to be holding had become a casualty of the slip. Still, it wasn’t beyond saving I thought.
Now for the laziness. I could have rebuilt the forearms, filled the slashes on the upper arms and either replaced or resculpted the skull...... But I had a lot of involved pieces clamouring for my attention at the same time, so whilst I really liked the model, it was either shelve her ( possibly never to be seen again ) or think of a way to fix things quickly.
The easy option was to remove the arms but leave as much of the good material as possible 0 that’s why one arm is longer than the other. There were no slashes to fill on the body, ant the roughness on the left side of her back looked to me like healed whip marks....... Perhaps as punishment she’d received as an apprentice ?
Having cleaned up the arms as best I could, I was keen to see what she’d look like with a coat or two of paint.
Just an aside here – or two as it happens.
One being that my painting regime is chaotic to say the least. I have many ( embarrassingly many ) projects on the go at once. For example, there’s four 1/24th scale cars, a 1/24th scale garage, around a dozen 28 – 30mm figures, a 1.6th scale robot girl and a bust of Shark Man on or around my desk that are part painted. ..... and those are the ones I can remember.
“Why ?” you ask in horror, and “How !” has it got like this.
Simple answer is I like having projects I can “flit” between, and some take longer than others. Paint sometimes takes time to dry, or it might be that I’m thinking about what i can do with a model or indeed. It can even be a case of how to make real what I have in my imagination, so projects stall, wait, or sometimes rush to the finish line. Oh and commissions take priority and jump right to the front of the queue.

Second aside – 3D printing. It’s a wonderful idea, some brilliant people making the STL files and sculpting virtually, and the ideas and speed at which things are released is astounding. However, it’s OK to get a really detailed fully fledged piece off a printing plate, with fly-away hair or weapons thrusting out, but I do get the impression that some – not all – virtual designers either do not know how the finished product will be painted, or have forgotten that maybe a multi piece kit would be better than everything in one lump.
This Elf Witch is one that shows exactly what I mean. It’s gorgeous to look at, nicely proportioned and going from seeing a render on screen to taking this off a print plate must be very pleasing. But, oh yes, there is a “but”, the flowing hair that droops down across the left hand side of the face completely fowls the eye behind it. Whilst the print has shown no problem in getting the ey and socket formation perfect, getting a brush in there to match up painting with the right eye is...... Lets say the occasional expletive was blurted out.
As 3d printing develops, I’m pretty sure these problems will be brought to light, discussed and solutions offered to solve the problem. In the meantime, learn to paint round corners Hopwood !
Back to the model.
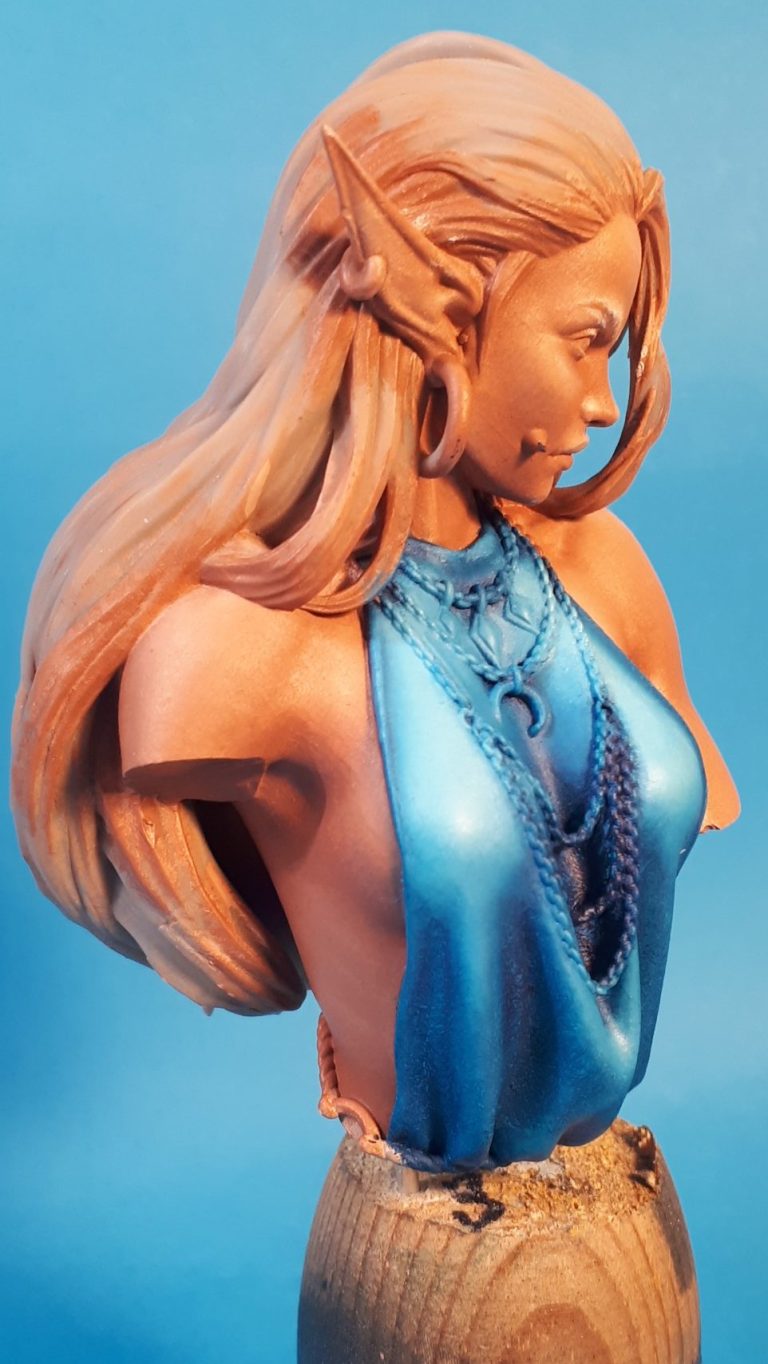
The first WIP shot shows my impatience has gotten the best of me and I’d primed, undercoated and painted the skin areas ( Halfords grey primer, GW Bronzed flesh followed by Mars Brown and Titanium White oils, in that order, pretty much sums it up ).
Depicting female flesh can be a lot more difficult that painting a bloke. Especially if the subject depicted is supposed to be young. There’s little chance of wrinkles and the paintjob needs to be a smooth flow of shadows to highlights with no unintended blemishes.
Get it right, and you’re laughing. Get it wrong....... and the AFV modellers version of tarpaulins and mud comes out, with the figure modellers version being tattoos and / or scars. I say this very much tongue in cheek, as not every bit of flung mud, crumpled tarp, complicated tattoo or weeping wound is covering up unsightly stuff....... But it gives you options.

One of my friends commented a little while ago that the colour palette was becoming a little dark and possibly leaning towards too much brown. He was right y’know, he had a point, so I thought I’d have a look at what colours I’d not used for some time and see what I could do.
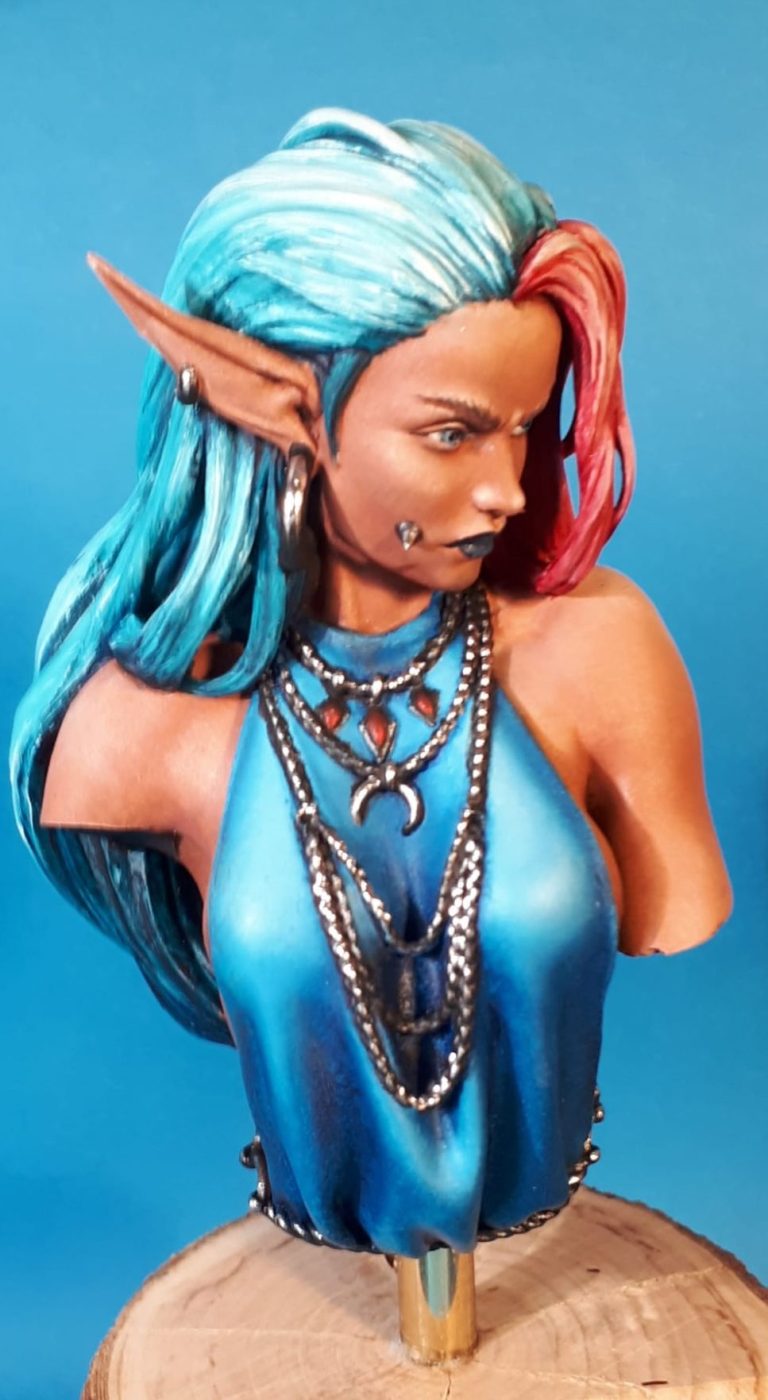
The bright blue dress that she’d almost wearing, came from an undercoat of GW Moody Blue and Skull White, and then once dry, I used Indigo oils to create the shadow areas. Adding progressively more titanium white to the model allowed me to build mid tones followed by highlights, placing the white in position with a fine brush and then using an old brush with shortened bristles ( imagine something that looks like a mop head ) to gently stipple the area to mix the white and blue colours.
WIP shot #2 shows the results of this and the paint really needs a week to dry in a warm, dust free place before doing anything else.
But once dry I could show some interest in the hair.
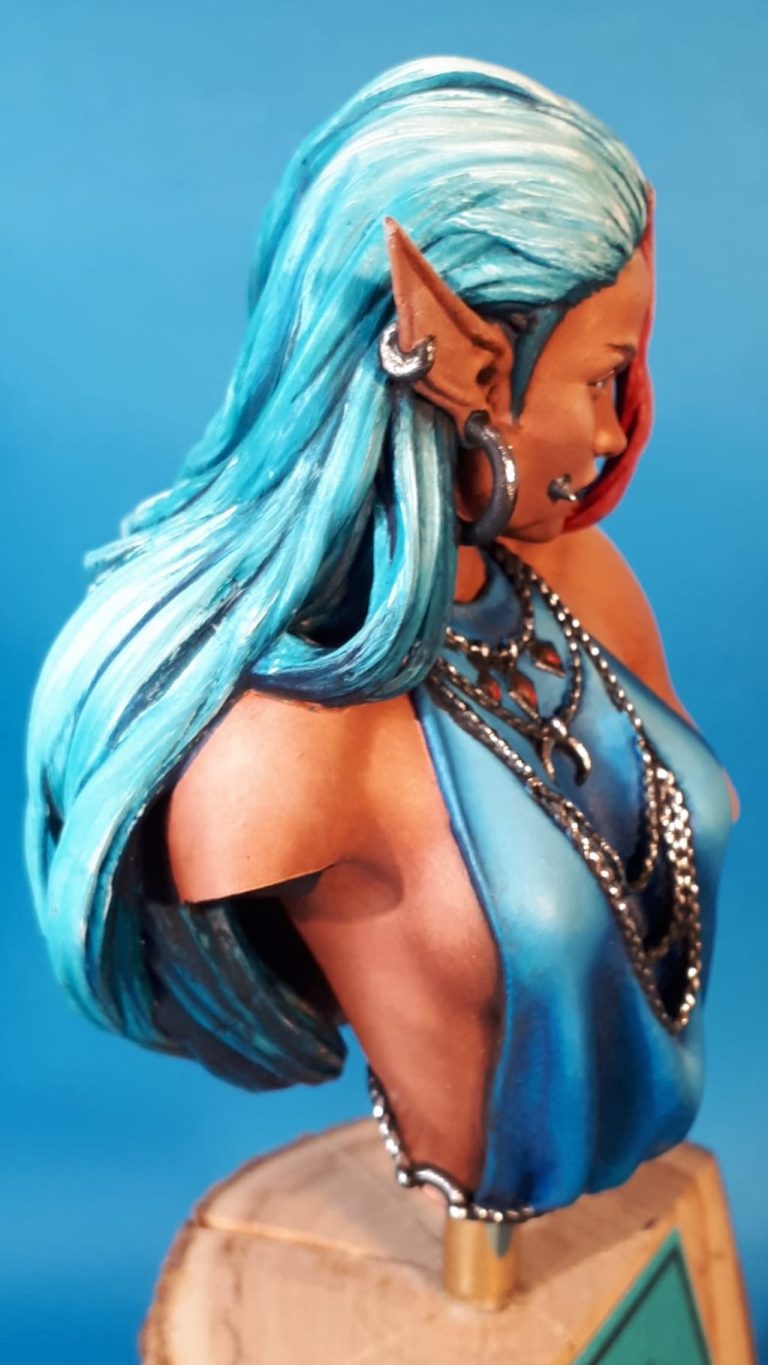
I’d been mulling ideas over in my mind while the dress was drying, and I initially thought that more blue would work well. I got about half way through undercoating the hair and it hit me that maybe there was going to be a bit too much blue. So I neatened the edges up and used a similar mix of the blue oils to paint the hair. More of the Titanium White was used to make the hair lighter, I didn’t want an exact match to the dress, and again a good amount of drying time was necessary before adding more colour.
WIP photo #3 shows the addition of a ginger colour to what was left of the hair, using Mars Violet as the starting point and again adding Titanium White to build up mid tones and highlights.
In the good old days ( where many things were sepia, and people wore hats, so it didn’t matter ), hair like this, with deep recesses would be painted with a dark colour, left to dry and then drybrushed with a lighter colour. Then maybe a wash would be added to “smooth in” the drybrushing, and that process could be repeated quite a few times depending on how the colours built up.


However, the down side of drybrushing areas like this was the very good chance that at some part of the process you got a little too happy with the paint and because the drybrushing strike is going across the strands of hair, you ended up with a banded pattern where no banded pattern should be.
A better wasy of rendering hair is to actually use the brush like youre combing the hair, following the flow of the strands, and allowing the paint to build up on the areas you choose to be lighter. As I use oils to paint hair, I must stress the need to wipe the paintbrush clean ( I stress wipe, not wash, no thinners should touch the brush until the paint session is finished ), and wipe it after EVERY time it has been passed over the hair. Then, and only then can it be recharged with the lighter colour paint you’re using.
The effect is probably best shown in WIP photo #4 where you can see that the lighter colours are on the more pronounced detail. Don’t forget that women tend to wash their hair – usually with umpteen “treatments” to hand ( I am so going to die for that comment ), so having an area just offset from the top of the head where the hair’s glossiness reflects the light always looks good.
WIP photo #5 shows the difference in colour value between the hair and the dress, the mix of colours is the same and matches nicely, but the two areas are still separate. Sometimes using a different colour to build up the mid tones or highlights works well – in this case it might have been interesting to use Buff Titanium instead of the Titanium White...... But I guess we’ll just never know.
Now, wasn’t I saying about scars and tattoos to hide problems ?

WIP photo #6 shows the fault lines on the lower left of the back. The faults only run over the ribs of the figure, but by painting them to resemble old scars I could hide the fact that they were an unintended fault in the casting, and by extending the scarring onto the back of the arm, the wounds looked more realistic as thought the weapon inflicting them had slashed her.
Creating the impression of old scars is easy, a little Carmine oil paint down in a ragged line, and then White Spirit added in small amounts to diffuse the edges of what will be the wounded area. Add some White or Buff Titanium to the central areas of the Carmine while it’s still wet, and gently blend the two colours a little. This will give you the appearance of scar tissue that has built up as the wound has healed.
Why the lighter colours for the scar tissue. Well, scar tissue does not tend to tan as much as the skin around it when the area is exposed to the sun. So it will, on a sun kissed body, always appear lighter.
( I cannot tell you how many years I’ve waited to get “Sun Kissed” into an article somehow ).
Eyebrows, I never used to like painting them, in fact on a lot of my early figures I didn’t even bother. On female figures they can be troublesome, because painted on too heavily and you have Denis Healy in drag ( Sorry, younger ones will have to look that one up ), and getting the shape even on each side can take a few tries.
Having them appear as though they are made up of separate hairs rather than a solid block can be made easier by using a slightly aging brush that the hairs are splitting into a bit of a fan shape. Take care to check how the hairs grow – that being almost straight up, gradually falling to almost horizontal as they go across the top of the eye and get to the temple area of forehead.
Jewellery was the final area to get some attention, I chose to keep this pretty simple, using Darkstar acrylics to paint in the main silver areas, coating them once they were dry with several thin washes of Mars Black oils, and then picking out some of the individual links of the necklace chain with unthinned oils.
To give some really bright highlights to the chains and rings etc I added very small spots or lines of Molotow silver ink. It was time consuming doing this on the separate links of the necklace, but worth the final effect it had.


With a brass tube inserted into the underside of the bust, I could attach her to a piece of wood that my neighbour had trimmed from a tree a couple of years back, having trimmed, sanded and varnished the wood once it had seasoned and dried out fully ( hence the two or three years it’s been sitting in the shed ).
Final thoughts and comments.
I really like this bust, I like the brightness of the paints and I like that whilst being lazy, I have still managed to make something of what would normally be a scrap casting. One of the disadvantages of resin over white metal is that once a casting ( or in this case, a print ) is made, you’re stuck with it. If you have a mould that is for a bigger component, then with old style resin you can use the miscast as a filler, taking up space in the mould rather than fresh resin. And this has been done for years by many casters. But otherwise, the resin is useless, and fodder for the bin. White metal always had the advantage of any miscasting could simply be thrown back into the melting pot, and so nothing effectively was lost. With 3D printing being along the lines of resin casting, but without the reuse for a bigger component, then many faulty castings will become waste I guess.
A shame, but maybe someone will find a way of recycling them.
In this case, I managed to recycle one, and without a lot of time spent doing it too.
So am I allowed to say this is a Green bust in blue and red ???

We need your consent to load the translations
We use a third-party service to translate the website content that may collect data about your activity. Please review the details in the privacy policy and accept the service to view the translations.