Horned Dragon Conversion
Heavy conversion using Creative Beasts Ice Dragon head and neck
Converted and painted in 2022

I decided to make a second heavy conversion using the same parts as on the frilled dragon ( which I’m sure you’ve already read about ), and this time use the mouth in the opened position. There’s very little of the original parts left visible by the end of this, but a lot of ideas from other sources went into its’ making.
In photo #1 I’ve glued the donor parts together, and with the jaws open, have added detail to the back of the mouth. Thinking that glands would be present to squirt fluid or fire, I added holes either side of the gullet that would represent where such noxious fluids or flames came from.

In photo #2 I’ve added the thin membranes to the side of the mouth and filled in the gap at the back of the jaw.
Photo #3 shows a closer look at the side of the head, showing the membrane at the back of the mouth, the addition of the tongue and also a second set of eyes. The latter were made from metal ball bearings, pressed into some putty that had been forced into a hole drilled into the side of the head. With the ball bearing in place I could form eyelids from more putty, which is where I’m up to in this shot.

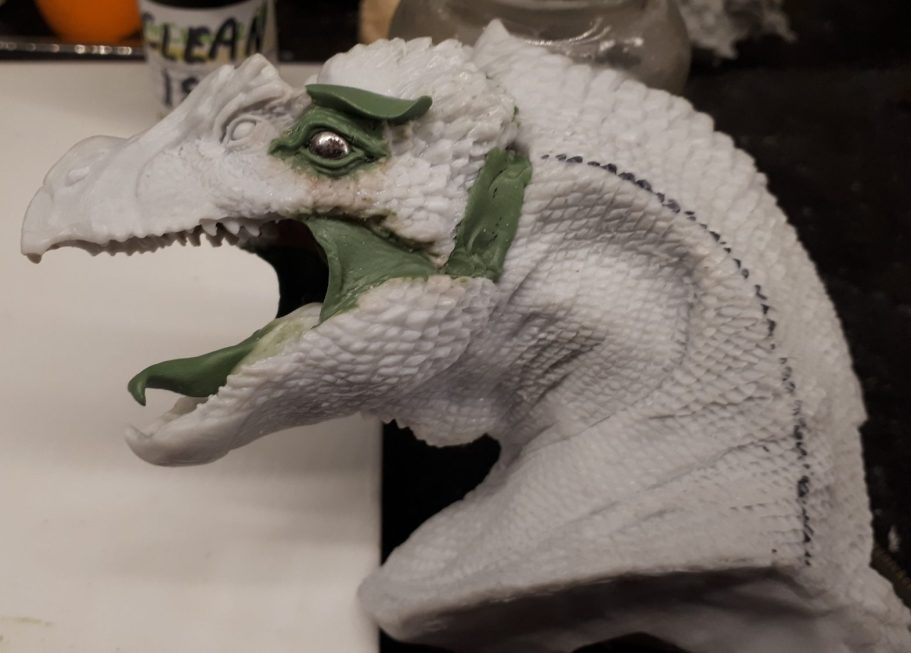
The marker line I’ve added in photo #4 is to guide me in where I’m going to have transitions in scale types , you’ll see how this guide has worked in shots further along, but for now, just think that I’m planning ahead for once and not completely winging it.
Also in this shot I’ve added a horn projection above the new eye, it seemed like the right thing to do at the time with some spare putty – back to winging it again I guess.
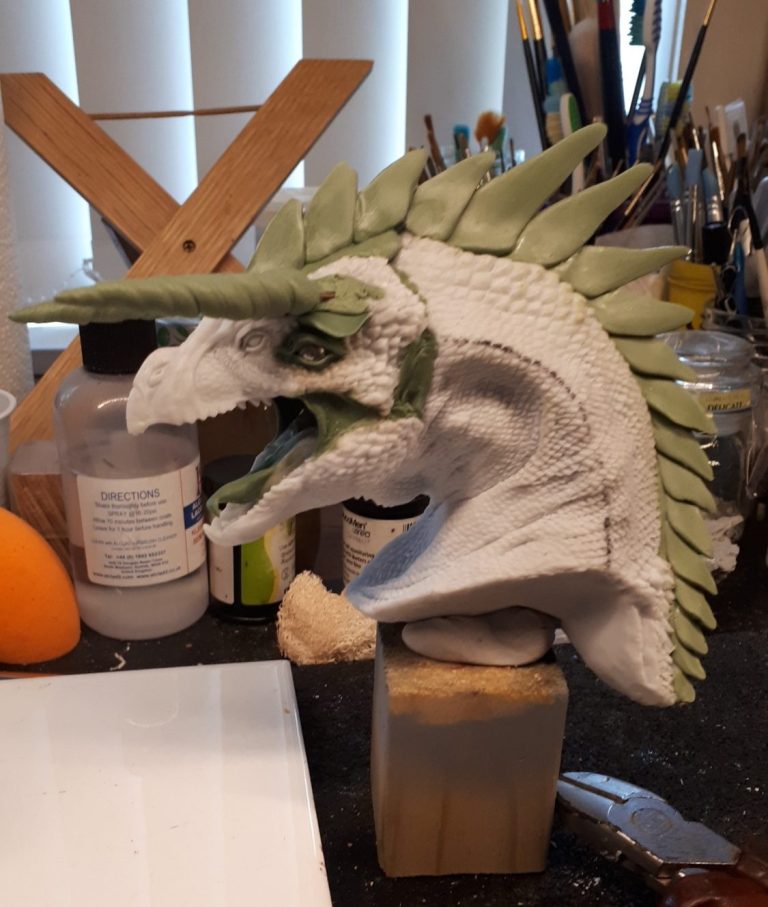
Photo #5 shows some real progress being made, with very large scale=like spines being added to the back of the dragon. These, like all the additions are made from a mix of Magic Sculpt and Duro, beginning adding them at the lowest point of the back and allowing each scale to overlap the previous one at the base. To smooth the putty I use spit. And although it sounds disgusting, I’d advise spitting onto a plate or small bowl, and using that rather than wetting your fingers by licking them. The taste of the putty is awful, and I’m pretty sure it is a health risk, So disgusting as it sounds, spit onto a plate and dab your fingers into that, then smooth out the putty.
Water can be used, but honestly, spit works better for some reason.
Oh, the twirly horns in this shot. These are made from moulding the soft putty around a cocktail stick in a long cone shape, and then spinning the cocktail stick so that a twist forms in the putty. Note that you have to spin the horn the opposite direction for the other side though…….. just saying.
Photo #6shows this stage from the front, there’s going to be a lot of covering up to do with putty detail to hide the joints of the scales on the back and the forward pointing horns, but we’ll get to that later.

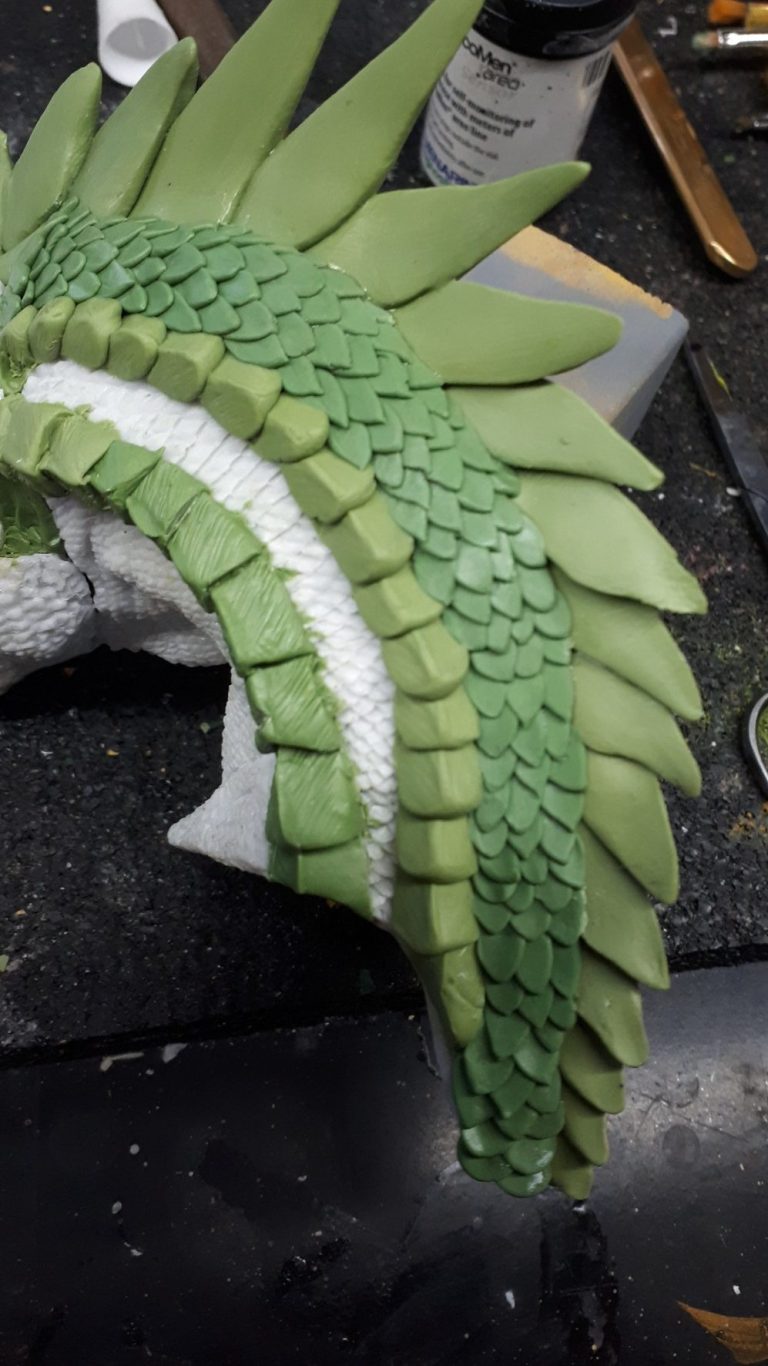
For now ( Photo #7 ) I started on the neck.
The large scales on the side needed a texture putting on them, and a way of speeding that up ( an old fashioned way at that ) is to make a texture stamp. I made a single scale slightly bigger than I’d need from the putty mix and once it had cured coated it with some Vaseline. Then added more putty to the detailed surface, pressing the putty firmly into place so that the soft putty formed into the detail.
After a couple of hours the putty is cured enough to retain the texture from the master, but still soft enough to ease away and form back into shape if there is any deformation caused by removing it from the master.
Why not let it cure fully ?
Well, it might be OK, but there is a chance that it will be difficult to remove from the master, and / or possibly crack or break in the process. The worst case scenario is that you cant remove it at all, and so it’d be back to square one in making a new master.
With the texture stamp made and fully cured, I could add balls of soft putty to the side of the neck, working from the furthest point away from the head, and pressing the texture stamp into each one as it was added. This formed a layered effect as I worked up the neck towards the head, and I decided to add a second row of smaller scales along the same line.
Once the larger scales had cured I added small balls of putty between the scales on the spine and the first row of new scales, flattening these out and texturing them with a flat sculpting tool. These allowed me to blend in the scales added to the spine of the neck quite nicely.
Photo #8 shows the same type of scales being added between the first and second set of large scales, I managed to stop myself long enough to take this shot, although I’ve nearly got as far as the head I grant you.
I did find that doing this was quite therapeutic, it’s repetitive yes, but takes your mind off everything else going on around you, and yes, the other side of the dragon needed exactly the same treatment.


Which brings me nicely on to photo #9, and hey presto, the other side.
I did make the scales slightly longer on this side as the neck is stretching to the left, and so my thinking was that the scales on that side would be compressed together slightly, whereas on this side they would be sliding over each other to expose more of each scale.
I’m sure you know what I mean, even if my explanation isn’t quite as clear as it could be.

In photo #10 I’ve begun to add small scales under the back of the jaw. These are made in exactly the same way as the ones on the neck – a small cone of soft putty is made, then pushed into position and flattened out a little with a sculpting tool.

After matching up the scales behind the jaw on the left side, I was getting a bit bored with making them, so in photo #11 I’ve changed from scales to small horns to fill in the spaces above the eyes and around the large twisted horns that were fastened into place earlier.
Photo #12 shows how I’ve placed these small horns all over the head, similar idea to a sea urchin really. And with that area completed, the changes were finished.
One note I should make here is that I’m not convinced how securely those small horns are held in place. If I do something similar to that in the future, I might run some very thin superglue down in amongst them to ensure that they’re all stuck down properly….. I live and learn.


Photo #13 and I’ve sprayed the whole thing with Halfords Grey Primer. This hides a lot of the work done, but does help to show up any areas that might need attention. Happily there were none that I could find this time, so I could let the primer dry for twenty four hours and then start thinking about colour schemes.
With the frilled Ice Dragon being predominantly blue and white, I thought I’d go for something in green. I had the feeling that this heavily armoured dragon was an ambush predator, not given to flying and breathing fire, so much as lunging from hiding to catch it’s prey.
So greens and possibly some browns were the plan.
In photo #14 I’ve begun working on the green colouration, coating the main sections of small scales with Olive Green oils and then blending in Chrome Green and finally adding some Chrome Yellow for the highlights. To make the larger scales running down the side of the neck a little different, these were coated with the Olive Green Oils, but then had Mars Yellow added to build up mid tones, and some Buff Titanium lightly brushed on to get the highlights.

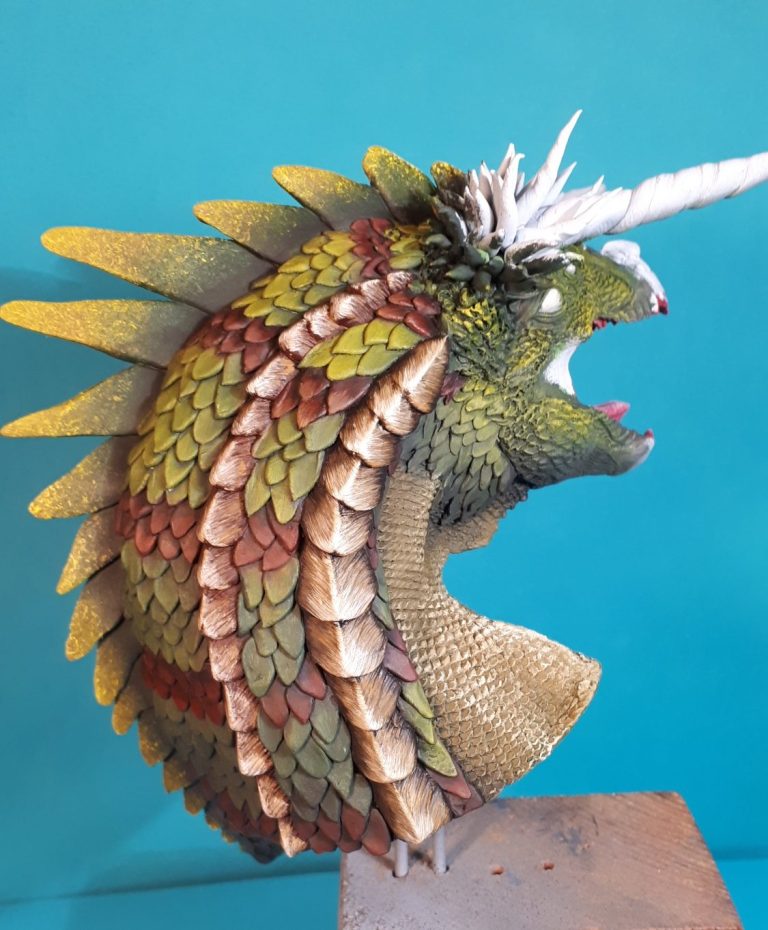
It still looked a little bland though, so in photo #15 I’ve added the Olive Green to the large scales on the spine, and then blended in the chrome green at first with a brush, and then to begin the spotting effect, used a sponge with more Chrome Green, moving to Chrome Yellow for the brightest points running towards the tips of each scale.
To break up all that green I then added some stripes of brown to the small scales sections, starting with Burnt Umber as a shadow colour, moving through Mars Brown and then to Light red for the mid tones and highlights respectively.
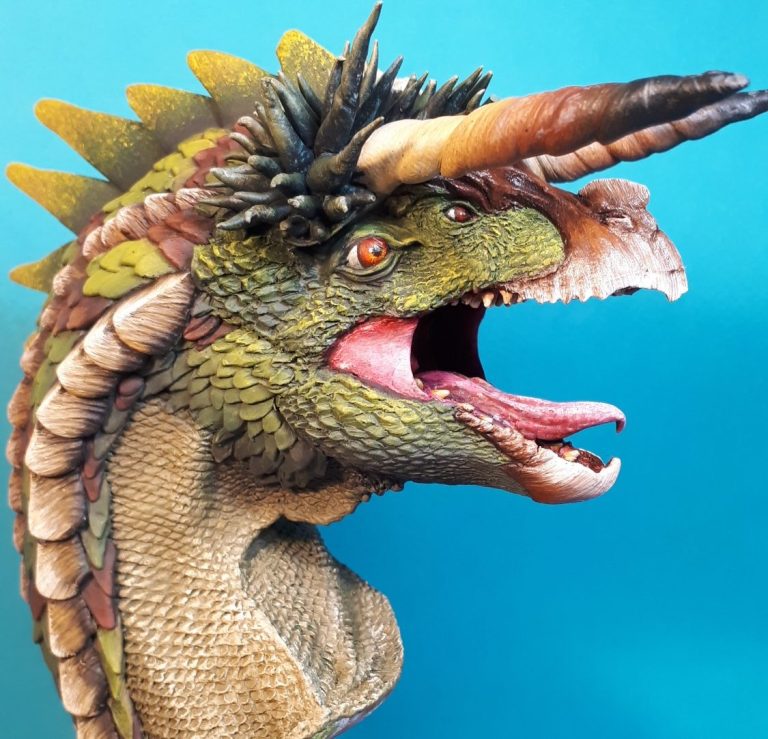
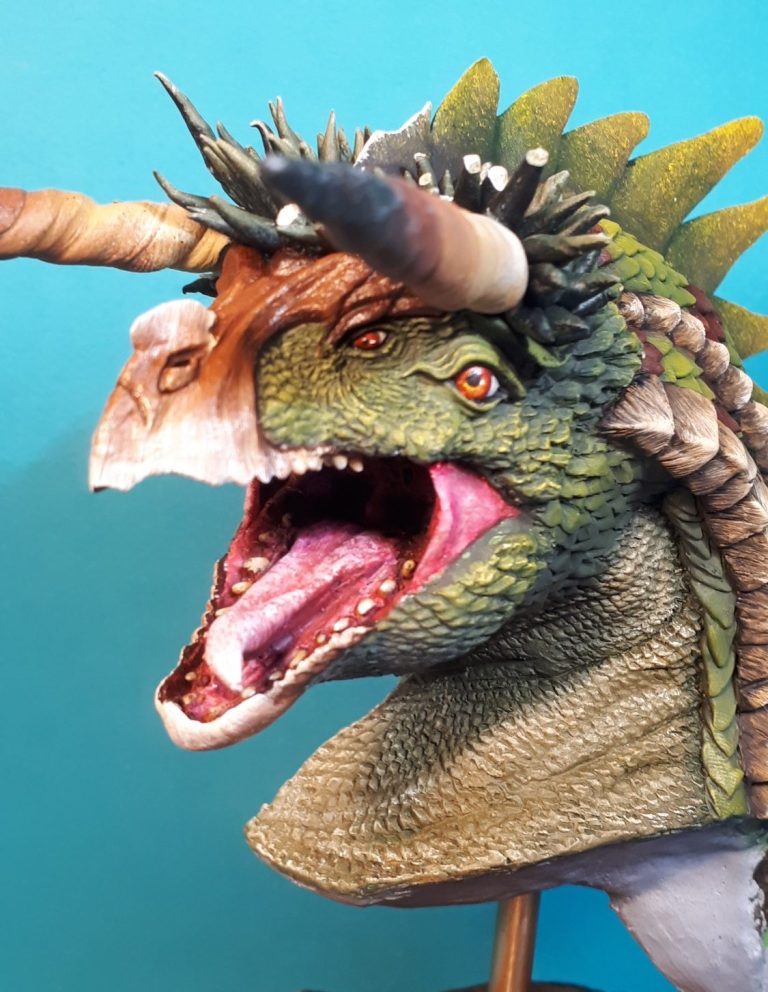
More of the same green colour mixes added to the thorn-like horns on the head and around the mouth, with brown mixes running nearly to white on the long horns and the birdlike beak on the upper jaw.
All the above shown in the final shots, with the model added to a nice plinth from Oakwood Studios.
Final thoughts
I’m not sure about the new eyes I added, I think that they’re a little bit big, and although they can be seen quite easily, they do dominate the face, and the original and much smaller eyes are sort of lost. Most people looking at the model will not recognise that the dragon has four eyes.
Other than that, I’m pretty happy with the additions, enough putty to make it unrecognisable from the original parts used, although I wish I had shares in Magic Sculpt.

We need your consent to load the translations
We use a third-party service to translate the website content that may collect data about your activity. Please review the details in the privacy policy and accept the service to view the translations.