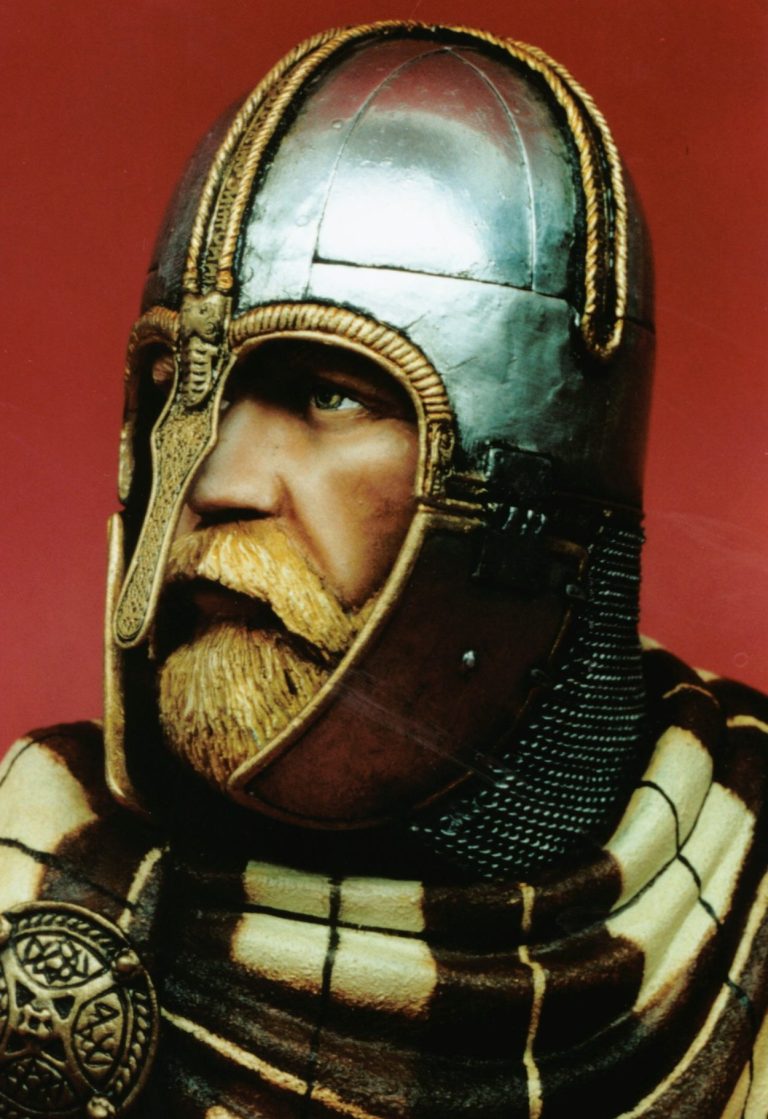
The Coppergate Saxon
1/4 scale resin model from Fort Royal Review
Article first published in Military Modelcraft International 1998
After spending more years modelling than I'd really care to mention, it still surprises me to find that the ideas and model figures offered by all the various companies can still create the feeling that " I've just got to have one of those ". After all, lets be honest, surely this feeling should wear off sometime... shouldn't it ?
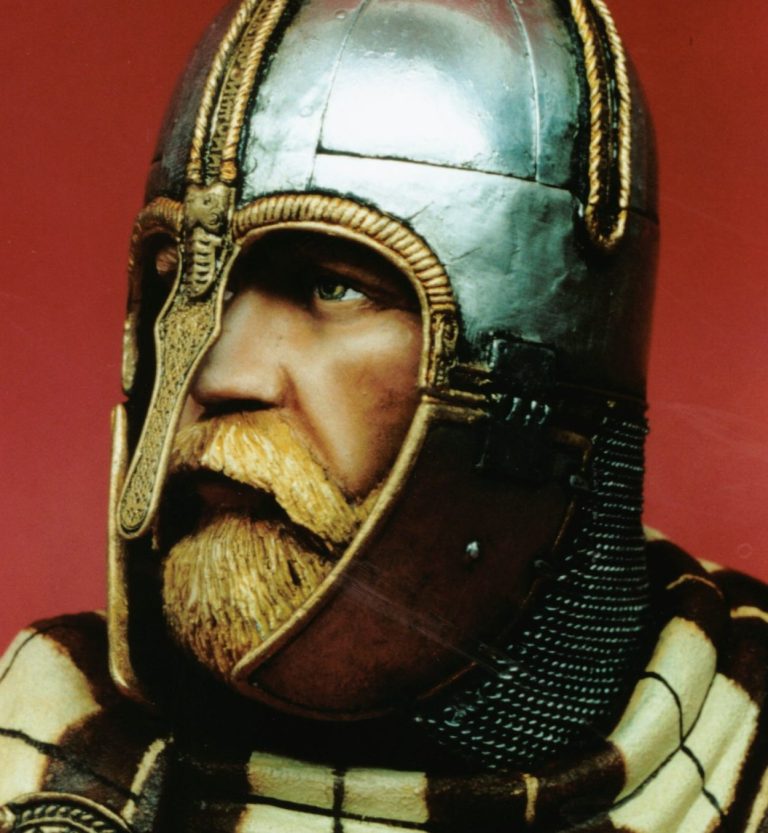
This for me was one of those models. The fact that the bust is designed solely around the history of the helmet - which I'll run through briefly later, was an added attraction. Not only that, but there's not going to be many of these about, the initial models in the casting run are destined for the tourist market, being sold in one of the York museums.
These models are cast
in " cold cast bronze " although, should anyone wish to have a go at painting one, they can be ordered cast in white resin, as the one in this article was.
History and Background
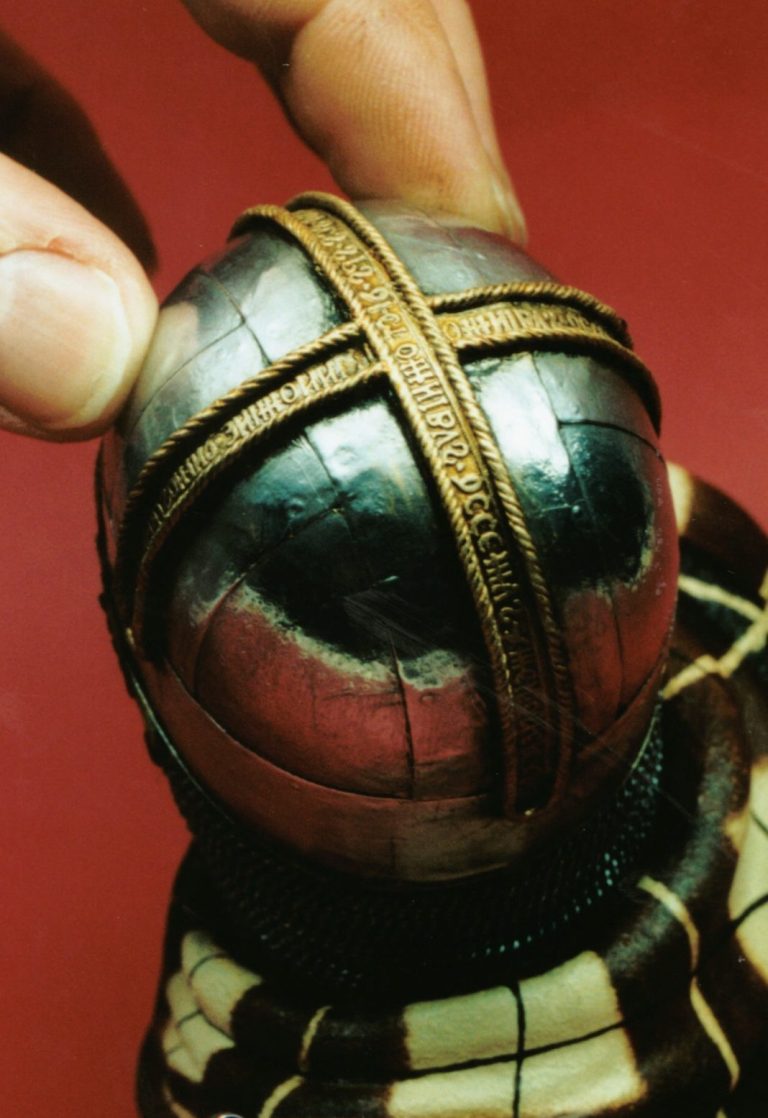
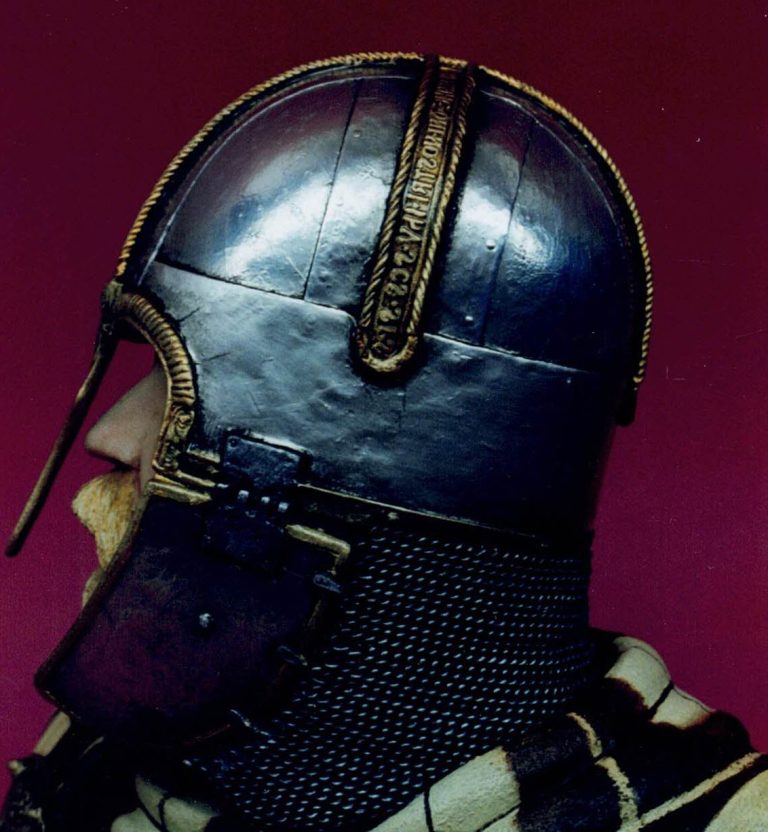
Now for a little history. In 1982 a chap by the name of Andy Shaw was operating an excavator. He was buisily digging away some foundation trenches in the Coppergate district of York, when he hit something solid that the digger wouldn't shift, and, as a precaution he and his supervisor - Chris Wade - had a look at the object that was causing the problem. A couple of archaeologist chappies soon came to joined them, and what they found was a cache of Saxon bits and bobs in a wood lined pit. Within this find was the helmet you see a miniature depiction of here. . So good in fact was the preservation, that the aventail ( mail neck guard ) which had been rolled into a ball and stored within the helmet for the 12 centuries or so since whoever then had placed it in storage, was restored completely along with the solid plate areas of the helmet. The detail on the helmet is quite astounding, the script running both ways across the crown and the Celtic design on the nasal guard must have taken an accomplished craftsman many hours to produce.

Cleaning of the helmet and mail was laborious, using dental picks and glass bristled brushes. However the script on the helmet was legible, the inscription running over the crown of the helmet from front to back being in Latin :- IN NOMINE DNI NOSTRI IHV SCS SPS DI ET OMNIBUS DECIMUS AMEN OSHERE XPI Which when translated means :- IN THE NAME OF OUR LORD JESUS THE HOLY SPIRIT THE FATHER AND WITH ALL WE PRAY

This followed by the name OSHERE which is probably the owner ( who is thought to be of royal or at least noble birth )
or possibly the maker of the helmet. It could possibly even be the name of the person that commissioned the making of the helmet as a gift). The final three letters of the inscription XPI being the first three letters that make up the word Jesus in Greek.

Some of the words in the inscription are abbreviated, and some of the letters making them up are reversed. The inscription running across the width of the helmet forming a cross with the other inscription if viewed from above, is a repeat of the script, being split into two halves on either side of the helmet. The left hand side of this inscription has been rather badly damaged although enough remains to allow an assumption of what was originally there.
This helmet is one of only three ever found for this time period, the others being the Sutton Hoo helmet and the Benty Grange helmet, and so it's worth is probably beyond value. Not to mention the fact that it is viewed as one of the most important archaeological finds in York in the last century or so.
Worthy of note are the rivets in the centre of each cheek guard, these, it is thought, are attachment points for a chin strap. The hinges that retain the cheek-guards are unevenly set, one being upside down if compared to the other. Well that's a very shortened version of the history of the real helmet, lets have a few lines about the model.
Now for the Model
The amazing thing is that Dave Gerrett of Fort Royal Review has painstakingly replicated all the detail in miniature, as perfectly as one could wish. Not only that, he's added a character wearing the helmet, and some beautifully detailed mail, not to mention the brooch holding the cloak. Am I gushing a little too much - well I think the bust deserves it to be honest.
At the time when I saw the bust - at the Crewe show in February - the bust was only available as a cold cast bronze piece, I managed to talk Dave into parting with one that he'd cast in white resin that he was going to paint himself.
The model comes in three parts, those being the base and the main bust casting, both these being in resin, and a separate piece moulded in white metal for the nasal guard.
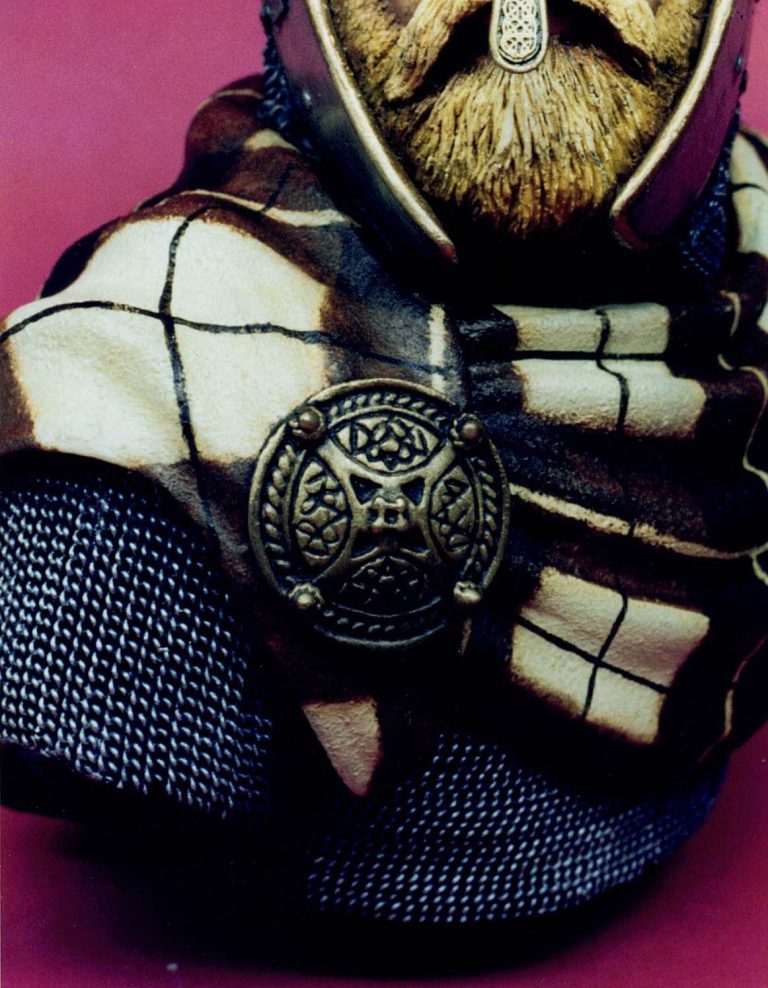
Now at the show Dave had said that the casting was good enough to require no cleaning. Me being a bit of a sceptic was pleasantly surprised to find this true, the casting being quite superb. There's no flash, no casting lugs, and not even the merest hint of a mould line. In fact if model companies continue in this way, I may have to do a bit of converting just to justify having spent hard earned cash on files, knives and saws - most perturbing ! Oh and there weren't any air bubbles either.

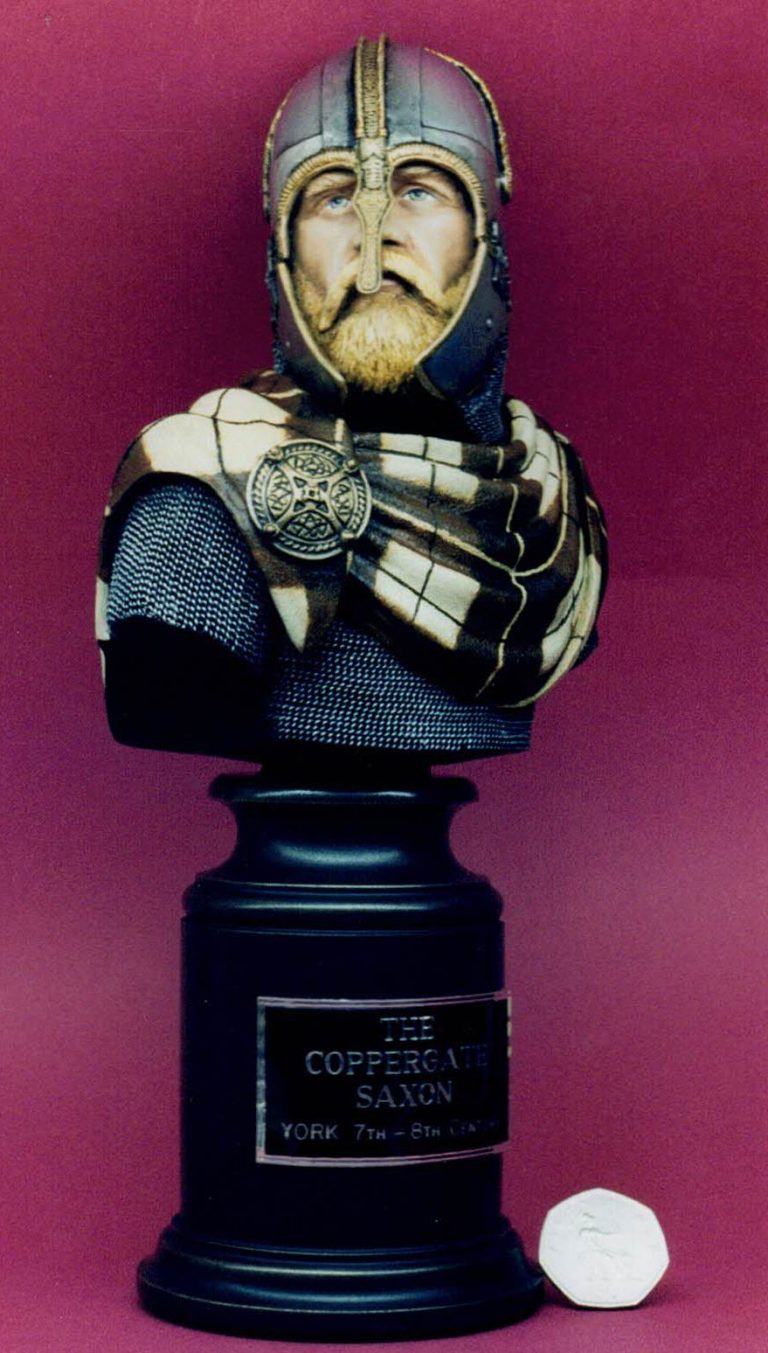
Now one thing that I haven't mentioned is size, well it's big, huge humungous, and consequently rather heavy too. As for size, well I took a photo of the model next to a new 50 pence piece, however for those of you who like the facts, the total model including plinth is 30cm tall ( 12 inches for us old fogies ), without the plinth the model bust itself is 18cm or 7 inches. Just as a thought though, Dave did mention he'd had the idea of making the full figure - and at 45 cm tall ( 18 inches ), that would be a real showstopper - but will he do it ?

Let me at the paints - The face
Now for the painting - which to be honest is straight forward enough. To begin with I painted the face, which Dave had undercoated with what appeared to be an enamel flesh colour already. Over this I brushed a thin coat of a mid-tone oil colour that I'd mixed from Windsor and Newton flesh tint, and a little Yellow ochre. This is the first model I've painted since the Crewe show, where I had a chance to have a really close look at Keith Clutton and Mike Killen’s work in the flesh so to speak.
And after I'd calmed down my feelings of envy at their skill and dexterity, I noticed that my models in comparison looked somewhat jaundiced. Granted I do prefer a slight yellow / brown tint to my skin tones, but I decided it was perhaps about time to have a slight rethink of the way I mix my flesh tones. So what I did was used the W & N flesh tint ( pink though it seems to my eyes ) with only the merest hint of yellow ochre added to it, plus the usual white to lighten it. The mix I used was roughly in the ratio 10 : 1 : 7 ( flesh tint : yellow ochre : white ). This gave a more North European untanned colour, to my eyes at least, so I
used this to thinly coat the whole of the face, continuing by adding shading with burnt umber and highlighting with pure white in my usual way.

The only other thing that I did that varied from my normal method was, once the flesh colours were fully dry, add a slight tint of paynes grey under each eye to darken the " skin " in that area so that the eyes have a tired look to them.

The eyes themselves I decided to paint blue, beginning by undercoating the eyeball white, and utilising some of the paynes grey that I still had on the palette. I used the grey to mark out the outer edge of the iris, adding touches of white and yellow ochre to the main part of the iris, and finally adding a black pupil to the centre of each eye.
The Beard
For the beard I began by undercoating in a sand coloured acrylic, this being followed by a thin coat of yellow ochre, which with the use of an old brush, was worked into all the detail. Into this I blended small amounts of burnt sienna, followed by brown madder alazarin, The darker colours being used to gradually build up and define the shadow areas particularly under the chin.
This area was a beggar to get at, both for the beard colour and the flesh area on the neck. All I can say is that perseverance won out .... eventually
After the beard colours had had chance to dry overnight, I added highlights in the form of a very lightly applied drybrushing of white oils. This semi-blended into the yellows and browns that hadn't quite dried to produce a pleasing looking blonde beard. Using the same colours but omitting the final addition of white, I painted the eyebrows, the shadow of the helmet negating the need for the highlight colour.
Fun with foil
After allowing all these paints time to dry, I began work on the helmet. I had decided that there was no way that metallic paints would work on a bust of this scale, and having found that my Humbrol Metalcote paints had dried up into unusable blocks at the bottom of their cans, I decided that the best option was going to be trying pieces of silver foil test fitted to the helmet.
If this worked then I could fit the foil to the helmet in segments building up the helmet just like the original full size piece would have been. So first of all I flattened the foil out to get rid of as many creases as possible, then placing the foil onto the helmet, burnished it into shape with a soft cloth. I then removed the foil, coating the area then with some wood glue, then replacing the foil in the same position and burnishing it flat again with the soft cloth.

Once the foil was in position I cut around it with a new blade in my craft knife to trim away the excess foil before the glue dried it in place.
This all seemed to work fine until I came to do the largest piece of the helmet running around the temples and back of the head. In this piece I just couldn't get rid of all the wrinkles, and had to content myself with leaving a few that I'd later try to disguise with paint.
Next up for painting was the chainmail, I decided to paint this black with thinned acrylic paint to begin with. Over this, once it had dried, I drybrushed Games Workshop " Chainmail ", following this with a light drybrushing of silver ink.
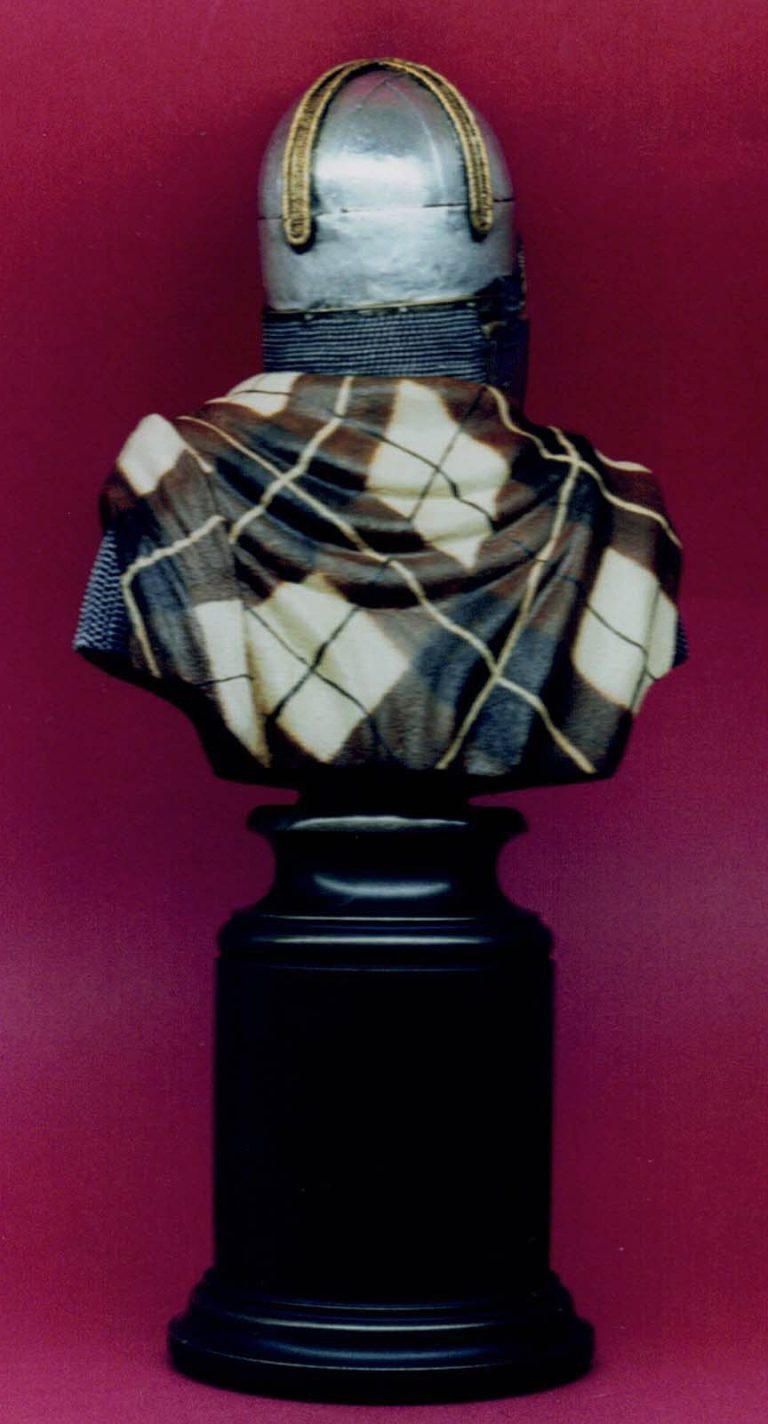
Anyway once I'd established a solid ivory colour over the white of the bare resin I began playing around mixing up some oil paints to match roughly those colours used by Mr Stewart. Beginning with the lighter of the two browns. This being a roughly equal mix of burnt Umber and burnt sienna with just a
tiny dab of black added to darken it ( this would tie it in to the darker colour - more of which later ). This brown was then painted onto the cloak, letting the brush follow the undulations of the folds to a certain extent, having the pattern of vertical lines radiating out from the head if viewing the figure from above. The horizontal lines were then added, not worrying too
much about the lines remaining level, but putting more emphasis on the lines meeting the vertical ones at what looked to be 90 degrees. This meant that by the time I'd worked to the rear of the model my horizontal lines had become diagonal - Mr Stewarts do this on his model, and look O.K.
With this colour effectively finished, I returned to the palette and mixed into the remains of the brown a large amount of black oil paint. This is the reason that I added the dab of black, so that the two brown colours, although different, have the same colours in their makeup and so tie in together a lot better. This colour was painted in the areas where the horizontal and vertical colours meet, beginning at the front of the cloak in the shape of rough squares, but becoming diamond shaped as I moved around to the back of the figure.
Now here's where I got all impatient. The oil colours would take ages ( O.K. a couple of days ) to dry and I was really itching to carry on painting. So as I wanted to add a set of ivory coloured lines over the top of the brown ones, I thought a little laterally and used a brush dampened with white spirit to remove some of the brown paint, thus revealing the ivory colour underneath.
The resulting lines have speckles of the darker colour on them still, which is intended to imitate the slightly rough and homespun look of a woollen cloak. This process was rather time consuming, but at least I didn't have to put the model down !
Further to this, I could use the last of the darkest brown paint to add the thin lines to the cloak using a fine brush, so I didn't need to mix the colours up again - waste not, want not as they say. although with all this done I did have to eventually leave the model to dry, which did take a couple of days as noted.
Finishing the helmet and detailing the brooch
Returning to the model then, I coated the helmet with black oils straight from the tube so to speak, brushing this out fairly thinly. The majority of this being removed with a soft cloth, leaving traces of the black in the recessed detail of joints and rivets. Once this had dried I began painting in the brass areas. For these I began with Testors gold enamel, coating this when
dry with a mix of orange and brown ink.
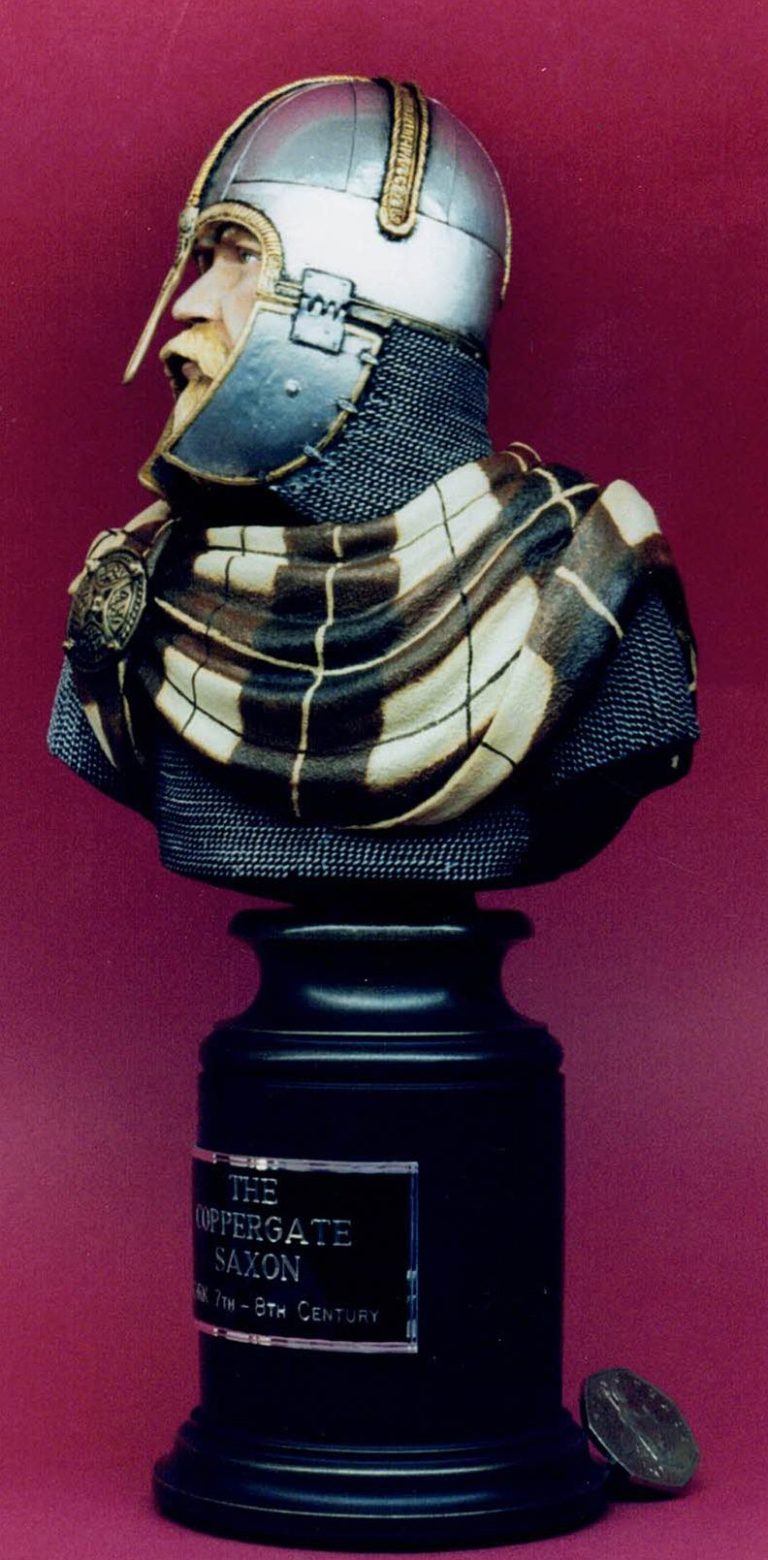
The details were then lifted a little by very lightly drybrushing with some more of the Testors gold.
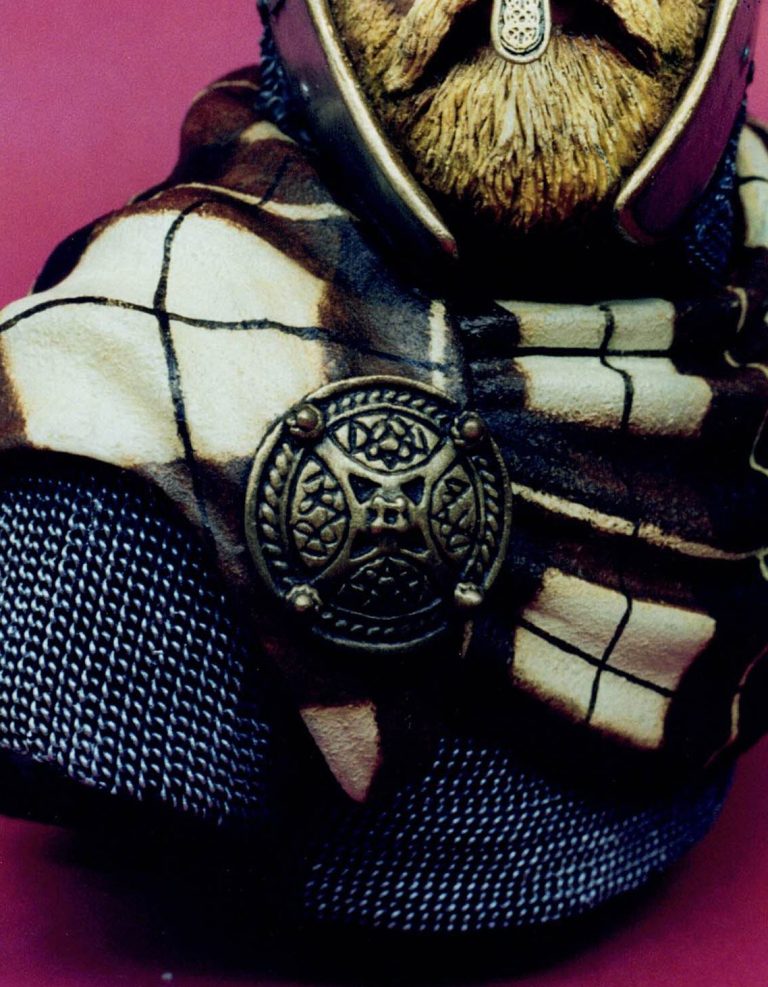
The final detail to add was the brooch holding the cloak. For this I raided my stock of Games Workshop metallics, surfacing with two colours - " tin bitz " and " dwarf bronze ". The tin bitz being used as an undercoat, which once dry was drybrushed with the dwarf bronze, final highlights being added with the tiniest amount of Testors gold.
That's all folks
All that remained to do was to paint the underside of the bust black, using a fast drying acrylic, and glue the nasal guard in place with a spot of superglue. Then I attached the base to the bust using a piece of dowel sunk and glued into holes in both bust and base, the glue used being waterproof wood glue. After adding a nameplate to the base the model was complete, I could sit back and admire Dave Gerretts' masterpiece.
O.K problems with the kit, the only slight niggle is the texture of the cloak which made my painting of straight lines weave, duck and dive a bit. But apart from that, what can I say. Well my left arm looking very similar muscle wise to Arnold Swarfega, painting this kit could save serious amounts of time
lifting weights in the gym ! Joking aside, hopefully you can tell that I was really impressed with this model when I saw it cost in bronze, and to paint it was a sheer joy.
The detail, particularly on the helmet, is beautifully rendered, the casting is faultless, and its sheer physical presence is eye-catching to say the least.
The price is probably going to floor quite a few of the modelling fraternity. But if you compare this to a 1/10th bust from some companies who market their wares in the £30 - £40 bracket, then perhaps the price will seem very reasonable indeed.
In addition to that, try having a word with someone who's into the large scale resin fantasy kits, particularly anything from the USA. They'll tell you that most busts of this size would probably be selling for £70.00 if not more. Personally I hope that Fort Royal Review sell enough to think of producing a few more in this scale, but as always the modelling public will vote with their wallets.
Just as a late addition, I've been talking to Dave since I wrote this article, and he mentions the fact that together with the bust you see here, there is a Viking bust that's already available, and two further busts - a Roman and a English Civil War soldier are also in the sculpting stage.
Can I at this point extend My thanks to for the initial talk at the Crewe show, Dave Gerrett for his trust in my painting ability, Tony Wilbraham for some information about the York Museums, and Pam Bruce of the Jorvik Museum for her help in locating and sending a most useful set of research material.

Main research - The Coppergate Helmet by Dominic Tweddle - This is a well recommended booklet which gives a background and numerous colour photos of the helmet. There's no ISBN number, but this booklet is available for £1.85 plus a first class stamp from the Jorvik Museum, Coppergate,York
Brasseys Barbarian Warriors By Dan and Suzanna Shadrake, this book mentions the helmet several times, and has a black and white photo of the helmet. ISBN 1 85753 213 9
We need your consent to load the translations
We use a third-party service to translate the website content that may collect data about your activity. Please review the details in the privacy policy and accept the service to view the translations.