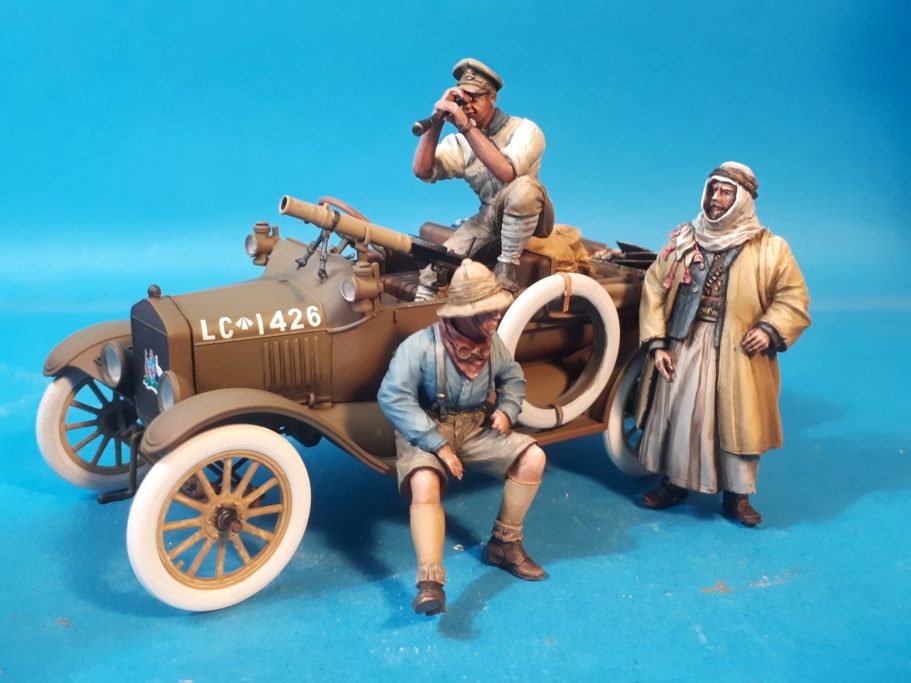
Model T Ford in Australian Service 1917
ICM Plastic kit with figures painted as a commission 2023

The Ford Model T has always been an icon of early motoring, Henry Ford’s idea of mass-producing a vehicle that would be available to as many people as possible was something of a game-changer in the early years of automobile design.
Although aimed at civilian use, the low cost and robust design soon came to the notice of armed services, and the ability to move small numbers of specialised troops from one part of a battlefield or war zone to another didn’t escape the minds behind changing tactics.
The Australian army adopted the Model T in what can only be described as an early version of the British Long Range Desert Group idea, although the numbers of cars were limited to six that were in service.

Initially the Australians had three marginally heavier armoured cars, but during WWI these became difficult to maintain, especially as they were deployed in a desert setting.
Instead of replacing like for like, six Model T’s stripped down to enable them to carry munitions and stores, plus one or two Vickers Machine guns, were bought as replacements.
The versatility of the Model T as a platform allowed for it to be used as a staff car as well, so it’s perhaps surprising that more of the cars weren’t bought in for LCP duties – Light Car Patrols.
As far as the Australian’s using the vehicles, they formed up the first LCP in Melbourne in 1916 as part of the Australian Imperial Force during WWI, at this point using three armoured cars.

As these became worn out due to their deployment in the hard deserts of the Sudan against the Senussi – an Islamic religious sect which had initially fought against the Italians since 1911, but had been convinced to fight alongside the Italians and Germans against the British. The six Model T’s were brought in as replacements for the defunct armoured cars, doubling the unit’s vehicular strength.
The six cars were given names – Anzac, Billzac, Osatal, Silent Sue, Imshi and Bung.
These only seem to have had a relatively short lifespan, as they were traded in for six new cars in the December of 1917
Back in the May of 1917 the unit had been shifted to Palestine and served throughout the campaign there.

In a similar manner to the British forces equipped with cars, the Australians performed long distance reconnaissanceand patrol duties. It can be noted that often the crews with their vehicles were a long way forward of the front line cavalry units, the relative speed the cars giving them the mobility to evade enemy units and bring back vital intelligence.
By 1918 the Australians with their model T’s reached Aleppo along with the British Indian 5th Cavalry, and were believed to e the furthest advanced Australian unit at the conclusion of the campaign.

The Model.
I’ve made a couple of ICM kits already, and to be honest I’m very impressed.
The parts are well made and cleanly moulded. Labelling on the sprues is clear and the parts can be removed easily without any damage. Some of the parts are very fine, and things like wire cover veins can probably be replaced as easily as carefully removing the kit parts if you’re as ham-handed as me.
I say this because although this particular version of the model T doesn’t have a canvas roof, one of the other versions does.
Photo #1 shows the box art for this kit, as supplied by the fellow commissioning the build,

and photo #2 shows the three kit combination that I bought because I enjoyed making the single version so much.
Maybe I should stop there and just leave you with the photos, because really that does sum up my feelings about this little kit – so good ( OK I didn’t buy the company but ) I did go out and buy the more expensive three-car package.
No ? You’re not going to let me get away that easily ?
OK then, fair enough.
Let’s begin then.
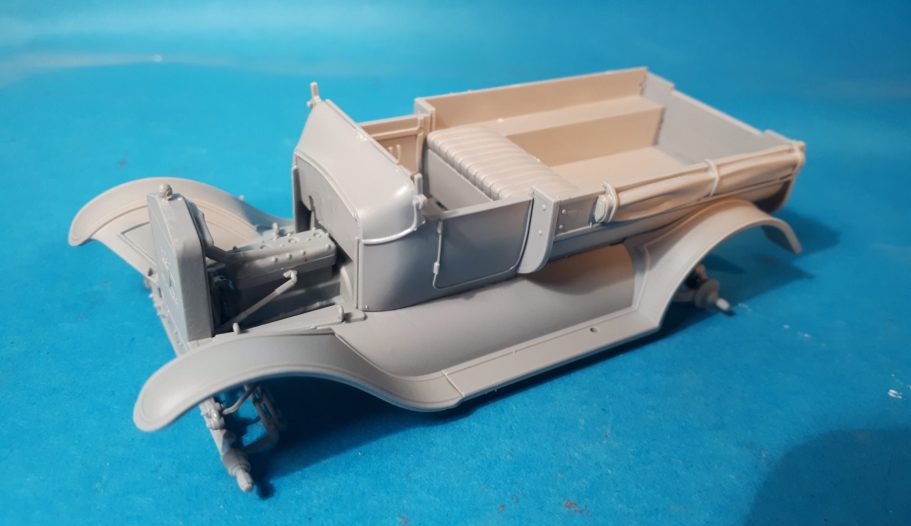
As I’ve mentioned, construction is very easy and photos #3 and #4 show a partially assembled vehicle. This shot is a little deceiving as the rear bed of the car is not glued in place. I’d left off the steering column and steering wheel, the Vickers machine gun and the hood as well, these all being painted separately and glued in place at a later time.
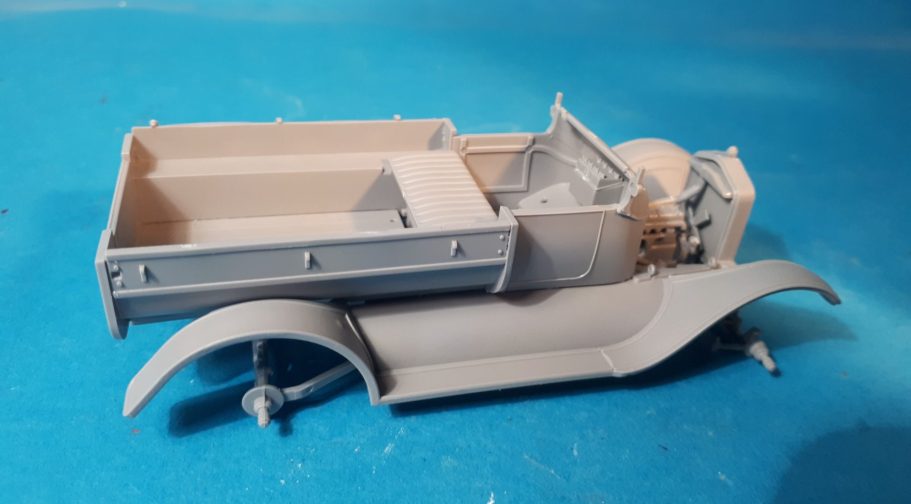
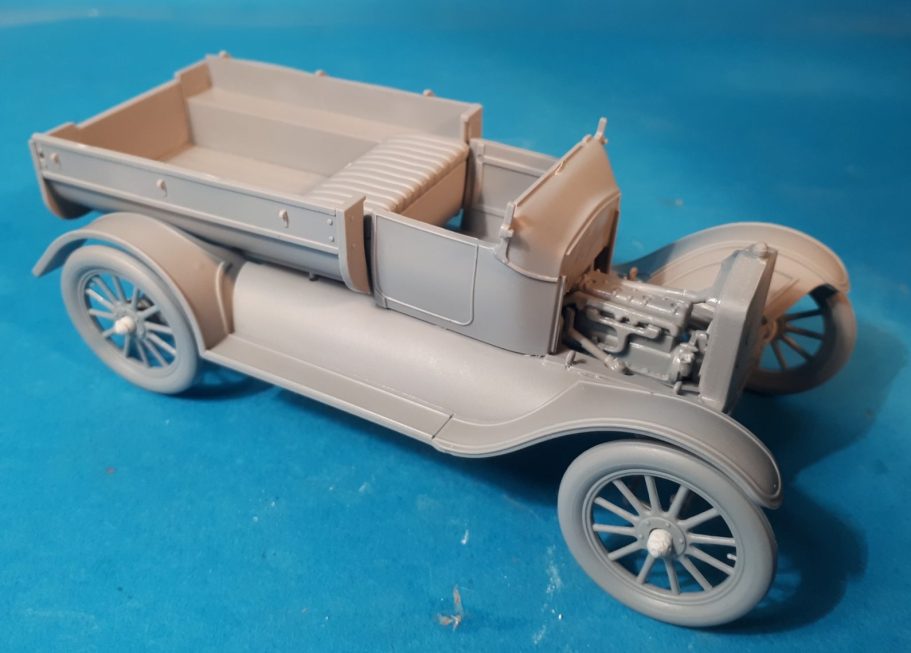
Photo #5 shows the car with the wheels temporarily in place – Blu-tac is a wonderful thing – and again these would be left separate to allow painting to take place.
One small disappointment is that the kit does not allow for the modeller to fasten the wheels in anything but the “straight ahead” position. A small amount of surgery would be necessary to change that, and I will be seeing what I can do on the kit I build for myself.
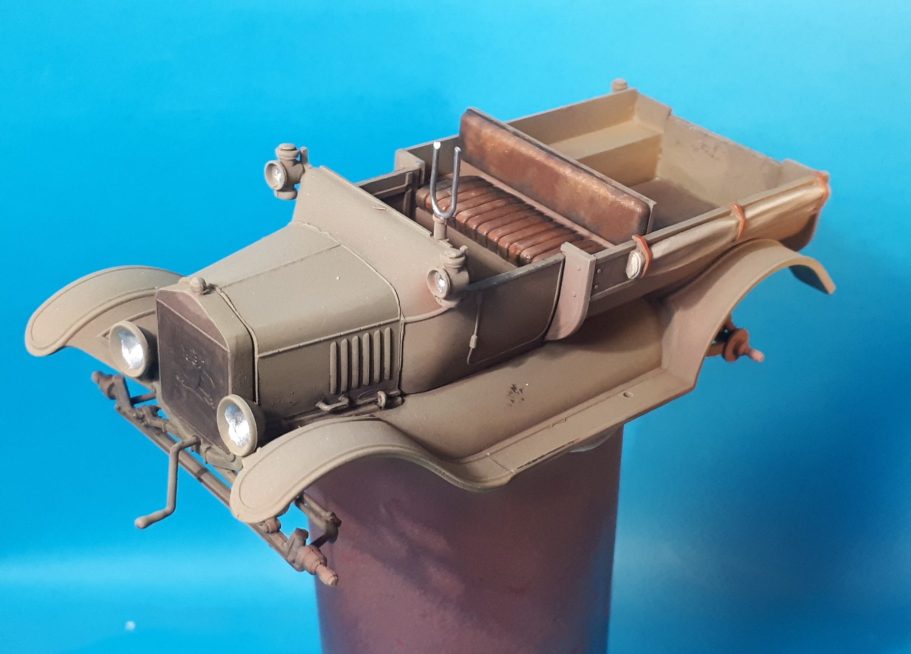
Photo #6 and the fun has begun. Painting !
I actually began with a black primer rattle can coating the underside of the vehicle with a couple of thin layers. Then a grey primer was sprayed over from the top at a slight diagonal angle to catch all the upper surfaces and some of the sides.
Once fully dry I added a layer of Tamiya Desert Sand to the upper areas and sides of the vehicle, allowing the dark primer to show through a little bit and accentuate the shadows. I used a thin layer of Tamiya Deck Tan as a highlight sprayed from directly above the car and then left the paint to dry fully in the drying cabinet overnight.
In this picture I’ve also painted the leather seat covers with oil paints, starting off with Burnt Umber, lightening that with Mars Brown, then some Light Red and finally adding wear and scuffs from Mars Yellow and Buff Titanium.

Photo #7, and a view of the rear of the car at this stage. The canvas cover on the side panel of the cargo tub has been painted using Vandyke Brown oils as the deepest shadows, lightening it with Buff Titanium and then Titanium White. The straps are painted with the same leather colours as on the seat.
You might also notice the “U” shaped holder for the Vickers machine gun. The kit item seems to be simply arrest for the gun to help the soldier steady the gun whilst using it rather than a fixed mount with a gimbal fixture for tilting the gun and bringing it to bear.
However, at some point during painting, the “U” shape of plastic parted company with the upright stand and the Carpet Monster got it, never to be seen again.
So what you see here is actually a soft length of wire, bent into shape around a paintbrush handle and glued in place with superglue. The upright tails of the “U” are too long, but they can be trimmed with some side cutters later on.
The chap commissioning the car had also supplied some resin aftermarket stowage to go in the cargo area. I wish I know where he’d got it from, because it’s rather good – an old suitcase, some fuel cans, ammunition pouches for the Vickers and food crates; there’s even some plates on there – how very civilised !
So although I painted on a thin wash of Vandyke Brown to push out the wood detail of the deck in the cargo area, I wasn’t too worried about making a meal of the details.
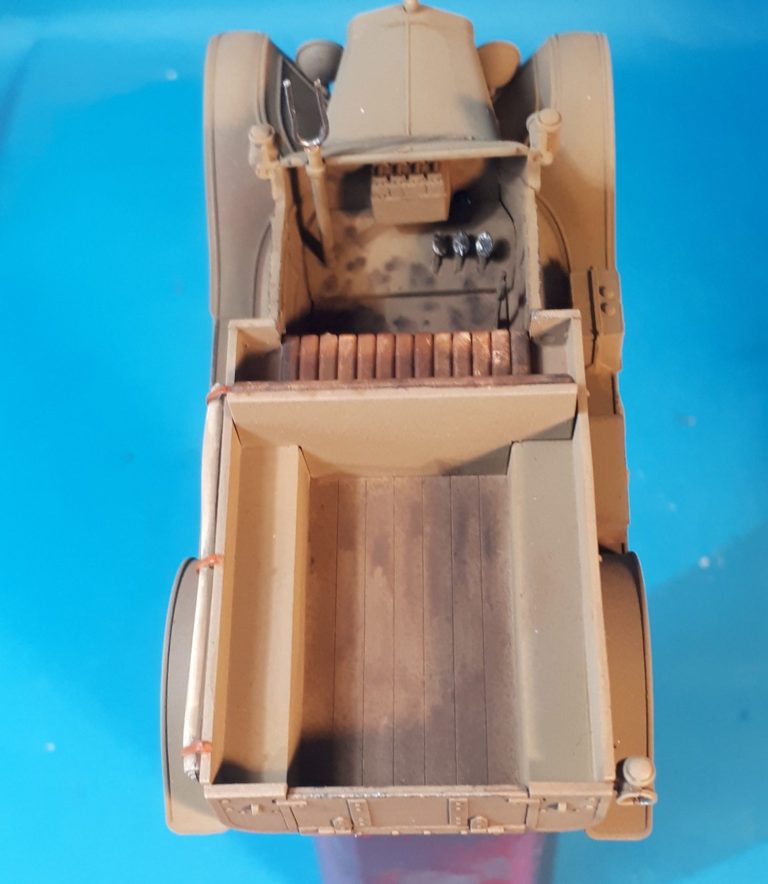
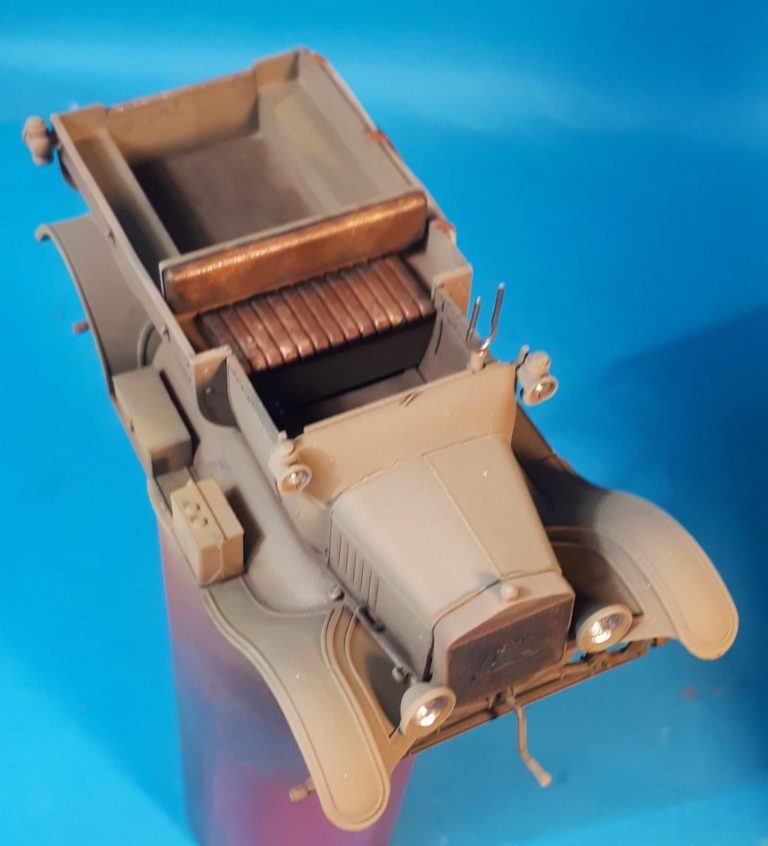
Photo #9 I don’t like clear parts, I struggle not messing them up, although I’m getting better at using them. In this case there are several lenses in clear plastic for the headlights, some side lights at the side of the crew compartment and a tail-light. I coated the inside of each headlamp with Molotow Chrome lacquer, and at the stage you see it in this shot I have yet to add the clear parts using clear PVA glue.
Photo #10 and the clear parts are in positions, and without any problems either.
I’ve run a thin coat of Mars Black oils over the radiator grill, mixing about 8 parts of White Spirit to 2 parts paint.
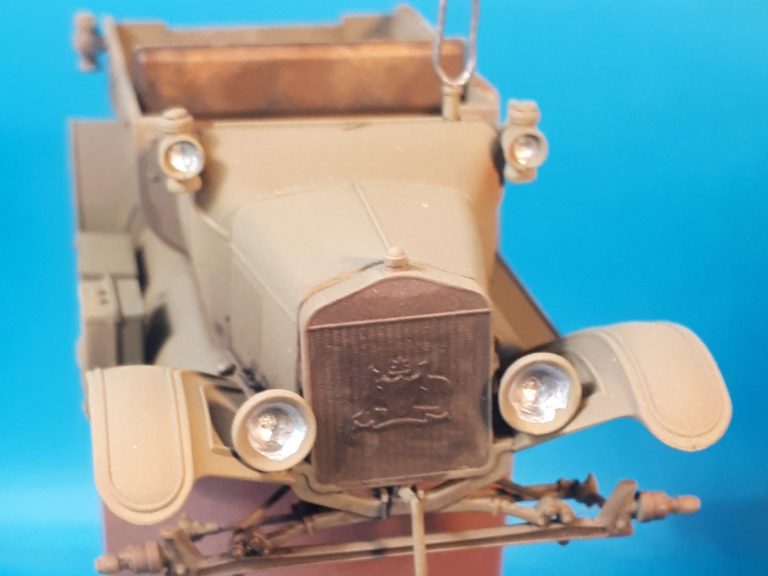

Photo #11 and the colours look a bit flat and lifeless somehow. Although it would darken the overall colour of the car, I opted to add a thin wash of Vandyke Brown over the whole vehicle, bringing out the surface detail and adding some life to the painting overall.
Prior to this I used a small piece of sponge to add some very restrained chipping to areas of high wear – the top edges of doors and the side steps. The tailgate also got the same treatment, but to be honest very little can actually be seen of the two different silver colours I used to do the chipping once the oil was had been added.

In the final photos I’ve added the Vickers machine gun, having forgotten to paint the barrel shroud with the sand colours to match the car. This was soon rectified though.
You might ask “Why the white tyres ?”
Well, I feel there’s a little confusion here. Rubber tyres were initially white when first used on cars in this era. It wasn’t until someone thought of adding charcoal to the rubber liquid before galvanisation, that tyres became the colour we think of them nowadays, i.e. black.
So the box art shows white tyres, and some of my references show white tyres, even on restored examples. Granted the restored examples aren’t pure white, more of a very pale buff colour, but even so, they’re not black.

However, I’ve seen a few models done with black tyres, so maybe they’re right too.
I’m going with the white tyres though – they look different and somehow give the model a cool look.
To paint the wheels, they were put on BBQ skewers and sprayed with three coats of White primer, then the sand colour added to the spokes and rims with a conventional paintbrush.
It was at this point that I added the hood and rear body, gluing them in place and finding that the small loops at the side of the front mudguards foul the location of the hood.
“That’s a pain” I expresses calmly…… Honest !

With a little bit of levering, tongue firmly in cheek, some mild cursing and gentle persuasion, the hood goes in place to hide all the work I didn’t do adding details to the engine.
The Vickers gun was glued in place, the steering column and steering wheel and the spare tyre on the side – all located positively without any “fettling” necessary.
Decals were added – these are very good and settle into place well, although I did use Micro Sol and Micro Set to help them along. The crest on the radiator grill is particularly colourful and well detailed.

Weathering…… yes, I haven’t mentioned it, because I haven’t added any. The chap that commissioned this from me also gets me to paint a few 1/35th scale figures, and he then makes dioramas, usually with vehicles or aircraft that he’s assembled and painted himself.
So I wasn’t too sure what scene this would be put in and I know he’s got the skills to add the weathering himself to whatever degree will make the model sit seamlessly into a diorama.
I painted the stowage and glued that into the cargo bed, and it does look very effective there.

Final thoughts
As mentioned near the beginning of this article, I enjoyed the construction and painting of this so much I bought the set of three cars for myself. Hopefully ( ha, ha ) I’ll get one put together this year, and maybe put it into a small setting.
We’ll have to see about that.
The ICM kit, like the other two I’ve done, are really good, not excessively pricey, and return a pleasing representation of the real vehicle.
I feel confident in recommending them.
But hold on, there's more......

So yes, I’ve got a second one put together and painted, but with a couple of alterations.
It seemed a bit of a waste to have that nicely detailed engine under the bonnet and not be able to see it. So whilst I was on making the same model for myself, that was one area that needed looking into.
Photo #12 is a picture of a real Model T engine, unfortunately from the opposite side to which I’d open up, but it does show how simple the engine is in comparison to modern cars.
The main things that would be visible were the HT leads for the spark plugs, and these would need adding – from some stretched sprue, glued into place on the top of the engine and leading away to the bulkhead.
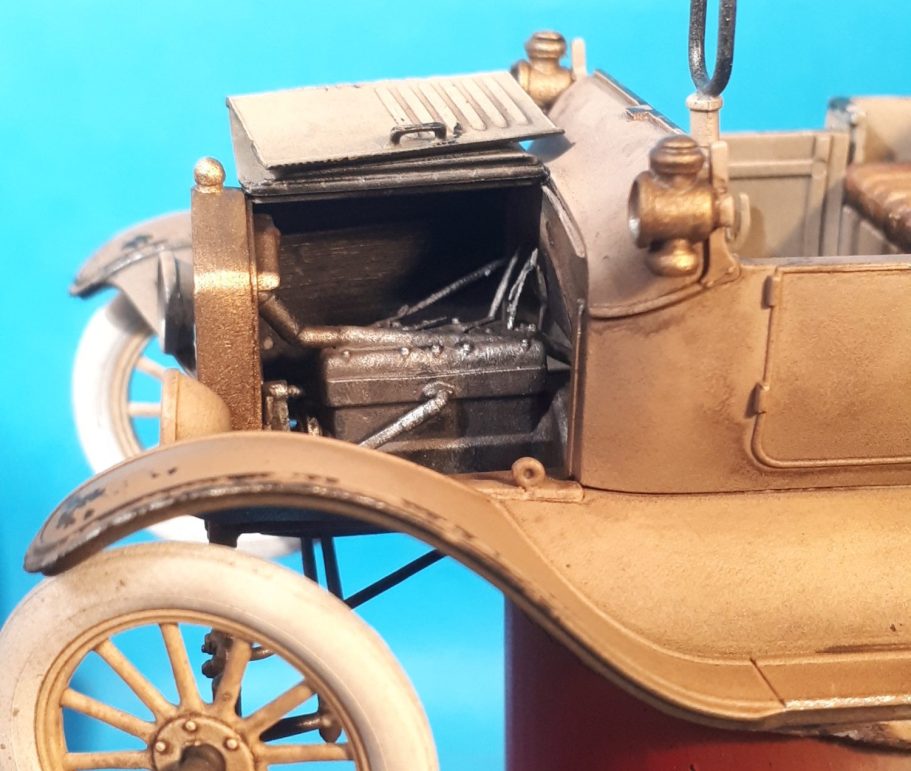
Photo #13 shows the model assembled and painted with the engine bay opened up.
A bigger problem was the folding bonnet.
Whilst it comes in two pieces, they join along the central upper hinge, and I would have to cut along the side hinge in order to have one side folded back.
Once cut, it was also necessary to thin down the edges of the plastic to imitate the slim edges of the sheet metal used to make the bonnet sides on the real car, then glue the two pieces together and add another section of stretched sprue along their joint to look like a hinge, adding the separations of the hinge with a sharp scalpel blade once the glue had nearly dried.

I had toyed with the idea of scribing out the vents, and although their lack on the inside of the right hand bonnet side are visible in this shot, their omission is very difficult to see without a magnifying glass and a torch in real life.
Photo #14 kind of proves this, and whilst the engine bay doesn’t appear to be particularly “busy”, it’s accurate enough to suit me.
Also visible in this shot, and with the painting done, my thoughts prior to painting turned to what colours should be used – obviously the same or similar to the original commission piece, but what about a little bit of wear and tear ?
Henry Ford is famously quoted as saying that “You could have the Model T in any colour you liked, so long as it was black”. So if there was any wear of the paint, surely some black could show through before any bare metal……
So the model was sprayed with grey primer, then gloss black, both from an aerosol can. Marmite was allied with a fine sponge, and then the sand colours sprayed on. Letting the model dry for half an hour – brew time and a biscuit – it was then washed in detergent and with a soft brush to remove the paint covered marmite.
Again letting the model dry, a couple of different metallic silver colours were spotted onto the black areas that looked like paint chips, showing where the paint had completely work through.
Another alteration was to drop the tailgate. This was very simple, as the tailgate itself is a separate component within the kit, ad glueing it in the open position was simplicity itself.
Photo #15 shows the tailgate painted along with the wood floor of the cargo bed.
Unfortunately, a lot of the cargo bed will be covered by stowage, but just in case there are sections of it visible, I thought I’d best paint it properly in case.


I’ve managed to get a couple of accessory sets from the Verlinden range, one of which was a selection of closed-up wooden crates, and another one that was crates of foodstuffs. Both will have some items from each kit used, plus a set of wicket cases from Vellejo Scenics that I spotted on Ebay. I was actually looking for a set of 1/35th scale suitcases, but no-one seems to do the ones that I was looking for with the strengthened corners and leather covered panels.
Photo #16 shows a top view of the wood cargo bay and a well used leather seat, both painted in oils.

Whilst the commission Model T had several figures going with it – seee photo #17, I wanted to enter my version in a car class, and so only needed a single figure to go with it.

Said figure can be seen in photo #18 and is from Ian Hanratty’s “Wee Pals” range of figures. If memory serves, this is a sculpt from Pete Morton, and whilst quite old ( possibly 20 years or more ) it’s still a very good figure.
I painted a similar one cast in White Metal, this one is in resin though. It takes a little clean-up, but the extra time spent on it is well worth it.
Again a change was necessary – the figure depicts a British soldier, and I wanted one that looked distinctly Australian.
To my rescue was of course that fine fellow, Roger Saunders of Hornet Miniatures, his range of replacement heads including a set of Australians.
The one I chose to use is shown in photo #19, although there’s not a bad one in the whole set.


Photo #20 shows the shorts with paint on, it’s still wet and needs time to settle and dry out, being a mix of Vandyke Brown, Mars Yellow and Buff Titanium oils. The tip of my thumb gives an idea of the figure’s size.
There’s a lot of detail on the trousers and shirt, so whilst the shorts look OK at this point, there will be some selected washes required to bring all the detail out.
Why paint the shorts first ?
Well, the arms would get in the way of painting the shorts and belt, so painting the shorts first, then the belt and pistol holster, then the flesh areas including the bare arms and face, and only at that point add the arms and paint the shirt. The head will be left off until the very end of the painting process.

Photos #21 and #22. Once the belt, shirts and flesh areas were painted, I could glue the arms on and paint the shirt. I wanted a paler colour than the shorts, although I was tempted to paint it blue – maybe I’ll do that if I do a figure for one of the other cars – but having decided on an off white colour I used an undercoat of MP paints Coffee, and then mixed up Buff Titanium Oils with a spot of Burnt Umber, and painted the whole shirt. I added a little more Burnt Umber under the arms and some of the deeper creases, and then blended the colours together with a small soft brush.
Lightening the initial mix with some Titanium White, I began building the mid-tones, again using the small brush to blend the colours into smooth transitions, and finally pure Titanium White was used to bring out the highlights.
I drilled a very small hole into his right hand between the forefinger and the middle finger and used some white stretched sprue to make a cigarette. It’s easiest to use a piece that’s about 5cm long, fasten it in place then trim it down to the appropriate size, rather than cutting the sprue to size and then trying to fix it in place. The tip of the cigarette was painted with a little red acrylic, followed by some orange, and finally a couple of mixes of black and white to make a couple of different shades of grey to represent the ash at the tip.
Socks were painted a pale green, and bands of paler paint put on the upper sections to look like ribbing, and the boots were painted with more of the MP Coffee coloured acrylic and then given several thin washes of Burnt Umber oils to make them look dusty and worn.


Photo #23. Whilst the figure dried, I could have a look at the stowage that might go in the back of the car. This is a mix of some parts from an old Verlinden set of foodstuffs along with a couple of pieces from the Vallejo set of wicket cases.
I used the two middle sized ones from the latter set, the largest one seeming too big for one chap to man-handle, and the smaller one looks more like a businessman’s briefcase.
Both sets are really well detailed, and I can see me using more of them in the future on other projects.
Painted up here are various wood boxes, a sack of potatoes, some trays of vegetables and fruit, a lot of wine bottles and some food cans.
It won’t all fit in, and I need to paint up some weapons to put in there too, and maybe a folded tarpaulin as well.

At this point I wanted a small base for the car to go on and decided on a small Olive wood chopping board. There’s be enough space for the car, the figure, some unloaded rations and the nameplate without it looking too crowded, but also being small enough to be transported easily to shows.
I decided on a very simple groundwork, using chinchilla sand ( sometimes called Chinchilla bathing dust ) which is very fine and can be put on the plinth and then have Superglue dribbled onto it to fasten it in place.

The final shots show the car etc all in place, some of the stowage having been unloaded, some pulled to the back tailgate to be picked up next, and some still in the cargo bed.
Final, final thoughts.
The Wee Friends figure did need a bit of attention to clean it up, but the sculpting is sound and once sorted it’s a really nicely detailed model.
I was lucky with the stowage, getting these sets within an auction lot, and I’m sure that whatever I haven’t used here will come in at a later date.
All in all, a very enjoyable little project, and one that I’m pleased with the final result.


We need your consent to load the translations
We use a third-party service to translate the website content that may collect data about your activity. Please review the details in the privacy policy and accept the service to view the translations.