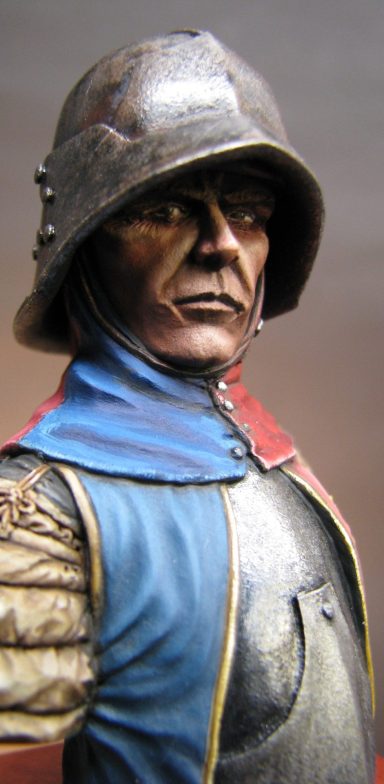

War of the Roses Billman
A 1/9th scale Resin bust from Elan 13 Miniatures
Painted in 2012
Velit expetendis omittantur sed ei, sit suavitate deseruisse sententiae ex. Ne omnium mentitum sea. Hinc interesset usu no, id nec autem quando sadipscing. Vix quem errem malorum et, elit labores reprehendunt ut usu. Nullam ornatus legimus est ei, denique intellegat ex est.
History.
The War of the Roses was fought sporadically over many years, the cause of it due to dynastic rivalry for who would occupy the throne of England. The main characters on the stage of history were members of the Houses of Lancaster and of York - both branches of the Royal house of Plantagenet.
Although there was some fighting linked to these civil wars both earlier and later, in the main it is accepted that the main battles took place in the thirty years between 1455 and 1485.
During those thirty years, the fortunes of both these minor houses of the Plantagenet line rose and fell, with many deaths on various battlefields thinning out the possible claimants to the English throne.
The death toll to the common man must have been high too, as the levies of peasants forced into the front lines would be used and abused like pawns on a chessboard. We do have long lists of names for the leaders and their sons who fell, and it seems that from the first major battle at St Albans in 1455, most of England seems to have had it’s part in this fight for the crown.


A lot of those names have stuck with us through the years – John of Gaunt ( we’ve two pubs in Lancaster named after him ), Richard the 16th Earl of Warwick ( probably better known as the “Kingmaker” ), Richard of York ( earliest contender for being the chap in the “grand old Duke of York” nursery rhyme ) to mention but a few.
In fact so involved and so many were the clashes during those thirty years, the to-ing and fro-ing where losers sailed off to temporarily gather their forces and strength in France or Ireland, that I could fill several pages here. So I’ll not bore you with all that, Wikipedia is just a click away on the computer, and there’s several good reference books available on the history of these battles.
One thing worthy of note was the use and adaptation of arms and armour.
With particular reference to the fighting man – the one on foot and really at the pointy end of things……sometimes just for a short while.
Because the common way of gathering a fighting force was still to gather levies from the peasant class, the tendency to have them armed with farm tools ( sharpened a lot ) was pretty common. The development of these basic tools – pitchforks, scythes and of course axes – into more elaborate weapons was a logical step forward.
Armour became simplified too so that it could be produced more easily, and thus cheaply. Mail became a thing for the rich, and plate armour a lot more common. Helmets of single piece construction, or riveted pieces took over from the multi-part great-helms, and with easier construction, the lower classes got to wear bits of metal on their heads and body to go some way to stop them losing bits or having gashes and gouges taken out of their faces…..well helmets helped a little. It probably still made your ears ring for quite some time if you got battered over the noggin with a knights mace.
As with all war, man developed new and interesting ways in which to try and kill his enemy. And whilst doing that, he also tried to think of ways of stopping his enemy doing the same to him.
Although a polearm is not seen in this kit, the model is of a billman, and he would have been armed with some form of pole based weapon along the lines of a spear, but with so many variations once you get to the shape of the metal and what it was derived from.
Take the Halberd – basically an axe head welded onto a spear, and developed so that the spear became a beefed up stiletto in some cases.


The Billhook – initially a cutting instrument like a thick bodied sickle, but developed to have in some cases a proper hook to help unseat mounted enemies and again that stiletto-like point to wheedle in between an enemy’s armour.
Both the above evolved from farm implements and changed to form an effective means of keeping enemy soldiers ( either on horseback or on foot ) at more than arms length. It’s worthy of note that even such terms as Halberd and Billhook had several different designs and forms, that should the modeller feel the need to add such to this kit, there’s some latitude to what design can be chosen, although sound references should be taken into account.
The model.
I’m going to let the pictures do a lot of the talking here, mainly because I have a direct interest in this piece, it forming part of the Basement range of kits that I’m part owner of. The thrust of the article really is about painting, and me sitting here typing compliments about something I have an interest in selling would be seen through straight away.
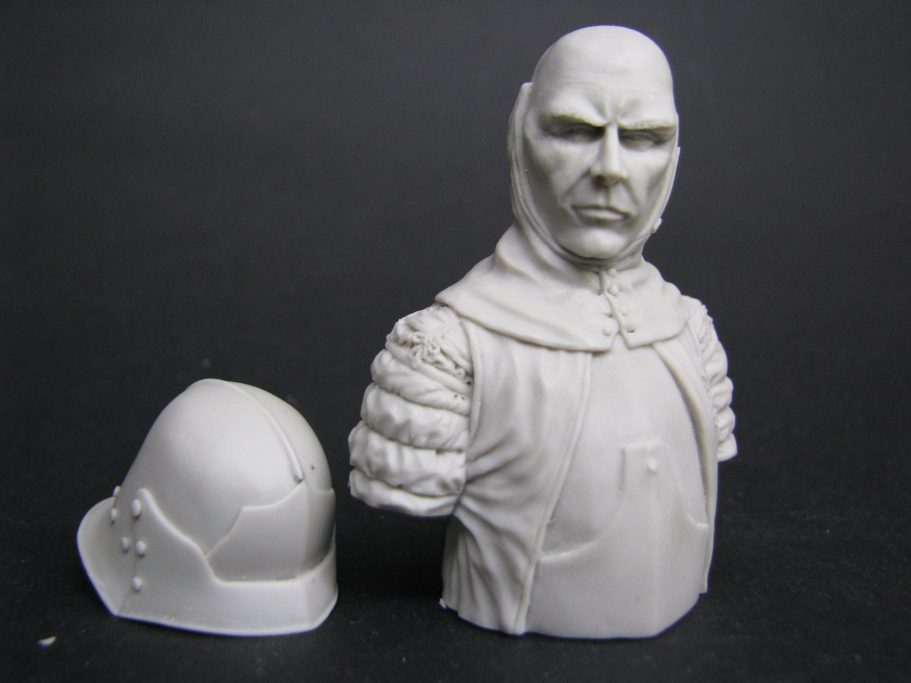
With all that declared, the model is cast in resin, there’s two parts and I believe that the sculptor – Rob Lane - knows what he’s doing and pushes putty about rather well.
I’ve supplied two shots here – strangely entitled photos #1 and #2 - of the bare resin pieces so you can see the back and front before I go and daub paint on it – well, you’ll be able to make your mind up about things better that way.
So, having said all that, I’ll get some colour splashed about.
Painting.
Ah-a…the bit I’m going to write about properly !

There’s been discussions lately on the online forums about the different media we use to paint our models. I’m firmly in the camp that will blatantly use or misuse any given means if it’ll get me the effect I want.
With that in mind, I’ll run through a couple of methods here that will cover oils, airbrush and problems with undercoats, and throw in for good measure something very obvious about the overhead lighting technique that a few folk seem to have missed.
Added to that ( what money’s worth you’re being given here ! ), I’ll even mention why I paint things in a certain order, and also why it’s beneficial to have skills with different media, rather than just concentrating on being really good with just one.
So to begin with, being that this model has armour, I think it’s better to paint the metallic areas first. So I did just that.

Painting Metals ( part 1 )
Metallic paints are a paint – there, I’ve said it.
Well they are. The paint whilst wet is fine, but when you wash the brush, flecks of the metal stay in the water or white spirit and stick to whichever brush you dip in there next…..then they mix in whatever paint you’re using and go onto the model. They also stay in the brush and again go right onto the model the next time you use that brush, usually where you don’t want them.
Oh and just to add insult to injury, if you get them on the wrong bit of the model, they have a habit of showing up in the next layers of paint, or just transferring there once dry because you handled the model.
But, even though I don’t like them, there’s not many things better for depicting metal areas of a model that metallic paints.
To get around all of the above, the modeller needs to do a couple of things, oh alright, four
- 1. To identify and use a brush or set of brushes for metallic paints, and to keep them separate from the rest of his or her brushes.
- 2. Ditto the above with cleaning fluid. Simply put, you have separate jars of water or white spirit for cleaning “metallic brushes” from those used to clean brushes that are used for flat colours.
- 3. Seal all areas touched by metallic paints – yes, even if you didn’t really mean for that particular area to get paint on it, and you cleaned it off the best you could using thinners and your best T-shirt !
- 4. Paint all metallic areas, where possible, before any other areas are tackled.
So, here’s a simple process for doing worn metal that I got off a chap called Lee Amey recently ( thanks Lee ).
First off I primed the bust with a flesh coloured acrylic, mixing the first coat with some Isopropyl Alcohol, that was enough to give the next coats of paint a good foothold on the resin, and photo #3 shows that I’ve added a couple of layers of Chaos Black acrylic to the breastplate.


Once dry, silver acrylic paint ( in this case GW’s Chainmail )can be added with a fine sponge ( think of the stuff that Pegaso and Andrea use as packaging in their kits ). The finer the sponge, the more detailed the effect, and for areas to look like anything from cast iron to finely hammered steel, this is a method that can work out to look very effective on large scale kits or busts. Photo #4 shows the results, and the method is simplicity itself. Just put some paint on the sponge, dab most of it off onto a tile so that you can recharge the sponge when necessary, then gently stipple over the area you want to paint, working mid-tones and highlights onto the black as you go.
It can be left at that, or……
Photo #5 shows how I’ve used a damp brush ( in this case I was using GW Chainmail, so the brush had been dipped in water and then dried off on some kitchen roll ), to gently stipple the area and soften the effect a little as the breastplate would have been smoother than the cast effect initially given.
Then some more very fine stippling was added with the sponge and deeper shadows added with some Mars Black oil paint. Finally once all that had dried, a couple of coats of Tamiya Smoke were added to deal in the area – photo #6
Whilst it doesn’t look like polished plate armour that you see on most re-enactors, I was aiming for a poorer man’s piece of equipment – something knocked up quickly in a blacksmith’s forge, and with enough imperfections, followed by some amount of abuse and poor maintenance by the owner that would lead to a less than well kept piece of kit.


Painting faces – the quick version
Well, I’ve run through it quite a few times, and really I’m only repeating myself, but I’ll justify one comment I made some time ago about the overhead lighting technique.
Photo #7 shows the face with its initial coat of oil paint. This has been painted on over a couple of thin coats of GW Talarn Flesh acrylic ( as can be seen in photo #6 ). The oil paint consists of about 3 parts Mars Brown and 1 part Titanium White and it’s painted over the whole of the face, paying particular attention to any areas that will be in deep shadow – under the nostrils, under the chin, under the brow ridges…..there’s a pattern to this I feel.
Once coated, a clean soft brush is used to remove a lot of the paint, once the undercoat begins to show through it’s time to stop working with the brush, although regular wiping of said brush on a soft, dust-free cloth will help to get the paint off the surface of the model. Once I get to the point that I can just begin to see the undercoat through the oils, I then just give the brush a final wipe on the cloth and then gently stipple the whole of the area ( in this case the face, but it’s the same for the hands or any other area of flesh being painted ) to even out the thickness of the paint and also to leave a uniform finish.
This is the stage that is shown in photo #7.
Now, the next thing to do is to start to add small spots or lines of Titanium White to the face, and to do this in areas where the light will hit the face.
With the overhead lighting technique, the theory runs that the main light source is directly above the object being painted.
That means that upper surfaces will be light, vertical surfaces will tend to be mid-tone and surfaces underneath overhangs will be in shadow. There’s gradations of all the colours due to compound curves and deeper recessing over the contours of a face, but the theory is pretty much sound with three colours – one light, one mid-tone and one shadow.
Now, without being too longwinded, I build up the mid-tone areas using small additions of the white, then stipple with a soft clean brush to blend the colours together. Wipe the brush that’s doing the stippling VERY often and also wipe the brush applying the white, so that both are clean each time they return to the model after painting a small area, but do not use thinners at all.
Gradually, by adding more white to each area I can work through to highlights that are almost white, and because I wipe the brushes regularly, as much paint is removed from the model as I’m putting on, and because of this, there’s no real build up of paint, just a gradual change in the colours.


Now I haven’t mentioned where to add the colours. That I’ve left for you to work out, but it’s simple really.
Take a look at photo #8, which is a view looking at the top of the busts head.
Nothing but light mid-tones through to highest highlights should be seen from this view. This is simply because the light is falling from above and will hit all the bits you can see here – simple, eh !
Likewise, if we turned the model to look up his nose ( not that we’d want to see what’s up there ), but from that angle we’d be seeing nothing but darker mid-tones through to deepest shadows. Still simple, yes ?
Right, so that’s overhead lighting sorted, and I know that you’re all saying “Adrian, the figure’s left cheek in photo #8 has a bit of shadow colour still on it.”

Good spot folks, you’re quite right, and that’s why you turn the model in this way, you’re checking that where the light falls is where you’ve put the paint. So, in photo #9 and photo #10 I’ve corrected it. But thanks for spotting that for me…….I was just testing, honest.
Now, there’s nothing absolute, nothing is simple, so the above is just a rule of thumb, because of course there are exceptions. In fact this bust is one, and it’s why I’ve chosen to show this method on this piece.
The bust, as you might have noticed, being discerning and observant readers, is wearing a great big pudding bowl of a ‘elmet !
Something like this is apt to cause the odd shadow or two, so returning to photo #8 you might notice that the nose and nasal flares are somewhat lighter than say the cheekbones or the brow ridges.

What I’ve done here is compensate for the helmet causing shadows and whilst I want to give the face depth and character by using different contrasts to emphasise the sculpting, I also want to paint the face to be shadowed by the brim of the helmet.
By lightening the nose and nasal flares, I’m painting in a cast shadow on the rest of the face. It’s not difficult to do at all, it’s just a case of thinking what any headgear is going to do regarding blocking light from the subject’s features.
And to prove the point, photo #11 comes along to show what I mean with cast shadows.
Also at this point you’re going to mention that I’ve sneaked around and painted the helmet whilst you weren’t looking…….Um there were problems with that, which I’ll come back to later in the article. Well, I’ve got to solve the problems before I can go telling you about how it turned out all fine and dandy.

Clothing – with oils
Now here’s a little problem I came across, maybe not for the first time, but certainly in it’s worst case, and that was all to do with getting the clothing to be matt rather than glossy.
It’s an age old problem with oil paints, and one that puts many people off using oils, the fact that they don’t dry completely matt.
It’s a fair accusation, and there’s lots of ways around it that have been written about over the years.
My method to get around it tends to be doing one of four things ( sometimes all four, sometimes not – depends on the colour ). Red’s and blue’s are about the worst colours for being shiny once dry, so in this case I’d use all four methods to tackle that.
The first thing I do is to add a small amount of Tamiya Flat Base ( X21 ) to the acrylic undercoat. This makes the undercoat colour dry very matt, and will allow the maximum amount of the oil carrier from the oil paint to seep into the undercoat, thus helping it dry matt.
The second thing to do is to squeeze out a small amount of oil paint onto a section of paper plate and go and make a cup of tea. The cup of tea has no effect whatsoever on the overall effect, but I like tea, and the time taken making a brew allows the oil carrier from the paint to soak out onto the section of paper plate – see, a reason to drink whilst painting !
Although I can only advise tea or coffee – anything stronger makes my straight lines go squiggly.
The third thing to do is to add a small amount of Humbrol Dullcote to the oil colour mix being used. Again, this will affect the paint as it dries, hopefully adding to the effect desired.
Finally, put the model in a warm place to dry, I use a drying cupboard made from an old kitchen unit and a low wattage tungsten filament bulb – 40 watts maximum, and left on whilst I go to sleep, go to work etc.

This method usually works fine, but I had lots of problems with the blue, not that it went glossy, but that it was drying so darn quickly that I didn’t have the time to blend it properly. Simply put, it was drying almost immediately, and when more paint was added, it was just bunching up into a thick, mud-like goo that didn’t want to blend with any previously applied oil paint.
The cause I think was that I’d added too much of the Tamiya Flat Base to the acrylic and that this, added to the fact that I’d soaked out a lot of the carrier and added a bit of matt varnish was just too much for the oil to take.
I took off as much of the offending clumps of oils that I could with a brush dampened with white spirit and allowed the model to dry overnight.
So in photo #12 you can see the second rate painting effect on the blue areas of the clothing.
However, the eyes look rather good I feel, so all was not lost.
After getting on better with the red and blue areas, allowing them to dry thoroughly, I decided that it’d be a good idea to paint the pale coloured cloth on the sleeves with an airbrush.
Yes, this would have been much simpler to do before the red or blue areas had been done, but the problem with light colours is that if you get some strong colour spilt onto them, then there is a good chance that the colour will stain the pale area, and I can’t very well use Vanish to make them go away – no matter what the television advertising would like you to think.
So, doing the light area last was something I’d have to get around.
Blu-tac – it’s a wonderful invention, and whilst it’s very good at making sure my models stay in place in the boxes I take to shows, it’s also a very versatile as a masking medium.
I learnt this of a guy who did aircraft years ago, and the simple method is to put Blu-tac over the areas that need masking, pressing it in with a soft plastic tool – I like to use one of the paint shaper tools that some of the sculptors make use of – and in this way the Blu-tac can be made to conform to just about any shape, no matter how complex – see photo #13.
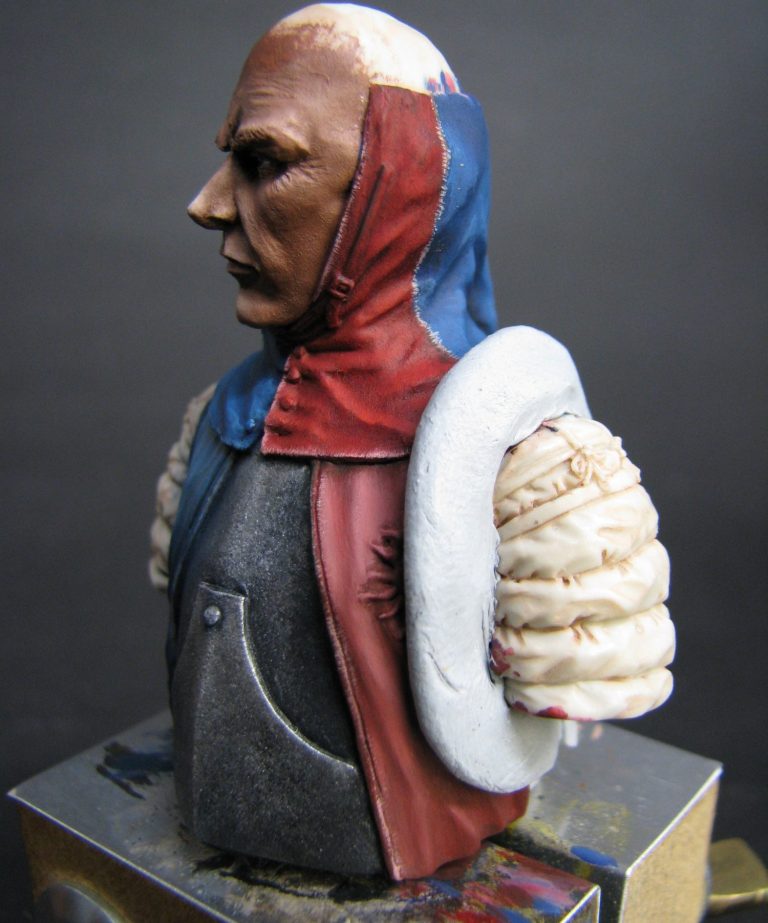

That masks off the area next to the one to be painted, for covering the rest of the model that doesn’t want spray painting, I tend to use sheets of notepaper – see photo #14 ( where’s the model gone, eh ? It’s almost a kind of magic ).
With only the part of the model that’s to be painted on show, it’s a simple case of airbrushing on various shades, starting off dark and working through to a highlight.
I tend to use acrylics thinned with Isopropyl Alcohol, and a full-face mask of the filter type, which hides my ugly fizog, not to mention keeping my lungs healthy. As one old H&S guy used to say at work “It’s no good having a top quality mask if it’s hangin’ round your neck.”
If you’re spraying paint, even outside, do it away from other people and wear a mask, please.
Back to that armour ( so this’d be part 2 then ).
I’ve got some references somewhere of an old Salet type helmet with a rather complex painted design on it ( The Medieval Knight by David Edge and John Miles Paddock ISBN0-86124-414-1 page 99, although I’ve seen it pictured in other books too, the helmet is thought to be from around 1490 ). This particular helmet seems to have been painted with black paint, then designs in white and red painted on it in small squares.
It gave me ideas……
So, having got the metal areas painted in a similar manner to the breastplate ( go on, I’ll wait until you’ve looked back for what I did…..Right, off we go again then ). So photo #15 shows the “metal” helmet all dry and ready for some messing about…….Time to get the Marmite out.

No, I wasn’t feeling hungry.
I got a small piece of fine sponge and put a little Marmite on one side
No, I hadn’t run out of bread.
And proceeded to gently stipple it over the helmet so that there was a very patchy and light covering of the Marmite.
No, I don’t eat painted resin either.
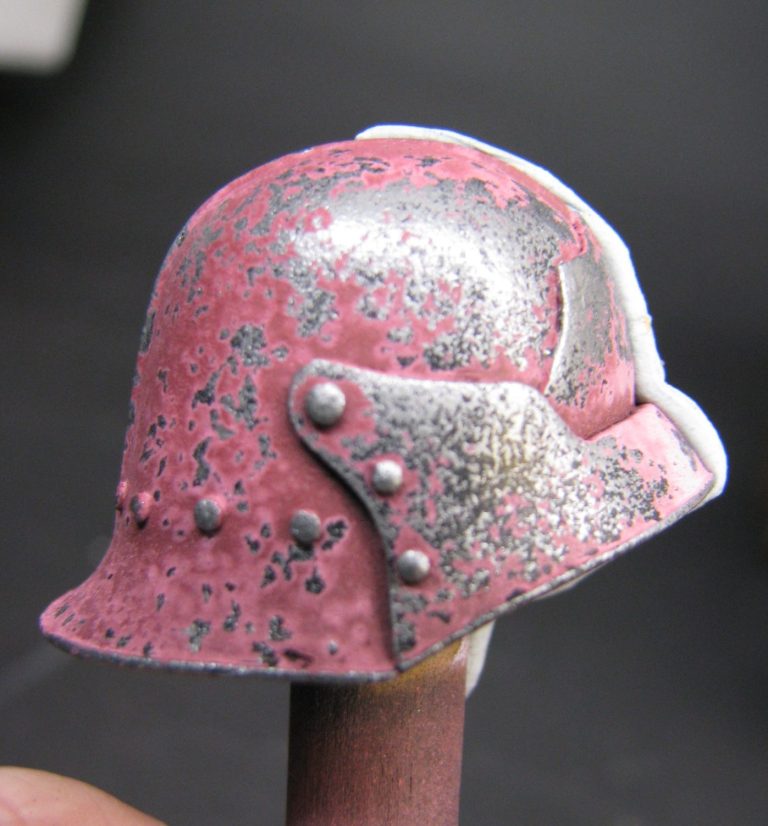
Then I got the airbrush set up with some acrylics ( GW Mechrite Red plus some thinners ) and sprayed the whole helmet with several very thin coats of paint.
The helmet was left to dry for about half an hour ( another excuse for a cup of tea and there might have been a biscuit involved too ), then the helmet was washed gently with some soapy water and a toothbrush.
The result is pictured in photo #16.
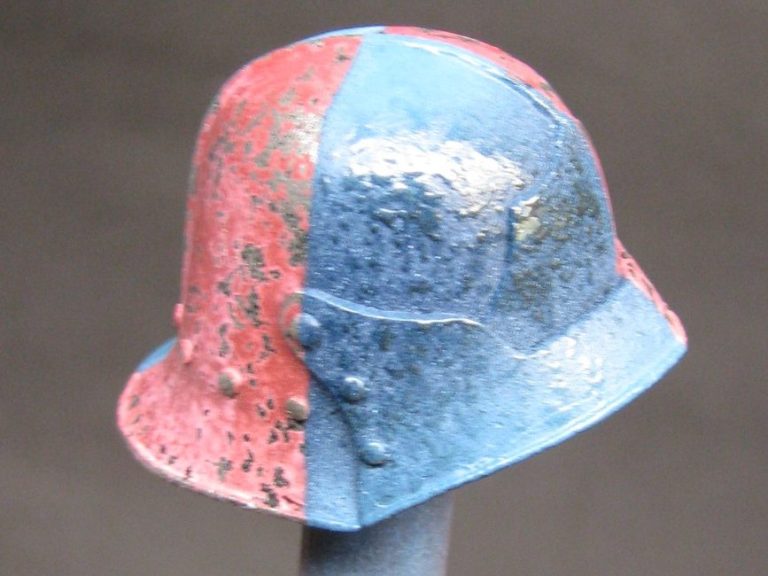
Now for the fun bit – Blu-tac is a very versatile masking medium as I’ve already mentioned, and I used it again to cover two separate quarters of the helmet.
Once covered up, the remaining quarters were dabbed at again with the Marmite covered sponge, and then they were sprayed with more acrylic through the airbrush ( GW Moody Blue plus some thinners ).
I removed the Blu-tac and took a quick shot with the camera – see photo #17 and the washed off results can be seen in photos #18 and #19.
Only one small, insignificant problem surfaced after this……My good friend Robert Lane……….The sculptor of this piece.
Quite sensibly, Rob mentioned that there’s no real evidence for a helmet being painted in this way, and although it looked very good, it might well not be accurate.
He had a point, and really I’d been enjoying myself way too much to realize the fact.
Ho hum, I guess I’d better change it then.
So I did.


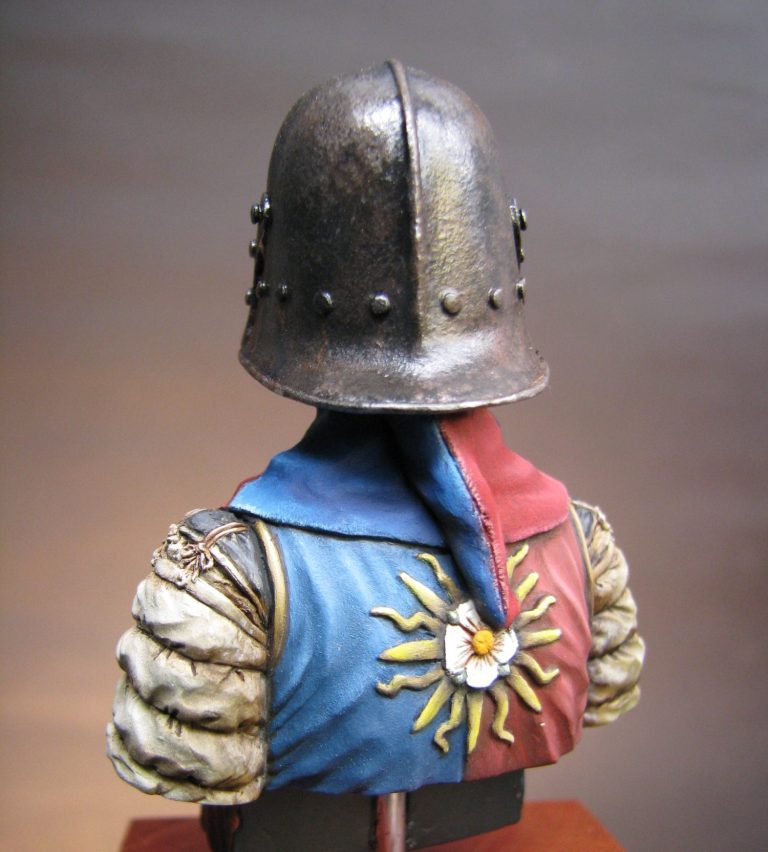
But rather than strip off all that paint, I just went back to square one in that I painted it with the black acrylic, dabbed on some silver paint with a sponge, then some Marmite and then sprayed it with some black acrylic…..and you end up with a scabby looking steel head protector with peeling black paint. The previous coats of paint made it look like it’d had a few layers of paint added to it over the years, and with a few judicious lined of rust feathered onto it below each of the rivets ( thinned down Light Red oil paint, a shaking hand and a fine brush ) it gave it an aged and abused look.
As for the earlier gaff – you know, when I mentioned I’d painted the helmet in the shot and got all previous. Well, if you glance back at that shot, I’d got the colours on the helmet the wrong way round. Admittedly I’d actually followed the reference sources that Rob had supplied for the painting, which showed one shot of a re-enactor with the colours the wrong way around. Something I didn’t notice until after the paint had dried, even though there were two other people in the shot that were correctly attired – attention to detail Adrian !
Then it was all down to the smaller areas. The badge on the back and also on his left breast were painted in the appropriate colours ( yellow rays, white Yorkist Roses with yellow centres and very small green diamonds spaced around the edge of the petals ), the yellow piping around the border of the surcoat ( Iyandan Darksun from GW as an undercoat and Mars Yellow oils over that ) and the buttons ( GW Chainmail mixed with some Chaos Black, then a touch of Winsor and Newton Silver ink for the highlight ), and that about finished it off.

Last words.
As mentioned, I’m involved with the company producing this kit and rather than it being a conscious act of self promotion, it was simply a case of being able to use a lot of different methods of painting on it; plus it being an unusual historical period model-wise, that made me write an article.
As I mentioned at the start of the article, I believe that using different paint media and different methods is the way forward. I’ve seen AFV’s and aircraft painted with various methods, and I think it’s just as useful when painting figures to use whichever tools and media that allow the effect you want, rather than fighting with a method that isn’t suitable, or makes it plain hard work.
With that said, sometimes it takes a long time to become comfortable with different paints or tools, but the effort made to master such skills will pay dividends in the end.
Sometimes it’s simply the speed at which a piece can be completed that is where the modeller gains, sometimes it’s a better effect; either way, it’s a bonus.
The model is available direct from Robert Lane at elan13.co.uk
We need your consent to load the translations
We use a third-party service to translate the website content that may collect data about your activity. Please review the details in the privacy policy and accept the service to view the translations.