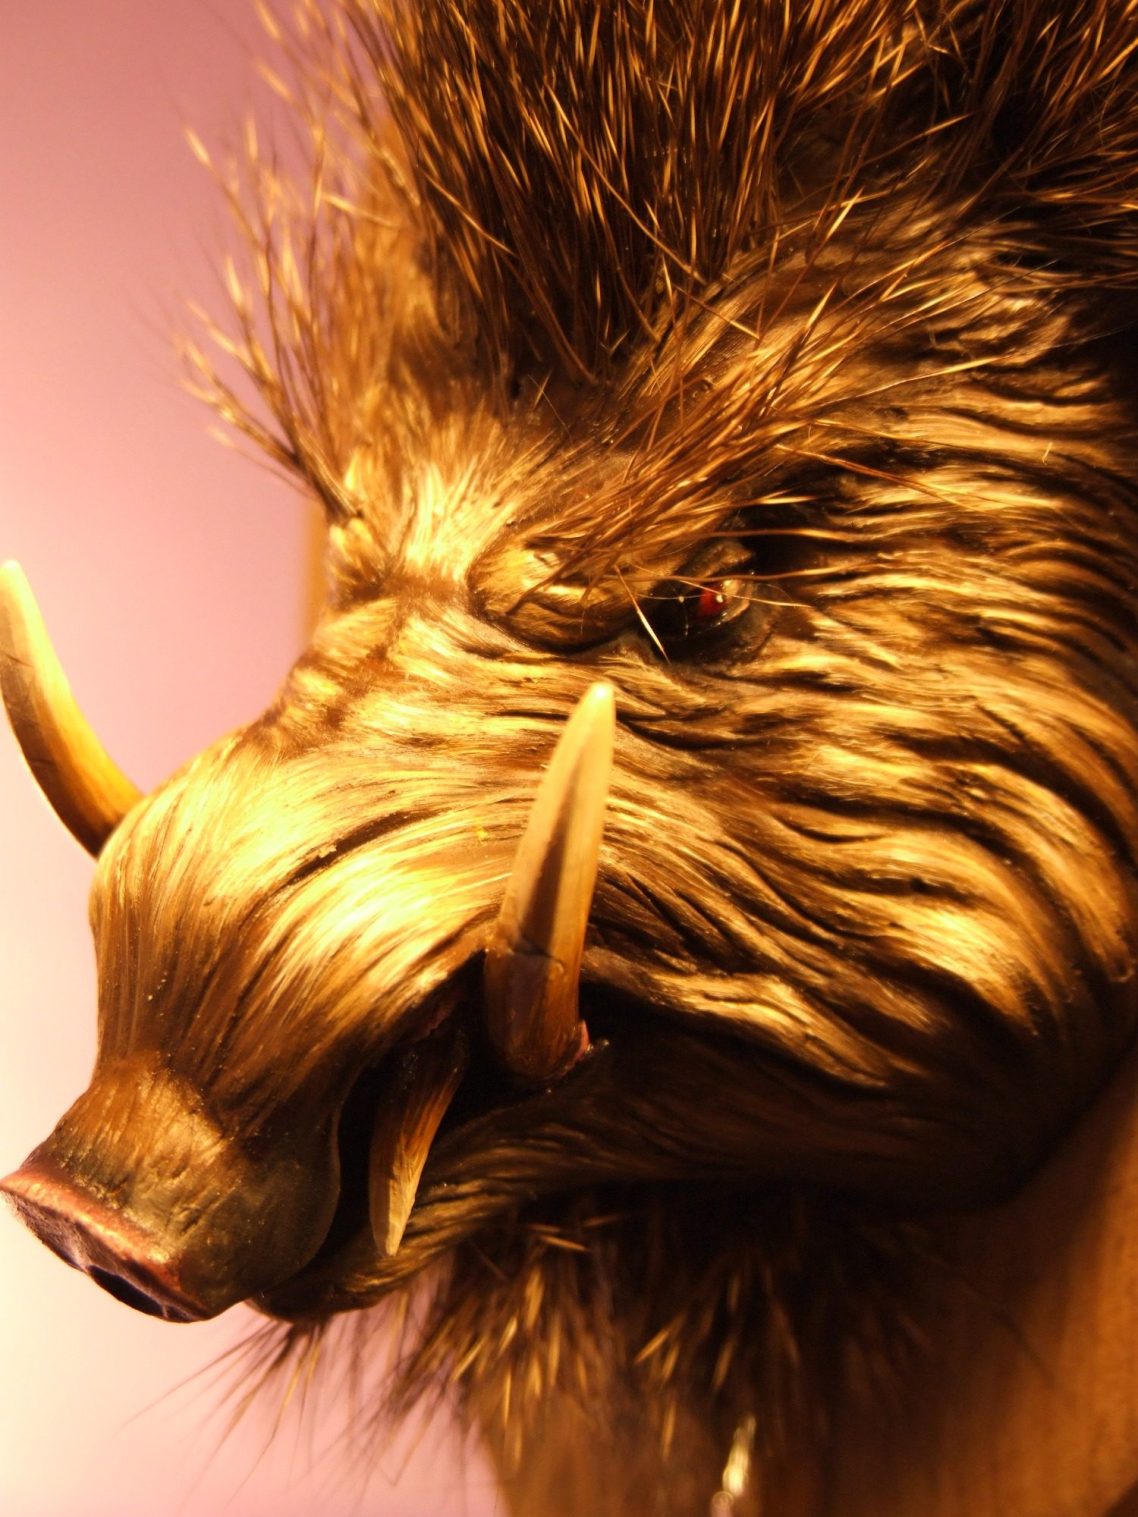
Orc War Boar
1/9th scale Resin casting from Morningstar Miniatures
Painted in 2015
History of the use of Boars in war........ Um, well, Orcs used ‘em, although it’s surely a bit risky. I mean, well, Wolves would be easier to tame and train surely – chuck ‘em a bit of steak and tickle them behind the ears and you’ve got a friend for life.....
Boars’ll be different, generally known to be in a right temper most of the time and can flick their head to the side and have your intestines out for all to see. How do you placate a boar anyway ?..... So Orcs are either completely mad, have a death wish, or are really cunning at training things to save them having to run about and carry all their rusty weapons.
Having got that out of the way I do rather like Orc Boar Riders, in fact Boars in general. My favourites being the drawings and paintings that Adrian Smith has done over the years for Games Workshop, really cool bristly hair, and this is what got me thinking when I saw this on Matt’s Morningstar Miniatures stand at the FigureWorld West show in Blurton near Stoke.
It’s a cool idea all on its own, but with hair..... Just think what it’d look like with hair ??!!


£15 for the head of the pig and a resin casting that looks like a piece of slate to mount it on, Could life get better ?
So, sometimes I buy stuff and it goes on a shelf with the rest of the grey army to wait ( possibly years ) for me to get some paint near it. Occasionally I’m that keen on an idea that it’s got to go straight on the bench..... this was one of those occasions.
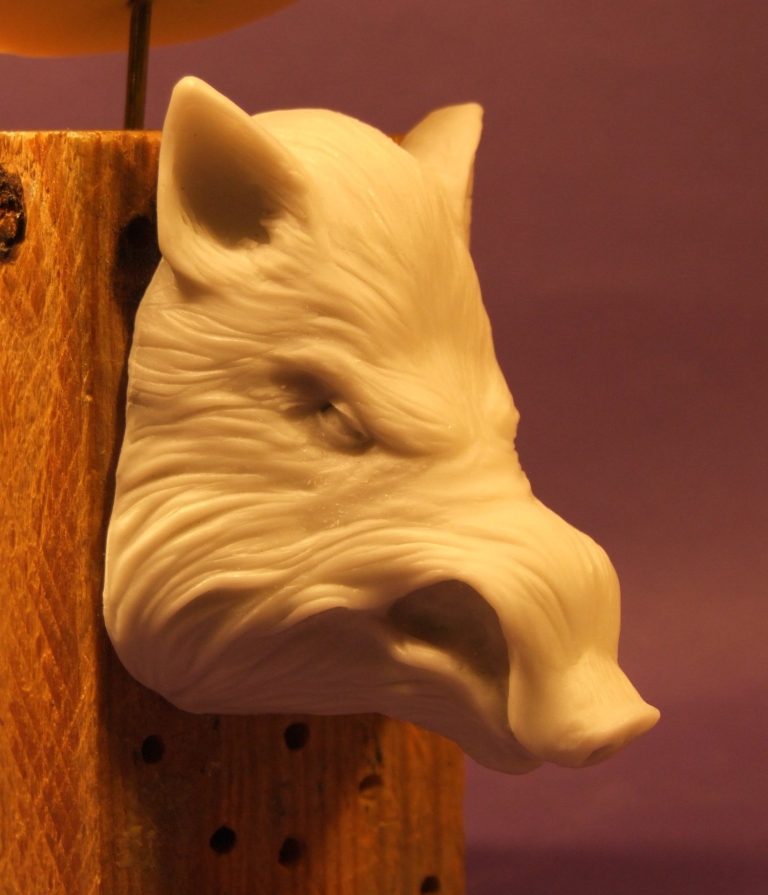
Part breakdown – OK, so there’s the main head casting, four separate tusks and the slate-like mount for you to use if you wish.
So, sculpting of the piece – very good, the volumes and flow of the hair are good and the proportions are great. It’s not modelled after any particular picture that i know of, just a generic Boar type animal
Casting – very good, a slight mould part line around the edge of the main casting that was no trouble to take care of, pour breaks on the base of each tusk, again quite small and no problem to clean up, and the slate, which at this point I was considering using, but how to get it to stand up...... forget that, lets paint !

So, the main casting was fastened to a piece of wood that I could use as a handle whilst painting – photos #1 and #2 as you can see, the sculpted hair has a flow to it and there’s tricks that can be used if you’re an old fogey who uses oil paints..... In these shots you can see the mould line ( the photo was taken before I’d cleaned it up ), so if you take a horizontal line from the eye towards the neck, maybe a millimetre in from the edge of the casting, that’s it there, and this went intermittently around the edge of the casting...... You can’t see it can you ? well that’s because it’s actually so small it’s quite difficult to see. It’s there, and paint won’t cover it up, but it’s a mark of how good Matt’s casting is that its got to be searched for.


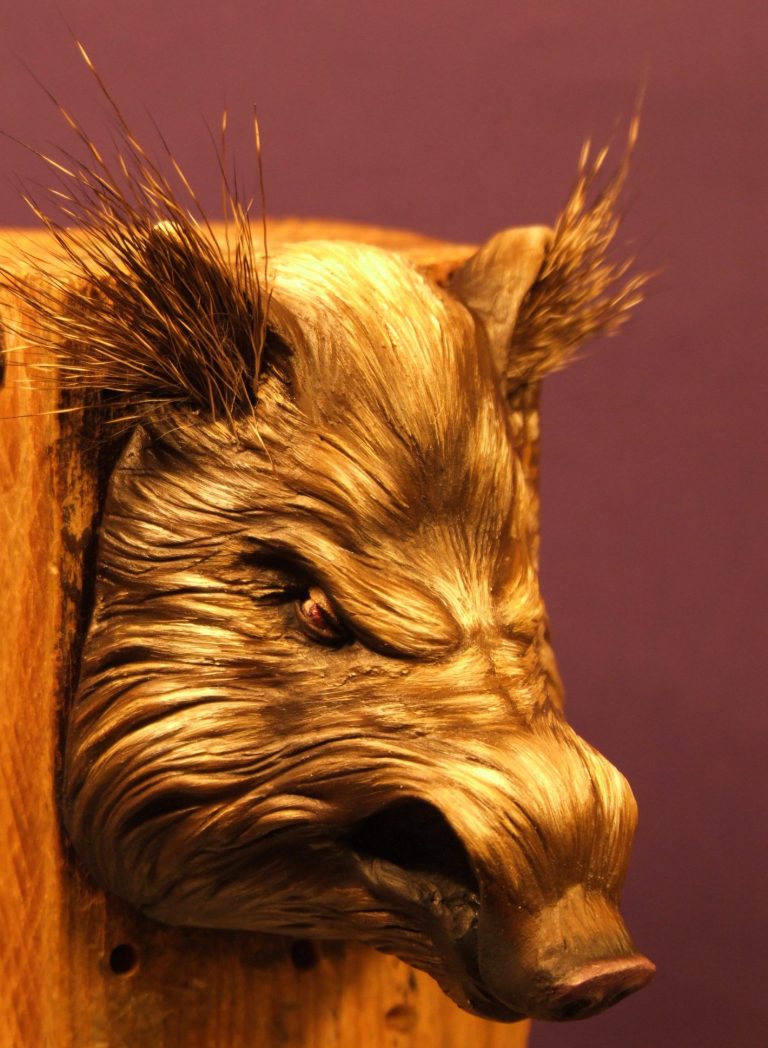
Photo #3 – so I primed the whole of the head with some GW Iyandan Darksun ( sand Yellow to everyone else ) mixed with a lot of Isopropyl Alcohol. The alcohol breaks down both the paint and any grease or mould release agent on the surface of the resin and to be honest the paint is only there so I can see where I’ve put the alcohol on the model. So a dab of the paint and enough alcohol to make it a nicely flowing liquid,
After an initial coat of that, more acrylic paint, but mixed with water. I usually add about three coats of the acrylic and then let it dry for twenty four hours.
Then the oils. Beginning with a coat of dark brown – 50:50 mix of Mars Black and Mars Brown, a little bit of white Spirit to make it flow and a large flat brush – something about 10mm wide. That was used to apply paint all over the model, getting in to all the detail, and then wiping the excess paint off the brush and using the same brush in almost a combing motion to follow the line that the sculpted hairs take on the casting.
Why do this last thing with the brush ?

Well, it gets rid of any brush marks that I don’t want on the model, and because the brush is following the flow of the hair, it actually enhances the sculpting.
Now, for making the hair look, well, more like hair.
Using the same brush ( please note that now White Spirit has been mentioned regarding cleaning the brush yet, just wipe the brush on an old T-Shirt ) I got a small amount of the Mars Brown and using the same combing motion, added that to build up mid-tones all over the model ap[art from under the chin. The secret here – don’t tell anyone either – is to keep wiping the brush on the T-shirt – it removes excess paint and as the brush is passing over the model it will pick up the darker paint as it lays down the lighter colour.
To build up the mid-tones further, and then add the highlights, I continued adding paint, wiping the brush after each pass and working through the Mars Brown, then a mix with Light Red ( a rust colour ) and then through to Mars Yellow and finally some Titanium White.
All of these colours are very dense pigments, they are light fast and retain their colour for years. The only exception is the Titanium White, which like any white paint has optical Brighteners in it to make it look really nice and bright, and which fade out within about six months, sometimes less.
To counteract the fading people do one of two things ( sometimes both ), they use more of the white than is necessary, knowing it will fade out, or they return to the model ( sometimes on several occasions ) to top up the highlights.
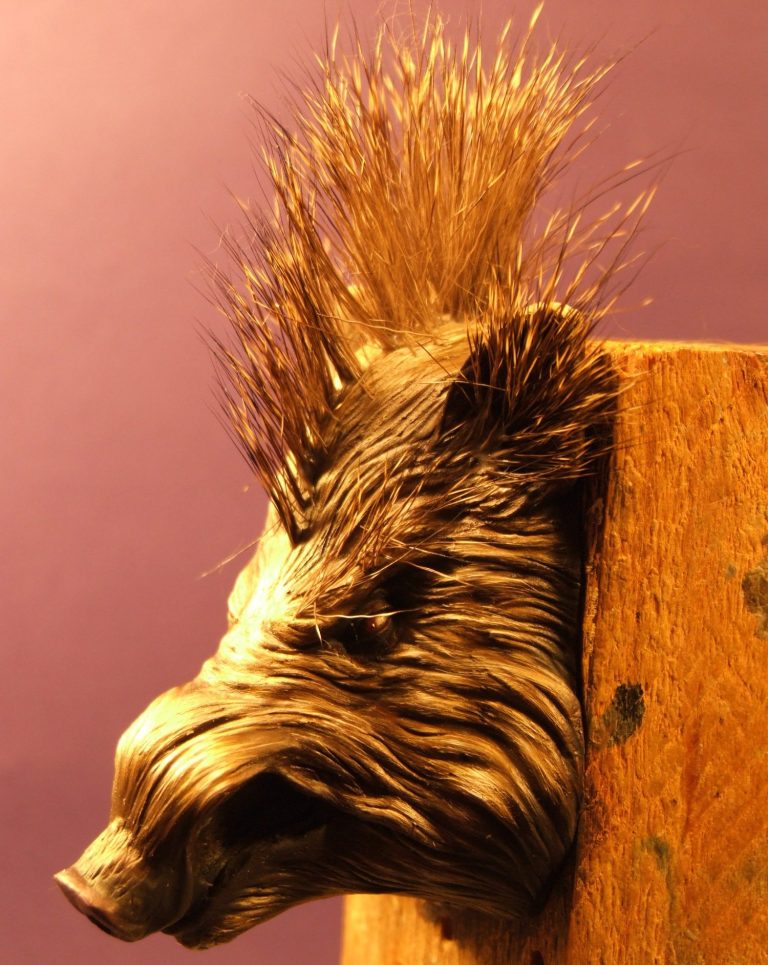
In photo #4 the other side of the head is shown, and you’ll notice in both shots I’ve got the eyes painted in too – small amount of off white for the eyeball and then a bit of red for the iris and a black dot for the pupil. A tiny dot of white is put on the border between the iris and the white to give a catch-light and make the eyeball look wet.

Right, nowt wrong with the pig at this point, but I did want to make him look hairier and a little more wild.
The stuff I chose to use is preserved deer hair that you can get from any large fishing tackle shop – it’s usually in the fly-tying department along with lots of other useful modelling bits – take plenty of cash if you’re going searching for this stuff, I guarantee you’ll not just buy one pack. A lot of the time it is dyed different colours ( green for example makes excellent grass 0 and because the tips don’t take the dye as well and the main body of each hair, it looks like the little seed heads on grass....... See where I’m going with this.
Anyway, I used a natural coloured deer hair which is best described as brindle colour. Usually this stuff is about 25 – 30mm long, but obviously it can be cut to any legth you want that is less than that.
Fastening it down – various means, I use Acrylic medium because it dries fast, is a clear solution so once dry it isn’t seen and because you can get gloss or matt medium types, I use the matt, because then it isn’t shiny either.
Simply put the matt medium on a tile or your palette and dip the ends of the hairs into it and stick ‘em on the model. Using small bunches – maybe ten or so hairs at a time it’s easy to build up and area. The art is cutting the hairs to the right length in the first place so that you don’t have to trim them. You could trim them of course, but then you’d lose the light tips of each hair........ S’up to you though.
So, photo #5 shows the process beginning with hairs being added inside the ears making sure to get each side even in comparison to the other. Remember to think how you’re going to get at each part of the model you’re adding hair to, in this case working from the flap of the ear towards the opening, and on the forehead I worked from the back of the neck then gradually forward to the forehead.
Photo# 6 – where you can see I’ve begun a line down the centre of the head and once that’s dried properly with broaden that out towards each ear.


Photo #7 shows this maybe a little clearer, and also about three bunches in from the front you can see a bit of the acrylic medium sticking out from the base of the hairs. This will dry back and be invisible unlike superglue.
And in photo #8 he’s got the full mullet going on, and under the chin and of course the eyebrows. It takes a little time, but adds to the look of the bust a lot to my mind. It also seems to make most people smile when they see him, mainly in an indulgent manner.


Photo #9 shows the bust from a different angle, some of the hairs will need trimming, and the process isn’t perfect – some hairs end up at odd angles or just plain haven’t stuck down, but after twenty four hours drying it’s safe to start the deforestation of the fallen and the uprooted.
The tusks were painted in a similar manner to the hair, allowing striations of paint to show from the passage of a brush and then small chips and gouges painted onto them to make it look like he’s been an argumentative chappie.
I was still wondering how to base him up when i was wandering round T.K.Maxx, lost in my own world as my nearest and dearest looked at clothes, handbags and shoes, when I saw a small Olive wood nibbles dish ( Don’t you dare smirk, I know you are doing, but please.... ), so, nibbles dish in olive wood, looked about the right size, perfect shape it would seem and all I needed to do was fasten it to a small plinth to stop it falling over.
I added a card backing and some self adhesive felt to hide the holes where the nibbles would go, and there you have it, £3 later, plus whatever Ruth decided to get and I was a happy modeller, and so good for being patient while she shopped....... Well once we got over the “What on earth is that for” style conversation when she saw the nibbles dish, but that’s another story.
Final shots show the finished Boar, although there isn’t much to the actual kit, there are lots of things you could add – longer neck then you could really add to the hairy look, armour, nose ring...... all the things I missed because I was fixated on adding the hair. But there again, if I’d done all that, there wouldn’t be anything for you to do now, would there ?
Model available online from Morning Star Miniatures,but please be aware that this article was written about 13 years ago and I'm not sure if this company is still trading. However, there was an expanding range of goodies on there at the time, and it’s certainly worth a look at his site - http://www.morningstarminis.com/ and as I say, this boar is on there as the War Pig under the Horror Heads section.

We need your consent to load the translations
We use a third-party service to translate the website content that may collect data about your activity. Please review the details in the privacy policy and accept the service to view the translations.